Indesit IFW 6540 P IX Handleiding
Bekijk gratis de handleiding van Indesit IFW 6540 P IX (20 pagina’s), behorend tot de categorie Oven. Deze gids werd als nuttig beoordeeld door 74 mensen en kreeg gemiddeld 4.5 sterren uit 37.5 reviews. Heb je een vraag over Indesit IFW 6540 P IX of wil je andere gebruikers van dit product iets vragen? Stel een vraag
Pagina 1/20

EN
Quick guide
FIRST TIME USE
1. SETTING THE TIME
You will need to set the time when you switch on the appliance
for the rst time: Press icon and the two digits until the
for the hour start ashing on the display.
Use or to set the hour and press
to conrm. The two digits for the
minutes will start ashing. Use or
to set the minutes and press to
conrm.
Please note: When the icon is flashing, for example following lengthy
power outages, you will need to reset the time.
2. HEAT THE OVEN
A new oven may release odors that have been left behind
during manufacturing: this is completely normal. Before starting
to cook food, we therefore recommend heating the oven with it
empty in order to remove any possible odors.
Remove any protective cardboard or transparent lm from the
oven and remove any accessories from inside it.
Heat the oven to 250 °C for about one hour. The oven must be
empty during this time.
Please note: It is advisable to air the room after using the appliance for the
first time.
FUNCTIONS & DAILY USE
CONVENTIONAL
For cooking any kind of dish on one shelf only.
CONVECTION BAKE
To cook on a maximum of two shelves at the same time. It
is a good idea to swap the position of the baking trays halfway
through cooking.
GRILL
For grilling steaks, kebabs and sausages, cooking
vegetables au gratin or toasting bread. When grilling meat, we
recommend using a Baking tray to collect the cooking juices:
position the pan on any of the levels below the wire shelf and
add 500 ml of drinking water.
GRATIN
For roasting large joints of meat (legs, roast beef, chicken).
We recommend using a Baking tray to collect the cooking juices:
position the pan on any of the levels below the wire shelf and
add 500 ml of drinking water.
FREASY COOK
All the heating elements and the fan come on,
guaranteeing the distribution of heat consistently and uniformly
throughout the oven. Pre-heating is not necessary for this
cooking mode. This mode is especially recommended for
cookingpre-packed food quickly (frozen or pre-cooked). The
best results are obtained if you use one cooking rack only.
ECO CONVECTION BAKE
For cooking roasts and stued roasting joints on a single
shelf. Food is prevented from drying out excessively by gentle,
intermittent air circulation. When this ECO function is in use, the
light will remain switched o during cooking but can be switched
on again by pressing .
AUTOMATIC OVEN CLEANING - PYRO
For eliminating cooking spatters using a cycle at very high
temperature.
TURN & GO
This function automatically selects an ideal temperature and
time for baking a wide range of recipes including meat, sh, pasta,
sweets and vegetables. Activate the function when the oven is
cold.
THANK YOU FOR BUYING AN INDESIT
PRODUCT
In order to receive a more complete
assistance, please register your product on
www . indesit . com / register
Before using the appliance carefully read the Safety
Instruction.
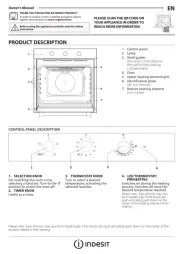
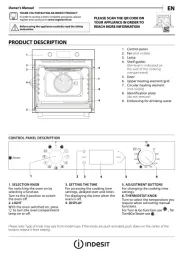
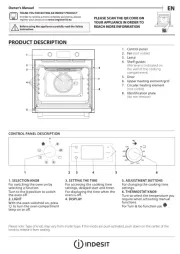
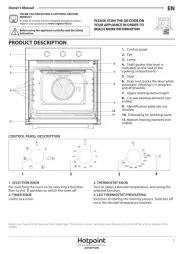
CONTROL PANEL DESCRIPTION
1 32 4 5 6
1. SELECTION KNOB
For switching the oven on by selecting a
function.
Turn to the position to switch the oven
o.
2. LIGHT
With the oven switched on, press to turn
the oven compartment lamp on or o.
3. SETTING THE TIME
For accessing the cooking time settings,
delayed start and timer.
For displaying the time when the oven is
o.
4. DISPLAY
5. ADJUSTMENT BUTTONS
For changing the cooking time settings
6. THERMOSTAT KNOB
Turn to select the temperature you
require when activating manual
functions.
For “Turn & Go” function keep on / .

1. SELECT A FUNCTION
To select a function, turn the to the symbol for the selection knob
function you require: the display will light up and an audible signal will
sound.
2. ACTIVATE A FUNCTION
To start the function you have selected, turn the thermostat knob
to set the temperature you require.
To interrupt the function at any time, switch o the oven, turn
the selection knob and the .thermostat knob to and
Please note: During cooking you can change the function by turning the
selection knob or adjust the temperature by turning the thermostat knob.
The function will not start if the thermostat knob is on 0 °C. You can set
the cooking time, cooking end time (only if you set a cooking time) and a
timer.
TURN & GO
To start the “Turn & Go” function, select the function
turning the selection knob on the relevant icon, keeping the
thermostat knob on the / icon.
To end the cooking, turn the selection knob on “ ”.
Please note: You can set the cooking end time and timer. To obtain
the best cooking results using the “Turn & Go” function, follow the
suggested weights for each kind of food in the following table.
Food Recipe Weight (kg)
Meat Roast veal, Roast Beef rare 0.6 - 0.7
Chicken / Leg of lamb in pieces 1.0 - 1.2
Fish Salmon fillet / Baked fish (whole) 0.9 - 1.0
Fish en papillote 0.8 - 1.0
Vegetables Stuffed vegetables 1.8 - 2.5
Vegetable pie 1.5 - 2.5
Salty cakes Quiche lorraine / Flan 1.0 - 1.5
Pasta Lasagne / Timbale of pasta or rice 1.5 - 2.0
Pastry Leavened cake / Plum cake 0.9 - 1.2
Baked apples 1.0 - 1.5
Bread Bread loaf 0.5 - 0.6
Baguettes 0.5 - 0.8
3. PREHEATING AND RESIDUAL HEAT
Once the function starts, an audible signal and a ashing icon
on the display indicate that the preheating phase has been
activated. At the end of this phase, an audible signal and the
xed icon on the display will indicate that the oven has
reached the set temperature: at this point, place the food inside
and proceed with cooking.
Please note: Placing the food in the oven before preheating has finished
may have an adverse effect on the final cooking result.
After cooking and with the function deactivated, the icon
may continue to remain visible on the display even after the
cooling fan has switched o to indicate that there is residual
heat in the compartment.
Please note: The time after which the icon switches off varies because it
depends on a series of factors such as ambient temperature and function
used. In any case, the product should be considered to be off when the
pointer on the selection knob is at “ ”.0
4. PROGRAMMING COOKING
You will need to select a function before you can start
programming cooking.
DURATION
Keep pressing until the icon and “00:00” start ashing on
the display.
Use or to set the cooking time you require, then press
to conrm.
Activate the function by turning the thermostat knob to the
temperature you require: an audible signal will sound and the
display will indicate that cooking is complete.
Notes: To cancel the cooking time you have set, keep pressing until the
icon starts flashing on the display, then use to reset the cooking
time to “00:00”. This cooking time includes a preheating phase.
PROGRAMMING THE END COOKING TIME/DELAYED START
After a cooking time has been set, starting the function can be
delayed by programming its end time: press icon until the
and the current time start ashing on the display.
Use o to set the time you want cooking to end and press r
to nrm. co
Activate the function by turning the thermostat nob k to the
temperature ou quire: he unction ill main aused ntil y re t f w re p u
it starts automatically after the period of time that has been
calculated in order forcooking to nish at the time you have set.
Notes: To cancel the setting, switch the oven off by turning the selection
knob to the position.
Notes: Delay to start functionality is not available for Grill and Turbo Grill
functions.
END OF COOKING
An audible signal will sound and the display will indicate that
the function has finished.
Turn the to select a dierent function or to selection knob
position “ ” to switch the oven o.
Please note: If the timer is active, the display will show “END” alternately
with the remaining time.
5. SETTING THE TIMER
This option does not interrupt or program cooking but allows
you to use the display as a timer, either during while a function is
active or when the oven is o.
Keep pressing until the icon and “00:00” start ashing on
the display.
Use or to set the time you require and press to conrm.
An audible signal will sound once the timer has nished
counting down the selected time.
Notes: To cancel the timer, keep pressing until the icon starts
flashing, then use to reset the time to “00:00”.

6. AUTOMATIC CLEANING FUNCTION – PYRO
Do not touch the oven during the Pyro cycle.
Keep children and animals away from the oven during and
after (until the room has nished airing) running the Pyro
cycle.
Remove all accessories - including shelf guides - from the oven
before activating the function. If the oven is installed below
a hob, make sure that all the burners or electric hotplates are
switched o while running the self cleaning cycle.
For optimum cleaning results, remove excessive residuals
inside the cavity and clean the inner door glass before using
the pyrolytic function. We recommend only running the Pyro
function if the appliance contains heavy soiling or gives o bad
odors during cooking.
To activate the automatic cleaning function, turn the selection
knob and the thermostat knob to the icon. The function will
be activated automatically, the door locked and the light inside
the oven switched o: The display will show the time remaining
to the end, alternating with “PYRO”.
Once the cycle has been completed, the door remains locked
until the temperature inside the oven has returned to a safe
level. Air the room during and after running the Pyro cycle.
COOKING TABLE
RECIPE FUNCTION PREHEAT TEMPERATURE
(°C)
DURATION
(MIN)
LEVEL AND
ACCESSORIES
Leavened cakes
Yes 170 30 - 50 2
Yes 160 30 - 50 2
Yes 160 40 - 60* 4 1
Biscuits/tartlets
Yes 160 25 - 35 3
Yes 160 25 - 35 3
Yes 160 20 - 35* 4 2
Pizza / Focaccia
Yes 190 - 250 15 - 50 1/2
Yes 190 - 250 20 - 50* 4 2
Lasagne / baked pasta /
cannelloni / ans Yes 190 - 200 45 - 65 2
Lamb / veal / beef /pork 1 kg 190 - 200 80 - 110Yes 3
Chicken/rabbit/duck 1 kg 200 - 230 50 - 100Yes 2
Baked sh/en papillote 0,5 kg
(llets, whole) Yes 170 - 190 30 - 45 2
Toasted bread 5’ 250 2 - 6 5
Roast potatoes Yes 200 - 210 35 - 55 ** 3
* Switch levels halfway through cooking.
** Turn food two thirds of the way through cooking (if necessary).
The time indicated does not include the preheating phase:
we recommend placing the food in the oven and setting the
cooking time only after the required temperature has been
reached.
Download the complete Use and Care Guide from
docs . indesit.eu for the table of tested recipes, compiled for the
certication authorities in accordance with the standard IEC
60350-1.
ACCESSORIES
Wire shelf Baking dish or cake tin
on the wire shelf
Baking tray/Drip tray or Baking
dish on the wire shelf Drip tray / Baking tray Drip tray / Baking tray
with 200 ml of water
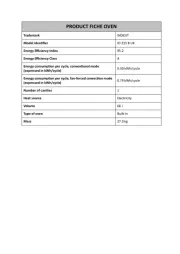
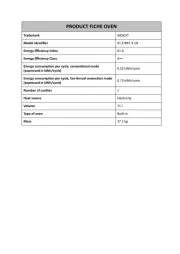
Product specificaties
| Merk: | Indesit |
| Categorie: | Oven |
| Model: | IFW 6540 P IX |
| Apparaatplaatsing: | Ingebouwd |
| Soort bediening: | Draaiknop |
| Vermogen grill: | 2200 W |
| Kleur van het product: | Roestvrijstaal |
| Deurscharnieren: | Neer |
| Ingebouwd display: | Ja |
| Gewicht: | 26300 g |
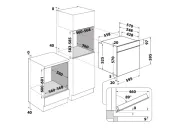
| Breedte: | 595 mm |
| Diepte: | 551 mm |
| Hoogte: | 595 mm |
| Netbelasting: | 3300 W |
| Opwarmfunctie: | Nee |
| Grill: | Ja |
| Snoerlengte: | 1 m |
| Wi-Fi-besturing: | Nee |
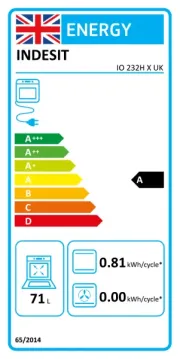
| Energie-efficiëntieklasse: | A |
| Gewicht verpakking: | 25000 g |
| Breedte verpakking: | 640 mm |
| Diepte verpakking: | 650 mm |
| Hoogte verpakking: | 670 mm |
| Verlichting binnenin: | Ja |
| Geïntegreerde klok: | Ja |
| Soort klok: | Elektronisch |
| Convectie koken: | Ja |
| Stoom koken: | Nee |
| Warmhoud functie: | Nee |
| Soort lamp: | Halogeen |
| Totale binnen capaciteit (ovens): | 66 l |
| Aantal ovens: | 1 |
| Controle positie: | Voorkant |
| Soort reiniging: | Pyrolytisch |
| Stroom: | 16 A |
| Materiaal deur: | Glas |
| Verwijderbare oven deur: | Nee |
| Hoeveelheid glazendeur panelen: | 3 |
| Energieverbruik (conventioneel): | 0.89 kWu |
| Energieverbruik (geforceerde convectie): | 0.79 kWu |
| Energie-efficiëntie-index (EEI): | 95.2 |
| Grootte oven: | Middelmaat |
| Soort oven: | Elektrische oven |
| Totaal vermogen van de oven: | - W |
| Netto capaciteit oven: | 66 l |
| Magnetronbereiding: | Nee |
| Zelfreinigend: | Ja |
| Onderverwarming: | Nee |
| Indrukbare knoppen: | Nee |
| Uitneembaar deurglas: | Ja |
| Zachtsluitende deur: | Nee |
| Type timer: | Digitaal |
| Land van herkomst: | Polen |
| Aantal schappen: | 1 schappen |
| Pizzafunctie: | Nee |
| Aantal rasters: | 1 |
| Oven vermogen: | - W |
| Brood maak mogelijkheid: | Nee |
| Verhitting van gehele grilloppervlak: | Ja |
| AC-ingangsspanning: | 220 - 240 V |
| Type beeldscherm: | LED |
| Energie-efficiëntieschaal: | A tot G |
Heb je hulp nodig?
Als je hulp nodig hebt met Indesit IFW 6540 P IX stel dan hieronder een vraag en andere gebruikers zullen je antwoorden
Handleiding Oven Indesit

5 Juli 2025
5 Juli 2025
5 Juli 2025
4 Juli 2025
4 Juli 2025
4 Juli 2025
4 Juli 2025
4 Juli 2025
4 Juli 2025
11 Juni 2025
Handleiding Oven
- Belling
- Thomas
- InAlto
- Oceanic
- MPM
- Amana
- Cosori
- Krups
- FriFri
- Foster
- Novamatic
- Tandoor Morni
- Electrolux
- De Dietrich
- Signature
Nieuwste handleidingen voor Oven

9 Augustus 2025
9 Augustus 2025
8 Augustus 2025
8 Augustus 2025
8 Augustus 2025

8 Augustus 2025
7 Augustus 2025
6 Augustus 2025
6 Augustus 2025
6 Augustus 2025