Indesit IFW 6230 WH.1 Handleiding
Bekijk gratis de handleiding van Indesit IFW 6230 WH.1 (16 pagina’s), behorend tot de categorie Oven. Deze gids werd als nuttig beoordeeld door 85 mensen en kreeg gemiddeld 4.8 sterren uit 43 reviews. Heb je een vraag over Indesit IFW 6230 WH.1 of wil je andere gebruikers van dit product iets vragen? Stel een vraag
Pagina 1/16

EN
Quick guide
FIRST TIME USE
HEAT THE OVEN
A new oven may release odors that have been left behind
during manufacturing: this is completely normal. Before starting
to cook food, we therefore recommend heating the oven with it
empty in order to remove any possible odors.
Remove any protective cardboard or transparent lm from the
oven and remove any accessories from inside it.
Heat the oven to 250 °C for about one hour. The oven must be
empty during this time.
Please note: It is advisable to air the room after using the appliance
for the first time.
FUNCTIONS & DAILY USE
OFF
For switching o the oven.
LIGHT
For switching on the light in the compartment.
BOTTOM HEATING
Useful for browning the base of the dish. This function
is recommended also for slow-cooking, for finishing the
cooking of juicy dishes, and making sauce concentrates.
CONVENTIONAL
For cooking any kind of dish on one shelf only.
GRILL
For grilling steaks, kebabs and sausages, cooking
vegetables au gratin or toasting bread. When grilling meat, we
recommend using a Baking tray to collect the cooking juices:
position the pan on any of the levels below the wire shelf and
add 500 ml of drinking water.
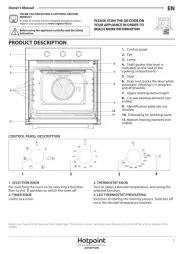
1. SELECT A FUNCTION
To select a function, turn the to the symbol for theselection knob
function you require.
2. ACTIVATE A FUNCTION
To start the function you have selected, turn the thermostat knob
to set the temperature you require. To interrupt the function at
any time, switch o the oven, turn the and theselection knob
thermostat knob to and .
3. PREHEATING
Once the function has been activated, the LED thermostat will
switch on signalling that the preheating process has begun.
At the end of this process, the LED thermostat switches o
indicating that the oven has reached the set temperature: at this
point, place the food inside and proceed with cooking.
Please note: Placing the food in the oven before preheating has
finished may have an adverse effect on the final cooking result.
4. SETTING THE TIMER
This option does not interrupt or activate cooking but allows
you to use the display as a timer, both while a function is active
and when the oven is off .
To activate the timer, turn the timer knob fully clockwise and
then return it to desired duration, proceeding
counterclockwise: an acoustic signal will warn you when the
countdown is finished.
THANK YOU FOR BUYING AN INDESIT
PRODUCT
In order to receive a more complete
assistance, please register your product on
www . indesit . com / register
Before using the appliance carefully read the Safety
Instruction.
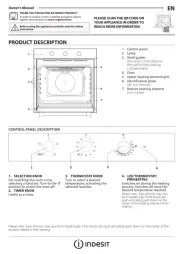
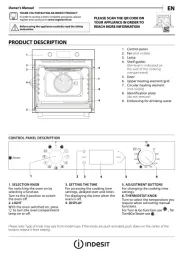
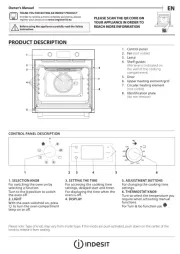
CONTROL PANEL DESCRIPTION
1 2 3
1. SELECTION KNOB
For switching the oven on by selecting a
function.
Turn to the position to switch the oven
o .
2. TIMER KNOB
Useful as a timer.
Does not activate or interrupt cooking.
3. THERMOSTAT KNOB
Turn to select the temperature you
require when activating functions.
4. LED THERMOSTAT / PREHEATING
Switches on during the heating
process. Switches o once the desired
temperature is reached.

COOKING TABLE
RECIPE FUNCTION PREHEAT TEMPERATURE
(°C)
DURATION
(MIN)
LEVEL AND
ACCESSORIES
Leavened cakes Yes 150 - 170 30 - 90 2
Biscuits / tartlets Yes 160 - 180 15 - 35 2 / 3
Pizza / Bread Yes 220 - 250 10 - 25 1 / 2
Lasagne / baked pasta / cannelloni / ans Yes 190 - 200 45 - 65 2
Lamb / veal / beef /pork 1 kg Yes 190 - 200 80 - 110 2
Chicken/rabbit/duck 1 kg Yes 200 - 230 50 - 100 2
Baked sh/en papillote 0,5 kg (fillets,
whole) Yes 170 - 190 30 - 45 2
Toasted bread 5’ 250 2 - 6 5
Sausages / kebabs / spare ribs /
hamburgers 5’ 250 15 - 30 * 5 4
Roast potatoes Yes 220 - 240 40 - 60 2
ACCESSORIES Wire shelf Baking dish on the wire
shelf
Baking tray/Drip tray or
baking dish on the wire shelf Drip tray / Baking tray Drip tray / Baking tray with
200 ml of water
* Turn food halfway through cooking
The level is indicated on the wall of the cooking compartment.
Download the complete Use and Care Guide from
docs . indesit.eu for the table of tested recipes, compiled for the
certication authorities in accordance with the standard IEC
60350-1.
CLEANING AND MAINTENANCE
Make sure that the oven has cooled
down before carrying out any
maintenance or cleaning.
Do not use steam cleaners.
Do not use wire wool, abrasive
scourers or abrasive/corrosive
cleaning agents, as these could
damage the surfaces of the appliance.
Wear protective gloves.
The oven must be disconnected from
the mains before carrying out any kind
of maintenance work.
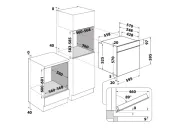
REMOVING AND REFITTING THE DOOR
To remove the door, open it fully and lower the catches until
they are in the unlock position (1). Close the door as much as you
can (2). Take a rm hold of the door with both hands - do not
hold it by the handle. Simply remove the door (3) by continuing
to close it while pulling it upwards (a) at the same time until it is
released from its seating (b).
1 2
~60°
3
a
b
~15°
Put the door to one side, resting it on a soft surface. Ret the
door by moving it towards the oven, aligning the hooks of the
hinges with their seating and securing the upper part onto
its seating. Lower the door and then open it fully. Lower the
catches into their original position: make sure that you lower
them down completely. Try closing the door and check to make
sure that it lines up with the control panel. If it does not, repeat
the steps above.
CLICK & CLEAN - CLEANING THE GLASS
After removing the door and resting it on a soft surface with the
handle downwards, simultaneously press the two retaining clips
(1) and remove the upper edge of the door by pulling it towards
you (2).
1 2
Lift and rmly hold the inner glass with both hands, remove it
and place it on a soft surface before cleaning it (3).
3
To correctly reposition the inner glass, make sure that the “R” is
visible in the left-hand corner and the clear surface (not printed)
is facing up. First insert the long side of the glass indicated by
“R” into the support seats, then lower it into position (4).

Ret the upper edge (5): a click will indicate correct positioning.
Make sure the seal is secure before retting the door.
4 5
TROUBLESHOOTING
Problem Possible cause Solution
The oven does not work. Power cut.
Disconnection from the mains.
Check for the presence of mains electrical power and whether
the oven is connected to the electricity supply.
Turn o the oven and restart it to see if the fault persists.
Policies, standard documentation and additional product information can be found by:
• Visiting our website docs . indesit. eu
• Using QR Code
• (See phone number in the warrantyAlternatively, contact our After-sales Service
booklet). When contacting our After-sales Service, please state the codes provided on your
product's identication plate.
X XXX XXXXX XXXXX
Mode l: xxxXXXXx x
Download the complete Use and Care Guide from docs.indesit.eu for more informations about your product
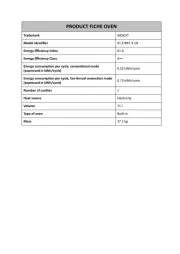
Product specificaties
| Merk: | Indesit |
| Categorie: | Oven |
| Model: | IFW 6230 WH.1 |
Heb je hulp nodig?
Als je hulp nodig hebt met Indesit IFW 6230 WH.1 stel dan hieronder een vraag en andere gebruikers zullen je antwoorden
Handleiding Oven Indesit

5 Juli 2025
5 Juli 2025
5 Juli 2025
4 Juli 2025
4 Juli 2025
4 Juli 2025
4 Juli 2025
4 Juli 2025
4 Juli 2025
11 Juni 2025
Handleiding Oven
- Beautiful
- Royal Catering
- Montiss
- Comelec
- Orima
- Lynx
- Esatto
- ZLine
- Techwood
- Candy
- Mistral
- Kunft
- New World
- Saturn
- Premier
Nieuwste handleidingen voor Oven

9 Augustus 2025

9 Augustus 2025

8 Augustus 2025
8 Augustus 2025
8 Augustus 2025

8 Augustus 2025
7 Augustus 2025
6 Augustus 2025

6 Augustus 2025
6 Augustus 2025