Indesit FE 10 K.C (BK) GB Handleiding
Bekijk gratis de handleiding van Indesit FE 10 K.C (BK) GB (8 pagina’s), behorend tot de categorie Oven. Deze gids werd als nuttig beoordeeld door 102 mensen en kreeg gemiddeld 4.5 sterren uit 51.5 reviews. Heb je een vraag over Indesit FE 10 K.C (BK) GB of wil je andere gebruikers van dit product iets vragen? Stel een vraag
Pagina 1/8

3
Congratulations on choosing an Indesit appliance, which you will find is dependable and easy to use. We recommend
that you read the instructions in this owner’s manual carefully before use for the best performance and to extend the life
of your appliance, as it will provide you with all the instructions you require to ensure its safe installation, use and
maintenance. Always keep this owner’s manual close to hand since you may need to refer to it in the future. Thank you.
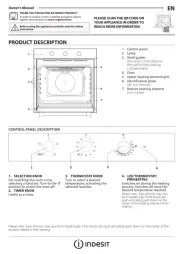
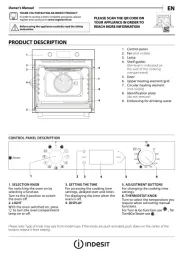
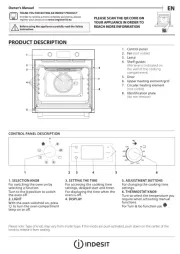
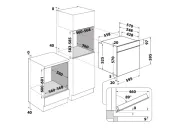
Close-up view
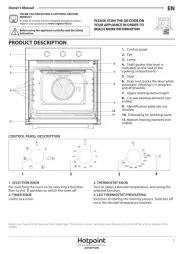
A. Control Panel
B. Cooking mode selection knob
C. Cooking temperature selection knob
E. Oven indicator light (only available on certain models)
- When lit, it indicates the ovens is heating up to the
temperature set.
F. Dripping Pan or Baking Sheet
G. Oven Rack
H. Guides for sliding the racks or dripping pan in and
out
B C
E
G
A
F
H
How to use your oven
The various features offered by your oven are selected by
means of selector knob “ ” and thermostat “B C” situated
on the control panel.
Notice: The first time you use your appliance, we recom-
mend that you set the thermostat to the highest setting
and leave the oven on for about half an hour with nothing
in it, with the oven door shut. Then, open the oven door
and let the room air. The odour that is often detected dur-
ing this initial use is due to the evaporation of substances
used to protect the oven during storage and until it is in-
stalled.
Notice: Place the dripping pan provided on the bottom
shelf of the oven to prevent any sauce and/or grease from
dripping onto the bottom of the oven only when grilling
food or when using the rotisserie (only available on cer-
tain models). For all other types of cooking, never use the
bottom shelf and never place anything on the bottom of
the oven when it is in operation because this could dam-
age the enamel. Always place your cookware (dishes, alu-
minium foil, etc. etc.) on the grid provided with the appli-
ance inserted especially along the oven guides.
Convection Mode a
Position of thermostat knob “C”: between 60°C and .Max
On this setting, the top and bottom heating elements come
on. This is the classic, traditional type of oven which has
been perfected, with exceptional heat distribution and re-
duced energy consumption. The convection oven is still
unequalled when it comes to cooking dishes made up of
several ingredients, e.g. cabbage with ribs, Spanish style
cod, Ancona style stockfish, tender veal strips with rice,
etc. Excellent results are achieved when preparing veal
or beef-based dishes as well (braised meats, stew, gou-
lash, wild game, ham etc.) which need to cook slowly and
require basting or the addition of liquid. It nonetheless re-
mains the best system for baking cakes as well as fruit
and cooking using covered casserole dishes for oven bak-
ing. When cooking in convection mode, only use one drip-
ping pan or cooking rack at a time, otherwise the heat
distribution will be uneven. Using the different rack heights
available, you can balance the amount of heat between
the top and the bottom of the oven. Select from among
the various rack heights based on whether the dish needs
more or less heat from the top.

4
Pastry Mode y
Position of thermostat knob “ ”: Between °C and .C 60 Max
The bottom heating element comes on.
This mode is ideal for baking and cooking delicate foods -
especially cakes that need to rise because the heat com-
ing from the bottom helps the leavening process.
Please note that it takes a considerable amount of time
for the higher temperatures to be reached, therefore we
recommend you use the “Convection Mode” in these
cases.
“Top” Oven c
Position of thermostat knob “ ”: Between °C and .C 60 Max
The top heating element comes on.
This mode can be used to brown food at the end of cook-
ing.
Grill d
Position of thermostat knob “C”: Max
The top central heating element comes on.
The extremely high and direct temperature of the grill
makes it possible to brown the surface of meats and roasts
while locking in the juices to keep them tender. The grill is
also highly recommended for dishes that require a high
temperature on the surface: beef steaks, veal, rib steak,
filets, hamburgers etc...
Some grilling examples are included in the “Practical Cook-
ing Advice” paragraph.
The oven light
Set knob “ ” to the symbol to turn it on. It lights theB3
oven and stays on when any of the electrical heating ele-
ments in the oven come on.
Cooling ventilation
In order to cool down the exterior of the appliance, some
models are equipped with a cooling fan which comes on
automatically when the oven is hot.
When the fan is on, a normal flow of air can be heard
exiting between the oven door and the control panel.
Note: When cooking is done, the fan stays on until
the oven cools down sufficiently.

5
How to Keep Your Oven in Shape
Before cleaning your oven, or performing maintenance,
disconnect it from the power supply.
To extend the life of your oven, it must be cleaned
frequently, keeping in mind that:
•Do not use steam equipment to clean the appliance.
• the enamelled or stainless steel parts should be
washed with lukewarm water without using any abra-
sive powders or corrosive substances which could ruin
them; Stainless steel could get stained. If these stains
are difficult to remove, use special products available
on the market. After cleaning, it is advisable to rinse
thoroughly and dry.
• the inside of the oven should preferably be cleaned
immediately after use, when it is still warm, with hot
water and soap; the soap should be rinsed away and
the interior dried thoroughly. Avoid using abrasive de-
tergents (for example cleaning powders, etc…) and
abrasive sponges for dishes or acids (such as
limescale-remover, etc…) as these could damage the
enamel. If the grease spots and dirt are particularly
tough to remove, use a special product for oven clean-
ing, following the instructions provided on the packet.
• if you use your oven for an extended period of time,
condensation may form. Dry it using a soft cloth.
• there is a rubber seal surrounding the oven opening
which guarantees its perfect functioning. Check the
condition of this seal on a regular basis. If necessary,
clean it and avoid using abrasive products or objects
to do so. Should it become damaged, please contact
your nearest After-sales Service Centre. We recom-
mend you avoid using the oven until it has been re-
paired.
• never line the oven bottom with aluminium foil, as the
consequent accumulation of heat could compromise
the cooking and even damage the enamel.
• clean the glass door using non-abrasive products or
sponges and dry it with a soft cloth.
How to remove the oven door
For a more thorough clean, you can remove the oven
door. Proceed as follows:
• open the door fully;
• lift up and turn the small levers situated on the two
hinges;
• grip the door on the two external sides, shut it slowly
but not completely;
• pull the door towards you, pulling it out of its seat;
Reassemble the door by following the above procedures
backwards.
Replacing the Oven Lamp
• Disconnect the oven from the power supply by means
of the omnipolar switch used to connect the appliance
to the electrical mains; or unplug the appliance if the
plug is accessible;
• Remove the glass cover of the lamp-holder;
• Remove the lamp and replace with a lamp resistant to
high temperatures (300°C) with the following charac-
teristics:
- Voltage: 230/240 V
- Wattage 25W
- Type E14
• Replace the glass cover and reconnect the oven to
the mains power supply.
1 2 3
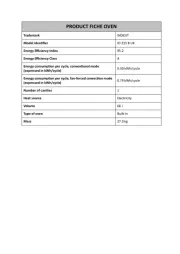
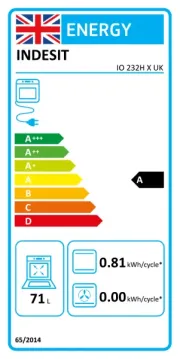
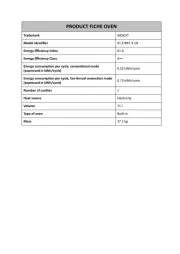
Product specificaties
| Merk: | Indesit |
| Categorie: | Oven |
| Model: | FE 10 K.C (BK) GB |
Heb je hulp nodig?
Als je hulp nodig hebt met Indesit FE 10 K.C (BK) GB stel dan hieronder een vraag en andere gebruikers zullen je antwoorden
Handleiding Oven Indesit

5 Juli 2025
5 Juli 2025
5 Juli 2025
4 Juli 2025
4 Juli 2025
4 Juli 2025
4 Juli 2025
4 Juli 2025
4 Juli 2025
11 Juni 2025
Handleiding Oven
- Avanti
- Hansa
- Team
- Sage
- Classique
- MPM
- Finlux
- Flama
- Turbotronic
- Gram
- Gorenje
- Hotpoint
- Porter & Charles
- KitchenAid
- Kleenmaid
Nieuwste handleidingen voor Oven

9 Augustus 2025
9 Augustus 2025
8 Augustus 2025
8 Augustus 2025
8 Augustus 2025

8 Augustus 2025
7 Augustus 2025
6 Augustus 2025
6 Augustus 2025
6 Augustus 2025