IDIS DA-JB2400 Handleiding
IDIS Niet gecategoriseerd DA-JB2400
Bekijk gratis de handleiding van IDIS DA-JB2400 (2 pagina’s), behorend tot de categorie Niet gecategoriseerd. Deze gids werd als nuttig beoordeeld door 21 mensen en kreeg gemiddeld 4.3 sterren uit 9 reviews. Heb je een vraag over IDIS DA-JB2400 of wil je andere gebruikers van dit product iets vragen? Stel een vraag
Pagina 1/2
DA-JB2400 INSTALLATION MANUAL
This manual is intended for users of the DA-JB2400 junction box. It
includes instructions for mounting the DA-JB2400 junction box to a wall.
•This junction box is intended to be used with DC-E & DC-T &
TC-T series model of camera. Do not use it with other models
of cameras.
•This installation should be performed by a qualied service
personnel in conformance to all local codes.
•You may need to reinforce the wall. If the wall is not strong
enough to support the camera, the camera may fall.
•Do not use this product for other purposes.
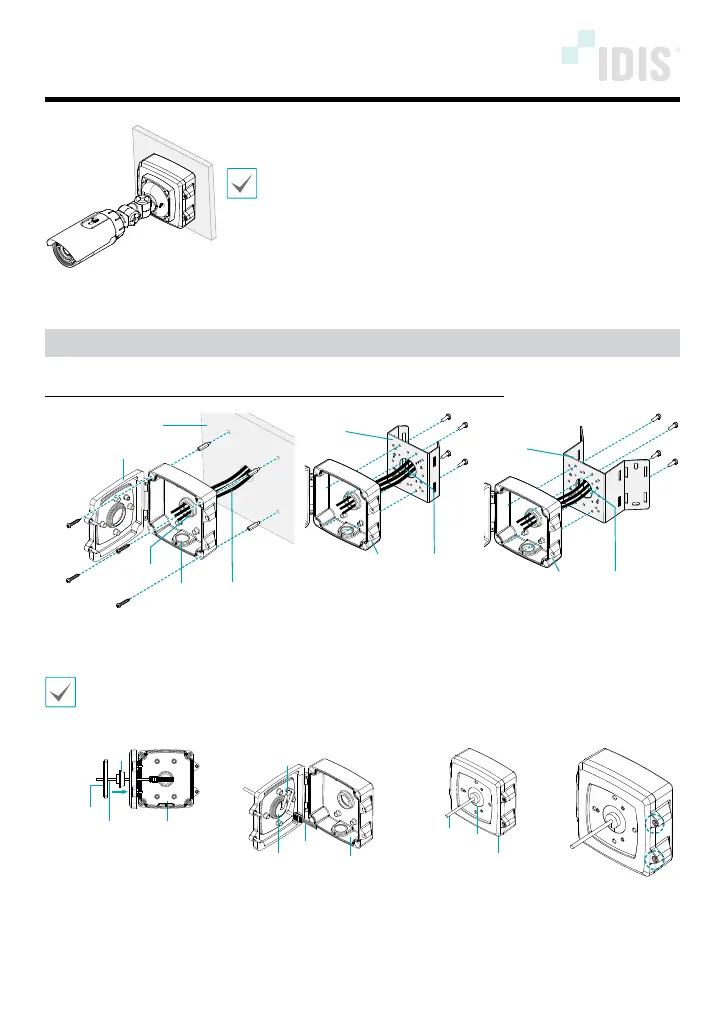
Mounting
Mount the junction box to the wall or mounting bracket as follows:
Wall
Cable
Junction Box
3/4" Cap
Wall Hole
Bracket
Junction Box
Cable
Bracket
Junction Box
Cable
1
Insert cables from external devices, network and power adapter to the junction box.
2
Mount the junction box to the wall or mounting bracket by using the screws.
•Use the provided guide pattern to check the distance between the screw holes if necessary.
•If you want to insert cables through the bottom of the junction box, remove the 3/4" cap and
attach it to the wall hole.
Rubber
Cable
Junction Box
Mounting
Bracket
Cable
Junction BoxRubber
Cable Clamp
Cable
Junction Box
Rubber
3
Route the cable from the camera through the rubber and then junction box. Attach the rubber
onto the junction box.
4
Fix the cables using the cable clamp.
5
Connect the cables from external devices, network and power adapter to each port of the
camera.
Product specificaties
| Merk: | IDIS |
| Categorie: | Niet gecategoriseerd |
| Model: | DA-JB2400 |
Heb je hulp nodig?
Als je hulp nodig hebt met IDIS DA-JB2400 stel dan hieronder een vraag en andere gebruikers zullen je antwoorden
Handleiding Niet gecategoriseerd IDIS

11 Juli 2026
10 Juli 2026
13 Mei 2026
7 Oktober 2025
7 Oktober 2025
1 September 2025
1 September 2025
10 Maart 2025
10 Maart 2025
10 Maart 2025
Handleiding Niet gecategoriseerd
Nieuwste handleidingen voor Niet gecategoriseerd
23 Juli 2026
23 Juli 2026
23 Juli 2026
23 Juli 2026
23 Juli 2026
22 Juli 2026
22 Juli 2026
22 Juli 2026
22 Juli 2026
22 Juli 2026