Hotpoint HFC 3C26 CW X Handleiding
Hotpoint Niet gecategoriseerd HFC 3C26 CW X
Bekijk gratis de handleiding van Hotpoint HFC 3C26 CW X (56 pagina’s), behorend tot de categorie Niet gecategoriseerd. Deze gids werd als nuttig beoordeeld door 103 mensen en kreeg gemiddeld 4.3 sterren uit 2 reviews. Heb je een vraag over Hotpoint HFC 3C26 CW X of wil je andere gebruikers van dit product iets vragen? Stel een vraag
Pagina 1/56
EN
1
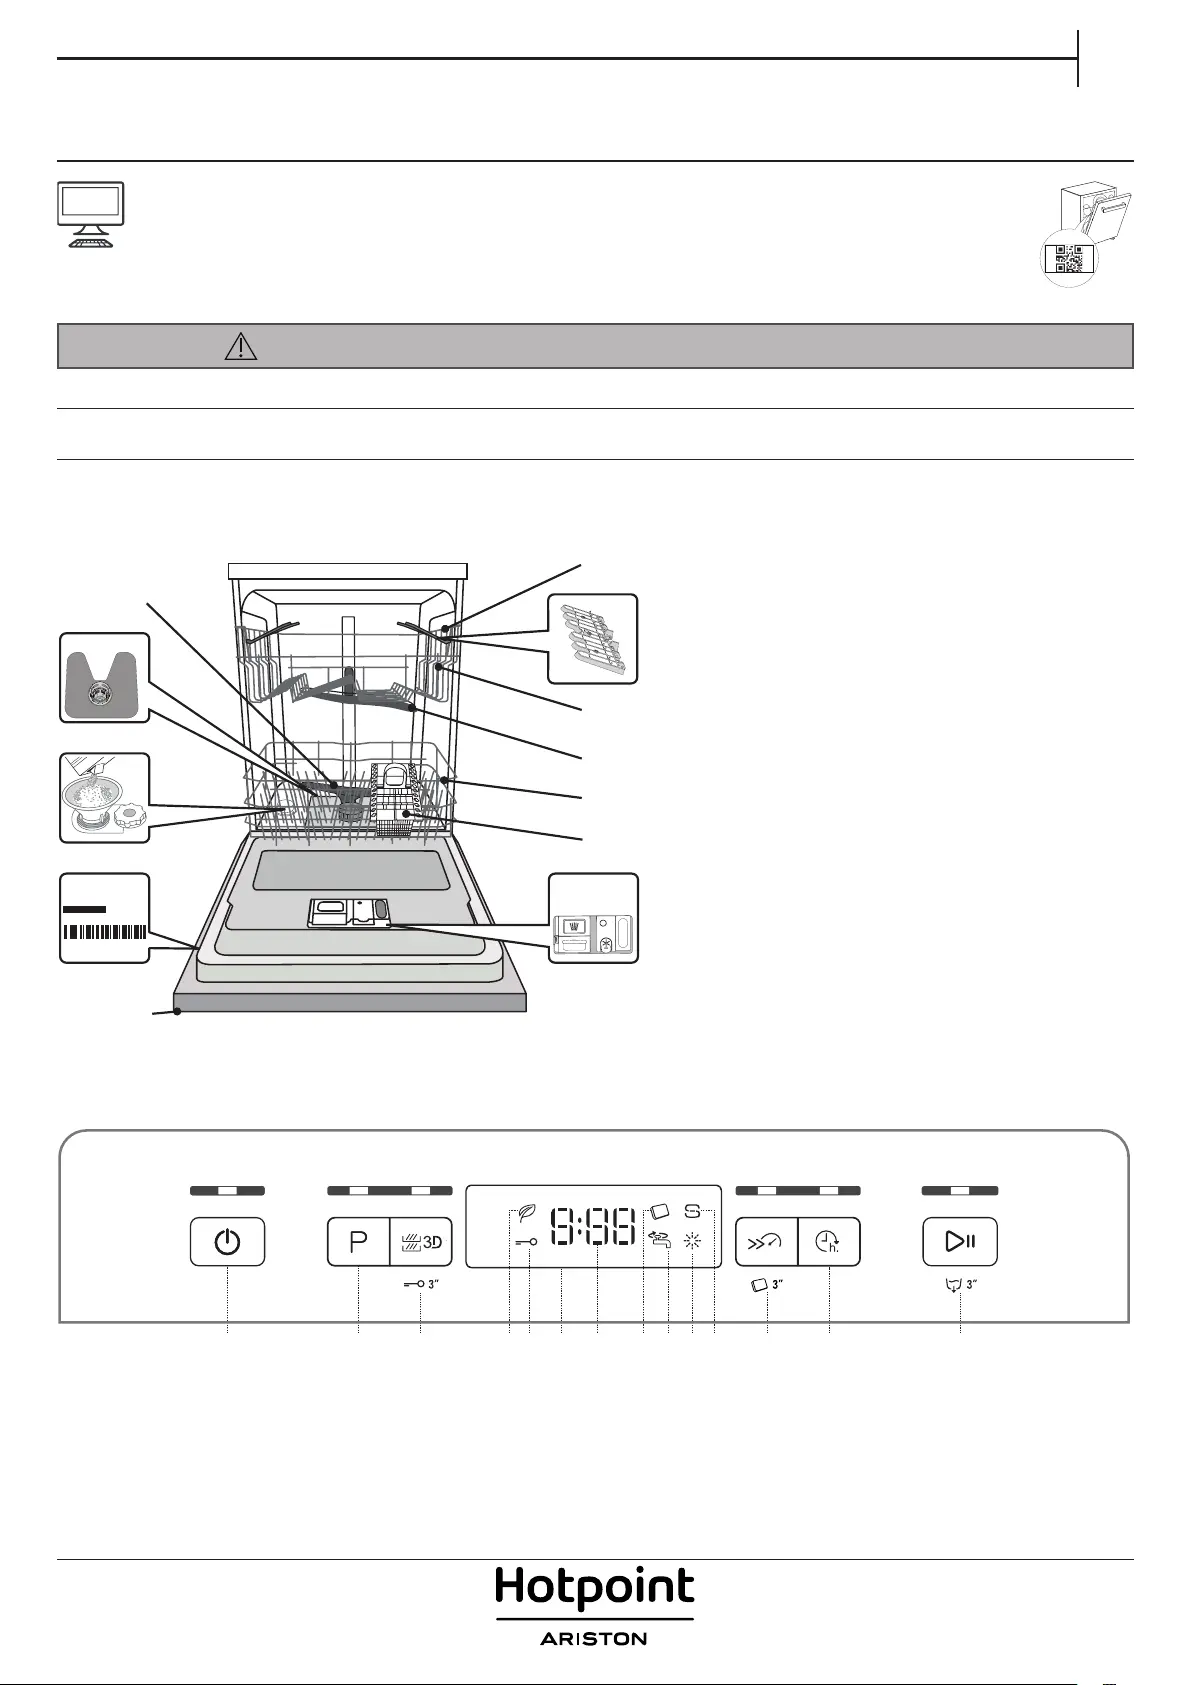
APPLIANCE
1. Upper rack
2. Foldable aps
3. Upper rack height adjuster
4. Upper spray arm
5. Lower rack
6. Cutlery basket
7. Lower spray arm
8. Filter Assembly
9. Salt reservoir
10. Detergent and Rinse Aid dispensers
11. Rating plate
12. Control panel
DAILY REFERENCE
GUIDE
CONTROL PANEL
Before using the appliance carefully read Safety Instructions.
0000 000 00000
Service:
1
2
3
4
5
6
10
12
7
11
9
8
1. On-O / Reset button with indicator light
2. Program selection button with indicator light
3. Zone Wash 3D button with indicator light / Keylock
4. Eco program indicator light
5. Keylock indicator light
6. Display
7. Program number and remaining time indicator
8. Tablet (Tab) indicator light
9. Closed water tap indicator light
10. Rinse Aid rell indicator light
11. Salt rell indicator light
12. Short Time button with indicator light / Tablet (Tab)
13. Delay button with indicator light
14. Start/Pause button with indicator light / Drain out
PRODUCT DESCRIPTION
THANK YOU FOR BUYING A HOTPOINT ARISTON
PRODUCT. In order to receive a more complete
assistance, please register your appliance on:
www.hotpoint.eu/register
3
1
2
8
13
14
5
4
6
71112
9
10
PLEASE SCAN THE QR CODE
ON YOUR APPLIANCE IN ORDER
TO HAVE MORE DETAILED
INFORMATION
Product specificaties
| Merk: | Hotpoint |
| Categorie: | Niet gecategoriseerd |
| Model: | HFC 3C26 CW X |
| Apparaatplaatsing: | Vrijstaand |
| Ingebouwd display: | Ja |
| Gewicht: | 47000 g |
| Breedte: | 600 mm |
| Diepte: | 590 mm |
| Hoogte: | 850 mm |
| Aantal couverts: | 14 couverts |
| Deurkleur: | Aluminium |
| Uitgestelde start timer: | Ja |
| Resterende tijd indicatie: | Ja |
| Kinderslot: | Ja |
| Wi-Fi-besturing: | Nee |
| Droogklasse: | A |
| Duur cyclus: | 190 min |
| Geluidsniveau: | 46 dB |
| Energie-efficiëntieklasse: | E |
| Gewicht verpakking: | 49000 g |
| Geschikt voor paneelaanpassing: | Nee |
| Installatie compartiment diepte: | 590 mm |
| Waterconsumptie per cyclus: | 9.5 l |
| Wasklasse: | A |
| Stroom: | 10 A |
| Zelfreinigend: | Ja |
| Geluidsemissieklasse: | C |
| Tijdsduur tot uitschakelen: | 12 min |
| Aantal wasprogramma's: | 6 |
| Energieverbruik per 100 cycli: | 95 kWu |
| Verstelbare voeten: | Ja |
| Productafmeting: | Volledige grootte (60 cm) |
| Zout indicator: | Ja |
| Glansmiddel indicator: | Ja |
| AquaStop-functie: | Ja |
| Half-geladen: | Nee |
| Afwasprogramma's: | Stil |
| Energieverbruik per cyclus: | 0.934 kWu |
| Bovenste mand verstelbare hoogte: | Ja |
| Automatische deuropening: | Ja |
| Maximale warmwatertoevoertemperatuur: | 60 °C |
| Temperatuur (max): | 60 °C |
| AC-ingangsspanning: | 220 - 240 V |
| AC-ingangsfrequentie: | 50 Hz |
| Type beeldscherm: | LED |
| Energie-efficiëntieschaal: | A tot G |
| Wasprogramma's: | Voorwassen |
| Type voetaanpassing: | Voor & achter |
Heb je hulp nodig?
Als je hulp nodig hebt met Hotpoint HFC 3C26 CW X stel dan hieronder een vraag en andere gebruikers zullen je antwoorden
Handleiding Niet gecategoriseerd Hotpoint

28 Mei 2026
25 Mei 2026
4 September 2025
3 Juli 2025
7 Mei 2025
26 Februari 2025
26 Februari 2025
12 April 2024
5 Januari 2024
12 December 2023
Handleiding Niet gecategoriseerd
Nieuwste handleidingen voor Niet gecategoriseerd
23 Juli 2026
23 Juli 2026
23 Juli 2026
23 Juli 2026
23 Juli 2026
22 Juli 2026
22 Juli 2026
22 Juli 2026
22 Juli 2026
22 Juli 2026