Growatt NEO 2500M-X2 Handleiding
Growatt Niet gecategoriseerd NEO 2500M-X2
Bekijk gratis de handleiding van Growatt NEO 2500M-X2 (4 pagina’s), behorend tot de categorie Niet gecategoriseerd. Deze gids werd als nuttig beoordeeld door 13 mensen en kreeg gemiddeld 4.8 sterren uit 9 reviews. Heb je een vraag over Growatt NEO 2500M-X2 of wil je andere gebruikers van dit product iets vragen? Stel een vraag
Pagina 1/4
NEO 1600-2500M-X2 Microinverter
Quick installation Guide
1.
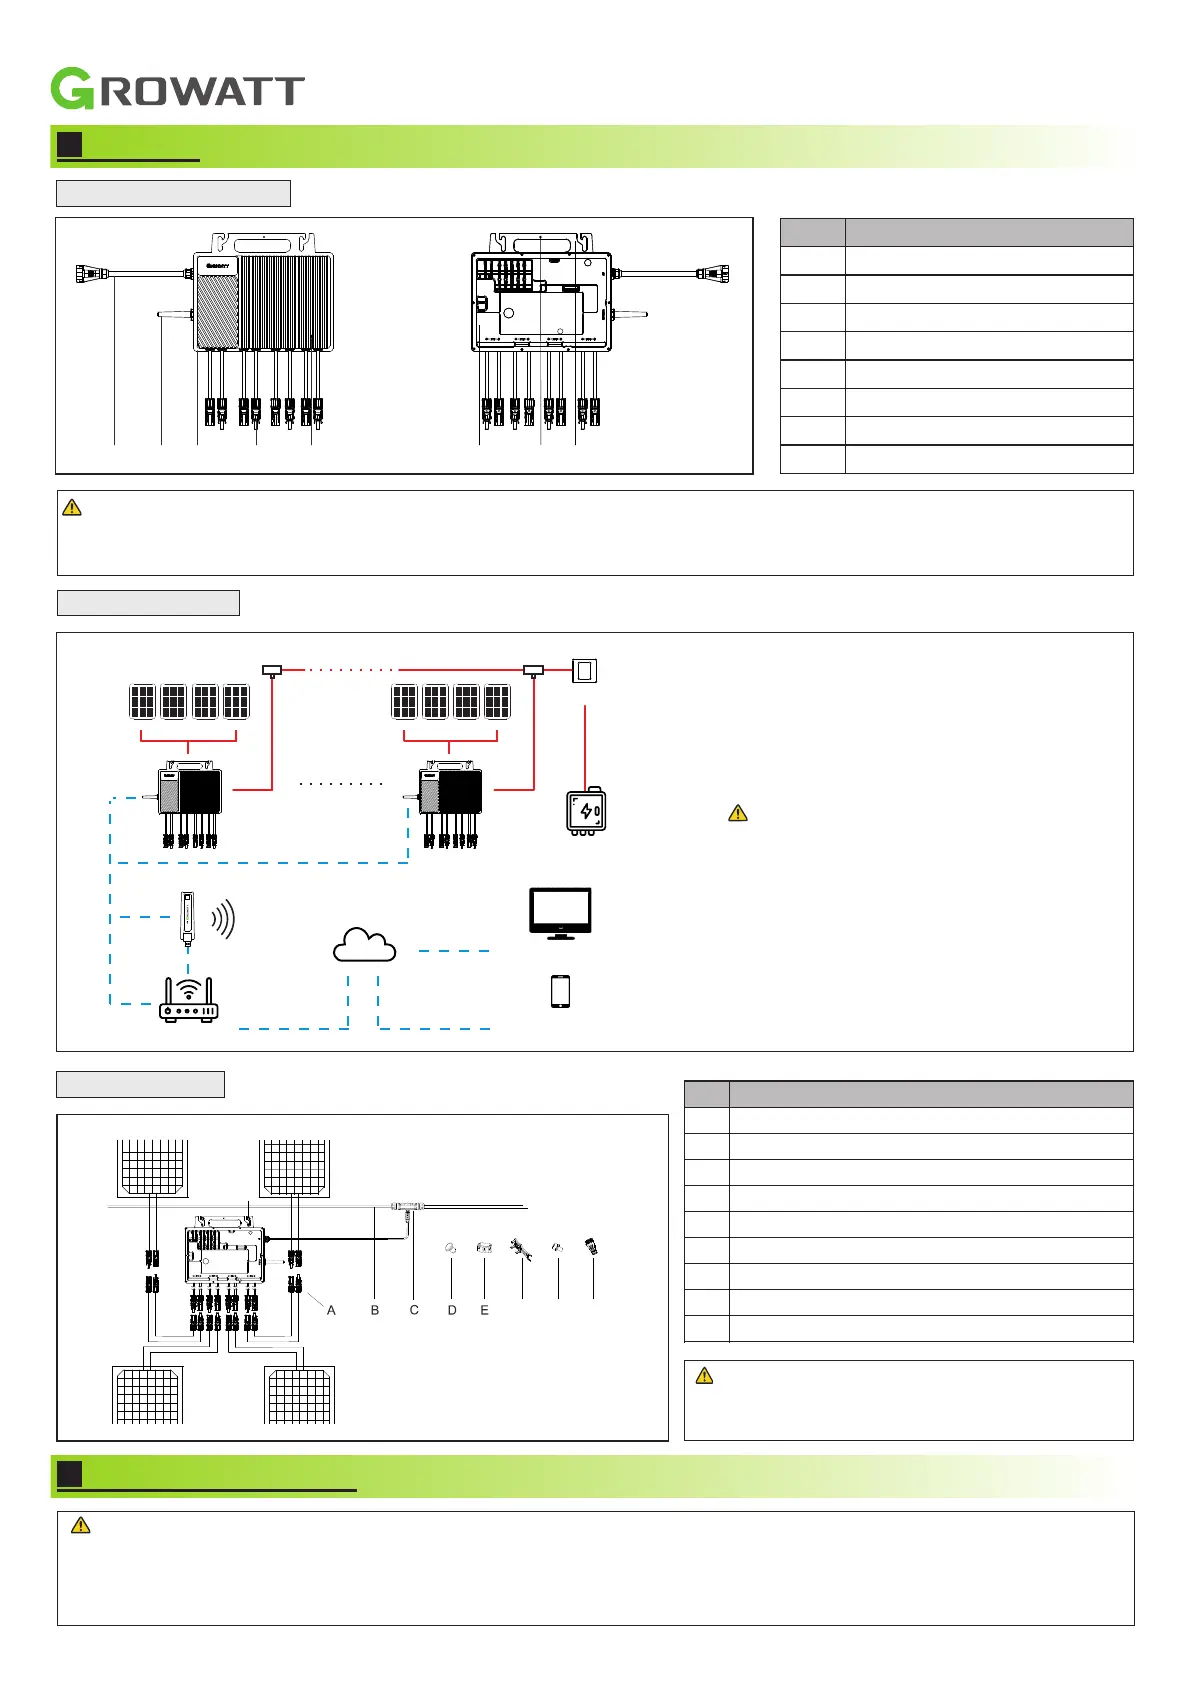
Overview
2.Growatt shall not be liable for any damage caused by improper operations.
1.This document is intended for use as a quick installation guide. For details, please refer to the User Manual.
Note:
1.1Microinverter Overview
1.2System Overview
1.The NEO series Microinverters support LoRa
communication or communication via WiFi
connection.
2.For remote monitoring, the Microinverter with
integrated LoRa module should be connected
to ShineWeLink.
2.Position the ShineWeLink next to the router,
but maintain a minimum distance of 0.5m to
avoid distortion resulting from the
excessively strong signal.
1.If the WiFi signal is weak, please install a WiFi
booster at a suitable place between the
microinverter and the router.
3.Do not place the inverter, the router and
Welink on the same vertical line to avoid
affecting the signal strength.
1.3Accessories
Item
Description
A
PV Extension Cable
B
AC Trunk Cable (AWG 12/10)
C
AC Trunk Connector
D
AC Trunk End Cap
E
AC Trunk Port Cap
F
AC Connector Unlock Tool
G
Grounding screw (M4*6)
H
Male AC Sub Connector
I
Mounting screw (M8*22)
All accessories listed above are not included in the
package and should be purchased separately.
NOTE:
AC bus cable is used to connect the Microinverter to the distribution panel.
Item
Description
A
AC cable
B
Antenna
C
Heat sink
D
PV terminal
E
LED
F
Back plate
G
Grounding hole
H
Handle
WARNING:
NOTE:
1.It is recommended to use AWG 12 or 10 cable for different applications.
2.It is recommended to use the AWG 14 cable when the Male AC Sub Connector is used.
3.Do not exceed the maximum number of Microinverters in each cable with respect to the maximum current of the AC bus cables.
Step 3. Connect the AC cable
Verify that the grid voltage is matching with the Microinverter rating.
NOTE:
1.Use the AC Trunk Connector, which is applicable to the system with a single Microinverter or multiple Microinverters.
d. Attach the AC Bus Cable to the mounting rack and secure the AC Trunk Connector with tie wraps.
a.Insert the AC Trunk End cap and screw the cap back to
port, then tighten the cap.
Click
0.8±0.1N·m
Screw Torque
2.5±0.5N·m
Joint Torque
2.
Installation Procedures
1.The sequence can be changed based on your installation plan.
3.The Male AC Sub Connector can only be used in situations where the distance between the Microinverter and the grid
connection point is less than 15 meters.
2.When crimping the the AC Trunk Cable, a hexagonal wire crimper must be used.
NOTE:
c. Tighten the screws, and install the cover back to
the trunk connector.
a. Prepare the male AC sub connector. Loosen the cover of
the connector.
2.Use the Male AC Sub Connector, which is applicable to the system with a single Microinverter.
c. Fasten the nut with the AC Connector
Unlock Tool.
Cable suggestion length:
AB
C
DEF
G
H
a.Mount the NEO Microinverter to the rail using the mounting screws recommended by
your module racking vendor.
b.Maintain a minimum of 20 mm clearance between the roof and the back plate of the
Microinverter to ensure ventilation and heat dissipation. Do not install the
Microinverter at the gap between the PV modules.
Step 1 Install the NEO Microinverter
b.In area with special grounding
requirements, external grounding
may be needed by grounding the
screw hole on the handle.
a.The AC cable has an embedded
earth wire, which might be
sufficient to ensure proper
grounding.
Step 2 Ground the system
>20
mm
>20mm
184mm
M8
Mounting
Torque 9N·M
1
2
Solar Panel
Rooftop
13±1mm
35±3mm
N(Black)
PE(Green&Yellow)
L(Red)
N
PE
L
AC Bus
Cable
Maximum number
1600M-X2
NEO
1800M-X2
NEO
NEO
2000M-X2
NEO
2250M-X2
NEO
2500M-X2
Max.
current
12AWG
3pcs
3pcs
2pcs
2pcs
2pcs
25A
10AWG
4pcs
3pcs
3pcs
2pcs
2pcs
32A
E2508
35±3
13±1
Cable
Max.cablelength
NEO
1600M-X2
NEO
1800M-X2
2000M-X2
NEO
NEO
2250M-X2
2500M-X2
NEO
12AWG
35m
30m
25m
20m
20m
10AWG
20m
15m
15m
10m
10m
bCrimp an EN6010 non-insulated cold-pressed terminal .
with each cable using a hexagonal wire crimper. Thread
the cables through the cover and sealing plug. Connect
the L, N and PE cables to the corresponding slots, and
then tighten all screws. Re-install the upper cover,
ensuring that you hear a “click” sound.
E2508
bStrip each cable to a length of 13 mm and crimp the E2508 cord .
end terminal with the hexagonal wire crimper. Assign the L, N
and PE cable to the corresponding slots, then tighten the screws
and assemble the connector.
N
PE
L
Datalogger
WiFi Router
ShineServer Web
ShinePhone APP
Cloud Server
Solar Panel
Micro Inverter
Distribution Panel
ACBreaker
WiFi
LoRa
I
G
HF
Product specificaties
| Merk: | Growatt |
| Categorie: | Niet gecategoriseerd |
| Model: | NEO 2500M-X2 |
Heb je hulp nodig?
Als je hulp nodig hebt met Growatt NEO 2500M-X2 stel dan hieronder een vraag en andere gebruikers zullen je antwoorden
Handleiding Niet gecategoriseerd Growatt

13 Maart 2026
21 December 2025
11 December 2025
10 December 2025
10 December 2025
9 December 2025
9 December 2025
9 December 2025
9 December 2025
9 December 2025
Handleiding Niet gecategoriseerd
Nieuwste handleidingen voor Niet gecategoriseerd
11 Juni 2026
11 Juni 2026
11 Juni 2026
11 Juni 2026
11 Juni 2026
11 Juni 2026
11 Juni 2026
11 Juni 2026
11 Juni 2026
11 Juni 2026