GE DSR24RWWH Handleiding
Bekijk gratis de handleiding van GE DSR24RWWH (12 pagina’s), behorend tot de categorie Wasdroger. Deze gids werd als nuttig beoordeeld door 74 mensen en kreeg gemiddeld 5.0 sterren uit 37.5 reviews. Heb je een vraag over GE DSR24RWWH of wil je andere gebruikers van dit product iets vragen? Stel een vraag
Pagina 1/12

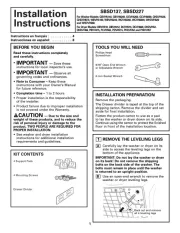
BEFORE YOU BEGIN
Read these instructions completely and
carefully.
•IMPORTANT – Save these
instructions for local electrical
inspector’s use.
•IMPORTANT – Observe all
governing codes and ordinances.
•Note to Installer – Be sure to leave these
instructions with the Consumer.
•Note to Consumer – Keep these instructions
for future reference.
•Installation and service must be performed
by a qualified installer.
•Proper installation is the responsibility of
the installer.
Installation Stack Stand Kit
Instructions
Questions? Call 800.GE.CARES (800.432.2737) or visit our Web site at: www.GEAppliances.com
FOR YOUR SAFETY:
WARNING
•Electric Shock Hazard. Disconnect power
before servicing. Failure to do so could
result in serious injury or death.
•Potential Personal Injury. More than one
person is recommended to lift the dryer
into position because of its weight and
size. Failure to do so could result in
personal injury or death.
•Avoid Tipping and Rupture of Utility
Services. Stand must be securely
assembled and dryer fastened to stand,
per installation instructions. Stand must be
securely fastened to wall, per installaiton
instructions. Failure to do so could result in
personal injury/death or property damage.
FOR USE WITH RECOMMENDED
COMPACT-TYPE ELECTRIC DRYERS
TOOLS YOU WILL NEED
•Flat-head screwdriver
•Adjustable wrench
•Nut driver
PARTS INCLUDED
PART QUANTITY
Lid Latch 1
Type A Screw 2
1/4–20 x 3/4
Type B Screw 6
1/4–20 x 11⁄2
Type C Screw 2
1/4–10 x 13⁄4
Type D Screw 7
10–16 x 5/8
Lock Nut 8
1/4–20
Spacer Ring 1
175D1807P423
49-90159
03-03 JR

Installation Instructions
2
PARTS INCLUDED (cont.)
The stand base has an angle bracket at each
end. One end of the angle bracket is 221⁄2″
long and has mounting holes in it. This end
goes up. The other end of the angle bracket
is 28 long and has no holes. This longer end″
(without holes) goes down.
DETERMINE STAND WIDTH
Your new stand can be assembled to two
different widths:
• 22″for smaller, compact washers
• 24″for larger washers
Check your washer width to determine the
stand width you need. The compact dryer
will assemble to either width.
1
ATTACH WALL MOUNTING
BRACKET
Attach one end of the wall mounting
bracket to one of the upper rear holes on
one of the stand bases using a Type A
screw and a lock nut. Make sure screws are
inserted from the top and the lock nuts are
on the bottom. Use the inside hole on the
stand base for 24″width. Use the outside
hole for 22″width.
2
Attach the other end of the bracket to the
upper rear hole of the other stand base the
same way. Use the inside hole on the stand
base for 24″width or the outside hole for
22″width. Hand-tighten the screws and
nuts.
Bracket
Type A Screw
Lock
Nut
Use outside
holes for
22″models
Use inside
holes for
24″models
Wall
Mounting
Bracket
Cross
Brace
Diagonal
Brace
Stand Bases

Installation Instructions
3
ATTACH DIAGONAL BRACE
Attach the diagonal brace to the back of the
front uprights on the stand bases. The brace
must run from the lower left to the upper
right when viewed from the rear of the stand.
Insert a Type B screw from the front of the
stand into the lower hole on the left upright
and secure with a lock nut. The lock nut will
be on the inside of the upright.
Insert another Type B screw into the hole on
the right upright. The top hole is used for 22″
width, and the lower hole is used for 24″
width. Hand-tighten the screws and lock nuts.
3ATTACH CROSS BRACE
Attach the cross brace to the rear uprights
on the stand bases.
Insert two Type B screws from the rear
of the stand into the lower holes on the
uprights and secure with lock nuts. The lock
nuts will be on the insides of the uprights.
Insert two Type B screws into the upper
holes on the uprights. The top holes are
used for 22″width, and the lower holes are
used for 24 width. Hand-tighten the screws″
and lock nuts.
4
TIGHTEN LOCK NUTS
Securely tighten all lock nuts using a
screwdriver and an adjustable wrench
or nut driver.
5
Product specificaties
| Merk: | GE |
| Categorie: | Wasdroger |
| Model: | DSR24RWWH |
Heb je hulp nodig?
Als je hulp nodig hebt met GE DSR24RWWH stel dan hieronder een vraag en andere gebruikers zullen je antwoorden
Handleiding Wasdroger GE

10 Augustus 2025

10 Augustus 2025

10 Augustus 2025
8 Juli 2025
6 Mei 2025
6 Mei 2025

1 Maart 2025
20 Februari 2025
30 Januari 2025

30 Januari 2025
Handleiding Wasdroger
- Novamatic
- Avanti
- Gorenje
- Smeg
- IFB
- Heinner
- Nevir
- Mabe
- InAlto
- Exquisit
- Grundig
- Lavor
- Baumatic
- Crosley
- Hyundai
Nieuwste handleidingen voor Wasdroger

2 September 2025

2 September 2025
2 September 2025
2 September 2025

2 September 2025

1 September 2025

1 September 2025

1 September 2025
1 September 2025
1 September 2025