Fluke 700PTP-1 Handleiding
Fluke
Niet gecategoriseerd
700PTP-1
Bekijk gratis de handleiding van Fluke 700PTP-1 (2 pagina’s), behorend tot de categorie Niet gecategoriseerd. Deze gids werd als nuttig beoordeeld door 47 mensen en kreeg gemiddeld 4.8 sterren uit 24 reviews. Heb je een vraag over Fluke 700PTP-1 of wil je andere gebruikers van dit product iets vragen? Stel een vraag
Pagina 1/2

PN 2811824
April 2007
©2007 Fluke Corporation. All rights reserved. Printed in U.S.A.
All product names are trademarks of their respective companies.
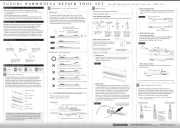
Pump Valve Assembly Cleaning Instructions
Occasionally, the 700PTP-1 may not work properly due to contamination of
the internal valve assembly. Use the following procedure to clean the valve
assembly. If the procedure does not fix the problem, a repair kit (part
number 2812587) may be ordered.
1. Using a small screwdriver, remove the 2 valve retention caps located
on opposite sides of the pump below the pressure/vacuum switch.
2. Gently remove the spring and o-ring assembly. Take care when
removing check valve as it contains several small components. See
Figure 3.
euz03f.eps
Figure 3. Cleaning t
Figure 3. Cleaning t
Figure 3. Cleaning t
Figure 3. Cleaning tFigure 3. Cleaning the Valve Assemb
he Valve Assemb
he Valve Assemb
he Valve Assembhe Valve Assembly
ly
ly
ly ly
3. Set aside the valve assemblies and clean out the valve body using a
cotton swab soaked in isopropyl alcohol.
4. Repeat the process several times using a new swab until clean.
5. Operate the pump handles several times and recheck for
contamination.
6. Clean the o-ring assembly and the o-ring on the retention caps with
isopropyl alcohol and inspect the o-rings closely for any damage or
excessive wear. Replacements are included in the repair kit.
7. Inspect the springs for wear or loss of tension. They should be
approximately 8.6 mm long in the relaxed state. If shorter, they may
provide sufficient sealing tension. Replace if needed.
8. Once all parts have been cleaned and inspected, reinstall the o-ring
and spring assembly into the valve body.
9. Reinstall the retention caps and gently tighten each cap.
10. Seal the output port and operate the pump to at least 50 % of capacity.
11. Release the pressure and repeat several times to ensure that the
o-rings seat properly.
Replacement Parts
Hose assembly, Fluke PN 2815714
Rebuild kit, Fluke PN 2812587
Bleed Valve Assembly (Needle) Fluke PN 2844329
LIMITED WARRANTY AND LIMITATION O
LIMITED WARRANTY AND LIMITATION O
LIMITED WARRANTY AND LIMITATION O
LIMITED WARRANTY AND LIMITATION OLIMITED WARRANTY AND LIMITATION OF LIABILITY
F LIABILITY
F LIABILITY
F LIABILITY F LIABILITY
This Fluke product will be free from defects in material and workmanship for one year
from the date of purchase. This warranty does not cover fuses, disposable batteries,
or damage from accident, neglect, misuse, alteration, contamination, or abnormal
conditions of operation or handling. Resellers are not authorized to extend any other
warranty on Fluke’s behalf. To obtain service during the warranty period, contact your
nearest Fluke authorized service center to obtain return authorization information,
then send the product to that Service Center with a description of the problem.
THIS WARRANTY IS YOUR ONLY REMEDY. NO OTHER WARRANTIES, SUCH AS
FITNESS FOR A PARTICULAR PURPOSE, ARE EXPRESSED OR IMPLIED. FLUKE IS
NOT LIABLE FOR ANY SPECIAL, INDIRECT, INCIDENTAL OR CONSEQUENTIAL
DAMAGES OR LOSSES, ARISING FROM ANY CAUSE OR THEORY. Since some
states or countries do not allow the exclusion or limitation of an implied warranty or
of incidental or consequential damages, this limitation of liability may not apply to
you.
Fluke Corporation
P.O. Box 9090
Everett, WA 98206-9090
U.S.A.
Fluke Europe B.V.
P.O. Box 1186
5602 BD Eindhoven
The Netherlands
11/99
Introduction
The Fluke-700PTP-1 Pneumatic Test Pump (hereafter called the “pump”) is
a handheld device that develops precise pressure and vacuum. The pump
has the following specifications:
• Pressure to 40 bar (600 psi)
• Vacuum to -0.96 bar (-13.9 psi)
• Wetted materials: aluminum, silicon, neoprene, stainless steel,
Buna-N
• Weight: 1.03 lb (467 g)
• Dimensions: length 8.7 in (220 mm), width 4.8 in (122 mm), depth
3.5 in (89 mm)
Box Contents
• 700PTP-1 Pneumatic Test Pump
• 1/4 in NPT male to 1/4 in BSP female
• 1 m hose
• (2) 1/8 in NPT male quick connects
• 1/8 NPT female to 1/4 in BSP female
• Seal Kit
• Instruction Sheet
Contacting Fluke
To contact Fluke or for service, call one of the following telephone numbers:
USA: 1-888-44-FLUKE (1-888-443-5853)
Canada: 1-800-36-FLUKE (1-800-363-5853)
Europe: +31 402-675-200
Japan: +81-3-3434-0181
Singapore: +65-738-5655
Anywhere in the world: +1-425-446-5500
Or, visit Fluke's Web site at www.fluke.com .
®
Fluke-700PTP-1
Pneumatic Test Pump
Instruction Sheet

Features
1
2
9
6
8
7
3
5
4
euz01f.eps
No. Item
No. Item
No. Item
No. Item No. Item Function
Function
Function
Function Function
A Master
instrument port Port for Fluke 700 Series Pressure Module
B Pressure /
vacuum button
Push in from this side for vacuum, and from
the other side for pressure. Use a small
screwdriver.
C Test pressure
port hose
Flexible hose to pressure instrument under
test
D Quick
Connects 1/8 in NPT male
E Maximum
stroke limiter
To limit the pressure from the hand pump,
tighten these nuts to shorten the compression
stroke.
F Pressure
release valve
Unscrew to vent pressure from the pump.
Tighten the valve to close the valve before
applying pressure.
G
Fine
adjustment
knob
To precisely adjust the applied pressure
H Adapter 1/8 in NPT female to 1/4 in BSP female
I (2) Clean out
ports
See “Pump Valve Assembly Cleaning
Instructions”
Figure 1. Featu
Figure 1. Featu
Figure 1. Featu
Figure 1. FeatuFigure 1. Features
res
res
res res
Using the Pump
T C
mA m A
VV
RT D
RT D
SOURCE
300V
MAX30V
MAX
30V
MAX
30V
MAX
MEAS
CAT
743
DOCUME NTING PROCESS CALI BRA TOR
MEAS
SOU RCE
SET UPmA
VV
Hz
TC
RTD
789
456
123
0
.
S I G N A L
T E S T
+ –
Red
Black
ENTER
CLEAR
(Z ERO)
RANGE
Pressure
Module
Test Pump
UUT
Calibrator
euz02c.eps
Figure 2. U
Figure 2. U
Figure 2. U
Figure 2. UFigure 2. Using the Pu
sing the Pu
sing the Pu
sing the Pusing the Pump
mp
mp
mp mp
WWarning
To avoid a violent release of pressure, always
depressurize the system slowly using the pressure
release valve (item F
F
F
FF) before detaching any
pressure line from the pump. Do not connect the
pump to an external pressure source.
1. Attach a 700 Series Pressure Module (hereafter called “pressure
module”) to the master instrument port. Use Teflon tape or other
sealing medium on all NPT thread connections to eliminate leakage.
2. Connect the test pressure port hose (item ) to the pressure input of C
the pressure instrument under test.
3. Make sure the pressure/vacuum button (item B) is in the desired
position.
4. Unscrew the pressure release valve (item F) to vent pressure from
the pump.
5. Zero the pressure module. The zeroing procedure depends on which
pressure module and calibrator is in use.
6. Turn the fine adjustment knob (item G) to mid-range.
7. Tighten the pressure release valve (item F). Do not over tighten.
8. To limit the maximum pressure that can be developed by the pump,
tighten the maximum-stroke limiting adjustment nuts (item E). This
also reduces the amount of pressure increase per stroke.
9. To apply very low pressures, use the fine adjustment knob only (item
G).
10. Squeeze the handles together to apply incrementally higher pressure.
For pressure over 7 bar (100 psi), use two hands.
11. Adjust the pressure using the fine adjustment knob (item G).
Product specificaties
| Merk: | Fluke |
| Categorie: | Niet gecategoriseerd |
| Model: | 700PTP-1 |
| Gewicht: | 467 g |
| Breedte: | 122 mm |
| Diepte: | 220 mm |
| Hoogte: | 89 mm |
| Gebruikershandleiding: | Ja |
| Materiaal: | Aluminium, Neoprene, Silicone, Stainless steel |
| Merkcompatibiliteit: | Fluke |
| Maximum werkdruk: | 40 bar |
| Type product: | Pneumatische testpomp |
| Inclusief slang: | Ja |
| Luchtdruk (max): | - bar |
| Inclusief afdichtingen: | Ja |
Heb je hulp nodig?
Als je hulp nodig hebt met Fluke 700PTP-1 stel dan hieronder een vraag en andere gebruikers zullen je antwoorden
Handleiding Niet gecategoriseerd Fluke
26 Augustus 2025
15 Juni 2025

10 Juni 2025

11 Maart 2025
7 Oktober 2024

7 Oktober 2024
7 Oktober 2024

9 September 2024

8 Juli 2024

7 December 2023
Handleiding Niet gecategoriseerd
- Samsung
- URC
- MGL Avionics
- Pletscher
- Yli Electronic
- FANAUE
- Brocade
- Sunset
- Vivax
- Silva Schneider
- Clatronic
- Superrollo
- Moman
- BBB
- Ditek
Nieuwste handleidingen voor Niet gecategoriseerd
7 September 2025
5 September 2025
5 September 2025

5 September 2025

5 September 2025
5 September 2025
4 September 2025
4 September 2025
4 September 2025

4 September 2025