Fagor LFI-040IT Handleiding
Fagor
Vaatwasser
LFI-040IT
Bekijk gratis de handleiding van Fagor LFI-040IT (8 pagina’s), behorend tot de categorie Vaatwasser. Deze gids werd als nuttig beoordeeld door 74 mensen en kreeg gemiddeld 5.0 sterren uit 37.5 reviews. Heb je een vraag over Fagor LFI-040IT of wil je andere gebruikers van dit product iets vragen? Stel een vraag
Pagina 1/8

19
e n g l i s h
This appliance, which is intended exclusively for domestic use, has been designed for washing
dishes.
Very important: Read all of this manual before installing and using the dishwasher. You will find the
documentation and accessories inside.
This manual is designed so that the text matches the corresponding drawing.
Instruction Manual
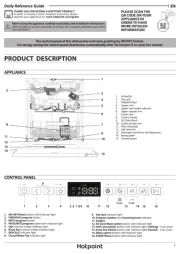
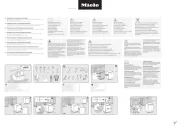
Identify your dishwasher model (“a”, “b”, “c”,
“d” or “e”) by comparing the control panel with
the illustrations.
1.1 Connection to the water supply (1.1.1)
The hose should run between the wall
and the bottom of the dishwasher (1.1.2),
making sure that the pipes are not twisted
or pulled too tight (1.1.3).
The water supply pressure should be
between 0.05 and 1 Mpa (0.5 to 10
kg/cm2)
If your dishwasher has a hot water intake,
you can connect the pipe to the hot water
tap. In this case, the maximum
temperature should not exceed 60ºC.
1.2 Drain. Fit the elbow supplied and
observe the levels in the drawing (1.2.1).
1.3 Connection to the mains electricity
supply. Take the information on the
nameplate (1.3) into account and never
attempt to remove it.
As this is a built-in appliance, the
electrical plug must be accessible after
installation.
1.4 For fitting the dishwasher under a
worktop, first take into account the
dimensions shown in the diagram (1.4.1).
loosen and remove the leg supports
(1.4.2). Then place the dishwasher in
front of the worktop and use a
screwdriver to raise the rear leg from the
front (1.4.3), leaving a space of approx. 3
mm from the worktop.
Insert the dishwasher and ensure that the
pipes and cable do not get trapped
behind the skirting. Adjust it to the
worktop by turning the front legs (1.4.4)
and rear leg (1.4.3) until the top of the
appliance is just touching the worktop.
0Identification
1Installation
If the appliance is to form part of a row of
kitchen fittings, fit the kitchen skirting and
if opening the door interferes with it, trim the
end until the door can open properly.
If you need to fit a piece of wood to the
front, follow the instructions that come with
the appliance documentation.
For column mounting, take the height of
the drain into account (1.2.2)
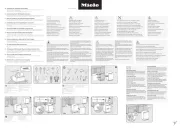
2.1 Open the door and switch on the
dishwasher by pressing the button
(2.1).
2.2 Hard water. Water contains lime and its
hardness increases in direct proportion
to the quantity found.
Before using the dishwasher, you
should find out the hardness level of
the water by consulting the water
company, consulting the Technical
Support Service or using the Aquadur
strip included in the accessories bag.
Dip the stick in a glass of water for one
second. Shake it and wait for one
minute. The strip will tell you the water
hardness level according to the following
table:
This simple adjustment of the
dishwasher is vital for correct operation.
Please ensure that you do it.
Otherwise your appliance could be
seriously affected.
2Initial settings
Scale
level (HF)
Scale
level (DH)
Test
result
Dial
position
Man Elec
Hardness
0-13 HF0-13 DH
Green
No salt
needed L0Soft
1 red strip
2 red strips
3 red strips
4 red strips
Standard
Medium
Hard
Very hard
Pos. 1
Pos. 2
Pos. 3
Pos. 4
L1
L2
L3
L4
8-21 DH
22-28 DH
29-35 DH
>35 DH
14-38 HF
39-50 HF
51-63 HF
>63 HF
HF: Water hardness (French system) DH: Water hardness (German system)

e n g l i s h
20
SUPER EASY: hold the basket by the
side handles and pull upwards with both
hands at the same time (both to raise and
lower it)(3.1.2). Ensure that it is level.
with the basket empty, NORMAL:
remove the stops (3.1.3); take the basket
out (3.1.4); insert it at the required height
and fit the stop back into place.
3.2 Putting the dishes into the machine.
Ensure that the dishes are
dishwasher-safe.
It is not advisable to put items made of
wood, silver, aluminium, decorated
porcelain or non heat-resistant plastic into
the dishwasher.
For correct washing, it is essential that
the dishes are positioned suitably in the
baskets without touching each other.
The is for the dirtiest items: lower basket
casserole dishes, bowls and plates.
Start to fill the basket from the outside
(3.2.1). Put the casserole dishes in facing
down, the soup dishes on the left and the
plates on the right.
If you have dropdown supports, you
can use them in their horizontal position
for large items such as casserole dishes
(3.2.2 - 3.2.3).
Put the in with the handle facing cutlery
downwards (3.2.4)
Knives and other sharp utensils should
be placed in the basket with their points
downwards or horizontally.
The is for delicate items: cups, top basket
glasses, porcelain, crystal and standard
size plates (3.2.5). There is an area for
long utensils and dropdown supports that
can be used for wine glasses when put
into vertical position (3.2.6).
For the Express programme or the Top
Load function , all of the dishes should
be placed in the Top Basket (3.2.7).
And for the Bottom Load function, the
dishes will be placed only in the Bottom
Basket (3.2.3).
Ensure that there is no obstacle
preventing the sprinklers from turning
around (3.2.8) or the detergent
compartment from opening.
If the level is 0, DO NOT use salt. If
you have any questions, consult the
technical support service.
Electronic setting.
If your model is type A, hold down the
Opc button (2.2.1) for more than 3
seconds. The current value will appear
on the display when you release it L2
(2.2.2)
Press the same key several times until
you reach the required value.
Validate by pressing button (2.2.3).
If your model has a Time Delay
(2.2.4) or Duo Zone (2.2.5) or 1/2
Load (2.2.6) button, hold this button
down for at least 3 seconds. When you
release it, the current L2 value will
appear on the display (2.2.2), or pilot
lights will flash (2.2.7).
Press the same key several times until
you reach the required value.
Validate PROG by pressing button
(2.2.8).
For all other models (models “e” without
Option buttons), hold down the PROG
button for at least 5 seconds. On
releasing the button the current value
will be shown by flashing pilot lights
(2.2.7).
If the model has less than 5
programmes, level 0 will be shown by
the pilot lights switching off (except for
the steady END/STOP light) (2.2.9).
Press the button repeatedly until PROG
the desired value is reached.
Validate PROG by releasing the button
and not pressing it again for at least 10
seconds. After this time, it will
automatically store the value and exit to
the main menu.
2.3 Preliminary cleaning. You should run a
preliminary wash (without detergent,
dishes or rinse aid). First of all, if you
need to, load the dishwasher with salt
(2.3.1) without completely filling the
compartment. Fill it up with water (2.3.2)
and stir with a spoon. Close the lid and
start the programme.
3.1 Regulating the top basket. Types of
regulation (3.1.1)
3Use

21
e n g l i s h
3.3 Detergent. You can use tablets, powder
or liquid. The amount to be used is
detailed in the progammes table. Pour
the required dose into the compartment
located inside the door (3.3.1) and close
the lid. In programmes that require an
additional dose, place it on top of the lid
(3.3.2).
3.4 Switching on ( ) .with the door open
3.5. Checking salt and rinse aid levels.
. If the pilot light is lit up, you Salt
have to fill the compartment. You should
not use salt if you do not need it (note
in section 2.2). If you do need it, follow
the steps explained in section 2.3, but fill
the compartment completely with salt.
If your appliance does not have a
warning light, you should fill the salt
compartment up after every 20 washes
for medium-hard water.
. If the pilot is lit or the Rinse aid
indicator light (3.5.1) inside the door is a
light colour, always refill until the
compartment is completely full (3.5.2).
3.6 Programme Selection. Programme
selection using the button (2.2.10)PROG
On display models (type B), the selected
programme will appear (P1, P2, etc.)
3.7 Selecting options.
All in 1 detergent (A type models
only)
Hold down the and buttons OPC
simultaneously for more than 3 seconds
(3.7.1).
If you use ALL-IN-ONE detergents, the
washing or drying results (and the times)
may be negatively affected, mainly in the
case of short and/or low temperature
programmes.
It is important to read the instructions on
the packet (3.3.3).
If in doubt, consult the detergent
manufacturer.
Time reduction
Shortens washing and drying times. This
can be used for the Intensive, Normal or
Automatic, Hygienizer and Economy
Programmes
Top/bottom load (duo-zone) .
Uses half of the dishwasher capacity. Top
basket , Bottom basket , or both.
Half Load (1/2)
This is the same as Top Load (only the top
basket is used)
Any change of programme will deactivate
options that are not compatible.
3.8 Delay Timer
Allows you to delay the Dishwashing start
time. Press the key several times until you
see the delay required on the screen (3.8.1)
or pilot (3.8.2).
If you want to cancel the delay, press .
3.9 Start-up
For A type models, press the button
(2.2.6) and close the door. For other
models, simply close the door.
For all models, when you close the door a
programme start beeper will sound.
After the programme has started, if you wish
to change the programme or option, open
the door carefully (there is a risk of
splashes) and restart the dishwasher .
3.10 Dishwashing process.
If there is a power cut during the
programme, once the power has been
restored, the dishwasher will continue to
operate normally from the same point at
which it stopped.
It is not advisable to open the dishwasher
door while it is in the process of washing.
Results could be affected. If you do, watch
out for hot water splashing out.
3.11 End of programme. When the programme
ends, the appliance will emit a beep and the
END (STOP) pilot light will come on, if your
model has one..
Switch off the machine . It will contribute
to energy saving.
3.12 Warnings about use.
Avoid having the door open to avoid
accidents (3.12.1).
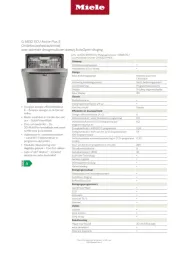
Product specificaties
| Merk: | Fagor |
| Categorie: | Vaatwasser |
| Model: | LFI-040IT |
| Apparaatplaatsing: | Volledig ingebouwd |
| Gewicht: | 44000 g |
| Breedte: | 595 mm |
| Diepte: | 545 mm |
| Hoogte: | 820 mm |
| Netbelasting: | 2170 W |
| Aantal couverts: | 12 couverts |
| Deurkleur: | Niet van toepassing |
| Snoerlengte: | 1.7 m |
| Uitgestelde start timer: | Ja |
| Startvertraging: | 9 uur |
| Droogklasse: | A |
| Geluidsniveau: | 49 dB |
| Jaarlijks energieverbruik: | 231 kWu |
| Gewicht verpakking: | 47000 g |
| Energie-efficiëntieklasse (oud): | A |
| Installatie compartiment afmetingen(WxDxH): | 600 x 600 x 820 mm |
| Waterconsumptie per cyclus: | 13 l |
| Wasklasse: | A |
| Aantal wasprogramma's: | 6 |
| Kleur bedieningspaneel: | Zwart |
| Aantal temperatuurinstellingen: | 4 |
| Afwasprogramma's: | Eco, Glass/delicate, Intensive, Normal, Pre-wash, Quick |
| Energieverbruik per cyclus: | 1.05 kWu |
| Jaarlijks waterverbruik: | 3080 l |
| Temperatuur (max): | 70 °C |
| AC-ingangsspanning: | 220 - 240 V |
| AC-ingangsfrequentie: | 50 Hz |
Heb je hulp nodig?
Als je hulp nodig hebt met Fagor LFI-040IT stel dan hieronder een vraag en andere gebruikers zullen je antwoorden
Handleiding Vaatwasser Fagor

29 Maart 2025
29 Maart 2025

29 Maart 2025

29 Maart 2025

29 Maart 2025

29 Maart 2025

29 Maart 2025
28 Maart 2025

5 December 2024

28 Juni 2024
Handleiding Vaatwasser
- Guzzanti
- CombiSteel
- Smeg
- Meiko
- Hotpoint
- Nabo
- Monogram
- Wolkenstein
- Romo
- Stoves
- Blaupunkt
- Nodor
- Amica
- Sôlt
- MPM
Nieuwste handleidingen voor Vaatwasser

30 Juli 2025

29 Juli 2025
29 Juli 2025
29 Juli 2025
29 Juli 2025
29 Juli 2025

29 Juli 2025

29 Juli 2025
29 Juli 2025
29 Juli 2025