Ergotron StyleView Vertical Lift Handleiding
Ergotron Flat panel steun StyleView Vertical Lift
Bekijk gratis de handleiding van Ergotron StyleView Vertical Lift (14 pagina’s), behorend tot de categorie Flat panel steun. Deze gids werd als nuttig beoordeeld door 28 mensen en kreeg gemiddeld 4.1 sterren uit 6 reviews. Heb je een vraag over Ergotron StyleView Vertical Lift of wil je andere gebruikers van dit product iets vragen? Stel een vraag
Pagina 1/14
1/14
ABCDEFGHIJ
1
2
3
4
5
6
7
8
1/2"
7.825
198.755
2.088
53.023
30.125
765.175
12.000
304.800
.888
22.543
27.750
704.850
4X Ø.500
PILOT HOLE
12.700
PILOT HOLE
X
OUTLINE OF 9"
VERTICAL LIFT SYSTEM
MOUNTING HEIGHT EQUATION FOR SITTING
APPLICATIONS:
52.00 (1321MM) - X = H
X = DISTANCE FROM THE TOP OF THE MONITOR
SCREEN TO THE CENTER OF THE MOUNTING
SCREW PATTERN (SEE PICTORIAL)
H = HEIGHT FROM FLOOR TO MOUNTING HEIGHT
LINE (ABOVE)
MOUNTING HEIGHT LINE:
(OBTAINED BY SOLVING
EQUATION BELOW)
MOUNTING HEIGHT EQUATION FOR STANDING
APPLICATIONS:
67.50 (1715MM) - X = H
X = DISTANCE FROM THE TOP OF THE MONITOR
SCREEN TO THE CENTER OF THE MOUNTING
SCREW PATTERN
H = HEIGHT FROM FLOOR TO MOUNTING HEIGHT
LINE (ABOVE)
1. REFER TO THE MANUAL.
2. MEASURE THE DISTANCE FROM THE TOP OF THE MONITOR
SCREEN TO THE CENTER OF THE MOUNTING SCREW PATTERN.
3. DETERMINE ERGONOMICLLY CORRECT VIEWING HEIGHT BY
USING EQUATION ABOVE (OR BELOW).
4. MARK THE DETERMINED VALUE FOR H, ON THE WALL.
5. ALIGN MOUNTING HEIGHT LINE TO MARK ON THE WALL.
USING A LEVEL, LEVEL THE TEMPLATE, THEN TACK IN PLACE.
6. CLEARLY MARK THE POSITIONS FOR FOUR PILOT HOLES
INTO THE WALL.
7. DRILL THE FOUR PILOT HOLES.
H
H
ERGOTrON
SIZE
DWG. NO.
D
REV.
DATE
DRAWN
CHECKED
TITLE
C
888-122
MJS
1/21/99
MANUAL,VISUAL GUIDE,TEMPLATE,
TO MOUNT 9" VERTICAL LIFT SYSTEM
TO WALL
OBSOLETE
PART NUMBER
888-122
STATUS
888-122-01
ACTIVE - AS SHOWN
HCS
2
1
1/2"
5/32"
3/32"
3/16"
Ø 1/2" (12.8 mm)
1x
1x
1x
1x
1x
1x
1x
2x
2x2x1x
1x
1x
1x
1x1x
1x
1x
8-32 x 1/4"
M4 x 6mm
M4 x 10mm
M4 x 20mm
M4 x 10mm
1/4-20 x 1-1/2"
4x4x1x5x
4x12x4x4x4x4x
2.5mm
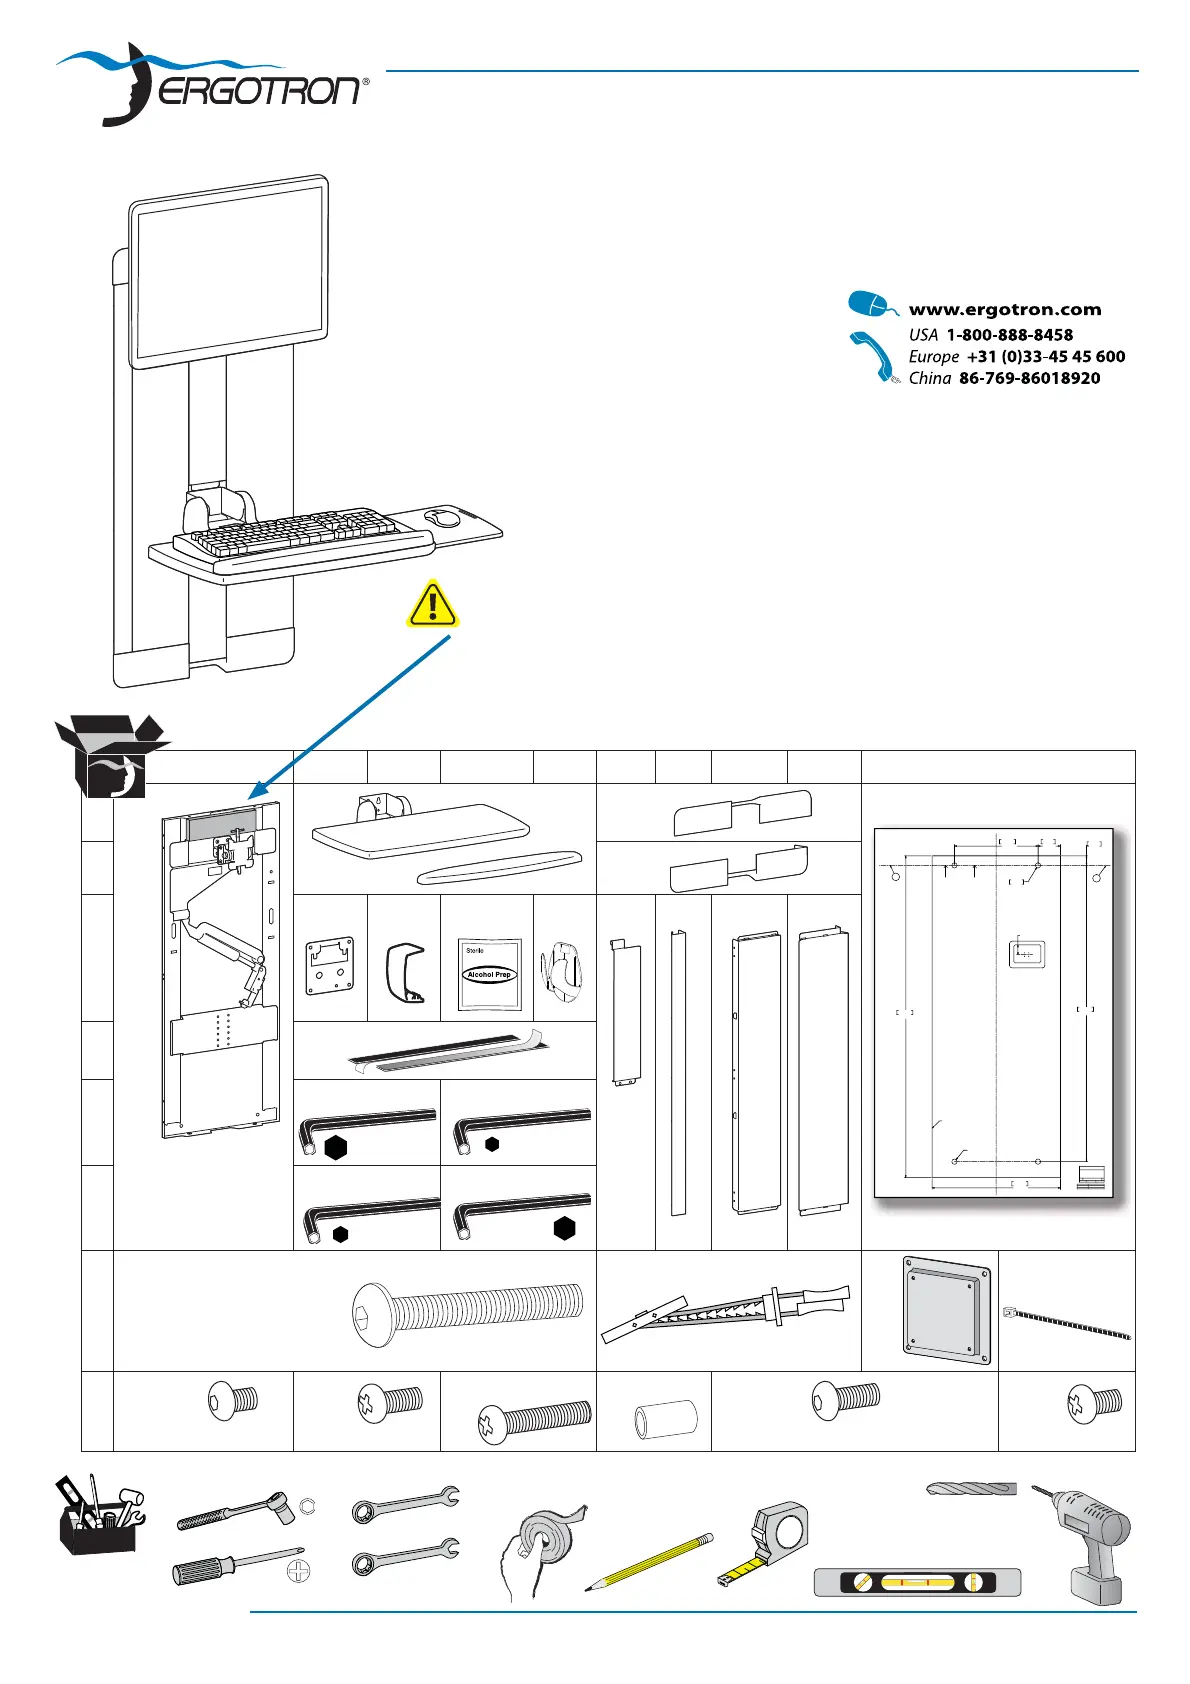
StyleView® Vertical Lift, PATIENT ROOM User's Guide
Soporte de pared StyleView, habitación de pacientes - Guía del usuario
Ajustement vertical StyleView, chambre du patient - Manuel de l’utilisateur
StyleView Vertical Lift, Patientenzimmer - Gebruikersgids
StyleView® verticale monitorophanging, patiëntkamer - Benutzerhandbuch
Braccio per sollevamento verticale StyleView, stanza del paziente - Guida per l’utente
スタイルビュー縦型リフト、病室ユーザーガイド
StyleView 垂直升降支架,病房 用户指南
StyleView 수직 리프트, 진료실 사용자 안내서
CAUTION: Do Not remove cardboard spacer until instructed to do so.
PRECAUCIÓN: No retire el separador de cartón hasta que lo indiquen las instrucciones.
ATTENTION : NE PAS retirer l’espaceur en carton tant qu’il ne vous est pas demandé de le faire.
VORSICHT: Entfernen Sie die Abstandshalter aus Pappe erst, wenn Sie dazu aufgefordert werden.
ATTENZIONE: non rimuovere il distanziale in cartone finché non si arriva all’istruzione specifi ca.
注意:段ボールのスペーサーは指示があるまで取り外さないでください。
小心: 除非要求,否则请勿取下纸垫片。
주의: 별도의 지시가 있기 전까지는 카드보드 스페이서를 제거하지 마십시오.
888-60-503-G-00 rev. C • 12/08
1x
1/2"
www.ergotron.com
Product specificaties
| Merk: | Ergotron |
| Categorie: | Flat panel steun |
| Model: | StyleView Vertical Lift |
Heb je hulp nodig?
Als je hulp nodig hebt met Ergotron StyleView Vertical Lift stel dan hieronder een vraag en andere gebruikers zullen je antwoorden
Handleiding Flat panel steun Ergotron

20 Januari 2026
Ergotron 200 Series Wall Mount Arm, 2 Extensions Handleiding
29 September 2025 22 September 2025
2 April 2025
2 April 2025
2 April 2025
2 April 2025
2 April 2025
2 April 2025
2 April 2025
Handleiding Flat panel steun
Nieuwste handleidingen voor Flat panel steun
5 Maart 2026
4 Maart 2026
4 Maart 2026
3 Maart 2026
3 Maart 2026
2 Maart 2026
2 Maart 2026
27 Februari 2026
27 Februari 2026
27 Februari 2026