Ergotec High Charisma Handleiding
Ergotec Niet gecategoriseerd High Charisma
Bekijk gratis de handleiding van Ergotec High Charisma (2 pagina’s), behorend tot de categorie Niet gecategoriseerd. Deze gids werd als nuttig beoordeeld door 66 mensen en kreeg gemiddeld 4.1 sterren uit 7 reviews. Heb je een vraag over Ergotec High Charisma of wil je andere gebruikers van dit product iets vragen? Stel een vraag
Pagina 1/2
Vielen Dank, dass Sie sich beim Kauf Ihres neuen Vorbaus für ein Produkt aus
unserem Haus entschieden haben.
Vergleichen Sie die Level-Zahl am Vorbau mit der nebenstehenden
Tabelle und vergewissern Sie sich, ob dieser für den vorgesehenen
Einsatzzweck geeignet ist.
Lesen Sie vor Gebrauch die nachfolgenden Montage- und
Sicherheitshinweise aufmerksam durch. Bewahren Sie die Hinweise
sorgfältig auf und geben Sie diese ggf. an den Nachbesitzer weiter.
Montage
Die Montage setzt eine entsprechende Grundkenntnis voraus. Sollten Sie über
diese nicht verfügen, so wenden Sie sich bitte an den Fahrrad-Fachhandel.
Überprüfen Sie, ob der Innendurchmesser der Ahead-Vorbau klemmung
(28,6 mm) mit dem Außendurchmesser des Gabelschafts übereinstimmt.
Es gibt hier 2 unterschiedliche Größen:
bei 1“ Gabelschaft: Außendurchmesser 25,4 mm und
bei 1 1/8“ Gabelschaft: Außendurchmesser 28,6 mm.
Der Innendurchmesser der Vorbauklemmung muss dem Außendurch messer
des Gabelschafts entsprechen.
Überprüfen Sie anschließend die Länge des Gabelschafts. Diese muss
mindestens 36,0 mm betragen.
Setzen Sie nun den Vorbau auf den Gabelschaft. Bei einem Gabelschaft länger
als 38 mm haben Sie die Möglichkeit, durch unterlegen von Spacern die Höhe
entsprechend anzupassen.
Richten Sie anschließend den Vorbau so aus, dass er mit dem Vorderrad in der
Flucht steht.
Kombinieren Sie den Vorbau aus Sicherheitsgründen mit
keinem Carbon-Gabelschaft – es besteht Bruchgefahr.
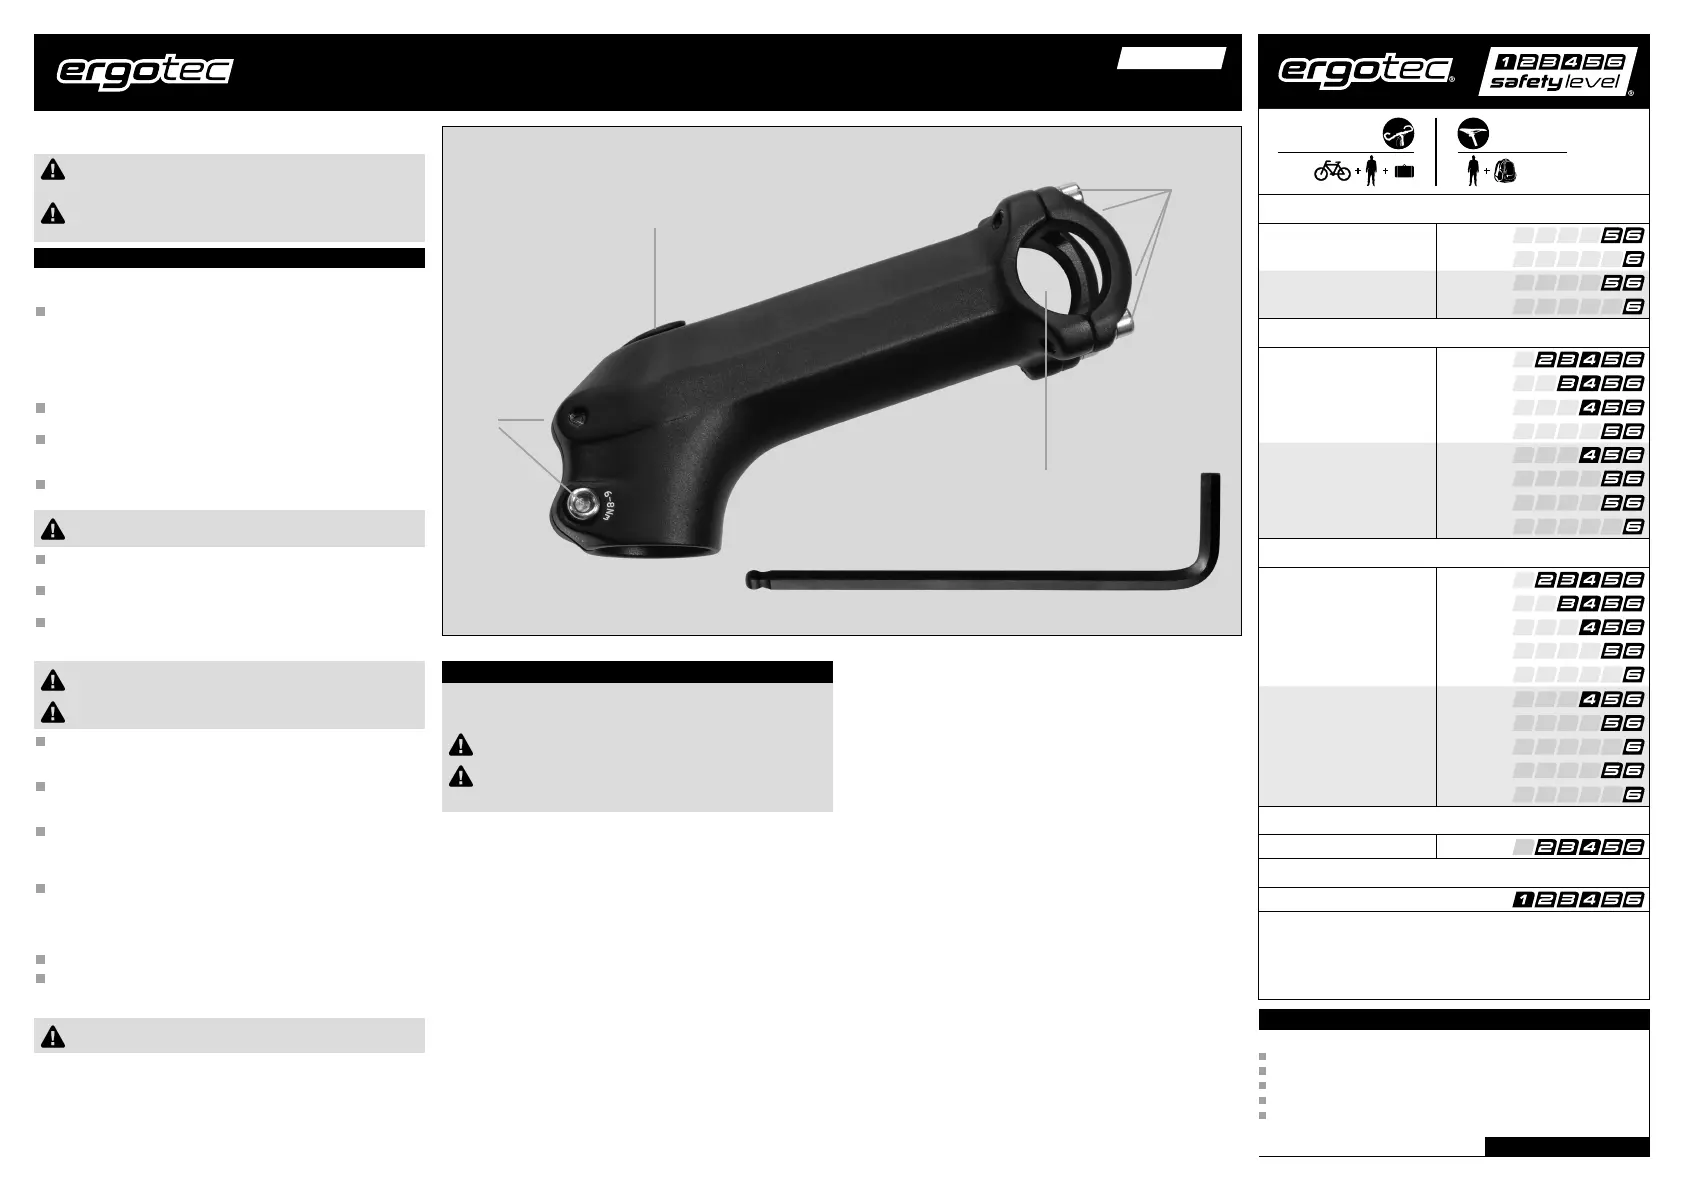
Ziehen Sie nun mit einem 4 mm Innensechskant-Schlüssel die untere
Schaftklemmschraube
c
leicht fest.
Überprüfen Sie vor der Montage des Lenkers die Kompatibilität zwischen dem
Lenkerbügel und dem Vorbau.
Überprüfen Sie auch, dass die Differenz der Durchmesser zwischen dem
Klemmbereich des Lenkerbügels und der Lenkerklemmung
d
des Vorbaus
nicht mehr als +0,2 mm beträgt.
Kombinieren Sie den Vorbau aus Sicherheitsgründen mit
keinem Carbon-Lenkerbügel – es besteht Bruchgefahr.
Achten Sie auch darauf, dass die Klemmflächen sauber
und fettfrei sind!
Setzen Sie nun den Klemmbereich des Lenkerbügels mittig in die Lenker-
bügelklemmung
d
des Vorbaus und fixieren Sie diesen leicht mit einem
4 mm Innensechskant-Schlüssel.
Montieren Sie anschließend die Ahead-Schraube des Steuerlagers und stellen
Sie das Steuerlagerspiel ein. Beachten Sie hierzu auch die Montage- und
Sicherheitshinweise des Steuerlagerherstellers.
Nachdem Sie das Steuerlagerspiel eingestellt haben, drücken Sie den
Stopfen
e
in die Bohrung, wo sich die Ahead-Schraube befindet.
Achten Sie dabei darauf, dass der Stopfen die Bohrung richtig abdeckt und
nicht zu tief im Klemmschlitz sitzt.
Ziehen Sie nun die beiden Schaft-Klemmschrauben
c
mit einem Anzugswert
von 6 - 8 Nm gleichmäßig fest. Achten Sie dabei darauf, dass der Vorbau
mit dem Vorderrad in einer Flucht steht und dass der Stopfen nicht aus dem
Klemmschlitz und der Bohrung herausgedrückt wird. Notfalls müssen Sie die
beiden Klemmschrauben noch einmal lösen und den Stopfen neu ausrichten.
Richten Sie dann die Griffenden auf Ihre individuellen Bedürfnisse aus.
Ziehen Sie nun die Lenkerbügel-Klemmschrauben
f
am Vorbau mit einem
4 mm Innensechskant-Schlüssel und einem Anzugswert von 6 - 8 Nm gleich-
mäßig über Kreuz fest.
Aus Sicherheitsgründen darf der max. Anzugswert von 8 Nm
nicht überschritten werden.
Montage- und Sicherheitshinweise für
Ahead-Vorbau Charisma, High Charisma
Mountain-Bike/Race-Bike Safety Level
max. 100 kgmax. 100 kg
max. 120 kgmax. 120 kg
E-BIKE
25 km/h + 45 km/h
max. 100 kgmax. 100 kg
max. 120 kgmax. 120 kg
Trekking-Bike Safety Level
max. 100 kgmax. 100 kg
max. 120 kgmax. 120 kg
max. 140 kgmax. 140 kg
max. 160 kgmax. 160 kg
E-BIKE
25 km/hmax. 140 kgmax. 100 kg
E-BIKE
25 km/hmax. 160 kgmax. 140 kg
E-BIKE
45 km/h*max. 140 kgmax. 140 kg
E-BIKE
45 km/h*max. 160 kgmax. 140 kg
City-Bike Safety Level
max. 100 kgmax. 100 kg
max. 120 kgmax. 120 kg
max. 140 kgmax. 140 kg
max. 160 kgmax. 160 kg
max. 180 kgmax. 180 kg
E-BIKE
25 km/hmax. 140 kgmax. 100 kg
E-BIKE
25 km/hmax. 160 kgmax. 140 kg
E-BIKE
25 km/hmax. 180 kgmax. 160 kg
E-BIKE
45 km/h*max. 140 kgmax. 140 kg
E-BIKE
45 km/h*max. 160 kgmax. 140 kg
Jugend/Young adult Safety Level
max. 100 kgmax. 100 kg
Kinderrad/Youth-Bike Safety Level
12"-24"
Lenksystem
Steering system
Sattelstütze
Seatpost
Die Produktklassifizierung der ergotec Safety Level entspricht der
DIN EN ISO 4210 Norm für Fahrräder und DIN EN 15194 für E-Bikes.
E-Bike-Typ: Trittunterstützung bis angegebene Geschwindigkeit.
*Nachträglicher Einbau nur mit Abnahme einer anerkannten
Prüf stelle und Eintragung in die Fahrzeugpapiere.
deutsch
Stand 11.05.2020
Garantie
Für ergotec Vorbauten gelten folgende Garantiezeiten:
mit Sicherheitslevel 6 6 Jahre oder 35.000 km
mit Sicherheitslevel 5 5 Jahre oder 30.000 km
mit Sicherheitslevel 4 4 Jahre oder 25.000 km
mit Sicherheitslevel 3 3 Jahre oder 20.000 km
mit Sicherheitslevel 2 3 Jahre oder 15.000 km
Eventuelle Garantieansprüche sollten über den
Fahrrad-Fachhandel abgewickelt werden.
RICHTIGRADFAHREN.DE
Sicherheitshinweis
Kontrollieren Sie auch den Anzugswert der Schrauben nach ca. 500 km und
anschließend regelmäßig im Rahmen der Service-Intervalle, mindestens
jedoch 1 x pro Jahr.
Um einen Sturz oder Unfall zu vermeiden, muss der Vorbau nach einer
Beschädigung unbedingt ausgetauscht werden.
Befestigen Sie keine Zusatzanbauten wie Kindersitz oder Gepäckträger
am Vorbau. Dies könnte zu einer Überbeanspruchung und somit zum
Bruch des Vorbaus führen.
c
e
f
d
Product specificaties
| Merk: | Ergotec |
| Categorie: | Niet gecategoriseerd |
| Model: | High Charisma |
Heb je hulp nodig?
Als je hulp nodig hebt met Ergotec High Charisma stel dan hieronder een vraag en andere gebruikers zullen je antwoorden
Handleiding Niet gecategoriseerd Ergotec

19 Mei 2026
13 Maart 2026
12 Maart 2026
9 Maart 2026
9 Mei 2025
9 Mei 2025
9 Mei 2025
9 Mei 2025
9 Mei 2025
16 April 2025
Handleiding Niet gecategoriseerd
Nieuwste handleidingen voor Niet gecategoriseerd
19 Mei 2026
19 Mei 2026
19 Mei 2026
19 Mei 2026
19 Mei 2026
19 Mei 2026
19 Mei 2026
19 Mei 2026
19 Mei 2026
19 Mei 2026