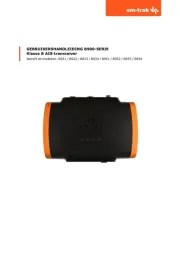
Em-Trak BT100 Handleiding
Em-Trak
Niet gecategoriseerd
BT100
Bekijk gratis de handleiding van Em-Trak BT100 (1 pagina’s), behorend tot de categorie Niet gecategoriseerd. Deze gids werd als nuttig beoordeeld door 52 mensen en kreeg gemiddeld 4.9 sterren uit 26.5 reviews. Heb je een vraag over Em-Trak BT100 of wil je andere gebruikers van dit product iets vragen? Stel een vraag
Pagina 1/1

BUOY-Tracker AIS Transponder
INSTALLATION GUIDE
201-0735:9
www.em-trak.com
support@em-trak.com
5. Install BUOY-Tracker
7. Recharge BUOY-Tracker
1. What do I need?
2. Charging BUOY-Tracker
3. Bracket installation
Fixings kit (417-0025)
BUOY-Tracker
Included
Charging will be required
approximately once every 5
twice to indicate battery is low.
Before charging
check that the
connector is dry.
Charge as shown in Step 2.
1 2 3 4
12
3
1
2
4
57
8
10
11
9
6
Nuts
Mounting
bracket U-bolts
Locking
ring Washers
x 4
x 4
5 x swercs ytiruceS
Protective cap
3
4
6. Check operation
BUOY-Tracker is working
correctly when the light
1. Download and install proBUOY-Tracker from the BT100
section of the em-trak website :-
https://em-trak.com/installation/
2. Connect the conguration charger to a PC via the
supplied USB cable and insert BUOY-Tracker into the
powered conguration charger.
3. Run the BUOY-Tracker software and select the required
Install at the
highest point
1
2
The protective cap
must be used.
LED Flash codes
In operation
In the charger
Continuous blue
Operating normally
Low battery
No MMSI
Charging
Charge complete
BUOY-Tracker must be inserted into the supplied bracket
when deployed.
BUOY-Tracker will be deactivated when removed from the
bracket.
Enabling BUOY-Tracker mode activates functionality
which is outside of the AIS Type 1 specifications and
therefore may not be permtted in some countries.
If you are in any doubt, please check with your local authorities.
A SIA t edom No
1. Select AIS AtoN mode.
CONFIGURATION FIELDS below).
2. Connect to BUOY-Tracker
by selecting the required
COM port and clicking
‘Connect’.
6. Repeat steps above to congure
additional BUOY-Tracker’s in this mode.
4. Click the icon shown to send
the conguration to
BUOY-Tracker.
5. Disconnect from BUOY-Tracker
by clicking ‘Disconnect’.
CONFIGURATION FIELDS
AtoN name:
MMSI number: Enter the AIS AtoN’s 9 digit MMSI number.
AtoN type: Select the most appropriate AtoN type from
the drop down list.
Type of EPFS: The EPFS used by the AtoN can be set to
the nominal position entered). For surveyed positions the
accuracy of the measurements (less than or greater than
10m) can be added.
Nominal Position: The charted (or intended) location of
the structure being marked.
The distance (m) by which the
AtoN may vary from its nominal position before it reports
RACON Fitted:
in the message #21 to indicated that a radar beacon is also
available at the reported location.
Message Schedule: The start slot, interval between
messages and start UTC for both channels A and B can be
AtoN’s dimensions: Enter the AtoN dimensions,
referenced to the location of the AIS AtoN, to the nearest
whole metre.
Select the
required operating VHF frequencies for transmissions.
The default channels are:
Channel A = 161.975MHz
Channel B = 162.025MHz
The default channels are intentionally reserved for AIS and
should not normally be adjusted.
2. Enter the parent vessel name, parent vessel MMSI and
a unique number from 1 to 99 for the BUOY-Tracker.
3. Click the icon shown to send
the details to BUOY-Tracker.
4. Disconnect from BUOY-Tracker
by clicking ‘Disconnect’.
5. Repeat steps above to congure
additional BUOY-Tracker’s in this mode.
F gnihsi u yoB Tr rekca edom
mode of operation The primary mode of operation is .
AIS AtoN mode.
AIS ATON CONFIGURATION MODE (PRIMARY)
AIS FISHING BUOY CONFIGURATION MODE
1. Select BUOY-Tracker mode.
activates functionality which is
outside of Type 1 AtoN
specifications and therefore may
not be permitted in some
countries.
Enabling BUOY-Tracker mode
1 long blue ash in 5 seconds
7 short yellow ashes in 5 seconds
5 short yellow ashes in 5 seconds
2 short yellow ashes in 5 seconds
1 short green ash in 5 seconds
Conguration charger (417-0047)
Cong. charger
USB
CableFlyer
Not included - purchase as accessories
Charger Dock (417-0020)
Product specificaties
| Merk: | Em-Trak |
| Categorie: | Niet gecategoriseerd |
| Model: | BT100 |
Heb je hulp nodig?
Als je hulp nodig hebt met Em-Trak BT100 stel dan hieronder een vraag en andere gebruikers zullen je antwoorden
Handleiding Niet gecategoriseerd Em-Trak
3 Juli 2025

30 Juni 2025

30 Juni 2025

30 Juni 2025

30 Juni 2025

30 Juni 2025

14 Mei 2024

14 Mei 2024

14 Mei 2024

14 Mei 2024
Handleiding Niet gecategoriseerd
- BoxLegend
- Monacor
- Modbap Modular
- Schwinn
- Marshall Electronics
- Orangemonkie
- ColorKey
- Mio
- Zodiac
- Eartec
- EchoMaster
- Fun Generation
- Homematic IP
- Ashdown Engineering
- Sinus Live
Nieuwste handleidingen voor Niet gecategoriseerd

13 September 2025

13 September 2025

13 September 2025

13 September 2025

13 September 2025

13 September 2025

13 September 2025

13 September 2025
13 September 2025
13 September 2025