Echogear EGAV-CMIWP1 Handleiding
Echogear Niet gecategoriseerd EGAV-CMIWP1
Bekijk gratis de handleiding van Echogear EGAV-CMIWP1 (2 pagina’s), behorend tot de categorie Niet gecategoriseerd. Deze gids werd als nuttig beoordeeld door 18 mensen en kreeg gemiddeld 4.4 sterren uit 5 reviews. Heb je een vraag over Echogear EGAV-CMIWP1 of wil je andere gebruikers van dit product iets vragen? Stel een vraag
Pagina 1/2
VerifyTVPlugFit
IMPORTANTSAFETYINSTRUCTIONS
PLEASE READ ENTIRE MANUAL PRIOR TO USE – SAVE THESE INSTRUCTIONS
CAUTION: Avoid potential personal injuries and property damage!
●Please read through these instructions completely to be sure you’re comfortable with this easy install process.
●Do not use this product for any purpose not explicitly specified by manufacturer.
●Manufacturer is not responsible for damage or injury caused by incorrect assembly or use.
●If you do not understand these instructions or have doubts about the safety of the installation, assembly or use
of this product,contact The Echogear Pros at www.echogear.com.
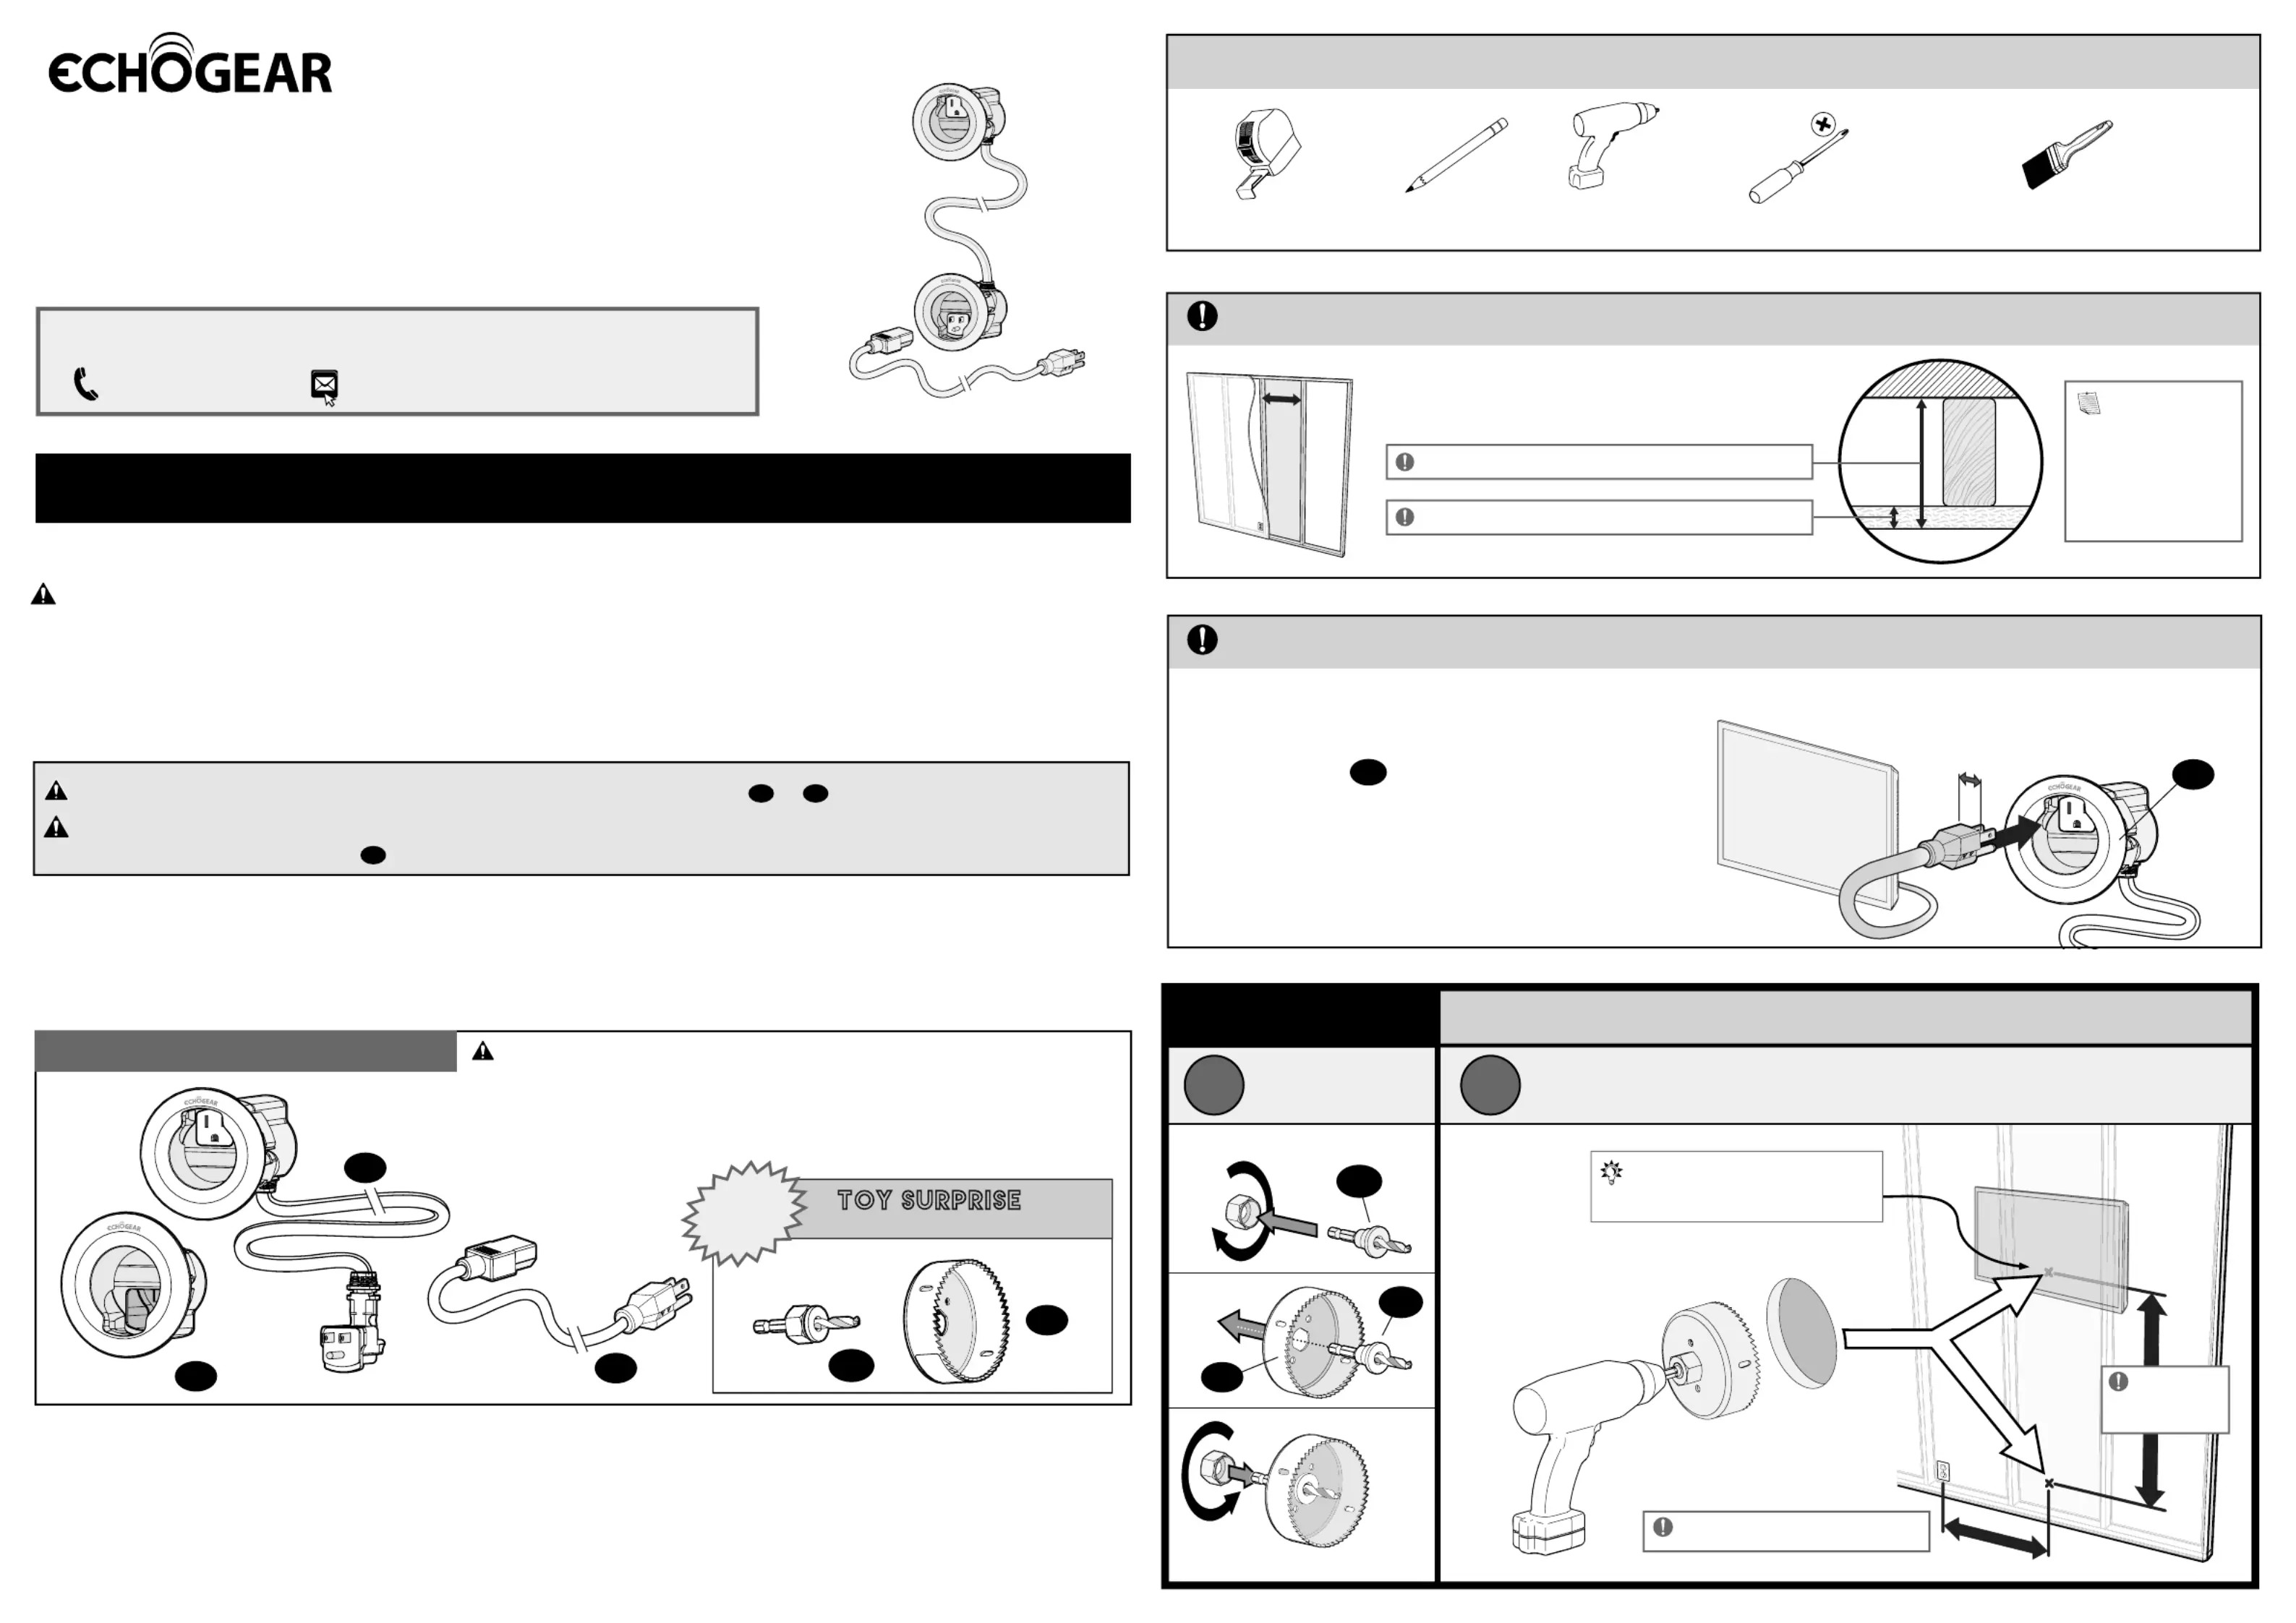
GrabYourTools
Tape Measure
This product conforms to and should be properly grounded in compliance with requirements of the current National
Electrical Code or codes administered by local authorities.
All electrical products may present a possible shock or fire hazard if improperly installed or used. This product may bear the
mark of a Nationally Recognized Testing Laboratory and should be installed in conformance with current local and/or the
National Electrical Code.
WARNING:
RISKOFFIRE AND SHOCK. Do not connect the modules
01
or
02
to any other circuits or outlets.
CAUTION: RISK OF FIRE AND SHOCK. ONLY intended for use on 15 ampere branch circuits.
Do not install power supply cord
03
within wall cavity.
PencilPhillips Screwdriver
Paint(optional)
Surfaces are paintable
to match your decor
Electric Drill
WARNING: DON'TFEED TO CHILDREN
—
This product contains
small items that could be a choking hazard if swallowed.
Before starting assembly, verify all parts are included and undamaged. If any parts
are missing or damaged,do not return the damaged item to your dealer; contact
Customer Service. Never use damaged parts!
MAX
1⅛ in. (29mm)
BEFORE DRILLING ANYHOLES:
Make sure your TV plug fits in the
upper module
01
.
VerifyWallCompatibility
Milestone AVTechnologies and its aliated corporations and subsidiaries (collectively,“Milestone”),intend to make this manual accurate and complete.
However,Milestone makes no claim that the information contained herein covers all details,conditions,or variations. Nor does it provide for every
possible contingency in connection with the installation or use of this product. The information contained in this document is subject to change without
notice or obligation of any kind. Milestone makes no representation of warranty,expressed or implied, regarding the information contained herein.
Milestone assumes no responsibility for accuracy, completeness or suciency of the information contained in this document.
©2018Milestone AVTechnologies. All rights reserved. ECHOGEARis a Milestone brand. ECHOGEARand the ECHOGEARlogo are trademarks of Milestone.
Milestone GlobalHeadquarters6436City West Parkway;Eden Prairie, MN55344USA
STEP 1
v
Upper Module
Driver Bit
(hole saw)
Hole Saw
3 in.
Lower Module
Power Cord
03
04
05
02
01
Assemble
Hole Saw
a
b
Drill Holes
MakeSomeHOLES
TIP: Drill the top hole
BEHIND your TV.
05
04
04
01
Maximum Distance: 6 feet
Maximum
Height:
5 feet
102206406/18
#YourGearUpgraded
ModelEGAV-CMIWP1
OWNERSGUIDE
IN-WALLPower + Cable
ManagementKIT
Confuzzled? Call the ECHOGEAR Pros:
1-855-428-2490 helpmehelpyou@ECHOGEAR.com
Yea, theboringstuff ... but read it, so you don’t jack things up!
"Phil wants his
tools back"
TOYSURPRISE
Inside EveryBox
FREE
WHAT’S IN THE BOX
“apologies, to
all the Jacks
in the world”
This Cable Kit is designed to fit
into both interior and exterior walls
constructed with:
Minimum Space into Wall:3 in.
Minimum Drywall Thickness: 1/2 in.
NOTE: Walls
with blown-in
type insulation
may require
removal of some
insulation inside
the cavity.
Drywall
Stud
Back Wall
“size DOES matter”
“Wanna show o your hard work?
Share a picture of your completed
project with #YourGearUpgraded.
Who knows, it might not be
as bad as you thought”
Product specificaties
| Merk: | Echogear |
| Categorie: | Niet gecategoriseerd |
| Model: | EGAV-CMIWP1 |
Heb je hulp nodig?
Als je hulp nodig hebt met Echogear EGAV-CMIWP1 stel dan hieronder een vraag en andere gebruikers zullen je antwoorden
Handleiding Niet gecategoriseerd Echogear

14 Augustus 2025
Handleiding Niet gecategoriseerd
Nieuwste handleidingen voor Niet gecategoriseerd
7 Juni 2026
7 Juni 2026
7 Juni 2026
7 Juni 2026
7 Juni 2026
6 Juni 2026
6 Juni 2026
6 Juni 2026
6 Juni 2026
6 Juni 2026