Drayton SM1 Handleiding
Bekijk gratis de handleiding van Drayton SM1 (2 pagina’s), behorend tot de categorie Niet gecategoriseerd. Deze gids werd als nuttig beoordeeld door 83 mensen en kreeg gemiddeld 4.4 sterren uit 5 reviews. Heb je een vraag over Drayton SM1 of wil je andere gebruikers van dit product iets vragen? Stel een vraag
Pagina 1/2
Quick Reference Guide
The table below describes the operation of each of the four numbered switching tappets.
The LED’s will light to indicate when the central heating and/or hot water is on.
Setting the timing dial
After the tappets have been set rotate the dial through 24 hours in the direction of the arrows printed on the dial, until the
correct time is shown opposite the timing mark.
In setting the time of day, optimum accuracy is achieved by moving the dial clockwise close to the correct time, then turn-
ing gently anti-clockwise against the stop mechanism. If necessary make a fine adjustment by one further click clockwise
and turn against the stop again. This replicates the action of the tappet against the cam as the dial rotates and enables
closer setting of the time.
Note: rotating the dial the wrong way could result in damage to the Timer
Advance Facility
The SM1 Electro Mechanical Programmer is fitted with one advance button, the SM2 two advance buttons.
These buttons will advance the programme to the next switching event, i.e. if on it will go off, if off it will go on.For exam-
ple, by pressing the appropriate advance button when the time control is in the middle of a heating cycle will make the time
control move to a heating off position.
This facility enables you to override your programme temporarily. The programme will revert to normal timed operation at
the next switching event. Thus if you are going out in the evening and don’t want the rest of the evenings programme you
can press the advance button to turn the heating or hot water on/off until the next programmed event.If both circuits are
to be advanced each circuit should be treated as a separate function.
NB. If the programmer has been set to the Gravity hot water mode and the heating is off, pressing the heating advance
will also bring on the hot water circuit.
Set the link on the back of the time control to Por G according to type of system.
For a pumped system remove the link and for a gravity system leave the link in place
P–Fully PUMPED and controlled system, allowing heating and hot water to be selected and function separately.
G–GRAVITYfed hot water system which does not permit heating to be on without hot water. It is possible to have hot
water without heating.
Note: this link is not fitted on the SM1 timeswitch.
Make sure mains input has a 3 Amp fuse
Installation should be carried out by a qualified electrician or heating engineer and must conform to the I.E.E. Regulations
for Electrical Equipment of Buildings and all other relevant standards.
In many cases the SM2 programmer will fit directly on to the existing wall-plate without any changes to existing wiring. The
chart below shows which programmers can be directly replaced and the wiring detail of those that will need the wall-plate
to be changed.
Generally, when fitting the SM1 timeclock, although it will fit onto existing wall-plates, some wiring changes will be neces-
sary. Please consult the chart below for guidance. The SM1 has Volt-Free terminals so you need to fit a link from Lto
Terminal 1 on the wall-plateif you want 230V output.
The SM1 timeswitch will automatically switch your boiler ON and OFF once or twice a day, at whatever times you choose.
The SM2 central heating programmer will automatically switch your heating and hot water system ON and OFF once or
twice a day, at whatever times you choose.
If you have a fully pumped and controlled system you will be able to have central heating without hot water and vice versa.
You can choose a different mode for your heating to hot water.
Agravity-fed hot water system does not allow heating to be on without hot water.
You also have the option to obtain continuous ON or OFF operation.
Type:
SM1 24-
Hour Timeswitch
SM2 24-Hour Programmer
Voltage:
Rating:
Ambient Temp:
0 °C to 50 °C Storage
Wiring:
Maintenance:
These Electro Mechanical Time Controls are simple to use central heating controllers which can be set to give the pro-
gramme you want as described below.
Using the switching tappets
The four tappets round the timing dial can be moved by pushing them in towards the dial and sliding them round to the
desired switching time.When they are released they engage with the underside of the dial where they are securely held
in position.
Twice a day setting
Push the hot water and/or central heating slide button to the “twice” position.Start with number 1 tappet which must be
pushed and moved round the dial to the first On setting time required, release pressure to secure.Move number 2 tap-
pet in the same way to the first chosen Off time.Move the number 3 tappet to your second
On time and the number 4
tappet to the last Off time.
Once a day setting
Slide the hot water and/or central heating slide buttons to the “once” position. The programmer will now only operate the
number 1 tappet for On, ignore the 2 and 3 tappets and operate the number 4 tappet for Off.
Note: it is important to use the correct tappets for the ON and OFFswitchings otherwise the wrong programme will result.
SM1 & SM2 Electro Mechanical Time Controls
Before Installation
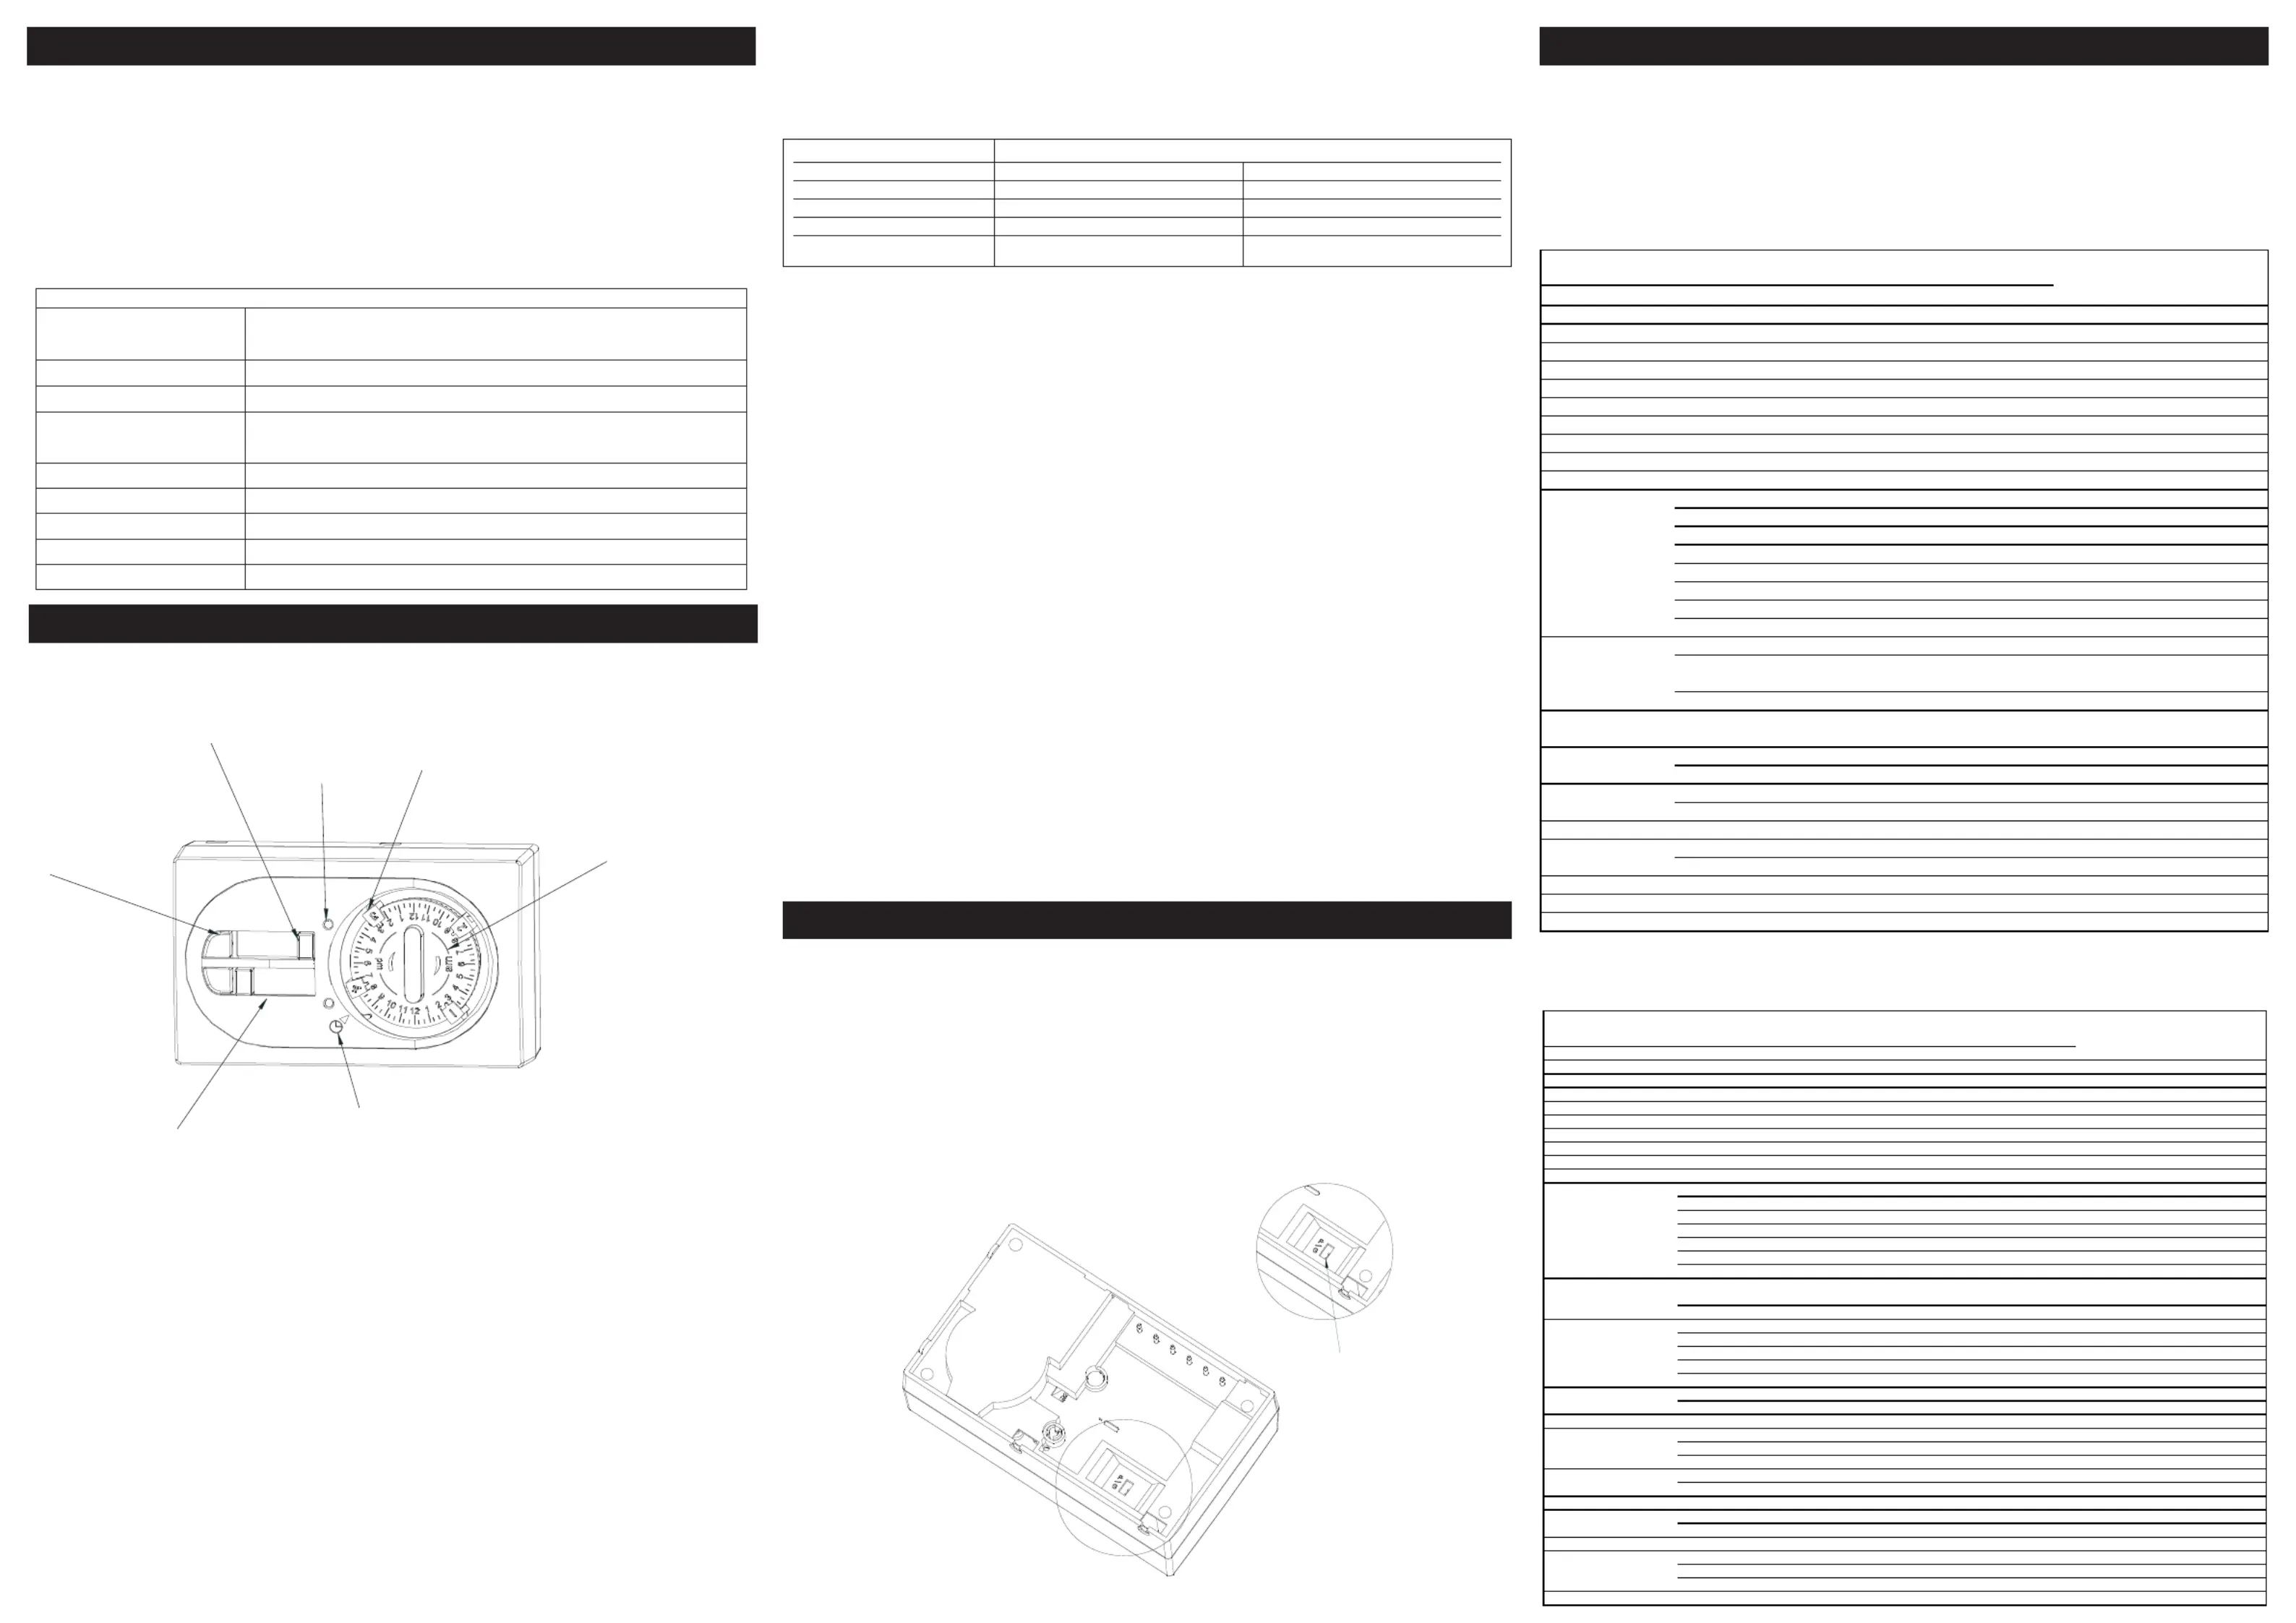
Central Heating slide button for OFF, TWICE A DAY,
ONCE A DAY, or 24 HR
Two LED's
Four numbered tappets which are moved to set the time
the timer is required to switch ON and OFF
Timing Dial
Advance buttons
Hot Water slide button for OFF, TWICE A DAY,
ONCE A DAY, or CONSTANT
Timing mark, set the actual time of day against this mark
CENTRAL HEATING
HOT WATER
ADVANCE OFF TWICE ONCE 24Hr
SM2
Set Link
Switching Tappet No.Twice a Day SettingOnce a Day Setting
OneHeating/Hot Water onHeating/Hot Water on
TwoHeating/Hot water offTappet not in use
ThreeHeating/Hot Water onTappet not in use
FourHeating/Hot Water offHeating/Hot Water off
Timer Setting
Programming the SM1 & SM2
Installation
Polution degree:l
2
Rated impulse volatge:
2.5 kV
Ball pressure test temperature:
85°C
No user maintenance should be attempted.
Designed for fixed wiring only to comply with current I.E.E. regulations.
0 °C to 45 °C Operating
2 (1) A230V AC
230V AC +10% -15%50 Hz
TECHNICAL DATA
PROGRAMMER
PROGRAMMER
PROGRAMMER
PROGRAMMERPROGRAMMER
Make
Make
Make
MakeMakeModel
Model
Model
ModelModel
DraytonNL1234SM2
DraytonmiGenie Wish 2NL1234
DraytonMiTime MT721R, MiTime RF Pack 2 & Pack 3NL1234
Drayton LifestyleLP112, LP241, LP522, LP722, LP241Si, LP522Si, LP722SiNL1234
DraytonTempus 3, 4, 6, 7 (Old models), Tempus 6, 7NL1234
Switchmaser400, 600 (No connection to terminal 4 on 600)NL431
Switchmaser805. 900, 900iNL4231
ACLMP (Towerchron)21
ACLFP (Towerchron)21861110
British GasEMP2, UP1, UP2NL1234
DanfossCP15, CP715, FP15, FP715 ( Mkl8), CP715Si, FP715SiNL1234
3020P, 3060E7642
4033 (link 1-6)E765342
102, 102E, 102E5, 102E7, (link 6-3)E5612
701 (link L-5 and 5-6)ENL31
702 (link L-5 and 5-6)ENL4231
922, 972 (link L-2 and 2-5)ENL1436
SET2, SET2E, SET3E, SET3M, FP975, SET5 (link L-2 and 2-5)ENL3614
HoneywellST699/799 (link L-5 and 5-8)NL7463
ST7100 (link L-3 and 3-6)NL7485
Horstmann
Myson
Microtimer (link L-5 and 5-8)
NL7463
MEP2CNL1234
Potterton MysonAll EP2000's, EP3000's, Eo6000's, (link L-5 and N-N)NL1234
Mini MinderNL1234
Siemens/Landis & StaefaRWB2, RWB2E, 20, 40, 102, 200, 252 & 270, RWB9, RWB29NL1234
SunvicSelect 207, SunPro 2000NL1234
SP50, SP100 (link L-3)NL1425
SalusEP200, SP220NL1234
Grasslin TowerchronDP72, QE2NL1234
SangamoM5, (link 1-6)NL18
Ch3
Ch3
Ch3
Ch3Ch3 on
on
on
on on
Ch4
Ch4
Ch4
Ch4Ch4 on
on
on
on on
Ear
Ear
Ear
EarEarth
th
th
thth
Neu
Neu
Neu
NeuNeutra
tra
tra
tratral
l
l
ll
Liv
Liv
Liv
LivLive
e
e
ee
Ch1
Ch1
Ch1
Ch1Ch1 on
on
on
on on
Ch2
Ch2
Ch2
Ch2Ch2 on
on
on
on on
614
525, 527, 425 Diadem, H21, H27, H121, Tiara, (link L-2 and L-5), Channelplus
H21Xl, H27Xl, H27ZXL
NEL3
34
ST6200, ST6300, ST6400, ST6450, ST6400S, ST9400A/C, ST9400S,
ST9500C, Y9420H RF
2
Pack 2, Y9420S RF
2
Pack 3, Y9520Z RF
2
Pack 5
NL12
TIMESWITCH
TIMESWITCH
TIMESWITCH
TIMESWITCHTIMESWITCH
Make
Make
Make
MakeMakeModel
Model
Model
ModelModel
DraytonSM1NL1234
DraytonmiGenie Wish 1NL1234
DraytonMiTime MT711R, MiTime RF Pack 1NL1234
Drayton LifestyleLP111, LP711, LP111Si, LP711SiNL1234
DraytonTempus 1 and 2NL1324
DraytonTempus 1 and 2 (Old models)NL1234
Switchmaster300, 980NL41
ACLTC (Towerchron)2147
British GasEMT2, UT1, UT2NL1324
DanfossTS15, 75 (Mkl8)ENL145/62
TS715, TS715SiNL1423
TS975ENL5461,2,3
SET1, SET1EENL546
SET4ENL546
103, 103E, 103E5, 103E7456312
911, 971ENL5642
Honeywell
ST7000BNL1234
Horstmann
Centaur SC1, SC7L32
Channelplus H17XL, H11XL
E
NL46
Centaur Plus C11, C17, C17-ZWNL243
Emerald 423, pear AutoNL243
517, Coronet, H11, H17ENL34
Myson
Microtimer (link L-5 and 5-8)
ENL546
MEPICNL1324
Potterton MysonEP4000, 4001, 4002, 5002NL542
Siemens/Landis StaefaRWB3NL43
RWB27, RWB30, RWB50, 100, 152, 170NL443
RWB7ENL243
SunvicSelect 107, SunPro1000NL1324
SP20, SP35NL3545
SalusEP101,SP120NL43
Grasslin TowerchronNL24QE1
T2001, T2001QENL7
SangamoE4631M6
SmithsCentroller Mk1 & Mk2NL32
Centroller 30123/4
Centroller 300, 980NL41
VennerVenneretteNLINELOADL
ST6100A, ST6100C, ST6100S, ST9100A/C, ST9100S, Y9120H RF
2
PACK 1, Y9120W RF
2
PACK
4
NL241
Off
Off
Off
OffOff
Spare
Spare
Spare
SpareSpare
Earth
Earth
Earth
EarthEarth
Neutral
Neutral
Neutral
NeutralNeutral
Live
Live
Live
LiveLive
Common
Common
Common
CommonCommon
On
On
On
OnOn
Product specificaties
| Merk: | Drayton |
| Categorie: | Niet gecategoriseerd |
| Model: | SM1 |
Heb je hulp nodig?
Als je hulp nodig hebt met Drayton SM1 stel dan hieronder een vraag en andere gebruikers zullen je antwoorden
Handleiding Niet gecategoriseerd Drayton

5 Augustus 2025
4 Augustus 2025
23 Augustus 2024
23 Augustus 2024
23 Augustus 2024
23 Augustus 2024
23 Augustus 2024
23 Augustus 2024
23 Augustus 2024
23 Augustus 2024
Handleiding Niet gecategoriseerd
Nieuwste handleidingen voor Niet gecategoriseerd
23 Juli 2026
23 Juli 2026
23 Juli 2026
23 Juli 2026
23 Juli 2026
23 Juli 2026
23 Juli 2026
23 Juli 2026
23 Juli 2026
22 Juli 2026