Delta Dore Si TYXAL + Handleiding
Delta Dore Alarm ringer Si TYXAL +
Bekijk gratis de handleiding van Delta Dore Si TYXAL + (2 pagina’s), behorend tot de categorie Alarm ringer. Deze gids werd als nuttig beoordeeld door 44 mensen en kreeg gemiddeld 4.2 sterren uit 2 reviews. Heb je een vraag over Delta Dore Si TYXAL + of wil je andere gebruikers van dit product iets vragen? Stel een vraag
Pagina 1/2
Contenu / Contents / Inhalt / Contenuto / Contenido / Zawartośæ / Inhoud
Instructions
Important
Product
Informations
Bloc-piles à l’intérieur /
Embedded battery unit /
Blockbatterie im Gerät /
Blocco pile all’interno /
Bloque de pilas en el interior /
Zestaw baterii wewn¹trz /
Accublok binnenin
Bloc-piles Lithium 3,6V / 26 Ah
IP
IP 30
IK 06
75 %
Consumption stand-by : 5 µA
Consumption : 1,4 A max.
176 x 268,5 x 59,5 mm
915 g
Puissance sonore à 1 m :
Nominal (Réglage par défaut 3) : 100dBA +/-2
Type Piezoelectric - Durée 90 s
868,95 MHz - 868,35 MHz
(EN 300 220) - 100 m
16 Max.
Standards EN 50131-4, RTC 50131-4
Grade 2
-10°C / +70°C
Environmental class I
+5°C / + 40°C
Important product
information (Ì)
Autoprotection à l’ouverture et à l’arrachement / Tamper alarm on opening or removal of unit /
Sabotagekontakt : Auslösung beim Öffnen und Abreißen / Autoprotezione all’apertura e alla rimozione
forzata / Autoprotección contra la apertura y el vandalismo / Funkcja antysabota¿owa w przypadku próby
wyrwania lub otwarcia / Automatische bescherming tegen opening en losrukken
Présentation / Presentation / Beschreibung / Presentazione / Presentación /
Prezentacja / Voorstelling
TTRTC
TYXAL+
CLE 8000
TYXAL+
MDO
TYXAL+
DOI PVC
TYXAL+
DO
TYXAL+
DMB
TYXAL+
DMBD
TYXAL+
DMBV
TYXAL+
DME
TYXAL+
DMBE
TYXAL+
DFR
TYXAL+
CS 8000
TYXAL+
Si
TYXAL+
SEF
TYXAL+
TTGSM
TYXAL+
DCP
TYXAL+
DF
TYXAL+
DOS
TYXAL+
DU
TYXAL+
CLT 8000
TYXAL+
TL 2000
TYXAL+
CLS 8000
TYXAL+
TTIP
TYXAL+
LB 2000
TYXAL+
DFR
TYXAL+
DF
TYXAL+
TL 2000 TYXAL+
DU
TYXAL+
Si TYXAL+
DO
TYXAL+
DCS
TYXAL+
Fonctionnement avec une centrale CS 8000 Tyxal+ / Operation with a CS 8000 Tyxal+ control unit / Betrieb
mit einer CS 8000 Tyxal+ Zentrale / Funzionamento con una centrale CS 8000 Tyxal+ / Funcionamiento con
una central CS 8000 Tyxal+ / Dzia³anie z central¹ CS 8000 Tyxal+ / Werking met centrale CS 8000 Tyxal+
Fonctionnement en mode autonome (sans centrale)
Operation in standalone mode (without control unit)
Autonomer Betrieb (ohne Zentrale)
Funzionamento in modalità autonoma (senza
centrale)
Funcionamiento modo autónomo (sin central)
Dzia³anie w trybie niezale¿nym (bez centrali)
Werking in autonome modus (zonder centrale)
Ou / Or / Oder / Oppure / O / lub / Of
FR
La sirène intérieure peut être associée à un système d’alarme DELTA DORE radio X3D ou fonctionner
en mode autonome sans centrale d’alarme (document disponible : www.deltadore.com).
EN
The indoor siren can be associated with a DELTA DORE wireless X3D alarm system or operate in
standalone mode without an alarm control unit (available document: www.deltadore.com).
DE
Die Innensirene kann mit einem DELTA DORE X3D Funk-Alarmsystem kombiniert oder im autonomen
Betrieb ohne Alarmzentrale verwendet werden (Info-Dokument: www.deltadore.com).
IT
La sirene interna può essere associata ad un sistema d’allarme DELTA DORE radio X3D oppure può
funzionare in modalità autonoma senza centrale d’allarme (documento disponibile su: www.deltadore.
com).
ES
La sirena interior se puede asociar a un sistema de alarma DELTA DORE radio X3D o funcionar en
modo autónomo sin central de alarma (documento disponible en: www.deltadore.com).
PL
Syrenê wewnêtrzn¹ mo¿na powi¹zaæ z radiowym systemem alarmowym DELTA DORE X3D lub mo¿e
ona dzia³aæ w trybie niezale¿nym bez centrali alarmowej (dostêpny dokument: www.deltadore.com).
NL
De interne sirene kan worden gekoppeld aan een alarmsysteem DELTA DORE radio X3D of autonoom
werken zonder alarmcentrale (document beschikbaar: www.deltadore.com).
1
4
2
1
56
D1
D4
D3
D2
V1
V1/ V2 : Ø 4mm
R1/ R2 : M4 / 4,3 / 9 / 0,8
V3/ V4 :
Ø 4mm
R3/ R4 : M4 / 4,3 / 9 / 0,8
R2
R1
V2
!
V4
R3
R4
V3
FR
Exclusivement en intérieur, sur une surface plane, avec suffisamment d’espace autour pour l’installa-
tion et l’ouverture de la face avant. Dans un endroit dégagé pour une diffusion optimale du son.
En évitant la proximité des masses métalliques importantes ou d’un tableau électrique.
EN
Install indoors only, on a level surface, with enough clearance to allow for fitting and opening of the
front panel. In an open space for optimum sound diffusion. Avoid installing close to metallic masses
or an electrical panel.
DE
Nur im Innenbereich, auf einer ebenen Fläche mit ausreichendem Freiraum für den Einbau und zum
Öffnen der Vorderseite. In hindernisfreier Umgebung für eine optimale Schallausbreitung. Nicht in
der Nähe von massiven metallischen Gegenständen oder Schalttafeln.
IT
Esclusivamente all’interno, su una superficie piana, con spazio sufficiente intorno da consentire
l’istallazione e l’apertura della parte anteriore. In un punto libero per una diffusione ottimale del
suono. Evitare un’istallazione vicino a grandi masse metalliche o a un quadro elettrico.
ES
Exclusivamente en interior, sobre una superficie plana con espacio suficiente alrededor para permitir la
instalación y la apertura de la parte frontal. En un lugar despejado para una difusión óptima del
sonido. No debe colocarse cerca de masas metálicas importantes o de un cuadro eléctrico.
NL
Wy³¹cznie wewn¹trz pomieszczeñ, na p³askim pod³o¿u, z zapewnieniem wystarczaj¹cej przestrzeni
wokó³ na monta¿ i otwieranie powierzchni czo³owej. W miejscu odkrytym, zapewniaj¹cym
optymalne rozchodzenie siê dźwiêku. Unikaj¹c bliskości du¿ych mas metalu lub tablicy elektrycznej.
PL
Alleen binnen, op een vlakke ondergrond, laat voldoende ruimte vrij voor de installatie en om het
batterijvakje te openen. Op een locatie waar een optimale geluidsdistributie mogelijk is. Vermijd de
nabijheid van metalen massa’s of een elektrisch paneel.
Emplacement / Location / Einbauort / Posizionamento / Ubicación / Lokalizacja /
Plaatsing
✓
2
www.deltadore.com
FR
Notice d’installation
EN
Installation instructions
DE
Installationsanleitung
IT
Guida di installazione
ES
Instrucciones de instalación
PL
Instrukcja instalacji
NL
Installatie-instructies
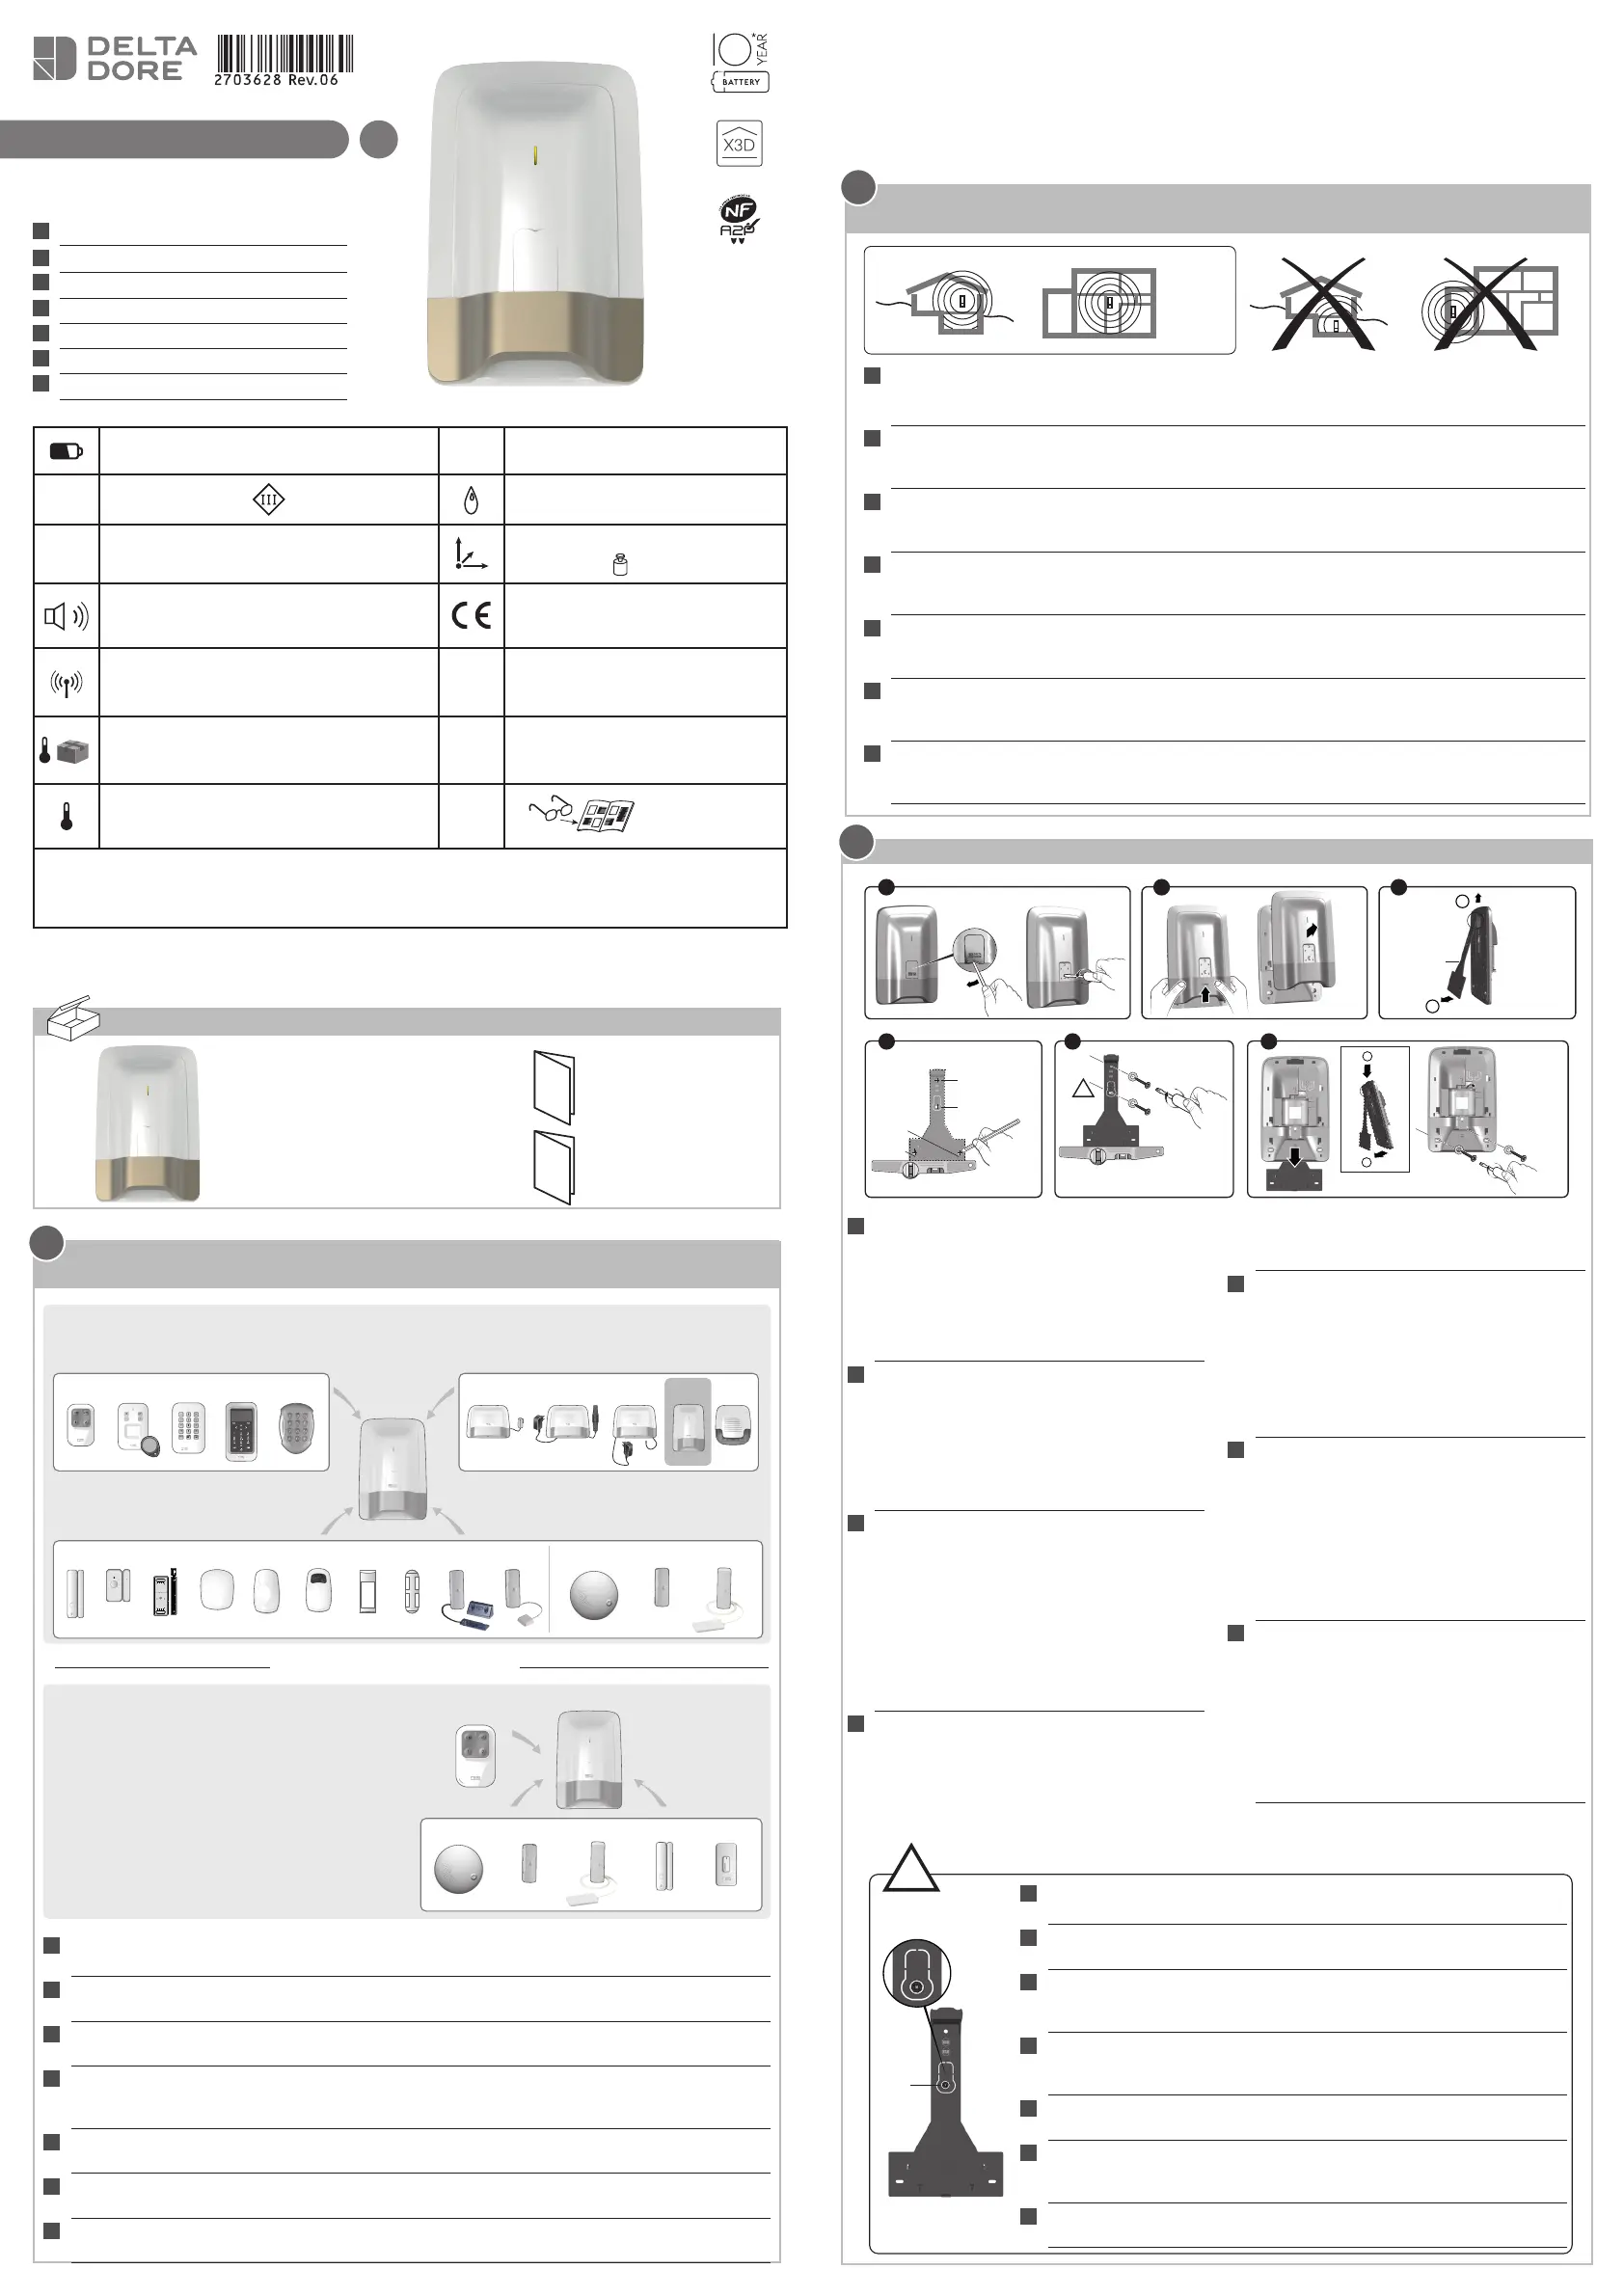
1
A
2
123
Fixation/ Mounting / Befestigung / Fissaggio / Fijación / Mocowanie / Bevestiging
3
FR
Ê Enlevez la protection et dévissez la vis.
Ë Séparez les 2 parties du boîtier.
Ì Ôtez le support de fixation (A).
Í Tracez et percez les trous (D1 D2 D3 D4).
ÎFixez le support de fixation avec les vis et
rondelles V1/V2 et R1/R2 (non fournies).
ÏRemontez la sirène sur le support de fixation
et fixez-là avec les vis V3 et V4 (non fournies).
EN
Ê Remove the guard and remove the screw.
Ë Separate the unit parts.
Ì Remove the mount (A).
Í Mark and drill the holes (D1 D2 D3 D4).
ÎSecure the mounting bracket with V1 / V2 and
R1 / R2 screws and rings (not supplied).
ÏFit the siren back on the mount and attach it
with screws V3 and V4 (not supplied).
DE
Ê Schutz entfernen und Schraube lösen.
Ë Die zwei Gehäuseteile trennen.
Ì Halterung entfernen (A).
Í Bohrstellen markieren und Löcher (D1 D2 D3
D4) bohren.
ÎBefestigen Sie die Halterung mit den
Schrauben V1/V2 und Unterlegscheiben R1/R2
(nicht mitgeliefert).
ÏSirene wieder an der Halterung anbringen
und mit den Schrauben V3 und V4 befestigen
(nicht mitgeliefert).
IT
Ê Togliere la protezione e svitare.
Ë Separare le parti della scatola.
Ì Togliere il supporto per il fissaggio (A).
Í Segnare e fare i fori (D1 D2 D3 D4).
ÎFissare il supporto di fissaggio con le viti e le
rondelle V1/V2 e R1/R2 (non fornite).
ÏRimontare la sirena sul supporto per il
fissaggio e fissarla con le viti V3 e V4 (non
fornite).
ES
Ê Retire la protección y desatornille el tornillo.
Ë Separe las partes de la caja.
Ì Retire el soporte de fijación (A).
Í Trace y realice los agujeros (D1 D2 D3 D4).
ÎFije el soporte de fijación con los tornillos y
arandelas V1/V2 y R1/R2 (no suministrados).
ÏVuelva a colocar la sirena en el soporte de
fijación y fíjela con los tornillos V3 y V4 (no
suministrados).
PL
Ê Zdejmij os³onê i wykrêæ wkrêt.
Ë Oddziel czêści obudowy.
Ì Zdejmij wspornik mocuj¹cy (A).
ÍWyznacz i wywieræ otwory (D1 D2 D3 D4).
ÎZamontuj obudowê za pomoc¹ śrub i
podk³adek V1/V2 oraz R1/R2 (nie dostarczone
w komplecie).
Ï Umieśæ syrenê na wsporniku mocuj¹cym i
zamocuj j¹ wkrêtami V3 i V42 (nie dostarczone
w komplecie).
NL
Ê Verwijder de bescherming en draai de schroef
vast.
Ë Scheid de delen van de behuizing.
Ì Verwijder de bevestigingsbeugel (A).
Í Markeer en boor de gaten (D1 D2 D3 D4).
ÎBevestig de montagebeugel met V1/V2 en
R1/R2 schroeven en ringen (niet meegeleverd).
ÏBevestig de sirene opnieuw op de bevestig-
ingsbeugel met de schroeven V3 en V4n (niet
meegeleverd).
!
V2
FR
V2 = Autoprotection à l’arrachement. Attention à ne pas déteriorer cette
partie du support (nécessaire à l’autoprotection). Vissez avec précaution.
EN
V2 = Tamper alarm. Be careful not the damage this part of the mount (used
for the tamper alarm). Screw carefully.
DE
V2 = Sabotageschutz gegen Abreißen. Bitte achten Sie darauf, dass dieser
Teil der Halterung nicht beschädigt wird (für Sabotageschutz erforderlich).
Schrauben vorsichtig anziehen.
IT
V2 = Autoprotezione contro il vandalismo. Attenzione a non deteriorare
questa parte del supporto (necessaria all’autoprotezione). Avvitare
prestando molta attenzione.
ES
V2 = Autoprotección en arranque. Tenga cuidado de no deteriorar esta parte
del soporte (necesaria para la autoprotección). Atornille con precaución.
PL
V2 = Zabezpieczenie w³asne przed zerwaniem. Uwaga, by nie uszkodziæ tej
czêści wspornika (koniecznej do automatycznej ochrony). Zachowaj
ostro¿nośæ podczas przykrêcania.
NL
V2 = Zelfbescherming opstelling. Wees voorzichtig dat dit onderdeel niet
beschadigt (nodig voor zelfbescherming). Zorgvuldig vastschroeven.
Si TYXAL +
* Jusqu’à 10 ans, valable dans les conditions d’utilisation précisées dans les notices d’installation et les Conditions générales de Vente
* Up to 10 years valid under the conditions of use specifi ed in the installation instructions and the General Conditions of Sale
*Hasta 10 años siempre y cuando se respeten las condiciones de uso especifi cadas en el manual de instalación y en la Condiciones Generales de Venta
*Fino a 10 anni, in base alle condizioni di utilizzo precisate nelle istruzioni di installazione e nelle Condizioni Generali di Vendita
*Bis zu 10 Jahren unter den in der Bedienungsanleitung und den AGB angegebenen Nutzungsbedingungen
*Tot 10 jaar, geldig onder de gebruiksvoorwaarden gespecifi ceerd in de installatie-handleidingen en de algemene verkoopsvoorwaarden
*aż do 10 lat, przy użytkowaniu zgodnym z opisem w instrukcji instalowania oraz Generalnymi warunkami Sprzedaży
10/21
Product specificaties
| Merk: | Delta Dore |
| Categorie: | Alarm ringer |
| Model: | Si TYXAL + |
Heb je hulp nodig?
Als je hulp nodig hebt met Delta Dore Si TYXAL + stel dan hieronder een vraag en andere gebruikers zullen je antwoorden
Handleiding Alarm ringer Delta Dore

9 Juni 2023
5 Juni 2023
27 Mei 2023
12 Mei 2023
Handleiding Alarm ringer
Nieuwste handleidingen voor Alarm ringer
24 Mei 2026
11 November 2025
30 Oktober 2025
14 September 2025
14 Augustus 2025
14 Augustus 2025
5 Februari 2025
3 December 2024
3 December 2024
3 December 2024