Crivit IAN 94513 Handleiding
Crivit
Fietscomputer
IAN 94513
Bekijk gratis de handleiding van Crivit IAN 94513 (4 pagina’s), behorend tot de categorie Fietscomputer. Deze gids werd als nuttig beoordeeld door 79 mensen en kreeg gemiddeld 4.7 sterren uit 40 reviews. Heb je een vraag over Crivit IAN 94513 of wil je andere gebruikers van dit product iets vragen? Stel een vraag
Pagina 1/4

GB/IE GB/IE GB/IE GB/IE GB/IE GB/IE GB/IE GB/IE
GB/IE GB/IE GB/IE GB/IE GB/IE GB/IE GB/IE GB/IE
GB/IE GB/IE GB/IE GB/IE GB/IE GB/IE GB/IE GB/IE
Bike Computer
Proper use
The product is intended for use as a cycle computer.
Not for commercial use.
Functions
– Menu languages: GB, DE, FR, NL, IT, ES
– Clock
– Stopwatch
– Temperature °C / °F
– Memory function for min. and max. temperature
– Current speed (0–99.9 km / h)
– Mean speed (0–99.9 km / h)
– Highest speed (0–99.9 km / h)
– Speed comparison
– Acceleration and deceleration
– Trip timer (max. 9:59:59) (countdown or forwards)
– Odometer (countdown or forwards)
– Total odometer and total cycling time display
– Calories
– Fat-burning
– Scan indicator (functions displayed in
continuous loop)
– Automatic switch to clock mode
– Backlight
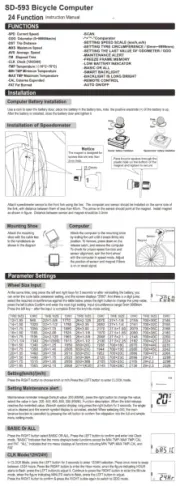
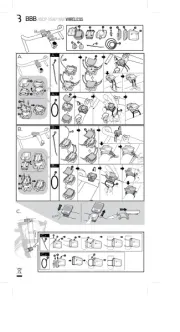
Description of parts
1a Bracket
1b Sensor
2 Magnet
3 Battery 3 V , type CR2032 button cell
4 Cable tie
5 Bike computer’s battery compartment cover
6 Bike computer
7 LC display
8 Function indicator
9 Secondary function value display
10 Primary function value display
11 MODE button
12 Light button
13 SET button
14 SCAN indicator
15 Servicing interval indicator
16
Speed comparison indicato
r
17 Acceleration / deceleration indicator:
Acceleration – anticlockwise
rotation
Decelerat
ion – clockwise rotation
18 Battery state indicator
Technical data
Battery: 3 V (CR2032 button cell)
Included items
1 Bike computer
1 Bike computer bracket
1 Magnet
1 Sensor
6 Cable ties
1 Battery 3 V , type CR2032 button cell
1 Operating instructions
General safety advice
KEEP ALL THE SAFETY ADVICE AND INSTRUC-
TIONS IN A SAFE PLACE FOR FUTURE REFERENCE!
This appliance can be used by children aged
from 8 years and above and persons with
reduced physical, sensory or mental capabilities
or lack of experience and knowledge if they
have been given supervision or instruction
concerning use of the appliance in a safe way
and understand the hazards involved. Children
shall not play with the appliance. Cleaning
and user maintenance shall not be made by
children without supervision.
Please note that the warranty does not cover
damage arising from improper treatment, non-
observance of the operating instructions and
safety advice or unauthorised use.
Safety advice concerning
batteries
RISK OF LOSS OF LIFE!
If batteries are swallowed, it can lead to loss of
life. Seek medical attention if a battery is swal
lowed.
Remove the battery if the product is not to be
used for a long period.
CAUTION! RISK OF EXPLO-
SION! Never recharge single-use
batteries!
CAUTION! DANGER OF EXPLO-
SION! Always replace all batteries
at the same time and only use batte
ries
of the same type.
If the battery is exhausted, remove it from the
device immediately. Otherwise the battery is
more likely to leak.
Make sure you insert the battery the right way
round (polarity).
Keep the battery away from children. Do not
throw the battery into a fire. Never short-circuit
it or take it apart.
If your battery leaks, remove it from the device
immediately to prevent the device from being
damaged.
Do not let the fluid from a leaking battery come
into contact with your skin, eyes or mucous
membranes. In the event of contact with fluid
leaking from a battery, thoroughly flush the
affected area with water and / or seek the
advice of a doctor!
Before use
Remove the protective foil from the LC display 7
before first use.
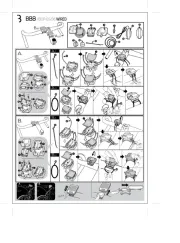
Inserting the battery
To insert the battery 3, proceed as shown in
Fig. A.
Attaching the bike computer
To attach the device, proceed as shown in
Figs. B to I.
Note: Make sure the cable is attached properly. It
must not get caught in the spokes or trail along them.
Preparing for use
Basic settings
Note: The LC display 7 comes on automatically
approx. 2 seconds after the battery 3 is inserted.
You are immediately offered a choice of languages.
Press the MODE-button 11 repeatedly until the
desired language appears.
Confirm your choice by pressing the SET but-
ton 13 . You move on automatically to select
the user profile.
Press the MODE button repeatedly until the
desired
user profile (ADVANCE EASY or )
appears.
Confirm your choice by pressing the SET but-
ton. Now you can choose the wheel size (SET
WS).
A four-digit number appears in the LC display.
Now enter the tyre circumference of your wheel
in mm. Press the MODE button repeatedly until
the desired number appears as the first digit.
Confirm your choice by pressing the SET button.
Repeat this process for each of the three
remaining digits.
Note: You can calculate your tyre
circumference
by multiplying your
tyre diameter by 3.1416.
The following list contains the tyre circumfer
ences
of the most common cycle tyres.
Tyre diameter Tyre circumference
20” 1598 mm
22” 1759 mm
24” 1916 mm
26” (650 A) 2073 mm
26.5” (tubular) 2117 mm
26.6” (700x25C) 2124 mm
26.8” (700x28C) 2136 mm
27” (700x32C) 2155 mm
28” (700B) 2237 mm
ATB24”x1.75 1888 mm
ATB26 x1.4 1995 mm
ATB26 x1.5 2030 mm
ATB26 x1.75 2045 mm
ATB26x2 (650B) 2099 mm
27”x1 2138 mm
27”x1 1 / 4 2155 mm
Now select your desired unit of distance. Press
the MODE button repeatedly until SET KM or
SET MILE appears in the LC display.
Confirm your choice by pressing the SET button.
You move on to entering your age.
A two-digit number appears in the LC display.
Now enter your age. Press the MODE button
repeatedly until the desired number appears
as the first digit.
Confirm your choice by pressing the SET butto
n.
Repeat this process for the remaining digit. You
move on to selecting the unit of weight.
Press the MODE button repeatedly until SET
KG or SET LB appears in the LC display.
Confirm your choice by pressing the SET button.
You move on to entering your weight.
A three-digit number appears in the LC display.
Now enter your weight. Press the MODE button
repeatedly until the desired number appears
as the first digit.
Confirm your choice by pressing the SET button.
Repeat this process for all the remaining digits.
You move on to selecting the time format.
Press the MODE button repeatedly until 12 for
the 12-hour format or 24 for the 24-hour format
appears in the LC display.
Confirm your choice by pressing the SET button.
You move on to setting the time.
A four-digit number appears in the LC display.
Enter the current time. Press the MODE button
repeatedly until the desired number appears
as the first digit.
Confirm your choice by pressing the SET button.
Repeat this process for all the remaining digits.
You move on to selecting the servicing interval.
Press the MODE button repeatedly until the
desired
number of units of distance to your next
in
tended bicycle service appears in the LC
display.
Note: You have the choice of 200, 400, 600
or 800 km or miles.
Confirm your choice by pressing the SET button.
You move on to selecting the unit of temperature.
Press the MODE button repeatedly until °C or
°F appears in the LC display.
Confirm your choice by pressing the SET button.
You have now completed the the basic settings.
Using the bike computer
Note: If the bike computer remains unused for
more than 5 minutes, it automatically switches
into the stand-by mode. Press any button to
reactivate the computer. The function indicator
8 shows the current mode.
Press the MODE button 11 repeatedly to
page through the various modes.
Press the SET button 13 to change into the sec-
ondary function for any function.
Press the SET button and keep it pressed to call
or reset up any saved values.
The bike computer has the following
functions:
Advanced users’ functions:
CLOCK > TOTALODO > TOTAL-TM >
TRIPDIST >
MAXSPEED
> AVGSPEED > TRIPTIME > TEMP >
STPWATCH >
CAL RATE > CALORIE > FAT-BURN >
KM+/- > TIME+/- > SCAN
Beginners’ functions:
TRIPDIST > AVGSPEED > TRIPTIME
Using functions
Note: All the functions and secondary functions
are described in the following list.
CLOCK: - Displays the time
Press the SET button
13
and keep it
pressed for
3 seconds to access the time settings.
TOTAL ODO: - Total odometer
Press the SET button and keep it pressed for
3seconds to access the wheel size settings
and total distance.
TOTAL-TM: Total time cycling
Press the SET button and keep it pressed for
3seconds to make changes to the saved total
time cycling.
TRIPDIST: Trip distance
Press the SET button and keep it pressed for
3seconds to reset the trip distance, the
average speed and the trip time displays to 0.
MAXSPEED: Highest speed
Press the SET button and keep it pressed for
3seconds to reset the maximum speed display
to 0.
AVGSPEED: Average speed
TRIPTIME: Trip time
TEMP: Thermometer
Press the SET button and keep it pressed to
switch between °C and °F.
Press the SET button to display the highest tem-
perature (HI) measured so far.
Press the SET button again to display the low-
est temperature (LO) measured so far.
Press and hold down the SET button while the
highest or lowest temperature is displayed to
switch back to the current temperature to
reset the saved data.
STPWATCH: Stopwatch
Press the SET button to start the stopwatch.
Press the SET button again to stop the stop-
watch.
Press the SET button and keep it pressed to
reset the stopwatch to 0.
CAL RATE: Current calorie consumption
CALORIE: Calorie meter
Press the SET button and keep it pressed to
reset the calorie counter to 0.
FAT-BURN: Fat burning in grams
Press the SET button and keep it pressed to
reset the fat burning value to 0.
KM: Odometer
Press the SET button and keep it pressed to
change the odometer settings.
The LC display 7 shows the symbol for count-
ing forwards or
backwards (+ or - respectively).
Press the MODE button 11 repeatedly until the
desired symbol is shown.
Confirm your choice by pressing the SET button.
You move on to setting the distance on the
odometer.
A 5-digit number appears in the LC display. En
ter
the desired distance. Press the MODE button
repeatedly until the desired number appears
as the first digit.
Confirm your choice by pressing the SET button.
Repeat this process for all the remaining digits.
TIME: Timer
Press the SET button and keep it pressed to
change the timer settings.
The LC display shows the symbol for counting
forwards or backwards (+ or - respectively).
Press the MODE button repeatedly until the
desired symbol is shown.
Confirm your choice by pressing the SET button.
You move on to the time settings of the timer.
A 5-digit number appears in the LC display.
Enter the desired time. Press the MODE button
repeatedly until the desired number appears
as the first digit.
Confirm your choice by pressing the SET button.
Repeat this process for all the remaining digits.
SCAN: Scan
Note: The scan mode automatically switches
between the trip distance, highest speed, average
speed and trip time displays.
Note: Refer to the section on “Basic settings” to
see how you make or change settings.
CUSTOMIZE mode
Apart from the ADVANCE and EASY mode, you
can make your individual adjustments in the
CUSTOMIZE mode (see procedure).
Press and hold the light button 12 to enter the
CUSTOMIZE mode.
By repeatedly pressing the MODE Note:
button 11 , you can toggle between the
ADVANCE and EASY modes.
In the
EASY mode, press and hold the SET
button 13 . Press the MODE button to switch
the settings on or off (e.g. time). Choose „On“,
to add the chosen adjustment to the EASY
modes. Choose „Off“, if you do not want to
add the adjustments.
Press the
SET button, to confirm your entry.
Using the backlight
Press the light button 12 to switch on the back-
light temporarily. The backlight automatically
extinguishes after a short period.
Resetting the bike computer
Press the MODE button 11 and SET button 13
at the same time and keep them pressed until
{{----}} appears in the LC display 7.
Now press the MODE button and keep it
pressed. This resets all the settings.
Note: All stored data will be deleted.
Changing the batteries
Note: The batteries of the bike computer must be
replaced when the battery symbol 18 appears on
the LC display 7.
Press the MODE key 11 and the SET key 13
at the same time and keep them pressed until
the {{-----}} symbol appears in the LC display 7.
To replace the battery, proceed as shown in
figure A. Make sure you fit the battery the right
way round (polarity). This is shown inside the
battery compartment.
Press the SET key and keep it pressed to return
to normal operating mode.
Note: Once the batteries are removed, all stored
data will be erased after approx. 20 seconds.
Troubleshooting
This device has delicate electronic components.
Therefore interference may occur when it is near
devices which transmit radio signals.
- If errors occur in the display, remove any such
devices from the vicinity of the product. In the case
of such malfunctions, remove the battery briefly and
then reinsert again.
Problem Solution
Empty LC-display or no
response after putting
the batteries in again
-
+
RESET
Remove battery. In the
area marked RESET of
the battery compartment,
touch the plus and minus
terminals at the same
time using a screwdriver.
Insert a 3V battery into
the battery compartment
in such a way
that the +
terminal points upwards.
Replace the battery cover
on the battery compart-
ment. The microprocessor
is reset and restarted.
Speed or distance are
not displayed.
Adjust magnet and
sensor correctly. -
Check that the battery is
inserted with the poles
arranged the right way
round.
Display is black The ambient temperature
is too high or the bicycle
computer was exposed
to direct sunlight for too
long. Remove appliance
from direct sunlight and
let it cool off for a while.
The LC-display shows
irregular symbols.
Remove battery and
replace it again.
BIKE COMPUTER
Operation and Safety Notes
CYKELCOMPUTER
Brugs- og sikkerhedsanvisninger
D
E
F
G
2
1b
4
4
1b
1b
2
B
A
6
3
5
1b
43 2
1a
C H
I
J
8
9
10
12
1113
14
15
17
16
18
2
1b
2 1b
7
IAN 94513
BIKE COMPUTER

GB/IE GB/IE GB/IE GB/IE GB/IE GB/IE GB/IE GB/IE

DK DK DK DK
DK DK DK DK DK DK DK DK
DK DK DK DK DK DK DK DK
DK DK DK DK DK
GB/IE
DKDKDK
GB/IEGB/IEGB/IE
Cleaning and care
Do not use any liquids or cleaning agents for
cleaning. Otherwise there is a risk of damaging
the device.
The device should only be cleaned on the out-
side with a soft dry cloth.
Disposal
The packaging is wholly composed of
environmentally friendly materials that
can
be disposed of at a local recycling centre.
Contact your local refuse disposal authority for more
details of how to dispose of your worn-out product.
In the interest of the environment, do not
throw out your product with your house-
hold refuse. Take it to a suitable centre
where it can be disposed of properly.
Your local council will be able to tell you
where the collection centres are located
and their opening times.
Defective or exhausted batteries mu
st be recycled
in accordance with Directive 2006 / 66 / EC
. Return
the batteries and / or the device through the appro-
priate collection facilities.
Pb
Improper disposal of batteries
can damage the environment!
Batteries must not be disposed of with the house-
hold refuse. They may contain toxic heavy metals
and require to be handled as special waste. The
chemical symbols of heavy metals are: Cd = cad-
mium, Hg = mercury, Pb = lead For this reason,
you must dispose of discarded batteries at a com-
munal disposal centre.
Warranty
The device has been manufactured to strict quality
guidelines and meticulously examined before delivery.
In the event of product defects you have legal rights
against the retailer of this product. Your legal rights
are not limited in any way by our warranty detailed
below.
The warranty for this device is 3 years from the date
of purchase. Should this device show any fault in
materials or manufacture within three years from the
date of purchase, we will repair or replace it - at
our choice - free of charge to you.
The warranty period begins on the date of purchase.
Please keep the original sales receipt in a safe location
.
This document is required as your proof of purchase.
This warranty becomes void if the device has been
damaged or improperly used or maintained.
The warranty applies to faults in material or manu-
facture. This warranty does not cover product parts
subject to normal wear, thus possibly considered
consumables (e.g. batteries) or for damage to fragile
parts, e.g. switches, rechargeable batteries or glass
parts.
EMC
Cykelcomputer
Forskriftsmæssig anvendelse
Produktet er beregnet til anvendelse som cykelcom-
puter. Ikke beregnet til erhvervsmæssig brug.
Funktioner
– Menusprog: GB, DE, FR, NL, IT, ES
– Kl.
– Stopur
– Temperaturvisning °C / °F
– Memory-funktion til min. og maks. temperatur
– Hastighedsvisning ved kørsel (0–99,9 km / h)
– Visning af gennemsnitshastighed (0–99,9 km / h)
– Visning af maksimumhastighed (0–99,9 km / h)
– Sammenligning af hastighed
– Visning af acceleration og deceleration
– Køretids-timer (maks. 9:59:59) (countdown eller
tæller fremad)
– Kilometertæller (countdown eller tæller fremad)
– Visning af samlede kilometer og samlet køretid
– Kalorietæller
– Fedtforbrændingsvisning
– Scan-visning (alle funktioner bladres igennem)
– Afbrydelsesautomatik for urfunktionen
– Baggrundsbelysning
Beskrivelse af dele
1a Holder
1b Sensor
2 Magnet
3 Batteri 3 V , type CR2032 knapcelle
4 Kabelbinder
5 Låg til batterirum, cykelcomputer
6 Cykelcomputer
7 LC-display
8 Funktionsvisning
9 Visning af den anden funktionsværdi
10 Visning af hovedfunktionsværdien
11 MODE-tast
12 Lys-tast
13 SET-tast
14 SCAN-visning
15 Visning vedligeholdelsesinterval
16 Visning af hastighedssammenligning
17 Visning af acceleration og deceleration:
Acceleration – drejning mod uret
Deceleration – drejning med uret
18 Batterivisning
Tekniske Data
Batteri: 3 V (CR2032 knapcelle)
Leverede dele
1 cykelcomputer
1 holder til cykelcomputer
1 magnet
1 sensor
6 kabelbindere
1 batteri 3 V , type CR2032 knapcelle
1 brugervejledning
Generelle
sikkerhedsinformationer
ALLE SIKKERHEDSANVISNINGER OG ANDRE
DOKUMENTER BØR OPBEVARES TIL FREMTIDIG
BRUG!
Dette apparat kan bruges af børn fra 8 år og
opad, samt af personer med forringede fysiske,
følelsesmæssige eller mentale evner eller med
mangel på erfaring og viden, når de er under
opsyn eller iht. sikker brug af apparatet blev
vejledt og forstod de derudaf resulterende
farer. Børn må ikke lege med apparatet.
Rengøring og vedligeholdelse må ikke gen-
nemføres af børn uden opsyn.
Bemærk venligst, at garantien ikke dækker ska-
der, som opstår på grund af forkert betjening,
manglende overholdelse af drifts- og sikker-
hedsanvisningerne eller uvedkommendes
anvendelse af produktet.
Sikkerhedsinformationer
om batterier
LIVSFARE! Batterier kan
sluges, hvilket kan være livsfarligt. Søg omgå-
ende lægehjælp, hvis et batteri sluges.
Fjern batterierne fra produktet, hvis det ikke
bruges i længere tid.
ADVARSEL! EKSPLOSIONS-
FARE! Batterier må ikke genoplades!
ADVARSEL! EKSPLOSIONS-
FARE! Udskift altid alle batterier
samtidigt, og brug udelukkende
batterier af samme type.
Et brugt batteri skal fjernes fra apparatet
omgående. Der er øget risiko for, at det lækker.
Polariteten skal passe, når batterierne lægges i!
Hold batterier på afstand af børn, kast ikke
batterierne ind i ild, kortslut ikke batterierne og
skil dem ikke ad.
Hvis batteriet skulle være løbet ud i apparatet,
skal det tages ud med det samme, så skader
på apparatet undgås!
Undgå kontakt med hud, øjne og slimhinder.
Ved berøring med batterisyre skal der skylles
med rigeligt med vand og / eller opsøges
lægehjælp!
Før ibrugtagning
Fjern beskyttelsesfilmen fra LC-displayet 7 inden
første brug.
Indsættelse af batteri
Gå frem som vist på illustr. A ved indsættelse
af batteriet 3.
Montering af
cykelcomputeren
Gå frem som vist på illustr. B til I for at montere
cykelcomputeren.
Henvisning: Vær opmærksom på korrekt anbrin-
gelse af kablet. Det må ikke indfiltre sig i egerne
eller slæbe langs disse.
Ibrugtagning
Grundindstillinger
Bemærk: Efter indsættelse af batteriet 3 tændes
LC-displayet 7 automatisk efter ca. 2 sekunder.
Du kommer direkte til sprogvalget.
Tryk på MODE-tasten 11 , indtil det ønskede
sprog kommer til syne.
Bekræft valget ved at trykke på SET-tasten 13 .
Du kommer automatisk til valg af brugerprofilen.
Tryk på MODE-tasten, indtil den ønskede bru-
gerprofil (
ADVANCE
(viderekommen) eller
EASY
(begynder)) kommer til syne.
Bekræft valget ved at trykke på SET-tasten. Du
kommer nu til valg af dækstørrelsen (SET WS).
På LC-displayet vises et fircifret tal, Indtast nu
dækomkredsen i mm. Tryk på MODE-tasten,
indtil det ønskede tal vises som første ciffer.
Bekræft valget ved at trykke på SET-tasten.
Gentag dette forløb for hvert af de tre føl-
gende cifre.
Bemærk: Du kan beregne dækomkredsen
ved at gange dækkets diameter med 3,1416.
I den følgende liste kan du finde dækomkred-
sem for de mest almindelige cykeldæk.
Dækdiameter Dækomkreds
20” 1598 mm
22” 1759 mm
24” 1916 mm
26” (650 A) 2073 mm
26,5” (Tubular) 2117 mm
26,6” (700x25C) 2124 mm
26,8” (700x28C) 2136 mm
27” (700x32C) 2155 mm
28” (700B) 2237 mm
ATB24”x1,75 1888 mm
ATB26 x1,4 1995 mm
ATB26 x1,5 2030 mm
ATB26 x1,75 2045 mm
ATB26x2 (650B ) 2099 mm
27”x1 2138 mm
27”x1 1 / 4 2155 mm
Vælg derefter den længdemålenhed, du
ønsker. Tryk på MODE-tasten, indtil SET KM
eller SET MILE vises på displayet.
Bekræft valget ved at trykke på SET-tasten. Du
kommer nu til aldersindtastningen.
På LC-displayet vises et tocifret tal, indtast nu
din alder. Tryk på MODE-tasten, indtil det
ønskede tal vises som første ciffer.
Bekræft valget ved at trykke på SET-tasten.
Gentag dette forløb for de følgende cifre. Du
kommer nu til valg af vægtmåleenheden.
Tryk på MODE-tasten, indtil SET KG eller
SET LB vises på displayet.
Bekræft valget ved at trykke på SET-tasten. Du
kommer nu til vægtindtastningen.
På LC-displayet vises et trecifret tal. Indtast nu
din vægt. Tryk på MODE-tasten, indtil det
ønskede tal vises som første ciffer.
Bekræft valget ved at trykke på SET-tasten.
Gentag dette forløb for alle de følgende cifre.
Du kommer nu til valg af tidssystemet.
Tryk på MODE-tasten, indtil 12 vises for
12-timersformatet eller 24 for 24-timers-forma-
tet på LC-displayet.
Bekræft valget ved at trykke på SET-tasten. Du
kommer nu til klokkeslæt-indstillingen.
På LC-displayet vises et fircifret tal. Indtast nu
det aktuelle klokkeslæt. Tryk på MODE-tasten,
indtil det ønskede tal vises som første ciffer.
Bekræft valget ved at trykke på SET-tasten.
Gentag dette forløb for alle de følgende cifre.
Du kommer nu til valg af vedligeholdelsesinter-
vallet.
Tryk nu på MODE-tasten, indtil det ønskede
kilometertal vises, efter hvilket du vil udføre
vedligeholdelse på din cykel.
Bemærk: Du kan vælge mellem 200, 400,
600 og 800 kilometer eller mil.
Bekræft valget ved at trykke på SET-tasten. Du
kommer nu til valg af temperaturenheden.
Tryk nu på MODE-tasten, indtil °C eller °F
vises på LC-displayet.
Bekræft valget ved at trykke på SET-tasten.
Dermed er grundindstillingen afsluttet.
Anvendelse af
cykelcomputeren
Hvis du ikke bruger cykelcompute-
Bemærk:
ren i mere end 5 minutter, skifter den automa-
tisk over til standby-modus. Tryk på en vilkårlig
tast for at aktivere den igen. Funktionsvisnin-
gen 8 viser, hvilken modus du befinder dig i
for øjeblikket.
Tryk flere gange på MODE-tasten 11 for at
bladre gennem de forskellige moduser.
Tryk på SET-tasten 13 for at skifte til den
anden funktion ved hver funktion.
Tryk på SET-tasten for at se de gemte værdier
eller nulstille dem.
Cykelcomputeren har følgende funktioner:
Funktioner for viderekomne:
CLOCK > TOTALODO > TOTAL-TM >
TRIPDIST >
MAXSPEED
> AVGSPEED > TRIPTIME > TEMP >
STPWATCH >
CAL RATE > CALORIE > FAT-BURN >
KM+/- > TIME+/- > SCAN
Funktioner for begyndere:
TRIPDIST > AVGSPEED > TRIPTIME
Anvendelse af funktionerne
Bemærk: Følgende liste beskriver alle funktioner
og underfunktioner.
CLOCK
: - Visning af klokkeslæt
Tryk på SET-tasten 13 , og hold den nede i
3sekunder for at komme til klokkeslætindstillin-
gen.
TOTALODO
: - Samlet tilbagelagt kilometerantal
Tryk på SET-tasten i 3sekunder for at komme
til indstillingen for dækstørrelse og samlet kilo-
meterantal.
TOTAL-TM
: samlet køretid
Tryk på SET-tasten i 3sekunder for at kunne
foretage ændringer ved den gemte samlede
køretid.
TRIPDIST
: Kørte dagskilometer
Tryk på SET-tasten i 3sekunder for at nulstille
visningen for kilometerantallet, gennemsnitsha-
stigheden og køretiden.
MAXSPEED
: Maksimumhastighed
Tryk på SET-tasten i 3sekunder for at nulstille
visningen for den maksimale hastighed.
AVGSPEED
: gennemsnitshastighed
TRIPTIME
: Køretid
TEMP
: Termometer
Tryk på SET-tasten for at skifte fra °C til °F
eller omvendt.
Tryk på SET-tasten for at vise den hidtil målte
højeste temperatur (HI).
Tryk igen på SET-tasten for at vise den hidtil
målte laveste temperatur (LO).
Tryk på SET-tasten, og hold den nede, mens
den højeste hhv. laveste temperatur vises, for at
nulstille de gemte værdier.
STPWATCH
: stopur
Tryk på SET-tasten for at starte stopuret.
Tryk igen på SET-tasten for at stoppe stopuret.
Tryk på SET-tasten, og hold den nede, for at
nulstille stopuret.
CAL RATE
: aktuelt kalorieforbrug
CALORIE
: kalorietæller
Tryk på SET-tasten, og hold den nede, for at
nulstille kalorietælleren.
FAT-BURN
: fedtforbrænding i gram
Tryk på SET-tasten, og hold den nede, for at
nulstille visningen for fedtforbrændingen.
KM
: kilometertæller
Tryk på SET-tasten, og hold den nede, for at
foretage indstillinger på kilometertælleren.
På LC-displayet 7 vises symbolet for fremad-
hhv. tilbagetæller (+ hhv. -). Tryk nu på MODE-
tasten 11 , indtil det ønskede symbol vises.
Bekræft valget ved at trykke på SET-tasten. Du
når nu til kilometertællerens strækningsindstil-
ling.
På LC-displayet vises et 5-cifret tal. Indtast nu
den ønskede strækning. Tryk på MODE-tasten,
indtil det ønskede tal vises som første ciffer.
Bekræft valget ved at trykke på SET-tasten.
Gentag dette forløb for alle de følgende cifre.
TIME
: Timer
Tryk på SET-tasten, og hold den nede, for at
foretage indstillinger på timeren.
På LC-displayet vises symbolet for fremad- hhv.
tilbagetæller (+ eller -). Tryk nu på MODE-
tasten, indtil det ønskede symbol vises.
Bekræft valget ved at trykke på SET-tasten. Du
kommer nu til tidsindstilling af timeren.
På LC-displayet vises et 5-cifret tal. Indtast nu
den ønskede tid. Tryk på MODE-tasten, indtil
det ønskede tal vises som første ciffer.
Bekræft valget ved at trykke på SET-tasten.
Gentag dette forløb for alle de følgende cifre.
SCAN
: Scan
Bemærk: Scan-modusen skifter automatisk mellem
visningerne for funktionerne Antal dagskilometer,
Højeste hastighed, Gennemsnitshastighed og Køretid.
Bemærk: I kapitlet „Grundindstillinger“ er det
beskrevet, hvordan du kan foretage hhv. ændre
indstillingerne.
CUSTOMIZE-Modus
Bortset fra ADVANCE- og EASY-modus kan De
foretage deres egne indstillinger i CUSTOMIZE-
modus (se plan).
Hold lysetasten 12 trykket for at komme frem
til CUSTOMIZE-modussen.
De kan trykke MODE-tasten
Henvisning: 11
gentagne gange for at skifte frem og tilbage
mellem ADVANCE og EASY-modussen.
Hold SET-tasten 13 trykket i EASY-modussen.
Tryk MODE-tasten for at tænde hendholdsvis
slukke for indstillingerne (f.eks. klokkeslettet).
Vælg „On“ for at tilføje den ønskede indstilling
i EASY-modussen. Vælg „Off“ når De ikke
ønsker at tilføje indstillingen.
Tryk SET-tasten for at bekræfte deres indtastning.
Anvendelse af baggrundslys
Tryk på lys-tasten 12 for midlertidigt at tænde
for baggrundslyset. Baggrundslyset slukkes
automatisk efter et stykke tid.
Nulstilling af
cykelcomputeren
Tryk samtidigt på MODE-tasten 11 og SET-
tasten 13 , og hold dem nede, indtil visningen
{{----}} kommer til syne på LC-displayet 7.
Tryk nu på MODE-tasten, og hold den nede.
Alle indstillinger nulstilles.
Bemærk: Alle gemte data slettes.
Skift af batteri
Bemærk: Batteriet til cykelcomputeren skal skiftes
ud, når batterivisningen 18 kommer til syne på
LC-displayet 7.
Tryk samtidigt på MODE-tasten 11 og SET-
tasten 13 , og hold dem nede, indtil visningen
{{----}} kommer til syne på LC-displayet 7.
Udskift batteriet som vist på illustr. A. Vær
opmærksom på den rigtige polaritet ved
indsættelsen. Denne vises i batterirummet.
Tryk på SET-tasten, og hold den nede, for at
vende tilbage til den normale driftsmodus.
Bemærk: Ca. 20sekunder efter at batteriet er
fjernet, slettes alle gemte data.
Fejlrettelse
Bemærk: Apparatet indeholder elektroniske
komponenter. Derfor kan der opstå forstyrrelser,
hvis det befinder sig i nærheden af apparater, som
udsender radiosignaler.
-Dukker der fejlmeldinger op på displayet, så skal
sådanne apparater fjernes fra produktets omgivelser.
Ved sådanne funktionsforstyrrelser fjernes batteriet
kortvarigt og indsættes påny.
Problem Løsning
Tomt LC-display eller
ikke noget svar efter
fornyet ilæggelse af
batterierne.
-
+
RESET
Fjern batteriet. Berør
med en skruetrækker
samtidig plus- og minuspo-
len i det som RESET
afmærkede område i
batterirummet. Isæt
3 V-batteriet sådan i
batterirummet, at +polen
viser opad. Sæt batteri-
dækslet på batterirummet.
Mikroprocessoren bliver
sat tilbage og startet
påny.
Ikke nogen hastigheds-
eller kilometervisning
Indstil magnet og føler
korrekt.
- Kontroller om batteriet
er sat polrigtigt i.
Display sort Omgivelsestemperaturen
er for høj eller cykel-
computeren blev udsat
direkte sollys i for lang
tid. Fjern apparatet fra
det direkte sollys og lad
det afkøle et stykke tid.
LC-displayet viser
irregulære symboler.
Fjern batteriet og sæt
det efterfølgende i igen.
Rengøring og pleje
Brug ikke væsker eller rengøringsmidler til
rengøringen. Ellers kan det resultere i skader
på apparatet.
Apparaturet må kun rengøres på ydersiden
med en blød, tør klud.
Bortskaffelse
Emballagen består af miljøvenlige mate-
rialer, der kan bortskaffes ved de lokale
genbrugsstationer.
Din kommune oplyser om muligheder for bortskaf-
felse af det udtjente produkt.
For miljøets skyld må produktet aldrig
bortskaffes sammen med husholdnings-
affaldet, når det er udtjent, men skal
afleveres til miljøvenlig bortskaffelse. Du
kan få informationer hos din kommune
om genbrugsstationer og deres åbnings-
tider.
Defekte eller brugte batterier skal genbruges i
henhold til direktivet 2006 / 66 / EC. Batterierne
og / eller apparatet returneres ved de angivne
indsamlingssteder.
Pb
Miljøskader på grund af forkert
bortskaffelse af batterier!
Batterier må ikke bortskaffes med husholdningsaf-
fald. De kan indeholde giftige tungmetaller og er
underlagt behandling af miljøskadeligt affald. De
kemiske symboler for tungmetaller er følgende:
Cd = kadmium, Hg = kviksølv, Pb = bly. Aflevér
derfor brugte batterier på din kommunale opsam-
lingsplads.
Garanti
Apparatet er produceret omhyggeligt efter strenge
kvalitetskrav og inden levering afprøvet
samvittighedsfuldt. Hvis der forekommer mangler
ved dette produkt, har du juridiske rettigheder over
for sælgeren af dette produkt. Disse juridiske
rettigheder indskrænkes ikke af vores garanti, der
beskrives i det følgende.
Du får 3 års garanti fra købsdatoen på dette
apparat. Garantifristen begynder med købsdatoen.
Opbevar den originale kassebon på et sikkert sted.
Denne kassebon behøves som dokumentation for
købet.
Hvis der inden for tre år fra købsdatoen for dette
produkt opstår en materiale- eller fabrikationsfejl,
bliver produktet repareret eller erstattet - efter vores
valg - af os uden omkostninger for dig. Garantien
bortfalder, hvis apparatet bliver beskadiget eller
ikke anvendes eller vedligeholdes korrekt.
Garantien gælder for materiale- eller fabrikations-
fejl. Denne garanti dækker ikke produktdele, som
er udsat for normalt slid og derfor kan betragtes
som normale sliddele (f.eks. batterier) eller ved
skader på skrøbelige dele; f.eks. kontakter, akku-
mulatorer som er fremstillet i glas.
EMC
IAN 94513
OWIM GmbH & Co. KG
Stiftsbergstraße 1
D-74167 Neckarsulm
Model No. Z31335A/Z31335B/Z31335C
Version: 11 / 2013
Last Information Update · Tilstand
af information: 09 / 2013
Ident.-No.: Z31335A/B/
C092013-GB/IE/DK
Product specificaties
| Merk: | Crivit |
| Categorie: | Fietscomputer |
| Model: | IAN 94513 |
Heb je hulp nodig?
Als je hulp nodig hebt met Crivit IAN 94513 stel dan hieronder een vraag en andere gebruikers zullen je antwoorden
Handleiding Fietscomputer Crivit

31 Januari 2025

31 Januari 2025

31 Januari 2025

31 Januari 2025

31 Januari 2025

15 Juni 2023

9 Mei 2023

25 April 2023

12 April 2023

10 April 2023
Handleiding Fietscomputer
- Mio
- Ananda
- Stels
- IGPSport
- Echowell
- Magene
- Vogue
- Velleman
- Assize
- Decathlon
- QT Cycle Tech
- Bafang
- Wahoo Fitness
- VDO Dayton
- Oregon Scientific
Nieuwste handleidingen voor Fietscomputer
25 Augustus 2025
29 Juli 2025
28 Juli 2025
6 Juli 2025
5 Juli 2025
5 Juli 2025

5 Juli 2025

2 Juli 2025

1 Juli 2025
1 Juli 2025