Casio G-Shock GWR-B1000X-1AER Handleiding
Bekijk gratis de handleiding van Casio G-Shock GWR-B1000X-1AER (22 pagina’s), behorend tot de categorie Horloge. Deze gids werd als nuttig beoordeeld door 37 mensen en kreeg gemiddeld 4.2 sterren uit 19 reviews. Heb je een vraag over Casio G-Shock GWR-B1000X-1AER of wil je andere gebruikers van dit product iets vragen? Stel een vraag
Pagina 1/22

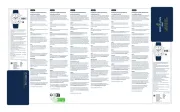
Contents
Before Getting Started...
Watch Face Items
Navigating Between Modes
Mode Overview
Using the Crown
Hand and Day Indicator Movement
Solar Charging
Viewing the Face in the Dark
Useful Features
Time Adjustment
Time Adjustment Using a Time Signal
Overview
Appropriate Signal Reception Location
Time Calibration Signal Reception
Ranges
Auto Time Calibration Signal Receive
Manual Time Signal Receive
Signal Reception Precautions
Using Watch Operations to Adjust the Time
Setting
Selecting Your Home City’s Time Zone
Adjusting the Time and Day Setting
Configuring the Summer Time Setting
(Home City)
Checking the Last Time Adjustment Result
Using the Watch in a Medical Facility or
Aircraft
MA1902-EA © 2019 CASIO COMPUTER CO., LTD.
Using Mobile Link with a Mobile
Phone
Getting Ready
A
Install the required app on your phone.
B
Configure Bluetooth settings.
C
Pair the watch with a phone.
Auto Time Adjustment
Configuring World Time Settings
Adjusting Hand and Day Indicator Alignment
Phone Finder
Configuring Watch Settings
Changing the Home City Summer Time Setting
Checking the Watch Charge Level
Connection
Connecting with a Phone
Canceling a Connection with a Phone
Using the Watch in a Medical Facility or
Aircraft
Unpairing
If you purchase another phone
Dual Time
Selecting a Time Zone
Configuring the Summer Time Setting (Dual
Time)
Swapping the Home City Time and World Time
(Dual Time)
Stopwatch
Measuring Elapsed Time
Using Flyback Timing
Starting a Elapsed Time Measurement
Operation from the Calendar Mode (Direct
Start)
Timer
Setting the Timer Start Time
Using the Timer
Alarm
Configuring Alarm Settings
Turning Off the Alarm
Adjusting Hand and Day Indicator
Alignment
Adjusting Hand and Day Indicator Alignment
Moving to Another Time Zone
Other Information
City (Time Zone) List
Supported Phones
Specifications
Mobile Link Precautions
Copyrights and Registered Copyrights
Troubleshooting
Operation Guide 5588
1

Before Getting
Started...
This section provides an overview of the watch
and introduces convenient ways it can be
used.
Note
●The illustrations included in this
operation guide have been created to
facilitate explanation. An illustration
may differ somewhat from the item it
represents.
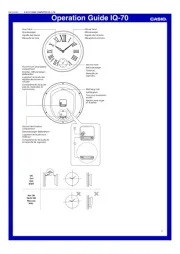
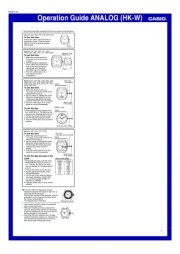
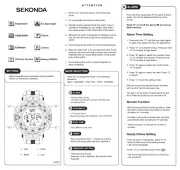
Watch Face Items
⑦
⑨
⑧
②
①③
④
⑤
⑥
⑩
⑪
ABattery level
The battery level is indicated by the mode
hand after you enter the Calendar Mode.
BDay of week
In the Calendar Mode, the mode hand points
to the day of the week in the Home City.
C[ST]
In the Stopwatch Mode, the mode hand points
to [ST].
D[TR]
In the Timer Mode, the mode hand points to
[TR].
E[AL]
In the Alarm Mode, the mode hand points to
[AL].
FSummer time setting
The mode hand points to the current summer
time setting.
G[C]
The second hand points to this mark while
there is a connection between the watch and
a phone.
HAlarm settings
In the Alarm Mode, the second hand indicates
if the alarm is enabled or disabled.
[ON]: Alarm enabled
[OFF]: Alarm disabled
ILast signal receive result/auto time
adjustment setting status
The second hand points to [Y(YES)] or
[N(NO)] to indicate the result of the last auto
time adjustment operation based on time
signal reception or connection with a phone.
[Y(YES)]: Auto time adjustment successful
[N(NO)]: Auto time adjustment failed
The second hand points to [Y(YES)] or
[N(NO)] to indicate if auto time adjustment is
enabled or disabled.
[Y(YES)]: Auto time adjustment enabled
[N(NO)]: Auto time adjustment disabled
J[RC]
The second hand points to this mark while
calibration signal reception is in progress.
K[A] / [P]
When configuring time settings in your current
location (Home City), the second hand
indicates whether it is an a.m. time or a p.m.
time.
[A]: AM
[P]: PM
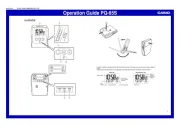
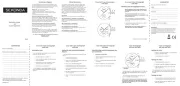
Navigating Between Modes
Press (C) to cycle between modes.
●In any mode, hold down (C) for at least one
second to enter the Calendar Mode.
CC
CC
30
Timer Mode
Stopwatch ModeAlarm Mode
Calendar Mode
Charge level
Day of week
Mode hand
●Connecting with a Phone
Hold down (B) for at least 2.5 seconds until the
second hand points to [C] twice.
●To disconnect, press any button.
B
30 30
Any button
After connectionBefore connection
Operation Guide 5588
2

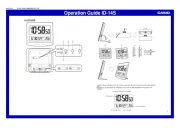
Mode Overview
●Calendar Mode
The main hour, minute, and second hands
indicate the current time.
The small hour and minute hands show
another time (Dual Time).
30
③ ④②
①
Last Time
Adjustment
Result
ADay of the week at current location
BDual Time hour
CDual Time minute
DDual Time hour (24-hour hand)
The hand points to the A-side for a.m. times,
and to the P-side for p.m. times.
Time Adjustment Using a Time Calibration
Signal
Hold down (B) for at least 0.5 seconds until the
second hand points to [RC].
●A manual time calibration signal receive
operation cannot be performed while the
watch is paired with a phone.
Swapping the Current Location Time and
Dual Time
Hold down (A) for about three seconds.
Checking the Charge Level
Immediately after you press (C) to return to the
Calendar Mode, you can check the battery
level by noting the mode hand position.
lChecking the Charge Level
Starting a Stopwatch Elapsed Time
Operation
Press (A) twice in succession.
Connecting with a Paired Phone to Adjust
the Watch’s Time
Hold down (B) for at least 0.5 seconds until the
second hand points to [C].
Searching for a Paired Phone
Hold down (B) for about 5 seconds.
●Stopwatch Mode
The second hand, and the small hour and
minute hands indicate the elapsed stopwatch
time.
●The main hour and minute hands indicate
the current time.
30
③
④
②
①
Start/Stop
Reset/Flyback
AStopwatch seconds
BStopwatch hours
CStopwatch minutes
DStopwatch hours (24-hour time)
The hand points to the A-side for hours 0
through 12, and to the P-side for hours 12
through 24.
●Timer Mode
The second hand, and the small hour and
minute hands indicate the current countdown
time.
●The main hour and minute hands indicate
the current time.
30
③
④
②
①
Start/Stop
Reset
ATimer seconds
BTimer hours
CTimer minutes
DTimer hours (24-hour time)
The hand points to the A-side for hours 0
through 12, and to the P-side for hours 12
through 24.
●Alarm Mode
The small hour and minute hands indicate the
alarm time.
The second hand indicates the alarm enabled/
disabled setting.
●The main hour and minute hands indicate
the current time.
30
③
④
②
①
Enabling/
Disabling the
Alarm
AAlarm enabled/disabled
BAlarm hour
CAlarm minute
DAlarm hour (24-hour time)
The hand points to the A-side for a.m. times,
and to the P-side for p.m. times.
Using the Crown
The watch’s crown is a screw-in (screw lock)
type. To use the crown, you first need to rotate
it towards you (leftwards) to loosen it.
Loosen
Crown
Important!
●To prevent loss of water resistance
and/or damage due to impact, be sure
to push the crown in to its normal
position after you are finished using it.
●When pushing the crown back in, take
care not to apply too much force.
Operation Guide 5588
3
Product specificaties
| Merk: | Casio |
| Categorie: | Horloge |
| Model: | G-Shock GWR-B1000X-1AER |
Heb je hulp nodig?
Als je hulp nodig hebt met Casio G-Shock GWR-B1000X-1AER stel dan hieronder een vraag en andere gebruikers zullen je antwoorden
Handleiding Horloge Casio
18 Juni 2025
17 Juni 2025
17 Juni 2025

16 Juni 2025

16 Juni 2025
16 Juni 2025

16 Juni 2025
16 Juni 2025
16 Juni 2025
16 Juni 2025
Handleiding Horloge
- Skmei
- Fila
- Gant
- Crane
- Holzkern
- Pulsar
- Iron Annie
- Irox
- Nike
- Lacoste
- Zenith
- Uri Minkoff
- Velleman
- Ebel
- Invicta
Nieuwste handleidingen voor Horloge
2 September 2025
1 September 2025

1 September 2025

1 September 2025

31 Augustus 2025
19 Augustus 2025
19 Augustus 2025

18 Augustus 2025
18 Augustus 2025

18 Augustus 2025