Caroma Luna Cleanflush Coupled Handleiding
Caroma Niet gecategoriseerd Luna Cleanflush Coupled
Bekijk gratis de handleiding van Caroma Luna Cleanflush Coupled (1 pagina’s), behorend tot de categorie Niet gecategoriseerd. Deze gids werd als nuttig beoordeeld door 130 mensen en kreeg gemiddeld 4.3 sterren uit 5 reviews. Heb je een vraag over Caroma Luna Cleanflush Coupled of wil je andere gebruikers van dit product iets vragen? Stel een vraag
Pagina 1/1
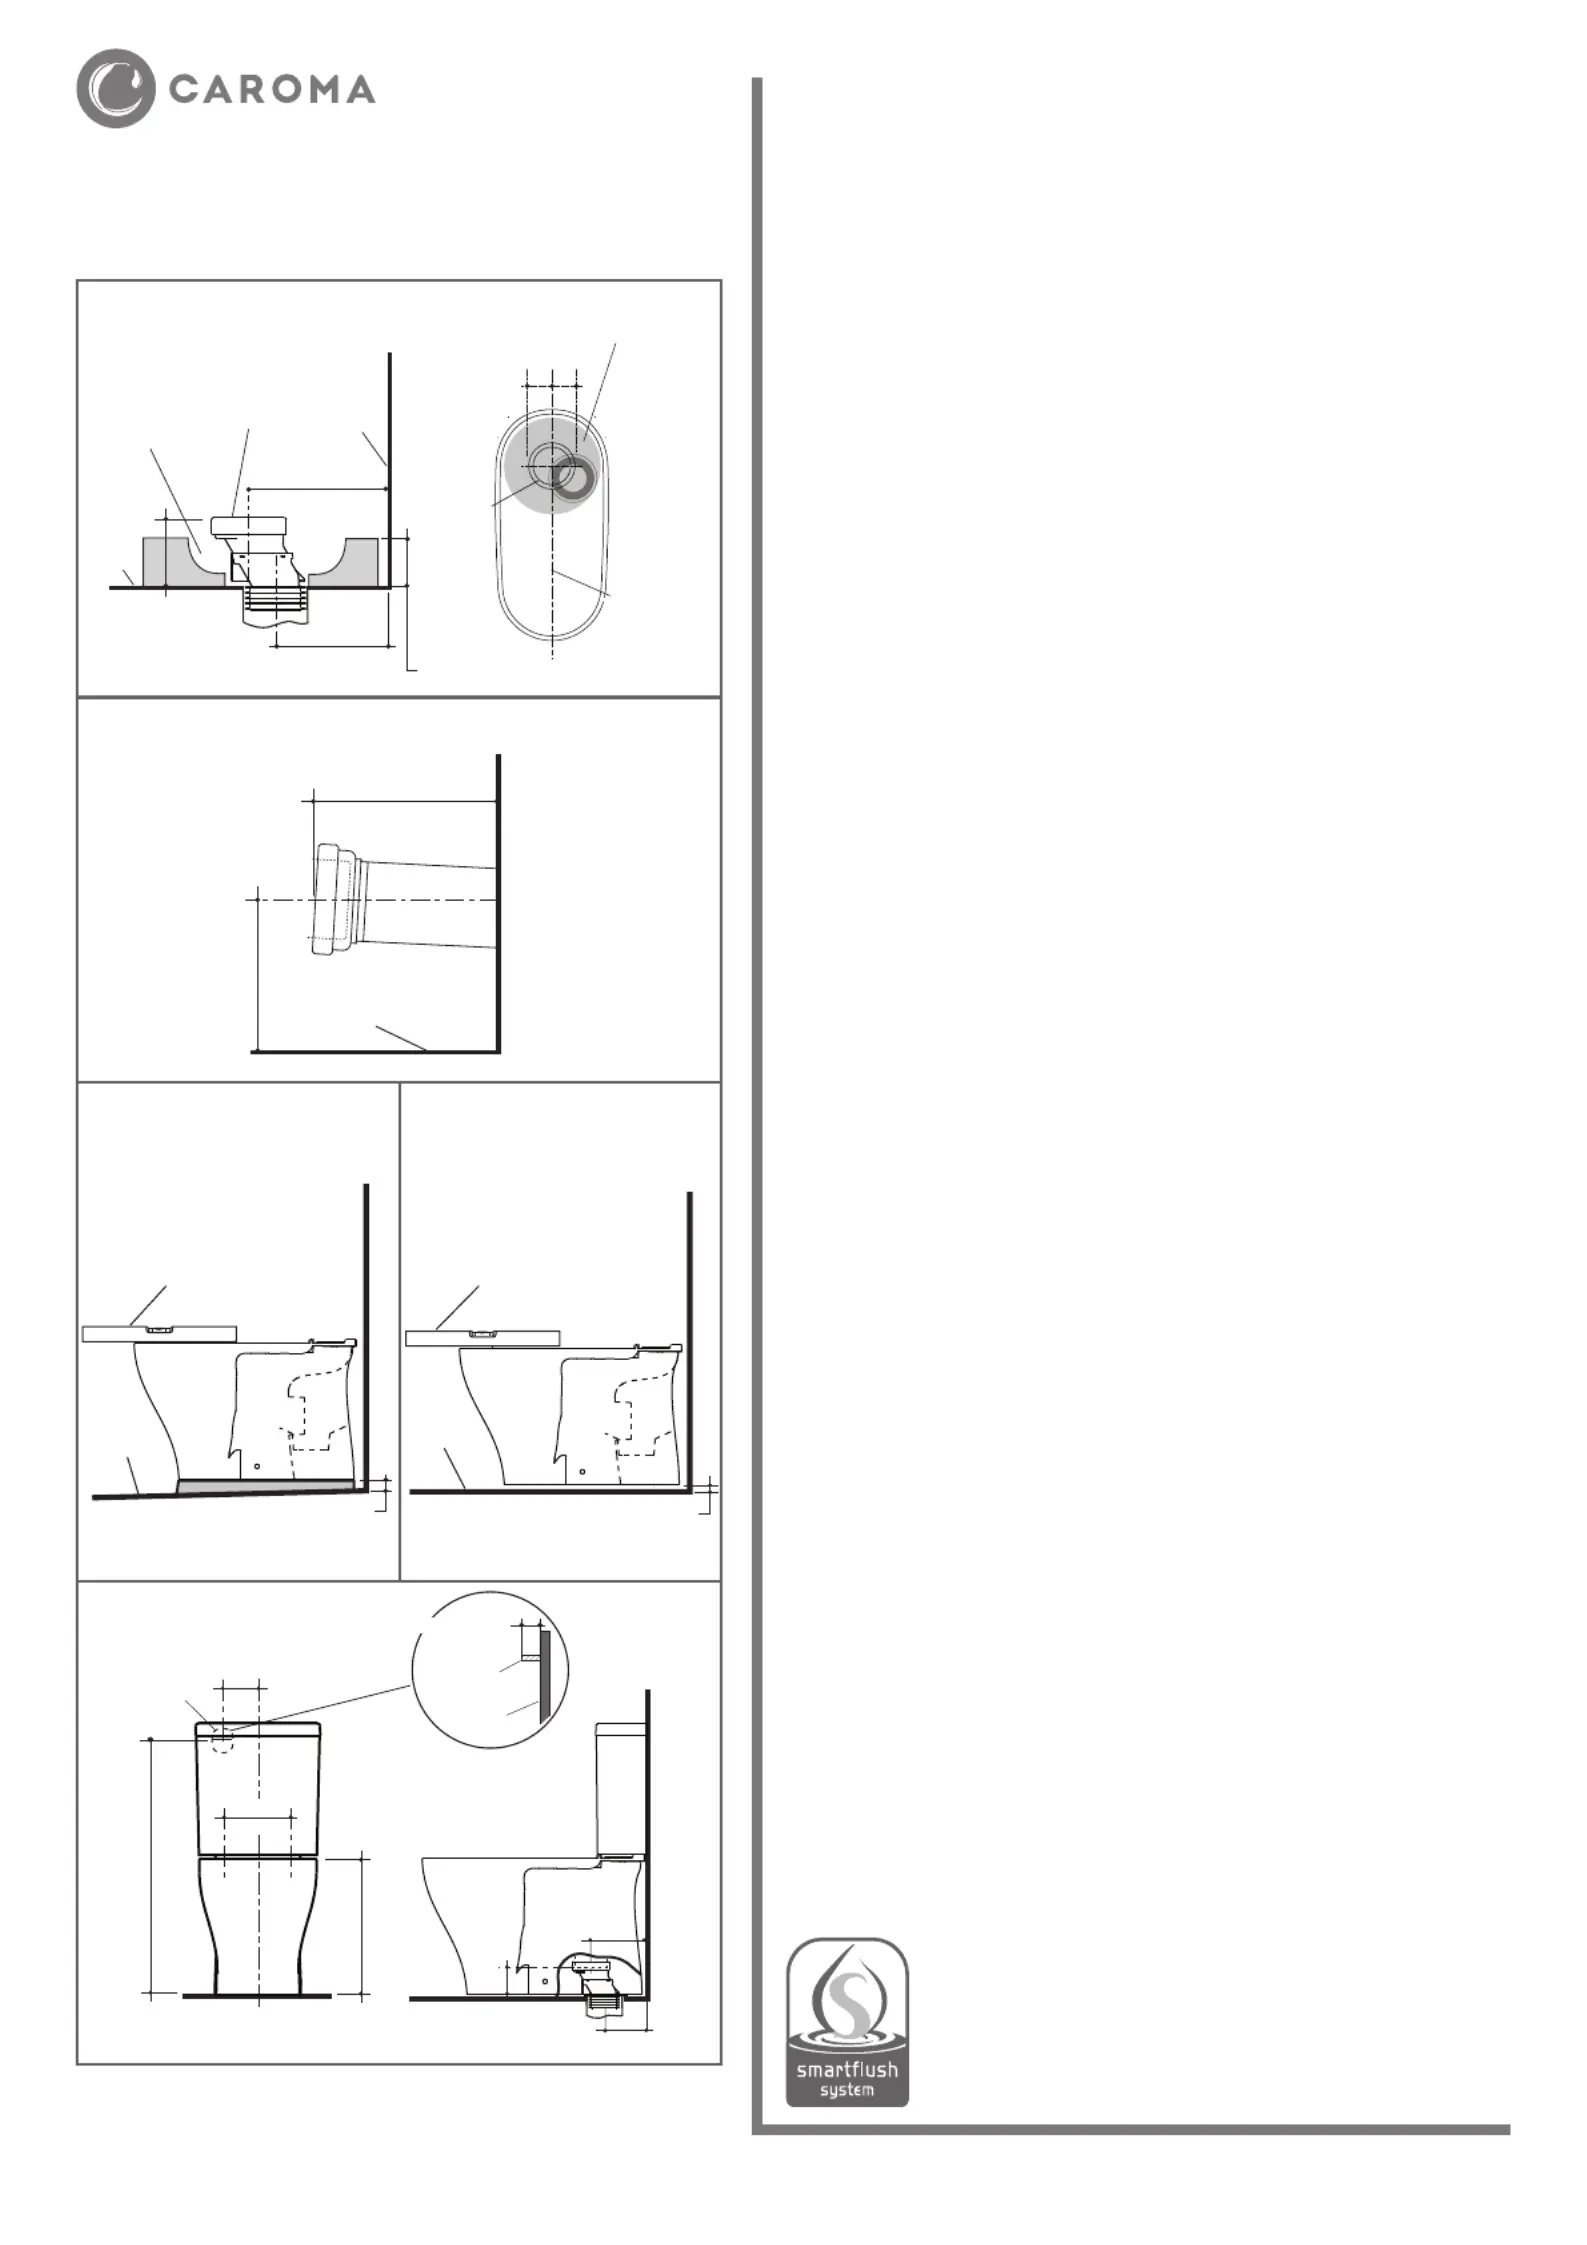
Note:The ‘S’ trap pan is supplied with the Caroma performance
approved variable offset pan connector. Code No: 416002. Set-outs can
be achieved with the pan remaining on the centre line of floor outlet.
ROUGHING IN:
The Luna ‘S’ trap pan installation is detailed in and ‘P’ trap pan inFig. 1 Fig. 2.
The recommended set-out for ‘S’ trap installations is 140mm from the finished
wall. The 50mm offset connector (supplied) is available to achieve a set out of
140mm, where the soil pipe is between 90mm min. and 190mm max. from the
finished wall. The connector also allows for sideways positional movement, as
detailed in .Fig. 1
For Back entry connection it is important that the cold water connection (1/2"
BSP connector nipple) be accurately position in the wall as detailed in .Fig. 5
PAN FIXING PROCEDURE
Pan bedding:
1- Remove an area of tiles which are within the internal area covered by the
foot of the pan to expose the sub floor and provide a bondage key for the
bedding mixture.
2- Ensure that the bedding area is clean and free of building material.
3- Prepare bedding sand cement mixture 3:1 to depth of 60mm as detailed in
Fig.1.
Do not fill the foot of the pan with bedding mix or include lime or fast Note:
drying cement into the mix, these may cause cracking in the foot of the
pan.
4- Position pan and connect with pan connector and level pan into bedding
mixture, so that the back of the foot of the pan is approximately 10mm
above the finished floor. It is recommended that wedges are used to
support the foot of the pan during the positioning, as detailed in Fig. 3.
5- Adjust pan position if necessary. Allow bedding mixture to set for at least 24
hours prior to use.
Screw fixing:
1- Position pan onto pan connector and locate the cistern onto the pan,
checking that the cistern aligns with the finished wall. Adjust pan position if
necessary and mark location of pan fixing holes on the floor. Remove the
cistern and pan.
2- Drill two holes in the marked positions on the floor. The hole diameter is
dependent on the type of fixing system and floor finish.
IMPORTANT-DO NOT USE THE PAN SCREW HOLES AS A GUIDE
FOR DRILLING AS THIS MAY CRACK THE PAN.
3- Ensure that the area around the floor is clean and free from building
material.
4- Run a bead of acetic cured silicone sealant at a height of 8mm
approximately fully around the foot of the pan which contacts the floor.
Use Wedges around the foot base (if required) so that the maximum height
of silicone sealant is not greater that 5mm on completion on bedding,
as detailed in Fig. 4.
5- Reposition pan to pan connector and fix to the floor with suitable corrosion
resistant screws. The silicone sealant will bed the pan to the floor. Remove
any excess sealant.
6- Allow bedding mixture to set for at least 24 hours prior to use.
All measurements are subject to accepted
manufacturing tolerances.
To ensure accuracy please check actual product dimensions before drilling for installation.
The manufacturer reserves the right to change specifications at any time without giving prior notification.
This product should be installed by a qualified plumber. Local authority, Water Board, and Building
Regulations may apply to the installation of this product, and you should consult the appropriate bodies
on these requirements.
Issue No. 2
Date of issue 02.10.19
Luna Close Coupled
Cleanflush Pan
IMPORTANT
TO ACHIEVE A SATISFACTORY 4.5/3L FLUSH
PERFORMANCE AND A 4 STAR WATER EFFICIENCY
RATING THE PAN MUST BE MATCHED WITH A
COMPATIBLE CAROMA SMARTFLUSH 4.5/3L
CISTERN.
Offset
connector
Installation for 'P' trap
Fig. 1
Fig. 2
Fig. 3
Fig. 5
Relieve bed
around
pan connector
Pan
foot
level
Finished
Wall
Bedding height
60mm
130
140
Pan foot
level
Finished
Wall
190
185
Bedded position 10mm
Level pan when
bedding
Finished
floor level
Finished Wall
1
/2
"
B.S.P.
Nipple
Finished wall
Bedding Installation
Screw Fixing Installation
Level pan when
bedding
Important:
Do not use the pan screw hole
as a guide for drilling as this
may crack the pan.
Bedding height position max. 5mm
silicone around foot
Finished Wall
Finished
floor level
22 mm
projection from
finished wall
90 - 190
Set-out range
Fig. 4
410 ‘S’ trap pan
395 ‘P’ trap pan
100
240 Inlet
or overflow
745 ‘S’ trap pan
730 ‘P’ trap pan
Centre water inlet optional
back entry connection
Setout position for
1
/
2
" B.S.P. Nipple
back inlet
140
90
Waste
outlet
50mm
Pan seal
Offset connector (supplied)
can be positioned
anywhere in shaded area
in a 50mm arc
Centreline of
Pan and Floor
outlet
Installation for 'S' trap
PLUMBERS' INSTALLATION
INSTRUCTIONS
PLEASE READ CAREFULLY BEFORE INSTALLATION
90 - 190
Set-out range
Product specificaties
| Merk: | Caroma |
| Categorie: | Niet gecategoriseerd |
| Model: | Luna Cleanflush Coupled |
Heb je hulp nodig?
Als je hulp nodig hebt met Caroma Luna Cleanflush Coupled stel dan hieronder een vraag en andere gebruikers zullen je antwoorden
Handleiding Niet gecategoriseerd Caroma

7 Februari 2024
24 Januari 2024
Handleiding Niet gecategoriseerd
Nieuwste handleidingen voor Niet gecategoriseerd
23 Juli 2026
23 Juli 2026
23 Juli 2026
23 Juli 2026
23 Juli 2026
22 Juli 2026
22 Juli 2026
22 Juli 2026
22 Juli 2026
22 Juli 2026