Canarm G18-13 Handleiding
Canarm Niet gecategoriseerd G18-13
Bekijk gratis de handleiding van Canarm G18-13 (2 pagina’s), behorend tot de categorie Niet gecategoriseerd. Deze gids werd als nuttig beoordeeld door 7 mensen en kreeg gemiddeld 4.0 sterren uit 8 reviews. Heb je een vraag over Canarm G18-13 of wil je andere gebruikers van dit product iets vragen? Stel een vraag
Pagina 1/2
H
V
A
C
P
R
O
D
U
C
S
H
V
A
C
P
R
O
D
U
C
S
H
V
A
C
P
R
O
D
U
C
S
G SERIES
DOUBLE INLET BELT DRIVE BLOWERS
OPERATION INSTRUCTIONS
PLEASE READ AND SAVE THESE INSTRUCTIONS
GENERAL SAFETY
Rotating parts, (pulleys, shafts and belts) on fans should not be exposed. Where these components are not protected by ductwork, cabinets
or covers, appropriate guards should be employed to restrict exposure to rotating parts. Access doors should not be opened with the fan
operating to avoid foreign objects being drawn into the system. On initial start-up, a careful inspection should be carried out to ensure no
foreign material is present which could become airborne in the system.
Read installation and operation instructions carefully before attempting to install, operate or service Canarm/Delhi 200 Series or
Canarm/Delhi IDB Series Blowers. Failure to comply with instructions could result in personal injury and/or property damage. Retain
instructions for future reference.
The purpose of this manual is to aid in the proper installation and operation of the G series double inlet belt drive blowers. These instructions
are intended to supplement good general practices and are not intended to cover detailed installation procedures. It is the responsibility
of the purchaser to ensure that no foreign material is present which could become airborne in the system.
MOTOR, PULLEYS & BELTS
1.Mount the blower pulley on the blower shaft and tighten the set screw securely on the key of the shaft.
2.Mount the motor pulley on the motor shaft. Leave some clearance between the pulley and the motor end bell. Tighten the set screws
on the key of the motor shaft.
3.Install the motor on the motor platform using the hardware provided.
4.With the platform in its minimum position, install the V-belt within the pulley grooves. Position the motor on the motor platform to
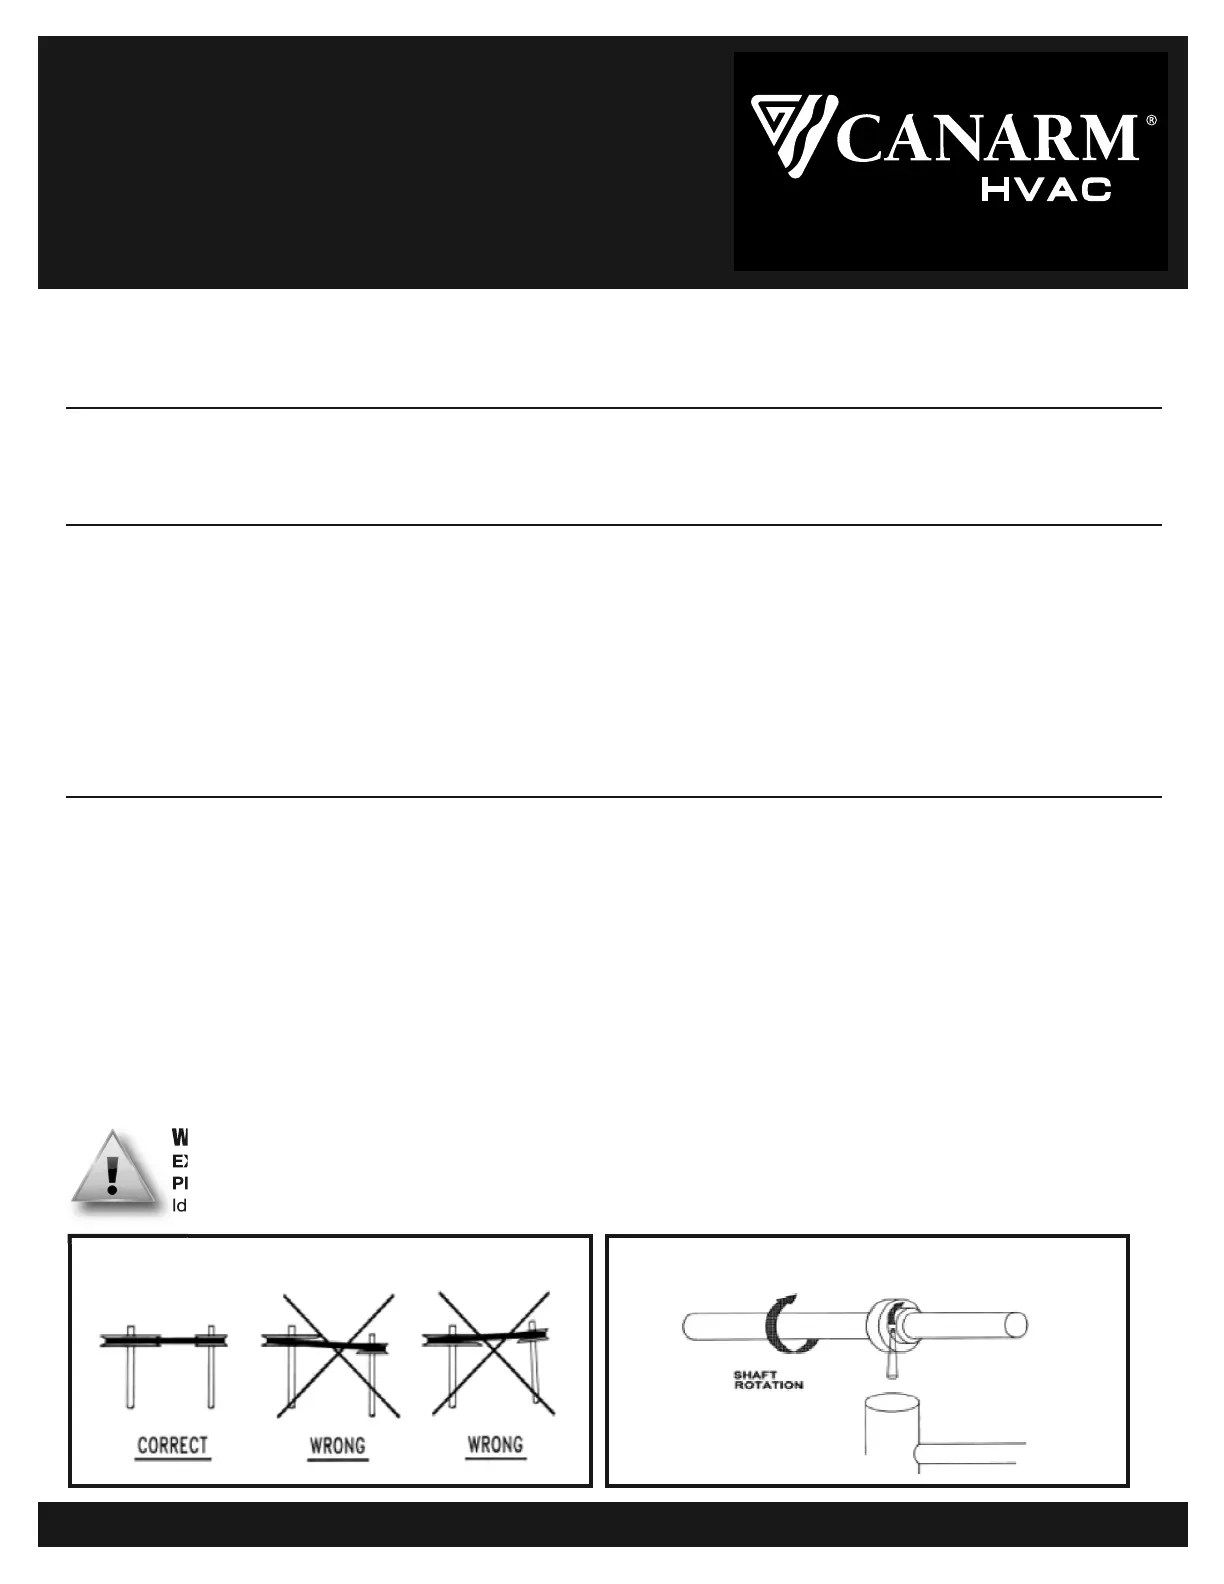
ensure proper pulley alignment (see Fig. 1) and secure to the motor platform. (A straight edge across the face of the driven pulley
should be parallel to the belt once proper alignment has been achieved).
Note: Adjustments in the variable speed pulley require pulley re-alignment.
5.Pivot the motor platform to tension the V-belt and lock in place using the 2 bolts on both sides of the blower. (Ideal belt tension is the
lowest tension at which the belt will not slip during start up. A rule of thumb suggests that 3/4" of deflection mid-span under medium
finger pressure (2-3 lbs.) for every foot of span is appropriate.)
BEFORE YOU BEGIN
Inspect unit for damage, report any shipping damage to carrier. Check all fasteners, re-tighten as required. Rotate the blower wheel by
hand to ensure free rotation. If rubbing occurs, loosen the set screw(s), re-position the wheel to the shaft center, re-tighten set screws.
WARNING
EXCESSIVE BELT TENSION IS THE MOST FREQUENT CAUSE OF BEARING WEAR AND RESULTING NOISE.
PROPER BELT TENSION IS CRITICAL FOR QUIET EFFICIENT OPERATION.
Ideal belt tension is the lowest value under which belt slip will not occur at peak load conditions.
BELT ALIGNMENT
FIGURE 1
FIGURE 2
G_SERIES-M-06_04_13Page 1 of 2
BEARING REPLACEMENT
Product specificaties
| Merk: | Canarm |
| Categorie: | Niet gecategoriseerd |
| Model: | G18-13 |
Heb je hulp nodig?
Als je hulp nodig hebt met Canarm G18-13 stel dan hieronder een vraag en andere gebruikers zullen je antwoorden
Handleiding Niet gecategoriseerd Canarm

28 April 2026
26 April 2026
25 April 2026
25 April 2026
24 April 2026
23 April 2026
23 April 2026
23 April 2026
23 April 2026
22 April 2026
Handleiding Niet gecategoriseerd
Nieuwste handleidingen voor Niet gecategoriseerd
15 Juni 2026
15 Juni 2026
15 Juni 2026
15 Juni 2026
15 Juni 2026
15 Juni 2026
15 Juni 2026
15 Juni 2026
15 Juni 2026
15 Juni 2026