BDI Kronos 6729 Handleiding
Bekijk gratis de handleiding van BDI Kronos 6729 (10 pagina’s), behorend tot de categorie Bureau. Deze gids werd als nuttig beoordeeld door 39 mensen en kreeg gemiddeld 4.3 sterren uit 20 reviews. Heb je een vraag over BDI Kronos 6729 of wil je andere gebruikers van dit product iets vragen? Stel een vraag
Pagina 1/10

Designed by Matthew Weatherly.
These distinctive product configurations are protected by US and international patents, trade dress, and/or
copyright laws. Kronos & BDI are trademarks of Becker Designed, Inc. All rights reserved. ©2017, BDI
Made in China. 09.25.2017 v3
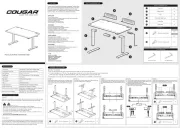
T2 4mm Hex Wrench
T3 Phillip screwdriver
C7 Modesty Panel x 1
A2 Drawer x 1
C4 Keypad x 1
C5 Power Cord x 1
C3 Control Module x 1
A1 Main Panel with
Hutch x 1
C1 Leg x 2
C2 Foot x 2
bdiusa.com
customerservice@bdiusa.com
KRONOS® 6752
LIFT DESK
H5 1/4-20 x 15mm Screw x 4
H2 #6 Wood Screw x 6
H3 M6 x 15mm Screw x 12
Product Registration
Registering your new BDI product allows us to send you important
product updates, service information and helpful hints related to your
BDI products. Register today, and you will be entered to win free a BINK
table from BDI: www.bdiusa.com/register
Placement and Maintenance
Kronos® Lift Desk is designed for indoor use on level floors. Clean steel,
laminate, and veneered surfaces with a moist cloth.
Your Kronos Office furniture is engineered for easy assembly. Carefully ®
follow this procedure to prevent any damage. Do not use power tools
for assembly of this product.
Step 1
Unpack and identify the parts listed below. The assembly workspace
should be a non-marring surface such as carpet. For missing hardware
pieces, please contact BDI Customer Service at
customerservice@bdiusa.com. For all other concerns, please contact
your BDI retailer. H7 Leveler x 4
H10 1/4-20 x 60mm Screw x 4
C8 Brackets x 2
H6 Wire clip x 6
H1 10mm Wood Screw x 2
H11 18mm Wood Screw x 2
T1 5mm Hex Wrench
H4 M6 x 16mm Screw x 8
C6 Cord Conduit x 1
OWNER’S MANUAL

bdiusa.com
customerservice@bdiusa.com
KRONOS 6752
LIFT DESK
2
Step 2 - Install Control Module and Keypad
Lay main panel with hutch upside down using packing material to support the front of the desk. Attach A1
Keypad C4 on the desired side (left or right) with 2 wood screws using Phillips screwdriver. Orient the conH1 -
trol module so that the keypad plug is facing the keypad side and secure between the 2 steel rails with 2 C3
wood screws as shown. Route the keypad cord into the groove in the panel and through the hole in the H11
metal frame.
Step 3 - Connect keypad cord into the Control Module port labeled “ ” and bundle the slack with the hook HS
and loop tie.
Step 4 - Secure the keypad cord into the groove using 6 cord clips and 6 wood screws using Phillips H6 H2
screwdriver.
User’s left
hand side
User’s right
hand side
C3
C4
H11 x 2
H1 x 2
H2 x 6
H6 x 6
Support desk with
packing materials
to protect the top
edge of the hutch
C3
H11
C4
H1

bdiusa.com
customerservice@bdiusa.com
KRONOS 6752
LIFT DESK
3
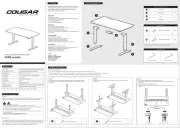
Step 6 - T2Attach each foot C2 with 4 screws H4 and hex wrench . The long end of the foot faces the front of
the desk. Thread the 4 levelers into the bottom of the foot corners. H7
Step 5 - Attach 2 legs C1 with 6 screws H3 per leg using hex wrench . Start all 6 screws before tightening T1
them down. Tighten the 2 outside screws first. Connect the leg cords to either end of the control module and
bundle up any slack using the hook and loop ties.
C1 x 2
C2 x 2
H7 x 4
H4 x 4
T1
1- Tighten the 2
outside screws first
2- Tighten the front/
back screws next
H4 x 8
H3 x 12
Long end of foot must
face front of desk
Product specificaties
| Merk: | BDI |
| Categorie: | Bureau |
| Model: | Kronos 6729 |
Heb je hulp nodig?
Als je hulp nodig hebt met BDI Kronos 6729 stel dan hieronder een vraag en andere gebruikers zullen je antwoorden
Handleiding Bureau BDI

6 Januari 2024

6 Januari 2024

6 Januari 2024

6 Januari 2024

5 Januari 2024

5 Januari 2024

5 Januari 2024

5 Januari 2024

5 Januari 2024

4 Januari 2024
Handleiding Bureau
- Newstar
- Thermaltake
- Ahrend
- Jysk
- SPC
- Leen Bakker
- Four Hands
- IKEA
- Glorious
- Hooker
- Insignia
- Alpha Gamer
- Zomo
- Butler
- Digitus
Nieuwste handleidingen voor Bureau

8 September 2025
8 September 2025
1 September 2025

1 September 2025

1 September 2025
1 September 2025
1 September 2025

1 September 2025
14 Augustus 2025
5 Augustus 2025