Bauknecht B7I HT58 TC Handleiding
Bauknecht Vaatwasser B7I HT58 TC
Bekijk gratis de handleiding van Bauknecht B7I HT58 TC (32 pagina’s), behorend tot de categorie Vaatwasser. Deze gids werd als nuttig beoordeeld door 66 mensen en kreeg gemiddeld 4.5 sterren uit 4 reviews. Heb je een vraag over Bauknecht B7I HT58 TC of wil je andere gebruikers van dit product iets vragen? Stel een vraag
Pagina 1/32
EN
Daily Reference Guide
1
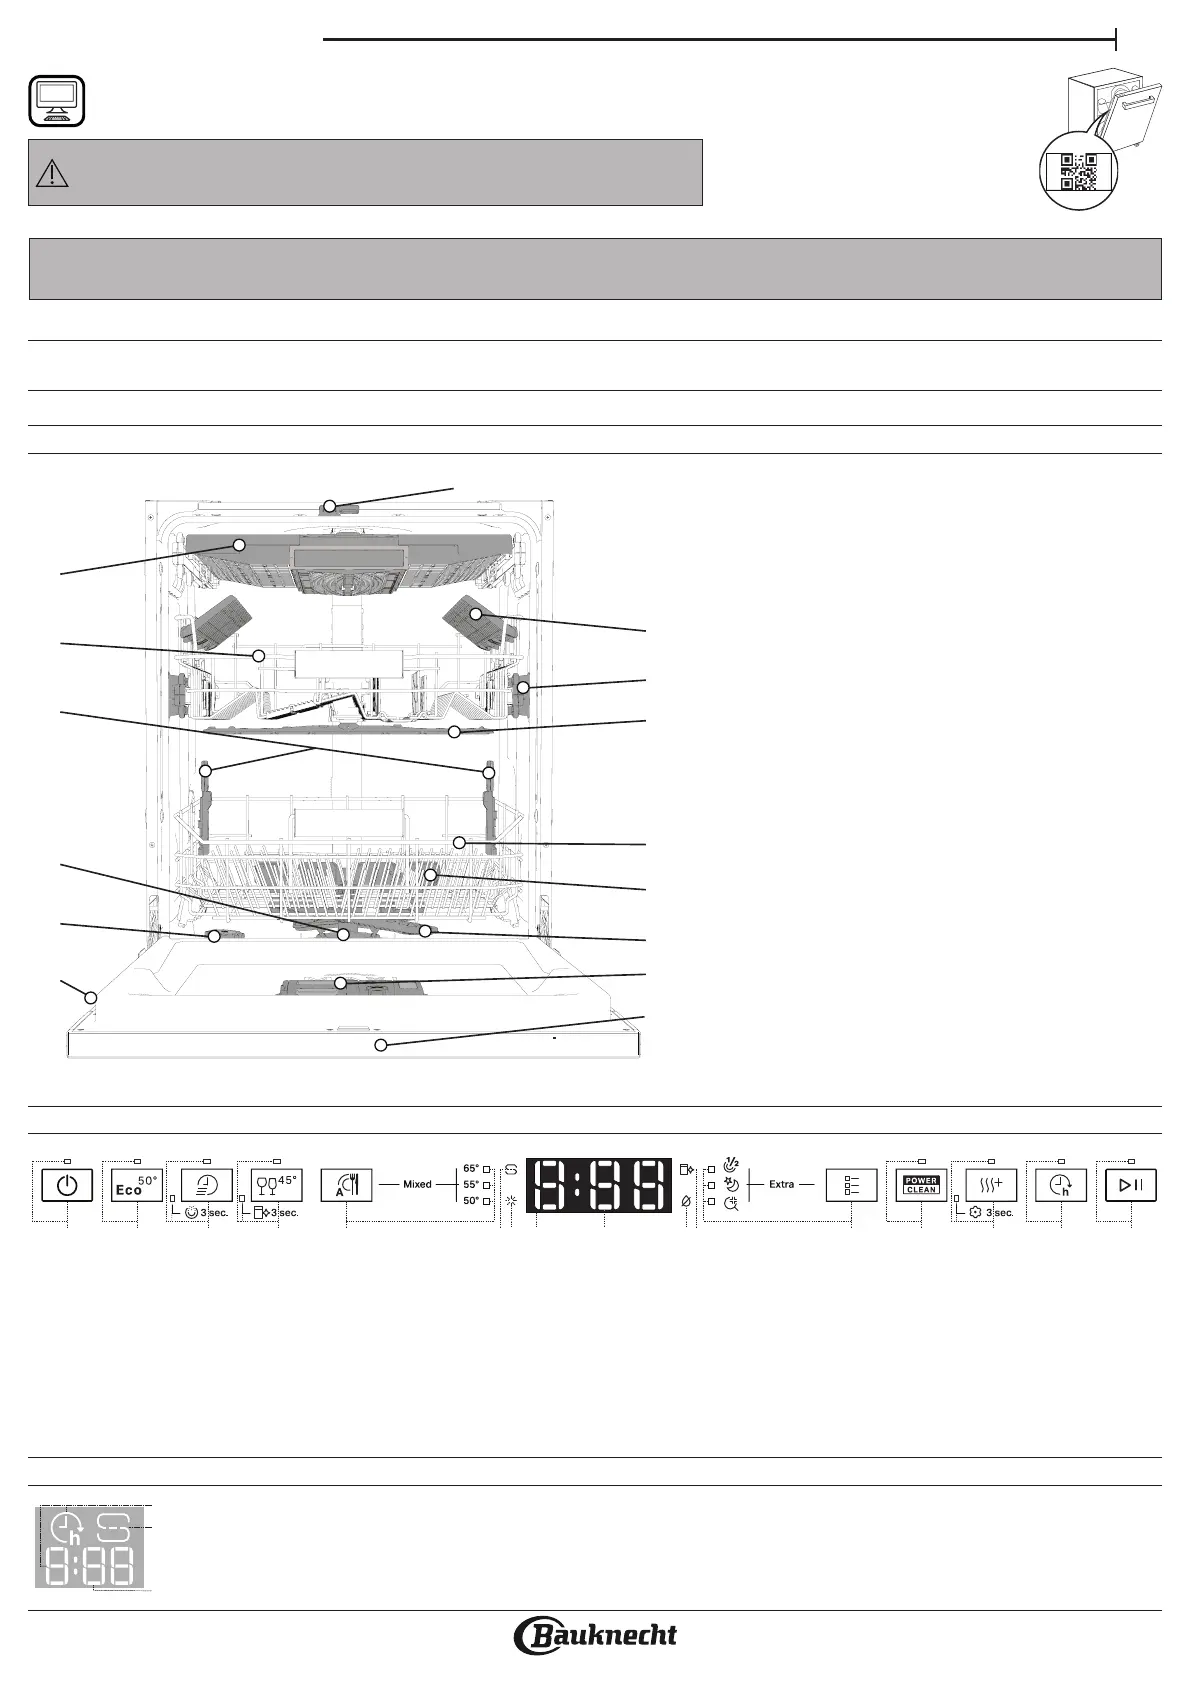
APPLIANCE
PRODUCT DESCRIPTION
CONTROL PANEL
1. NaturalDry
2. Cutlery rack
3. Foldable aps
4. Upper rack
5. Upper rack height adjuster
6. Upper sprayer arm
7. PowerClean Pro support
8. Lower rack
9. PowerClean Pro
10. Lower sprayer arm
11. Filter Assembly
12. Salt reservoir
13. Detergent and Rinse Aid dispensers
14. Rating plate
15. Control panel
3
4
5
6
7
8
10
11
2
9
12
13
14
15
1
The control panel of this dishwasher activates pushing by ON/OFF button.
For energy saving the control panel deactivates automatically after 10 minutes if no cycle has started.
1. ON-OFF/Reset button with indicator light
2. Eco programbutton with indicator light
3. Rapid program button with indicator light/ Prewash program- 3 sec. press
4. Glass program button with indicator light/ Self-Clean program
- 3 sec. press
5. Auto programsbuttons with indicator lights - Auto Intensive65°/
Auto Mixed55°/ Auto Fast50°
6. Salt reservoir empty indicator light
7. Rinse Aid reservoir empty indicator light
8. Display
9. Program number and remaining time indicator
10. Closed water tap indicator light
11. DESCALE indicator light
12. Extra options buttons with indicator lights - Half Load/ Silent/ Sani Rinse
13. PowerClean Pro option button with indicator light
14. Extra Dry option button with indicator light / Settings - 3 sec. press
15. Delay optionbutton with indicator light
16. START/Pause button with indicator light
12345671011128913141516
panel - W11602471
1
3
2
1. Delay Time on the oor - indicator of thetime left to the start of the cycle, when the Delay option is set
2. Salt reservoir empty - indicator light on the oor
3. Remaining Time on the oor - indicator of the time left to the end of the cycle
DISPLAY ON THE FLOOR
THANK YOU FOR BUYING ABAUKNECHT PRODUCT.
In order to receive amore complete assistance, please
register your appliance on: www.bauknecht.eu/register
PLEASE SCAN THE
QR CODE ON YOUR
APPLIANCE IN
ORDER TO HAVE
MORE DETAILED
INFORMATION
Before using the appliance carefully read Safety and Installation Instructions.
After installation, please remember to remove all transport protection parts from
the dishwasher.
Product specificaties
| Merk: | Bauknecht |
| Categorie: | Vaatwasser |
| Model: | B7I HT58 TC |
| Apparaatplaatsing: | Volledig ingebouwd |
| Ingebouwd display: | Ja |
| Gewicht: | - g |
| Breedte: | 598 mm |
| Diepte: | 555 mm |
| Hoogte: | 820 mm |
| Aantal couverts: | 15 couverts |
| Deurkleur: | Zwart |
| Snoerlengte: | 1.3 m |
| Uitgestelde start timer: | Ja |
| Resterende tijd indicatie: | Ja |
| Duur cyclus: | 240 min |
| Geluidsniveau: | 38 dB |
| Energie-efficiëntieklasse: | B |
| Waterconsumptie per cyclus: | 9.5 l |
| Zelfreinigend: | Ja |
| Geluidsemissieklasse: | A |
| Aantal wasprogramma's: | 8 |
| Energieverbruik per 100 cycli: | 65 kWu |
| Verstelbare voeten: | Ja |
| Productafmeting: | Volledige grootte (60 cm) |
| Bestek compartiment type: | Mand & lade |
| Vloerindicatielampje: | Ja |
| Zout indicator: | Ja |
| Glansmiddel indicator: | Ja |
| Half-geladen: | Ja |
| Afwasprogramma's: | Glass/delicate, Hygiene, Silent, Soak |
| Energieverbruik per cyclus: | 0.654 kWu |
| Automatische deuropening: | Ja |
| Temperatuur (max): | - °C |
| Watertoevoer: | Cold, Hot |
| Aantal mandjes: | 2 mand(en) |
| Manden verstelbare plaatsing: | Bovenste |
| Energie-efficiëntieschaal: | A tot G |
| Whirlpool-technologieën (afwas): | Maxi Space Tub, Natural Dry, Powerclean Pro |
Heb je hulp nodig?
Als je hulp nodig hebt met Bauknecht B7I HT58 TC stel dan hieronder een vraag en andere gebruikers zullen je antwoorden
Handleiding Vaatwasser Bauknecht

13 Mei 2026
7 Maart 2026
4 Maart 2026
27 Januari 2026
26 Januari 2026
5 Januari 2026
4 Januari 2026
4 Januari 2026
22 December 2025
21 December 2025
Handleiding Vaatwasser
Nieuwste handleidingen voor Vaatwasser
7 Juni 2026
6 Juni 2026
5 Juni 2026
5 Juni 2026
5 Juni 2026
4 Juni 2026
3 Juni 2026
3 Juni 2026
2 Juni 2026
2 Juni 2026