Bauknecht B2I HD524 AS Handleiding

Bauknecht Vaatwasser B2I HD524 AS

Lees hieronder de 📖 handleiding in het Nederlandse voor Bauknecht B2I HD524 AS (48 pagina's) in de categorie Vaatwasser. Deze handleiding was nuttig voor 30 personen en werd door 2 gebruikers gemiddeld met 4.5 sterren beoordeeld

Pagina 1/48
1
EN
Before using the appliance carefully read Safety Instructions guide.
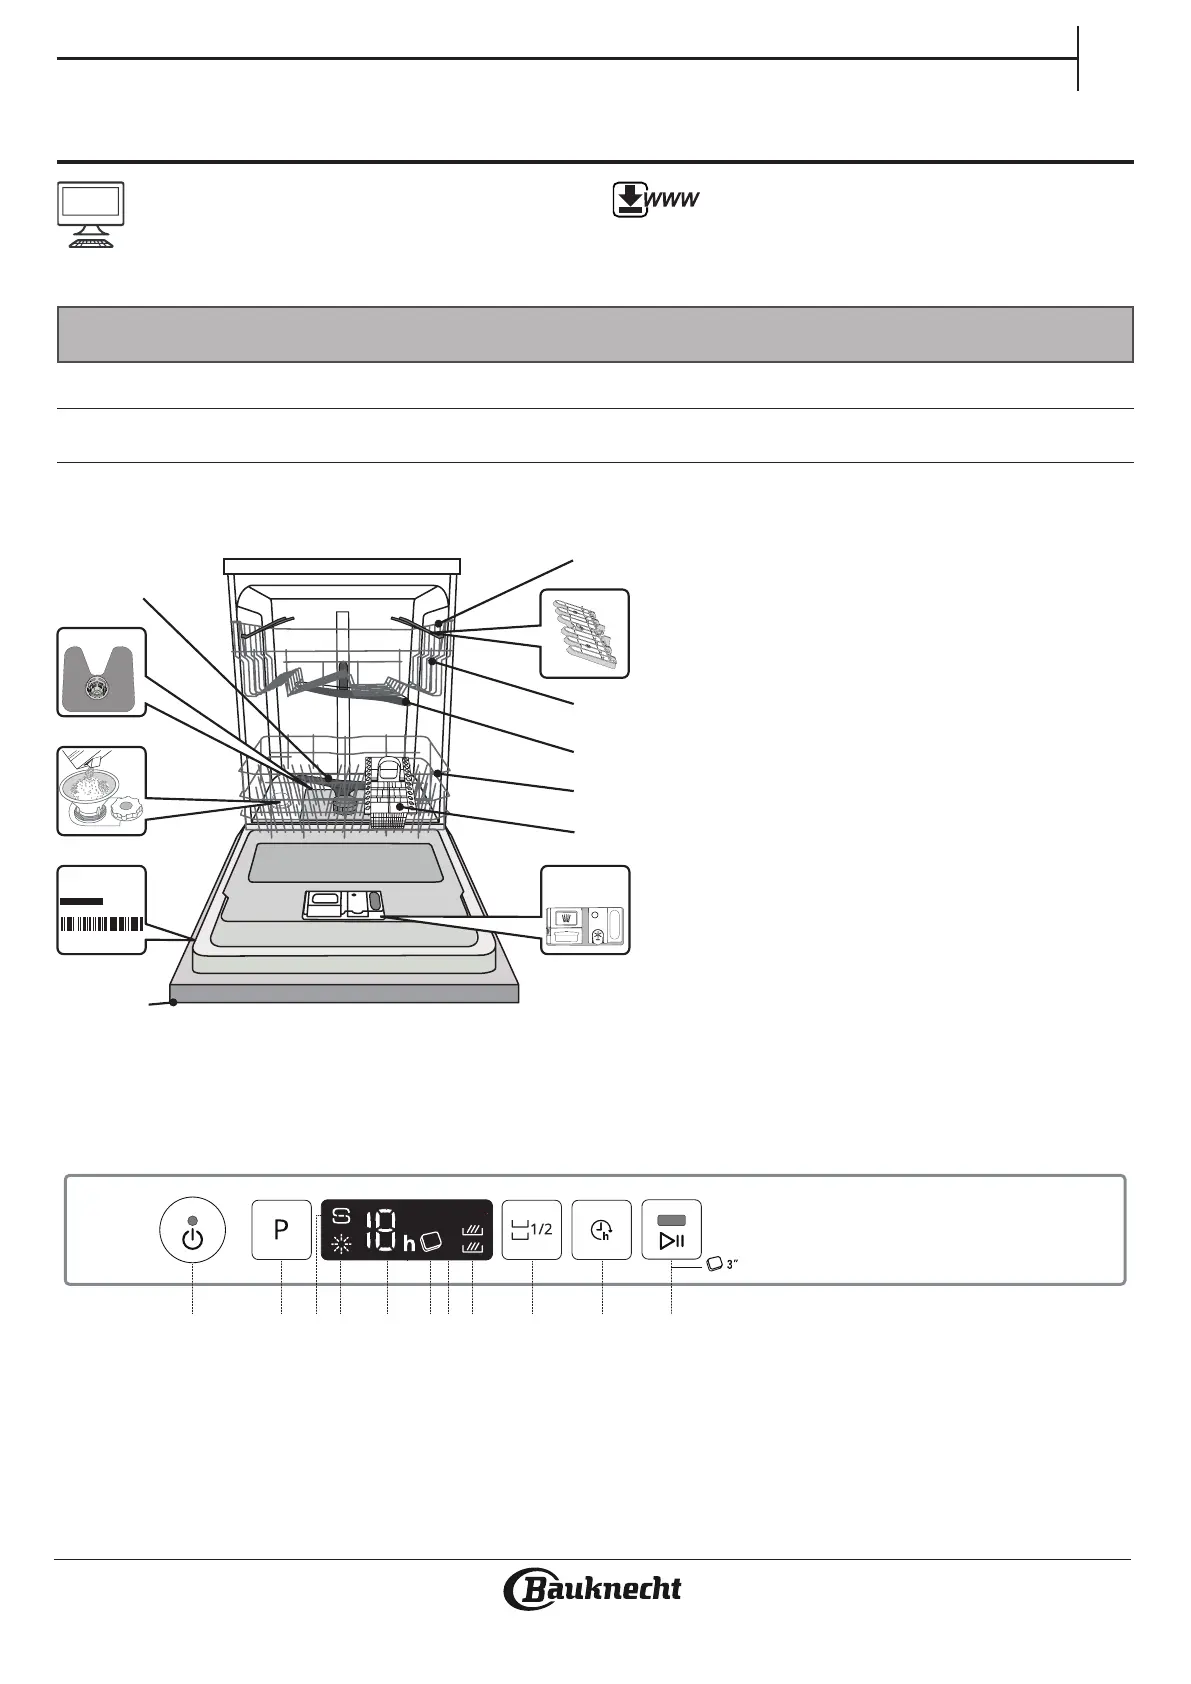
APPLIANCE
PRODUCT DESCRIPTION
DAILY REFERENCE
GUIDE
THANK YOU FOR BUYING ABAUKNECHT PRODUCT.
In order to receive amore complete assistance, please
register your appliance on: www.bauknecht.eu/register
You can download the Safety Instructions and the User
Manual, by visiting our website docs.bauknecht.eu and
following the Instructions on the back of this booklet.
1. ON-OFF/Reset button with indicator light
2. Program selection button
3. Salt rell indicator light
4. Rinse Aid rell indicator light
5. Program number and delay time indicator
6. Tablet indicator light
7. Display
8. Half Load indicator lights
9. Half Load button
10. Delay button
11. START/Pause button with indicator light / Tablet (Tab)
CONTROL PANEL
1. Upper rack
2. Foldable aps
3. Upper rack height adjuster
4. Upper spray arm
5. Lower rack
6. Cutlery basket
7. Lower spray arm
8. Filter Assembly
9. Salt reservoir
10. Detergent and Rinse Aid dispensers
11. Rating plate
12. Control panel
1 2 3 4 5 6 7 8 9 10 11
0000 000 00000
Service:
1
2
3
4
5
6
10
12
7
11
9
8
2
FIRST TIME USE
SALT, RINSE AID AND DETERGENT
ADVICE REGARDING THE FIRST TIME USE
After installation, remove the stoppers from the racks and the retaining
elastic elements from the upper rack.
FILLING THE SALT RESERVOIR
The use of salt prevents the formation of LIMESCALE on the dishes and
on the machine’s functional components.
It is mandatory that THE SALT RESERVOIR NEVER BE EMPTY.
It is important to set the water hardness.
The salt reservoir is located in the lower part of the dishwasher
(see PRODUCT DESCRIPTION) and must be lled when the SALT REFILL
indicator light in the control panel is lit.
1. Remove the lower rack and unscrew the
reservoir cap (anticlockwise).
2. Only the rst time you do this: ll the salt
reservoir with water.
3. Position the funnel (see gure) and ll the salt
reservoir right up to its edge (approxima-
tely 1 kg); it is not unusual for alittle water to
leak out.
4. Remove the funnel and wipe any salt residue
away from the opening.
Make sure the cap is screwed on tightly, so that no detergent can get
into the container during the wash program (this could damage the
water softener beyond repair).
Whenever you need to add salt, it is mandatory to complete the pro-
cedure before the beginning of the washing cycle to avoid corrosion.
SETTING THE WATER HARDNESS
To allow the water softener to work in aperfect way, it is essential that
the water hardness setting is based on the actual water hardness in
your house. This information can be obtained from your local water
supplier.
The factory sets the default value for the water hardness.
Switch on the appliance by pressing the button.ON/OFF
Switch o the appliance by pressing the button.ON/OFF
Hold down button for 5 seconds, until you hear abeep.P
Switch on the appliance by pressing the button.ON/OFF
The current selection level number and the salt indicator light both ash.
Press button to select the desired hardness level (Psee WATER
HARDNESS TABLE).
Switch o the appliance by pressing the button.ON/OFF
Setting is complete!
As soon as this procedure is complete, run aprogram without loading.
Only use salt that has been specically designed for dishwashers.
After the salt has been poured into the machine, the SALT REFILL indi-
cator light switches o.
If the salt container is not lled, the water softener and the heating
element may be damaged as aresult of limescale accumulation.
Using of Salt is recommended with any type of dishwasher deter-
gent.
Water Hardness Table
Level °dH
German degrees
°fH
French degrees
°Clark
English degrees
1 Soft 0 - 6 0 - 10 0 - 7
2 Medium 7 - 11 11 - 20 8 - 14
3 Average 12 - 16 21 - 29 15 - 20
4 Hard 17 - 34 30 - 60 21 - 42
5 Very hard 35 - 50 61 - 90 43 - 62
FILLING THE RINSE AID DISPENSER
Rinse aid makes dish DRYING easier. The rinse aid dispenser should be A
lled when the in the control RINSE AID REFILL indicator light
panel is lit.
1. Open the dispenser by pressing and pulling up the tab on the lid.B
2. Pour in the rinse aid (max.110 ml), making sure it does not overow
from the dispenser. If this happens, clean the spill immediately with
adry cloth.
3. Press the lid down until you hear aclick to close it.
NEVER pour the rinse aid directly into the appliance tub.
ADJUSTING THE DOSAGE OF RINSE AID
If you are not completely satised with the drying results, you can ad-
just the quantity of rinse aid used.
Switch the dishwasher on using the button.ON/OFF
Switch it o using the button.ON/OFF
Press button three times - abeep will be heard.P
Switch it on using the button.ON/OFF
The current selection level number and rinse aid indicator light ash.
Press button to select the level of rinse aid quantity to be supplied.P
Switch it o using the buttonON/OFF
Setting is complete!
If the rinse aid level is set to ZERO (ECO), no rinse aid will be supplied.
The LOW RINSE AID indicator light will not be lit if you run out of rinse aid.
Amaximum of 5 levels can be set according to the dishwasher model.
The factory setting is specic to the model, please follow instruction
above to check this for your machine.
If you see bluish streaks on the dishes, set alow number (1-2).
If there are drops of water or limescale marks on the dishes, set amid-
-range number (3-4).
FILLING THE DETERGENT DISPENSER
To open the detergent dispenser use the opening device C.
Introduce the detergent into the dry dispenser D only. Place the
amount of detergent for pre-washing directly inside the tub.
1. When measuring out the detergent
refer to the mentioned earlier infor-
mation to add the proper quantity.
Inside the dispenser there are indiD-
cations to help the detergent dosing.
2. Remove detergent residues from
the edges of the dispenser and clo-
se the cover until it clicks.
3. Close the lid of the detergent
dispenser by pulling it up until the
closing device is secured in place.
The detergent dispenser automatically opens up at the right time
according to the program.
If all-in-one detergents are used, we recommend using the TABLET
button, because it adjusts the program so that the best washing and
drying results are always achieved.
Usage of detergent not designed for dishwashers may cause mal-
function or damage to the appliance.
A
B
C
D
3
EN
ECO program data is measured under laboratory conditions according to European Standard EN 60436:2020.
Note for Test Laboratories:
For information on comparative EN testing conditions, please send an email to the following address: dw_test_support@whirlpool.com
Pre-treatment of the dishes is not needed before any of the programs.
*) Not all options can be used simultaneously.
**) Values given for programs other than the program Eco are indicative only. The actual time may vary depending on many factors such as temperature
and pressure of the incoming water, room temperature, amount of detergent, quantity and type of load, load balancing, additional selected options and
sensor calibration. The sensor calibration can increase program duration up to 20 min.
PROGRAMS TABLE
PROGRAMS DESCRIPTION
Instructions on wash cycle selection.
1 ECO
Eco programme is suitable to clean normally soiled tableware, that for
this use, it is the most ecient programme in terms of its combined
energy and water consumption, and that it is used to assess complian-
ce with the EU Ecodesign legislation.
2 INTENSIVE
Program recommended for heavily soiled crockery, especially suitable
for pans and saucepans (not to be used for delicate items).
3 MIXED
Mixed soil. For normally soiled dishes with dried food residues.
4 FAST WASH&DRY
Normally soiled crockery. Everyday cycle, that ensures optimal cleaning
and drying performance in shorter time.
5 RAPID 28
Program to be used for half load of lightly-soiled dishes with no dried
food residues. Does not include drying phase.
6 SILENT
Suitable for night-time operation of the appliance. Ensures optimal cle-
aning and drying performance with the lowest noise emission.
7 HYGIENE
Normally or heavily soiled crockery, with additional antibacterial wash.
Can be used to perform maintenance of the dishwasher.
8 PREWASH
Use to refresh crockery planned to be washed later. No detergent to be
used with this program.
9 SELF-CLEAN
Program to be used to perform maintenance of the dishwasher, to be
carried out only when the dishwasher is EMPTY using specic deter-
gents designed for dishwasher maintenance.
Notes:
Please note that cycle is dedicated for lightly soiled dishes.Rapid 28
Program
Drying phase
Available
options *)
Duration
of wash
program
(h:min)**)
Water
consumption
(litres/cycle)
Energy
consumption
(kWh/cycle)
1. Eco 50° 3:35 9.5 0.95
2. Intensive 65° 2:40 18.0 1.60
3. Mixed 55° 2:15 16.0 1.40
4. Fast Wash&Dry 5 1:30 11.5 1.30
5. Rapid 28’ 50° - 0:28 9.0 0.50
6. Silent 50° 3:35 16.6 1.30
7. Hygiene 65° 2:00 12.0 1.50
8. Prewash - - 0:12 4.7 0.01
9. Self-Clean 65° - 0:50 10.0 0.80


Product specificaties

Merk: Bauknecht
Categorie: Vaatwasser
Model: B2I HD524 AS

Heb je hulp nodig?

Als je hulp nodig hebt met Bauknecht B2I HD524 AS stel dan hieronder een vraag en andere gebruikers zullen je antwoorden


Handleiding Vaatwasser Bauknecht

Handleiding Vaatwasser

Nieuwste handleidingen voor Vaatwasser