AXESS 99-3012G-LC Handleiding
AXESS Niet gecategoriseerd 99-3012G-LC
Bekijk gratis de handleiding van AXESS 99-3012G-LC (16 pagina’s), behorend tot de categorie Niet gecategoriseerd. Deze gids werd als nuttig beoordeeld door 13 mensen en kreeg gemiddeld 4.4 sterren uit 3 reviews. Heb je een vraag over AXESS 99-3012G-LC of wil je andere gebruikers van dit product iets vragen? Stel een vraag
Pagina 1/16
Metra. The World’s Best Kits.
®
MetraOnline.com © COPYRIGHT 2019 METRA ELECTRONICS CORPORATION REV. 2/28/19 INST99-3012G-LC
INSTALLATION INSTRUCTIONS
99-3012G-LC
Attention!Let the vehicle sit with the key
out of the ignition for a few minutes before
removing the factory radio. When testing the
aftermarket equipment, ensure that all factory
equipment is connected before cycling the
key to ignition.
KIT FEATURES
• ISO DIN radio provision with pocket
• ISO DDIN radio provision
• Painted gray to match the factory finish
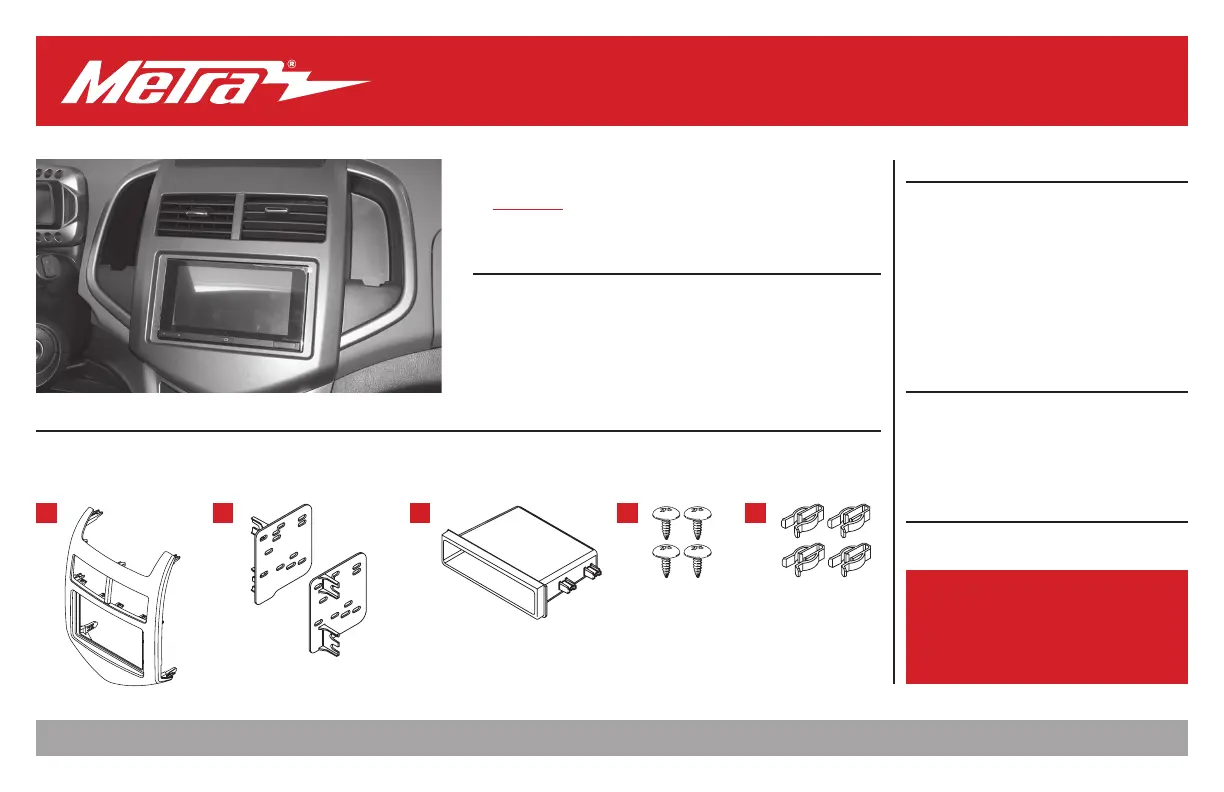
KIT COMPONENTS
• A) Radio trim panel • B) Radio brackets • C) Pocket • D) (4) #8 x 3/8” Phillips screws • E) (4) Panel clips
• F) Axxess interface and wiring harness (not shown)
TOOLS REQUIRED
• Panel removal tool • Phillips screwdriver
• 9/32” socket wrench
TABLE OF CONTENTS
Dash Disassembly ..................................................2
Kit Preparation .......................................................2
Kit Assembly
–ISO DIN radio provision with pocket ..................3
–ISO DDIN radio provision .....................................3
Axxess Interface Installation .................................4
Final Assembly .......................................................6
WIRING & ANTENNA CONNECTIONS
Wiring Harness: Axxess interface and harness included
Antenna Adapter: 40-EU55 (sold separately)
Steering Wheel Control Interface: ASWC-1
(sold separately)
ABCDE
Chevy Sonic 2012-2016
Visit MetraOnline.com for more detailed information about the product and up-to-date vehicle
specific applications
Product specificaties
| Merk: | AXESS |
| Categorie: | Niet gecategoriseerd |
| Model: | 99-3012G-LC |
Heb je hulp nodig?
Als je hulp nodig hebt met AXESS 99-3012G-LC stel dan hieronder een vraag en andere gebruikers zullen je antwoorden
Handleiding Niet gecategoriseerd AXESS

29 Juli 2025
29 Juli 2025
29 Juli 2025
29 Juli 2025
25 Februari 2025
25 Februari 2025
25 Februari 2025
25 Februari 2025
25 Februari 2025
25 Februari 2025
Handleiding Niet gecategoriseerd
Nieuwste handleidingen voor Niet gecategoriseerd
23 Juli 2026
23 Juli 2026
23 Juli 2026
23 Juli 2026
23 Juli 2026
23 Juli 2026
23 Juli 2026
23 Juli 2026
23 Juli 2026
22 Juli 2026