Asus ROG Chakram X Origin Handleiding
Bekijk gratis de handleiding van Asus ROG Chakram X Origin (2 pagina’s), behorend tot de categorie Muis. Deze gids werd als nuttig beoordeeld door 101 mensen en kreeg gemiddeld 4.7 sterren uit 9 reviews. Heb je een vraag over Asus ROG Chakram X Origin of wil je andere gebruikers van dit product iets vragen? Stel een vraag
Pagina 1/2
IT
ES
CS
TR
DERU
KONL
ROPT:BR
UA
JP
FIEN
HUFR
NO
PL
SK
SV
Wprowadzenie
W celu ustawienia myszy do gier ROG Chakram X:
1. Podłącz kabel USB do portu USB komputera.
2. Pobierz i zainstaluj oprogramowanie Armoury Crate ze
strony https://rog.asus.com.
3. Więcej informacji można znaleźć na forum ROG pod
adresem https://rog.asus.com/forum/.
Wymagania systemowe
• Windows® 10 i Windows® 11
• 100 MB wolnego miejsca na dysku twardym (do
instalacji opcjonalnego oprogramowania)
• Połączenie internetowe (do pobrania
opcjonalnego oprogramowania)
• Port USB 2.0 (Port USB 3.2 Gen 1 do szybkiego
ładowania)
Začíname
Ak chcete nastaviť hraciu myš ROG Chakram X:
1. Kábel USB zapojte do portu USB v počítači.
2. Z lokality https://rog.asus.com si prevezmite súbor Armoury
Crate a nainštalujte si ho.
3. Viac informácií týkajúcich sa fóra ROG nájdete na
https://rog.asus.com/forum/.
Používateľská príručka
• Windows® 10 a Windows® 11
• 100 MB voľného miesta na pevnom disku (na
inštaláciu voliteľného softvéru)
• Internetové pripojenie (na stiahnutie voliteľného
softvéru)
• Port USB 2.0 (Port USB 3.2 1. generácie na rýchle
nabíjanie)
시작하기
ROG Chakram X
게임 마우스를 설정하려면:
1. USB 케이블을 컴퓨터의 USB 포트에 연결합니다
2. https://rog.asus.com 에서 Armoury Crate
소프트웨어를 다운로드하여 설치합니다.
3. 자세한 내용은 https://rog.asus.com/forum/에서 ROG
포럼을 참조하십시오.
시스템 요구사항
• Windows
®
10 및 Windows
®
11
• 하드 디스크 100 MB (옵션 소프트웨어 설치용)
• 인터넷 연결 (옵션 소프트웨어 다운로드용)
• USB 2.0 포트 (급속 충전용 USB 3.2 Gen 1
포트)
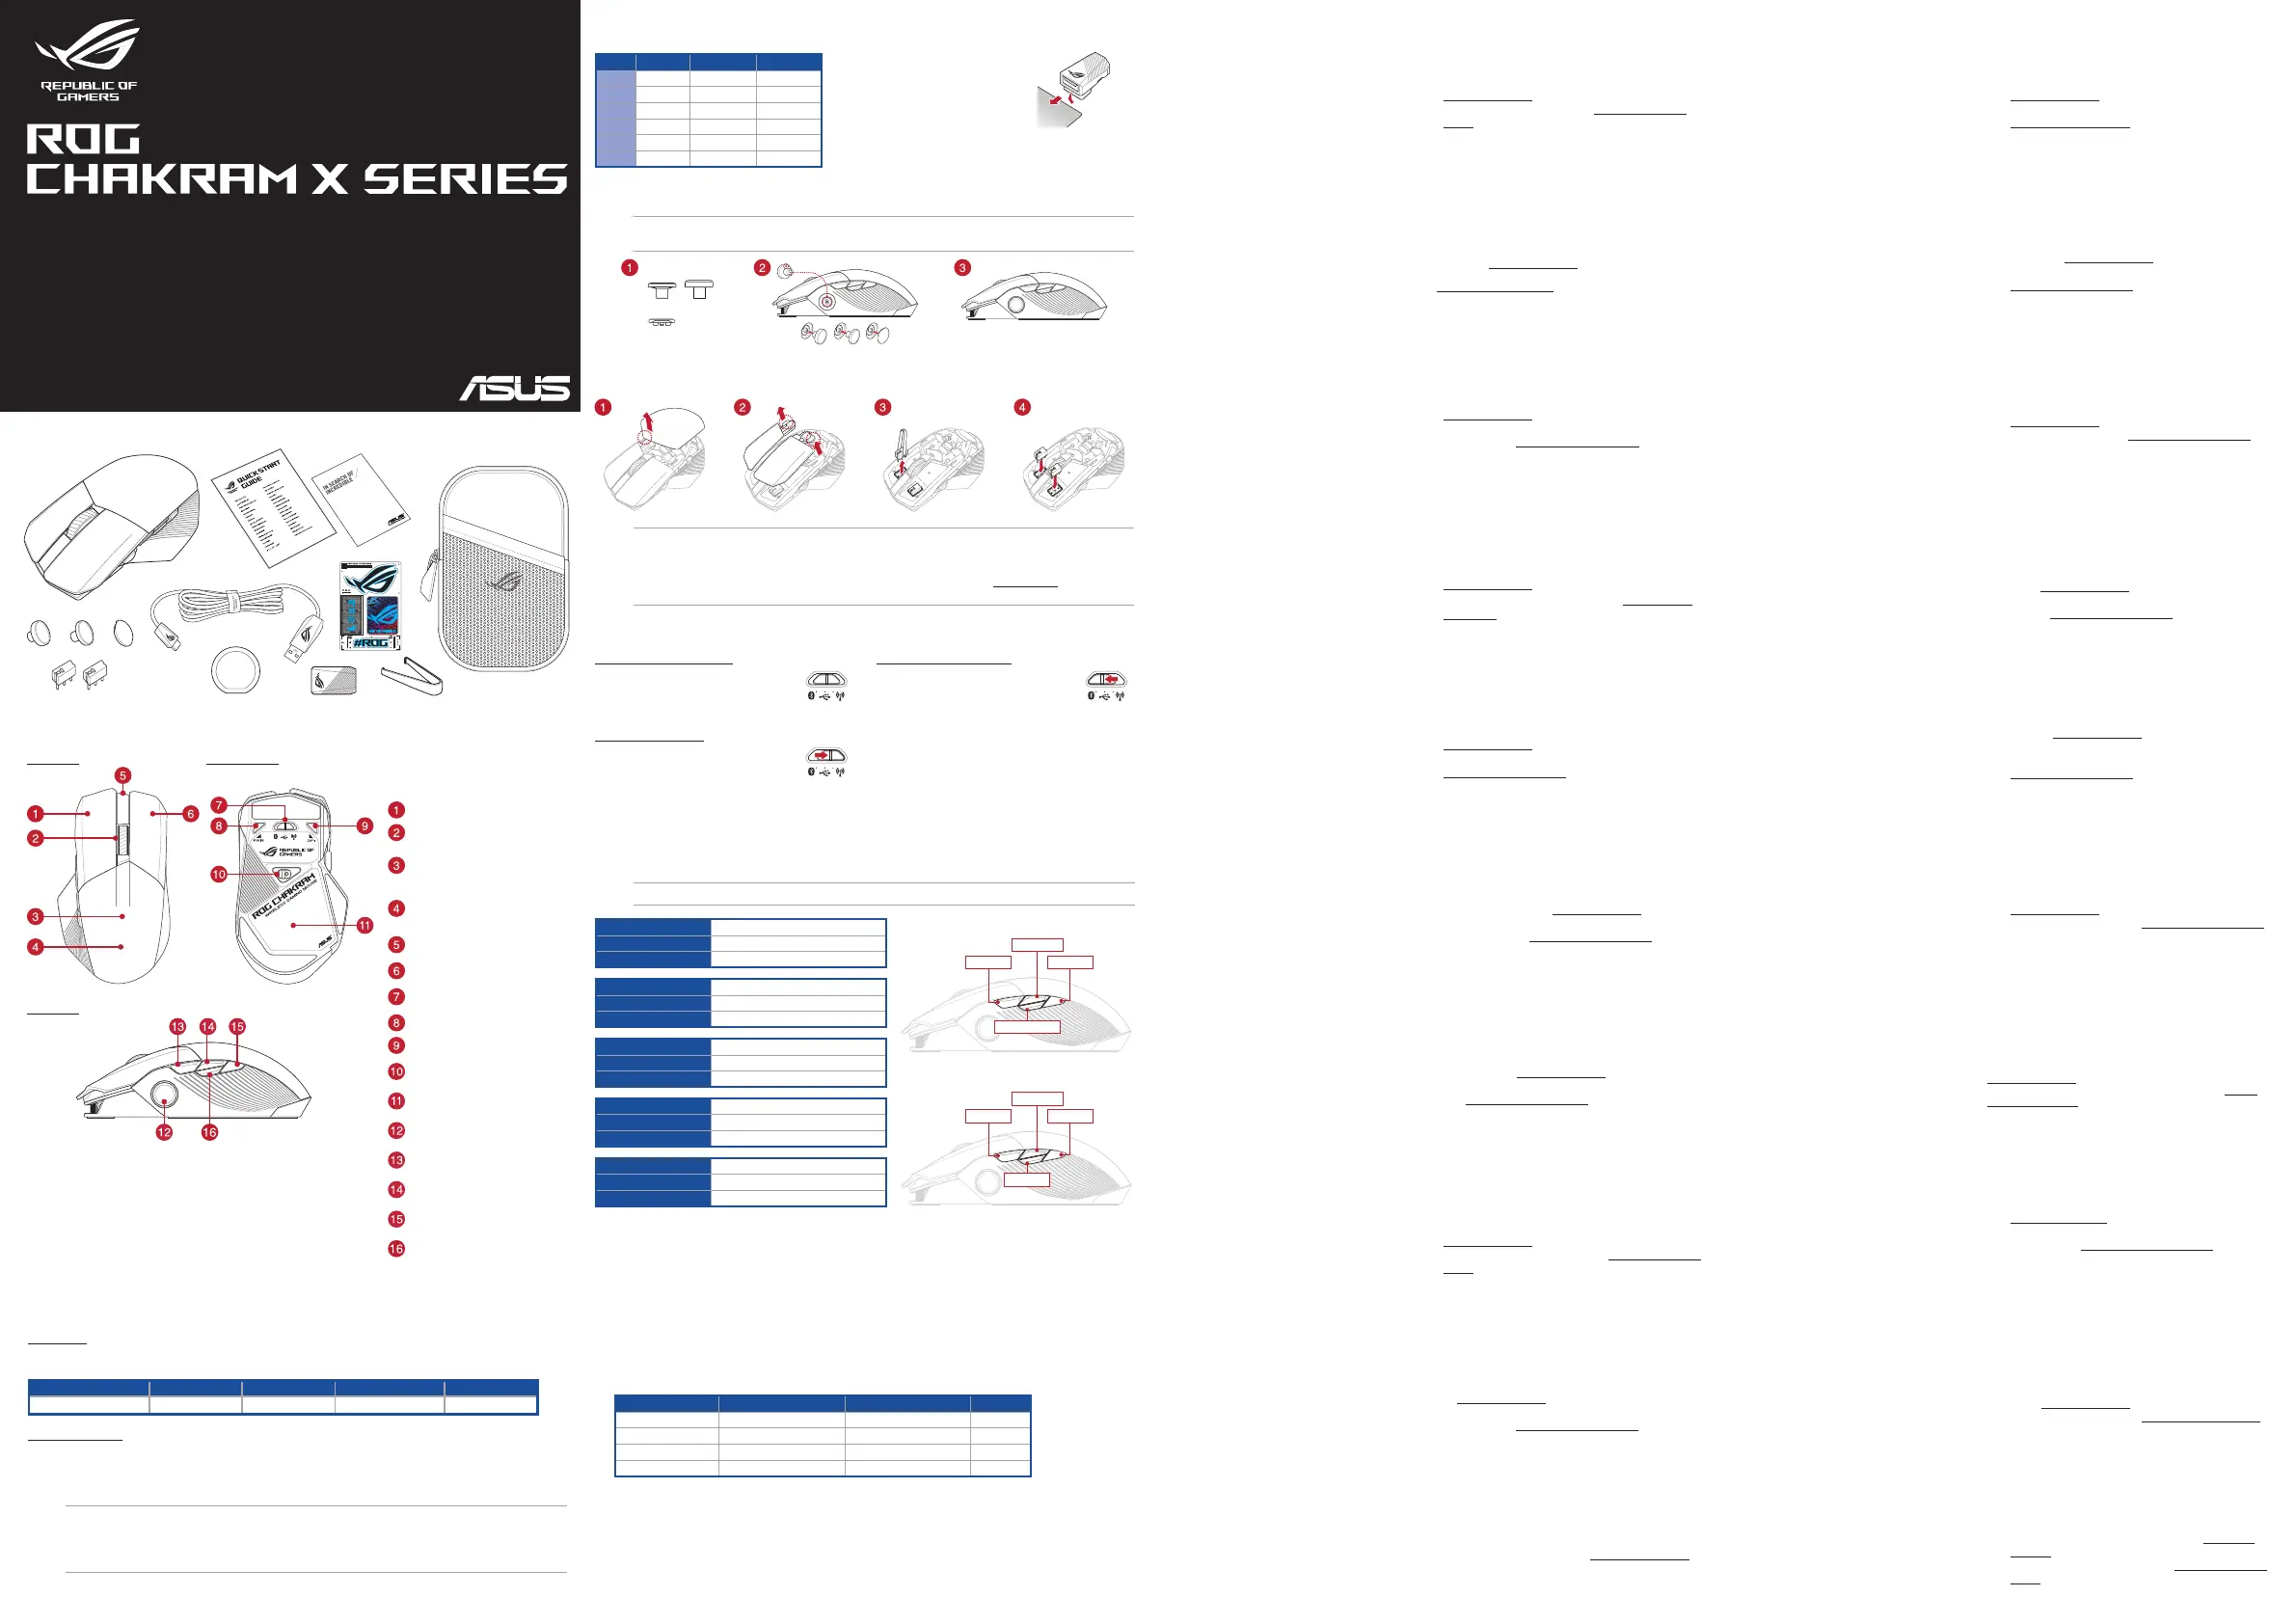
Mouse features
Top viewBottom view
Left view
Package contents
Q20589a
Warranty Card
DPI On-The-Scroll
The DPI On-The-Scroll tuning function allows you to customize the DPI of your gaming mouse without using Armoury Crate.
1. Press and hold the DPI button for 3 seconds until the LEDs on your gaming mouse light up.
2. Rotate the scroll wheel forwards or backwards to adjust the DPI. The LED color hue on your scroll wheel will dier
depending on the DPI adjustment. Move the mouse around to test until you nd the best sensitivity.
NOTE:
• The DPI increments at 100 DPI per scroll forwards and decrements at 100 DPI per scroll backwards.
• The DPI ranges from 100 DPI (blue) to 36000 DPI (red).
• Tuning DPI On-The-Scroll will disable independent X-Y controls.
3. Press the DPI button again once you have nished customizing the DPI value to save the changes made.
Getting started
To set up your ROG Chakram X Gaming Mouse:
1. Connect the USB cable to your computer’s USB port.
2. Download and install the Armoury Crate software from
https://rog.asus.com
3. You may refer to the ROG forum at https://rog.asus.com/
forum/ for more information.
Setting up Chakram X controls and joystick in Steam
You can setup your gaming mouse buttons and joystick to work like a controller in Steam.
1. Connect your gaming mouse to your computer.
2. Install Armoury Crate and Steam.
3. Launch Armoury Crate, then switch your gaming mouse to Prole 3, and click on Reset to revert to default settings.
4. Launch Steam, then go to View > Settings > Controller > GENERAL CONTROLLER SETTINGS.
5. Only check the Xbox Conguration Support and Generic Gamepad Conguration Support options.
6. Under Detected Controllers, select CHAKRAM X.
7. You can set up the Chakram X joystick and 4 side buttons to work exactly like a gamepad. Please refer to the table below
to map side buttons 6, 7, 8, and 9 on the Chakram X to work as an XBOX controller in Steam:
Chakram X - SteamChakram X - HorizontalChakram X - VerticalXBOX
Button 0Side button 8Side button 7B
Button 1Side button 9Side button 8A
Button 2Side button 6Side button 9X
Button 3Side button 7Side button 6Y
8. Map the x-axis and y-axis of the Analog joystick to the Left Stick X and Left Stick Y commands.
9. Press Esc on your keyboard, then click SAVE to complete.
10. If you wish, you can share the settings you’ve made online from the next prompt.
Replacing the switches
IMPORTANT!
• Ensure to install the switch with its button facing the front of the mouse.
• Ensure that the switches are seated properly on the switch sockets.
• Both 3-pin mechanical and 5-pin optical micro switches are supported. Refer to www.asus.com for the list of
compatible switches.
Customizing the joystick or applying the cover
NOTE:To prevent damage, place the mouse on a at surface, then push the joystick into the socket while ensuring
the small circular hole is pointing upwards.
System requirements
• Windows® 10 and Windows® 11
• 100 MB of hard disk space (for optional software
installation)
• Internet connection (for downloading optional
software)
• USB 2.0 port (USB 3.2 Gen 1 port for fast charging)
Default mouse proles
NOTE:The mouse buttons and analog/digital joystick can be assigned to other functions using Armoury Crate.
Prole 1DPI button + Side button 6
Default lighting eectRainbow
Joystick function4 Keyboard direction keys
Prole 2DPI button + Side button 7
Default lighting eectColor Cycle
Joystick functionAnalog joystick (vertical)
Prole 3DPI button + Side button 8
Default lighting eectComet
Joystick functionAnalog joystick (horizontal)
Prole 5DPI button + Scroll wheel click
Default lighting eectReactive (green)
Joystick function4 Keyboard direction keys
Prole 4DPI button + Side button 9
Default lighting eectBreathing (blue)
Joystick functionAnalog joystick (vertical)
Quick Start Guide
Guide de démarrage rapide (FR)
Guida rapida (IT)
Guía de inicio rápido (ES)
Rychlý průvodce (CS)
Hızlı Başlangıç Kılavuzu (TR)
Краткое руководство (RU)
Beknopte handleiding (NL)
Guia de Início Rápido (PT:BR)
クイックスタートガイド (JP)
Pikaopas (FI)
Gyors üzembe helyezési útmutató (HU)
Hurtigstartveiledning (NO)
Przewodnik szybkiego startu (PL)
Stručný návod na používanie (SK)
Snabbstartshandbok (SV)
Schnellstartanleitung (DE)
간단사용설명서
(KO)
Ghid de pornire rapidă (RO)
Стисле керівництво для початку експлуатації (UA)
快速使用指南(簡體中文)
快速使用指南(繁體中文)
)AR(
)HB
ForwardBack
Volume Up
Volume Down
Button 2Button 0
Button3
Button 1
Side button conguration for Prole 1, 2, 4, and 5
Side button conguration for Prole 3
Using RF wireless mode
1. Connect the USB dongle to a USB port on
your computer.
2. Set the connection switch to the RF 2.4G
Wireless mode.
3. Press and hold the Pair button for 3
seconds if the connection is lost.
Using the ROG Paracord cable
Connect the bundled USB Type-C® to Type-A
cable to your gaming mouse and any
available USB 3.2 Gen 1 port (or above) on
your computer for fast-charging.
Connecting your gaming mouse
Switching to Bluetooth mode
• When pairing Bluetooth mode for the
rst time, your gaming mouse will enter
discovery mode automatically. Find ROG
Chakram X from the device list and then
conrm to pair.
• Up to 3 devices can be saved. Press the
Pair button to cycle through the 3 paired
devices, or you can overwrite any of the
saved devices by pressing and holding
the Pair button for 3 seconds.
DPI adjustment
DPI Button
The hidden DPI button on the bottom of the mouse switches the DPI between 4 levels instantly. The LED will ash to indicate
the current DPI level. Please refer to the table below for the more information on the DPI levels.
ResolutionDPI 1 (Red)DPI 2 (Purple)DPI 3 (Default / Blue)DPI 4 (Green)
100 DPI to 36000 DPI400 DPI800 DPI1600 DPI3200 DPI
Per iniziare
Per installare il mouse gaming ROG Chakram X :
1. Collegate il cavo USB alla porta USB del vostro computer.
2. Scaricate e installate il software Armoury Crate dal sito
https://rog.asus.com.
3. Per ulteriori informazioni potete fare riferimento al forum
ROG all’indirizzo https://rog.asus.com/forum/.
Requisiti di sistema
• Windows® 10 e Windows® 11
• 100 MB di spazio libero su hard disk (per
installazione di software opzionale)
• Connessione ad Internet (per il download di
software opzionale)
• Porta USB 2.0 (Porta USB 3.2 Gen 1 per carica
rapida)
有線接続
1. USBケーブルをパソコンのUSBポートに接続します。
2. Web サイトから Armoury Crate ソフトウェアをダウン
ロードしインストールします。https://rog.asus.com/
3. Armoury Crate で設定をカスタマイズします。
システム要件
• Windows® 10 / Windows® 11
• 100 MBのディスクの空き容量 (ソフトウェアのイン
ストール)
• インターネット接続 (ソフトウェアのダウンロード)
• USB 2.0 ポートを搭載したPC
(
USB 3.2 Gen 1 ポー
ト接続で急速充電
)
Prise en main
Pour congurer votre souris gaming ROG Chakram X :
1. Connectez le câble USB à l'un des ports USB de votre
ordinateur.
2. Téléchargez et installez le logiciel Armoury Crate en vous
rendant sur https://rog.asus.com
3. Vous pouvez consulter le forum ROG à
https://rog.asus.com/forum/ pour obtenir plus d'informations.
Conguration requise
• Windows® 10 et Windows® 11
• Espace disque de 100 Mo (pour l'installation de
logiciels optionnels)
• Connexion internet (pour le téléchargement de
logiciels optionnels)
• Port USB 2.0 (port USB 3.2 Gen 1 pour la charge rapide)
DE
Erste Schritte
So richten Sie Ihre ROG Chakram X Gaming Maus ein:
1. Verbinden Sie das USB-Kabel mit dem USB-Anschluss Ihres
Computers.
2. Laden Sie die Armoury Crate Software unter
https://rog.asus.com herunter und installieren Sie sie.
3. Weitere Informationen nden Sie im ROG-Forum unter https://
rog.asus.com/forum/.
Systemvoraussetzungen
• Windows 10 und Windows 11
• 100 MB freier Festplattenspeicher
(für optionale Software-Installation)
• Internetverbindung
(für optionale Software-Downloads)
• USB 2.0 Anschluss (USB 3.2 (Gen1) Anschluss
für die Schnellauadung)
Початок роботи
Щоб налаштувати Ігрову мишу ROG Chakram X:
1. Підключіть кабель USB до порту USB на комп’ютері.
2. Завантажте і встановіть ПЗ Armoury Crate з https://rog.
asus.com.
3. Більше інформації – на форумі ROG: https://rog.asus.com/
forum/.
Системні вимоги
• Windows® 10 і Windows® 11
• 100 MБ на жорсткому диску (для інсталяції
додаткового ПЗ)
• Підключення до інтернету (для завантаження
додаткового ПЗ)
• Порт USB 2.0 (Порт USB 3.2 Gen 1 для
швидкісного зарядження)
Noţiuni introductive
Pentru a congura mouse-ul pentru jocuri ROG Chakram X:
1. Conectaţi cablul USB la portul USB de pe computer.
2. Descărcaţi şi instalaţi software-ul Armoury Crate de la
adresa https://rog.asus.com
.
3. Puteți consulta forumul ROG la https://rog.asus.com/forum/
pentru mai multe informații.
Cerinţe de sistem
• Windows® 10 şi Windows® 11
• 100 MB de spaţiu liber pe hard disk (pentru
instalarea de software opţional)
• Conexiune la internet (pentru descărcarea de
software opţional)
• Port USB 2.0 (Port USB 3.2 din prima generație
pentru încărcare rapidă)
Komma igång
För att ställa in din ROG Chakram X Gaming Mouse:
1. Anslut USB-kabeln till datorns USB-port.
2. Ladda ner och installera Armoury Crate-programvaran från
https://rog.asus.com.
3. Du kan besöka ROG-forum på https://rog.asus.com/forum/
för mer information.
Systemkrav
• Windows® 10 och Windows® 11
• 100 MB hårddiskutrymme (för installation av
tillvalsprogram)
• Internetanslutning (för hämtning av
tillvalsprogram)
• USB 2.0-port (USB 3.2 Gen 1-port för
snabbladdning)
Komme i gang
For å sette opp din ROG Chakram X Gamingmus:
1. Koble USB-kabelen til datamaskinens USB port.
2. Last ned og installer Armoury Crate-programvaren fr
https://rog.asus.com.
3. Du kan se ROG-forumet på https://rog.asus.com/forum/ for
mer informasjon.
Systemkrav
• Windows® 10 og Windows® 11
• 100 MB ledig plass på harddisken (for å installere
valgfri programvare)
• Internettoppkobling (for å laste ned valgfri
programvare)
• USB 2.0 port (USB 3.2 gen. 1-port for hurtiglading)
Első lépések
A játékokhoz készült ROG Chakram X egér beállítása:
1. Csatlakoztassa az USB-kábelt a számítógép USB-csatlakozójához.
2. Töltse le és telepítse az Armoury Crate szoftvert a következő
weboldalról https://rog.asus.com.
3. Bővebb információkért tanulmányozhatja a ROG fórumot a
https://rog.asus.com/forum/ címen.
Rendszerkövetelmények
• Windows® 10 és Windows® 11
• 100 MB terület a merevlemezen (az opcionális
szoftver telepítéséhez)
• Internetkapcsolat (az opcionális szoftver letöltéséhez)
• USB 2.0-csatlakozó (USB 3.2 Gen 1 aljzat
gyorstöltéshez)
Näin pääset alkuun
ROG Chakram X -pelihiiren asettaminen:
1. Liitä USB-kaapeli tietokoneen USB-porttiin.
2. Lataa ja asenna Armoury Crate -ohjelmisto osoitteesta
https://rog.asus.com.
3. Katso lisätietoja ROG-foorumilta osoitteessa
https://rog.asus.com/forum.
Järjestelmävaatimukset
• Windows® 10 ja Windows® 11
• 100 Mt kiintolevytilaa (valinnaisen ohjelmiston
asentamista varten)
• Internet-yhteys (valinnaisen ohjelmiston lataamista
varten)
• USB 2.0-portti (USB 3.2 Gen 1 -portti nopeaa
latausta varten)
Iniciando
Para congurar sei Mouse para Jogo ROG Chakram X:
1. Conecte o cabo USB à porta USB do seu computador.
2. Faça Download e instale o software Armoury Crate a partir
de https://rog.asus.com.
3. Você pode consultar o fórum ROG para obter mais
informações em https://rog.asus.com/forum/.
Requerimentos de sistema
• Windows® 10 um Windows® 11
• 100 MB de espaço livre no disco rígido (para
instalação do software opcional)
• Conexão com a Internet (para baixar o software
opcional)
• Porta USB 2.0 (Porta USB 3.2 Gen 1 para
carregamento rápido)
Procedimientos iniciales
Para congurar el ratón para juegos ROG Chakram X:
1. Conecte el cable USB al puerto USB del equipo.
2. Descargue e instale el software Armoury Crate desde
https://rog.asus.com.
3. Puede consultar el foro de ROG forum en https://rog.asus.
com/forum/ para obtener más información.
Requisitos del sistema
• Windows® 10 y Windows® 11
• 100 MB de espacio en disco duro (para instalación
del software opcional)
• Conexión a Internet (para descargar el software
opcional)
• Puerto USB 2.0 (Puerto USB 3.2 Gen 1 para carga
rápida)
Začínáme
Pokyny pro nastavení herní myši ROG Chakram X:
1. Připojte kabel USB k portu USB počítače.
2. Stáhněte a nainstalujte software Armoury Crate z webu
https://rog.asus.com.
3. Další informace můžete nalézt na fóru ROG forum na adrese
https://rog.asus.com/forum/.
Systémové požadavky
• Windows® 10 a Windows® 11
• 100 MB místa na pevném disku (pro instalaci
volitelného softwaru)
• Připojení k internetu (pro stažení volitelného
softwaru)
• Port USB 2.0 (Port USB 3.2 Gen 1 pro rychlé nabíjení)
Aan de slag
Uw ROG Chakram X gamemuis instellen:
1. Sluit de USB-kabel aan op de USB-poort van de computer.
2. Download en installeer de Armoury Crate-software van
https://rog.asus.com.
3. U kunt het ROG-forum raadplegen op https://rog.asus.com/
forum/ voor meer informatie.
Systeemvereisten
• Windows® 10 en Windows® 11
• 100 MB harde schijfruimte (voor optionele software-
installatie)
• Internetverbinding (voor het downloaden van
optionele software)
• USB 2.0-poort (USB 3.2 Gen 1-poort voor snel opladen)
Başlarken
ROG Chakram X Oyun Farenizi kurmak için:
1. USB kablosunu bilgisayarınızın USB bağlantı noktasına
bağlayın.
2. Armoury Crate yazılımını https://rog.asus.com adresinden
indirip yükleyin.
3. Daha fazla bilgi için https://rog.asus.com/forum/
adresindeki ROG forumuna başvurabilirsiniz.
Sistem gereksinimleri
• Windows® 10 ve Windows® 11
• 100 MB sabit disk alanı (isteğe bağlı yazılım yüklemesi
için)
• Internet bağlantısı (isteğe bağlı yazılımı indirmek için)
• USB 2.0 bağlantı noktası (Hızlı şarj için USB 3.2 Gen 1
bağlantı noktası)
Начало работы
Для настройки игровой мыши ROG Chakram X:
1. Подключите USB-кабель к разъему USB компьютера.
2. Скачайте и установите программное обеспечение
Armoury Crate с https://rog.asus.com
3. Дополнительную информацию можно найти на форуме
ROG https://rog.asus.com/forum/.
Системные требования
• Windows 10 и Windows 11
• 100 Мб места на жестком диске (для установки
дополнительного программного обеспечения)
• Подключение к интернету (для загрузки
дополнительного программного обеспечения)
• Разъем USB 2.0 (разъем USB 3.2 Gen 1 для быстрой
зарядки)
Left-click button /
左鍵 / 左鍵
Scroll wheel /
滾輪 /
滾輪
USB dongle (hidden) /
USB
接收器
(收納於滑鼠內)
/ USB
接收器
(收納於鼠標內)
Logo plate (hidden) / Logo
銘牌(收
納於滑鼠內)
/ Logo
銘牌(收納
於鼠標內)
USB Type-C® port /
USB Type-C
®
連接埠 /
USB Type-C
®
接口
Right-click button /
右鍵
/
右鍵
Connection mode switch /
連線模
式切換開關
/
連接模式切換開關
Pair button /
配對按鍵
/
配對按鍵
DPI button /
DPI
按鍵
/ DPI
按鍵
AimPoint optical sensor /
AimPoint
光
學感應器
/
AimPoint
光學感應器
Qi wireless charging area* /
Qi
無線
充電區域*
/ Qi
無線充電區域
*
Analog/Digital joystick /
模擬/數字
搖桿
/
模擬/數字搖桿
Side button 6 /
側邊按鍵
6 /
側邊
按鍵
6
Side button 7 /
側邊按鍵
7 /
側邊
按鍵
7
Side button 8 /
側邊按鍵
8 /
側邊
按鍵
8
Side button 9 /
側邊按鍵
9 /
側邊
按鍵
9
Polling Rate
WiredRFBluetooth
250VVV
500VV
1000VV
2000VV
4000V
8000V
Using the dongle extender
Connect the bundled paracord cable and
the RF receiver to the dongle extender to
improve wireless reception or extend the RF
signal range. You may also clip the dongle
extender to your mouse pad (2~3mm in
thickness) if required.
* The Qi wireless charging area is available on selected models and is
required for wireless charging. ROG Chakram X Origin (P708-ORIGIN)
does not support Qi Wireless charging.
*
使用無線充電功能需要裝置支援 Qi 無線充電,是否搭載 Qi 無線充電區域
視型號而定。ROG Chakram X Origin(P708-ORIGIN)不支援 Qi 無線充電。
*
使用無線充電功能需要設備支持 Qi 無線充電,是否搭載 Qi 無線充電區域
視型號而定。ROG Chakram X Origin(P708-ORIGIN)不支持 Qi 無線充電。
*
Product specificaties
| Merk: | Asus |
| Categorie: | Muis |
| Model: | ROG Chakram X Origin |
| Kleur van het product: | Zwart, zilver |
| Gewicht: | 123 g |
| Breedte: | 132.7 mm |
| Diepte: | 76.6 mm |
| Hoogte: | 42.8 mm |
| Snoerlengte: | 2 m |
| Stroombron: | Batterijen/kabel |
| Bluetooth-versie: | 5.2 |
| Vormfactor: | Rechtshandig |
| Frequentieband: | 2.4 GHz |
| Bedoeld voor: | Gamen |
| Ondersteunt Windows: | Windows 10, Windows 11 |
| Aantal: | 1 |
| Aantal knoppen: | 11 |
| Aansluiting: | RF Wireless + Bluetooth + USB Type-C |
| Kleur van de verlichting: | Blue, Green, Red |
| Oplaadbaar: | Ja |
| Charging port type: | USB Type-C |
| Scroll type: | Wiel |
| Bewegingsresolutie: | 36000 DPI |
| Aantal programmeerbare knoppen: | 11 |
| Soort knoppen: | Drukknoppen |
| Bewegingsdetectietechnologie: | Optisch |
| Ingebouwd geheugen: | Ja |
| Batterijtechnologie: | Lithium-Ion (Li-Ion) |
| Belichting: | Ja |
| Programmeerbare muisknoppen: | Ja |
| Aanpasbare bewegingsresolutie: | Ja |
| Stemmingsrato: | 250,1000,8000 Hz |
| Aantal bewegingsresolutiemodi: | 4 |
| Trackingsnelheid muis: | 650 ips |
| Versnelling (max): | 50 G |
Heb je hulp nodig?
Als je hulp nodig hebt met Asus ROG Chakram X Origin stel dan hieronder een vraag en andere gebruikers zullen je antwoorden
Handleiding Muis Asus

31 December 2026
31 December 2026
30 December 2026
30 December 2026
30 December 2026
29 December 2026
29 December 2026
29 December 2026
Asus ROG Gladius III Wireless Aimpoint EVA-02 Edition Handleiding
29 December 2026 19 December 2025
Handleiding Muis
Nieuwste handleidingen voor Muis
8 Maart 2026
6 Maart 2026
4 Maart 2026
4 Maart 2026
3 Maart 2026
3 Maart 2026
3 Maart 2026
2 Maart 2026
2 Maart 2026
2 Maart 2026