Air King 9124 Handleiding
Air King
Ventilator
9124
Bekijk gratis de handleiding van Air King 9124 (3 pagina’s), behorend tot de categorie Ventilator. Deze gids werd als nuttig beoordeeld door 88 mensen en kreeg gemiddeld 4.2 sterren uit 44.5 reviews. Heb je een vraag over Air King 9124 of wil je andere gebruikers van dit product iets vragen? Stel een vraag
Pagina 1/3

Rev. A 10/14 8 5084415 15084415
Rev. A 10/14
INCLUDED WITH THIS FAN:
(1) 3 Speed Motor Assembly
(1) Column Assembly
(1) Base
(1) Blade
(1) Front Grill
(1) Rear Grill
(1) Hardware Bag
(1) Motor Hardware Bag
(1) Instruction Sheet
24" / 30" OSCILLATING PEDESTAL FAN
MODEL 9125, 9135, 9174, 9175
24" / 30" NON-OSCILLATING PEDESTAL FAN
MODEL 9124, 9130, 9171, 9170
INSTRUCCIONES DE TRASLADO
MANTENIMIENTO
INSTRUCCIONES DE FUNCIONAMIENTO
ADVERTENCIA: SIEMBRE DESENCHUFE EL CABLE ANTES DE
MOVER O PROPORCIONAR SERVICIO AL VENTILADOR.
ADVERTENCIA: ¡NO SUMERJA EL VENTILADOR EN EL AGUA!
LIMPIEZA: Use un paño suave y una solución jabonosa suave, tal
como un detergente líquido para lavar trastes. Seque todas las partes
por completo antes de reconectar el Ventilador a la fuente de poder.
ADVERTENCIA: No use gasolina, bencina, acetona,
limpiadores abrasivos, etc., puesto que dañarán el
Ventilador. NUNCA use ALCOHOL O SOLVENTES.
SERVICIO: Para cualquier reparación, que no sea de mantenimiento
general por parte del usuario, por favor contacte a nuestro equipo de
Servicio al Cliente al (800) 233-0268 de Lunes a Viernes de 8 a.m. a 5 p.m.
LUBRICACIÓN: Los cojinetes de precisión vienen sellados de por
vida en la fábrica y no precisarán ninguna lubricación adicional.
ALMACENAMIENTO: Guarde el Ventilador con estas instrucciones
en un lugar fresco y seco.
DISPOSICIÓN: Los materiales de empaque de cartón corrugado
son reciclables. Para desechar este producto de manera
ecológicamente responsable, comuníquese con su proveedor
de servicio de desechos local o visite www.1800recycling.com®.
1.
2.
3.
(Inseto A)
Del
Engranaje
De Levas
90˚
45˚
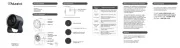
1. Para usar: Enchufe el cordón en un tomacorriente de 120 V, 60 Hz
con puesta a tierra. Seleccione la velocidad de funcionamiento
deseada usando el cordón de tirar en la parte posterior del motor.
PRECAUCIÓN: EL VENTILADOR PUEDE ENCENDERSE CUANDO
LO ENCHUFA POR PRIMERA VEZ.
Primer tirón:Alta Tercer tirón: Baja
Segundo tirón: Mediana Cuarto tirón: APAGADO
ADVERTENCIA: Apague y desenchufe el ventilador antes de
ajustar el ensamblaje de cabeza
2. Para ajustar la altura del cabezal: Mientras se sostiene
firmemente la columna superior, afloje el perno del collar de la
columna (en sentido contrahorario). Eleve o baje el cabezal a
la posición deseada. Vuelva a apretar el perno FIRMEMENTE.
NOTA: Este ventilador es muy pesado. No sostener firmemente
el conjunto del cabezal mientras se ajusta la altura o el ángulo
del cabezal podría resultar en lesiones personales.
3. Oscilación: Empuje hacia abajo la perilla de oscilación en la caja del
motor para hacer que el cabezal del ventilador oscile de lado a lado.
NOTA: EL BARCO DEL VENTILADOR CON 90º EL ÁNGULO DE
LA OSCILACIÓN, PARA OBTENER UNA OSCILACIÓN DE 45º,
CONECTE EL VÍNCULO DE OSCILACIÓN CON EL ORIFICIO MÁS
INTERNO DEL ENGRANAJE DE LEVAS.
GARANTÍA LIMITADA DE AirKing PRODUCTS, INC. (VÁLIDO EN EE.UU., SUS TERRITORIOS, Y CANADÁ ÚNICAMENTE)
QUÉ CUBRE ESTA GARANTÍAS: Este producto está garantizado contra defectos de mano de obra y/o materiales.
CUÁNTO DURA ESTA GARANTÍA: Esta garantía se extiende únicamente al comprador original del producto y dura un (1) año a partir de la fecha
original de compra o hasta que el comprador original del producto venda o transfiera el producto, cualesquiera de ambas que ocurriera en primer lugar.
QUÉ HARÁ AirKing: AirKing, a opción propia, reparará o reemplazará cualquier parte o partes que demuestren ser defectuosas o reemplazará el
producto completo por el mismo modelo u otro comparable. Para todas las reclamaciones de garantía, se debe devolver el producto a AirKing
Products, Inc. a cargo del cliente con la prueba de compra dentro del período de garantía. Comuníquese con el departamento de atención al cliente
de AirKing para obtener una Autorización de Devolución (“RA”, por sus siglas en inglés). NO devuelva los productos sin una RA o no se procesará la
reclamación de la garantía.
QUÉ NO CUBRE ESTA GARANTÍA: Esta garantía no tiene validez si el producto fue dañado o falló debido a un accidente, manipulación u operación
inadecuadas, daño en el envío, abuso, mal uso, reparaciones no autorizadas hechas o el intento de hacerlas. Esta garantía no cubre los costos de
envío para la devolución de productos a AirKing para su reparación o reemplazo. AirKing abonará los cargos de envío de devolución a AirKing con
posterioridad a las reparaciones o el reemplazo bajo garantía.
CUALESQUIERA Y TODAS LAS GARANTÍAS, EXPLÍCITAS O IMPLÍCITAS (INCLUYENDO, SIN LIMITACIÓN, CUALESQUIERA GARANTÍA IMPLÍCITA
DE COMERCIABILIDAD), DURAN UN AÑO A PARTIR DE LA FECHA ORIGINAL DE COMPRA O HASTA QUE EL COMPRADOR ORIGINAL DEL
PRODUCTO VENDA O TRANSFIERA EL PRODUCTO, CUALESQUIERA DE AMBAS QUE OCURRIERA EN PRIMER LUGAR Y EN NINGÚN CASO
LA RESPONSABILIDAD DE AirKing BAJO CUALQUIER GARANTÍA EXPLÍCITA O IMPLÍCITA INCLUIRÁ (I) DAÑOS INCIDENTALES O POR
CONSECUENCIA POR CUALQUIER CAUSA QUE FUERE, O (II) REEMPLAZO O REPARACIÓN DE CUALESQUIERA FUSIBLES HOGAREÑOS,
CORTA-CIRCUITOS O TOMACORRIENTES. INDEPENDIENTEMENTE DE CUALQUIER DECLARACIÓN CONTRARIA, EN NINGÚN CASO
LA RESPONSABILIDAD DE AirKing BAJO CUALQUIER GARANTÍA EXPLÍCITA O IMPLÍCITA PODRÁ EXCEDER EL PRECIO DE COMPRA DEL
PRODUCTO Y DICHA RESPONSABILIDAD TERMINARÁ AL VENCIMIENTO DEL PERÍODO DE GARANTÍA.
Algunos estados y provincias no permiten limitaciones sobre la duración de una garantía implícita, o sobre la exclusión o limitación de los daños
incidentales o por consecuencia, por lo tanto dichas exclusiones o limitaciones podrían no aplicarse en su caso. Esta garantía le otorga a usted
derechos legales específicos. Usted también podría tener otros derechos que varían de estado en estado y de provincia en provincia.
Se requiere prueba de compra antes que se acepte un reclamo bajo garantía.
El manual imprimió en la USA
Inseto A
Figura 6
Figura 7
Detalle A
Detalle B
Figura 5
READ AND SAVE THESE INSTRUCTIONS
READ CAREFULLY BEFORE ATTEMPTING TO ASSEMBLE,
INSTALL, OPERATE OR MAINTAIN THE PRODUCT DESCRIBED.
PROTECT YOURSELF AND OTHERS BY OBSERVING ALL SAFETY
INFORMATION. FAILURE TO COMPLY WITH INSTRUCTIONS COULD
RESULT IN PERSONAL INJURY AND/OR PROPERTY DAMAGE!

Rev. A 10/14 6 5084415 Rev. A 10/14 35084415
Locate Motor Hardware Bag to Assemble Column and Motor Assembly.
1. Place flat section on Upper Tube of Column Assembly next to
Neck on Motor Assembly. Align the 1/2” diameter hole in the
flat section on the Upper Tube of Column Assembly with the
1/2” diameter hole in the Motor Assembly. (Figure 4)
2. Insert the 1/2” X 1” Hex Bolt (3/4” head) through the Motor
Neck, and the Upper Tube Assembly. Place 1/2” diameter Split
Lockwasher then the 1/2” diameter Hex Nut (3/4” head) and
tighten fully with a adjustable wrench. (Figure 4)
3. From the same side of the Motor Neck,insert one 1/4-20 X 1 5/8”
Carriage Bolt through the Arc-Shaped Slot in the Motor Neck
and Hole in the Upper Pipe of Column Assembly. (Figure 4)
To Fasten: Place one 1/4” Flatwasher, one 1/4” Internal Tooth Lock-
washer, a second 1/4” Flatwasher and then tighten the Adjustable
Knob over the remaining threads.
4. Attach pull string to motor speed switch, if desired.
Locate remaining parts from Motor Hardware Bag to Assemble
Grills and Blade to the Motor.
1. Install the Rear Grill onto the Motor, lining up the six holes in the
grill with the six threaded holes in the motor mounting flange.
Install (6) 10-32 X 5/16” Hex Screws through the rear grill into
the mounting flange. Securely tighten all (6) screws. (Figure 6)
2. Push the Fan Blade onto the Motor Shaft, centering the Hub
facing away from the motor, until it stops against the shaft
(Inset A) . Align Square Head Bolt with flat of the motor shaft.
TIGHTEN VERY SECURELY WITH AN ADJUSTABLE WRENCH.
Failure to securely tighten the Bolt could result in damage to
the Fan and/or personal injury.
3. Hold the Front Grill so that the name, in the center, is right side
up and straight across. Starting at the top: Fasten Front Grill
to Rear Grill by sliding the hooked wires on the Front Grill over
the outermost ring on the Rear Grill. The (Figure 7 / Detail A).
bottom most hooks will require the use of a flathead screwdriver
to complete assembly. Stand behind the Fan. Slip the flat of
the screwdriver between the Front and Rear Grills, next to one
of the unfastened hooks. Pull screwdriver (Figure 7 / Detail B)
handle upwards towards the Rear Grill. Slip the Front Grill hook
over the Rear Grill outer ring with a push. Repeat procedure
with remaining hooks.
CAUTION: DO NOT BEND WIRES ON THE FRONT OR THE
REAR GRILLS.
GRILL AND BLADE ASSEMBLY
COLUMN AND MOTOR ASSEMBLY
COLUMN/MOTOR TO BASE ASSEMBLY
1. Rest Column and Motor Assembly on floor next to the Base
Assembly. Tilt Base Assembly up on end. Pick up lower pipe
of Column Assembly and insert into the Mounting Flange. (Figure 5)
2. Tighten the 3/8-16 X 1” Square Head Bolt into the
Mounting Flange.
3. Tilt entire assembly to the upright position.
MAKE SURE BOLTS IN COLUMN AND MOTOR ASSEMBLY STEPS
ARE TIGHT BEFORE STANDING FAN UPRIGHT.
4. Loosen 3/8-16 X 1” Square Heat Bolt in the Mounting Flange.
This will allow the Column to settle in the bottom of the Base
after setting the Fan upright.
5. Tighten the 3/8-16 X 1” Square Head Bolt in the Mounting Flange.
Figure 4
Actual motor not shown for
detailed hardware view.
Locate Hardware Bag “A” to Assemble Base. (Figure 1)
1. Place Base on floor.
2. Fit Mounting Flange through large hole in center of Base.
3. Insert (4) through 3/8-16 X 1” Carriage Bolts Mounting Flange
and .Base
4. Tilt Base and secure one at a time by first putting Carriage Bolt
on a and then a . DO 3/8” Split Lockwasher 3/8-16 Hex Nut
NOT FULLY TIGHTEN AT THIS TIME. Repeat above procedure
with remaining Bolts.
5. GO BACK AND FULLY TIGHTEN Hex Nut each so that the
Flange Base is securely assembled to the .
6. Thread the 3/8-16 X 1” Square Head Bolt Mounting Flange into the .
BASE ASSEMBLY
Figure 1
Mounting Flange
Carriage Bolts (4)
Square Head
Bolt
Base
Hex Nut (4)
Split Lockwasher (4)
HARDWARE BAG A:
(1) Mounting Flange
(1) Square Head Bolt (3/8-16 X 1”)
(4) Carriage Bolts (3/8-16 X 1”)
(4) Split Lockwashers (3/8”)
(4) Hex Nuts (3/8-16)
Square Head Bolt
(3/8-16 X 1”)
Carriage Bolt
(3/8-16 X 1”)
Split Lockwasher (3/8”)
Hex Nut (3/8-16)
Mounting Flange
MOTOR HARDWARE BAG
(1) Hex Bolt (1/2-13 X 1”)
(1) Split Lockwasher (1/2”)
(1) Hex Nut (1/2-13)
(1) Carriage Bolt (1/4-20 X 1 5/8”)
(1) Lockwasher (1/4” Internal Tooth)
(2) Flatwashers (1/4”)
(1) Adjustable Knob
(6) Hex Head Screws (10-32 X 5/16”)
(1) Pull Cord
Hex Bolt
(1/2-13 X 1”)
Split
Lockwasher
(1/2”)
Hex Nut
(1/2-13)
Adjustment Knob
Hex Head Screws
(10-32 X 5/16”) Lockwasher
(1/4” Internal Tooth)
Carriage Bolt
(1/4-20 X 1 5/8”)
Flatwasher (1/4”)
Flatwasher (1/4”)
HARDWARE BAG CONTENTS
INSTRUCCIONES IMPORTANTES DE SEGURIDAD
Cuando use este ventilador, se deben de seguir las siguientes advertencias y
precauciones para reducir el riesgo de incendio, descargas eléctricas y lesiones:
Lea todas las instrucciones antes de usar este Ventilador.
NO utilice este ventilador para ventilar las zonas donde se usen, almacenen o estén presentes líquidos o vapores inflam-
ables, incluidos pinturas, gasolina, barnices, disolventes o productos de acabado para pisos. ¡SIEMPRE lea y siga todas las
advertencias e instrucciones descritas en los envases de estos productos!
SIEMPRE asegúrese de que el enchufe encaje bien en el tomacorriente. Cuando los enchufes no encajan bien en el tomacor-
riente, pueden deslizarse un poco y crear una mala conexión. Esto puede causar que los tomacorrientes se sobrecalienten y
crear un riesgo de incendio potencial. Un electricista calificado debe cambiar los tomacorrientes que se encuentren en esta
condición.
SIEMPRE desenchufe el cable de corriente cuando realice mantenimiento, limpieza o mueva el ventilador. NO use el inter-
ruptor ENCENDIDO/APAGADO (ON/OFF) como el único medio para desconectar de la electricidad. NUNCA deje a los niños
sin supervisión cuando el ventilador esté encendido o conectado. apague y desenchufe el ventilador cuando no SIEMPRE
esté en uso.
ASEGURESE que la fuente de energía para el ventilador sea de 120 Vca . NO enchufe el ventilador en una fuente de energía
de 240 Vca ni en ninguna otra fuente de energía que no sea la indicada.
El cordón eléctrico está equipado con una clavija a tierra de tres espigas que tiene que ser enchufada a un receptáculo del
mismo diseño. Bajo ninguna circunstancia deberá cortarse la espiga a tierra de la clavija. De existir un receptáculo de pared
de dos espigas, deberá reemplazarse por uno de tres espigas debidamente puesto a tierra e instalado de conformidad con el
Código Nacional de Electricidad y todos los códigos y ordenanzas locales aplicables. El trabajo deberá hacerlo un electricista
calificado, utilizando exclusivamente alambre de cobre.
NO UTILICE UN ADAPTADOR DE TRES A DOS CLAVIJAS. LA CONEXIÓN INDEBIDA PODRÍA CREAR EL RIESGO DE SER
ELECTROCUTADO. EL USO DE TALES ADAPTADORES NO ESTÁ PERMITIDO EN CANADÁ.
PARA REDUCIR EL RIESGO DE INCENDIOS, DESCARGAS ELÉCTRICAS SIEMPRE SIGA LAS
SIGUIENTES INSTRUCCIONES Y ADVERTENCIAS:
PRECAUCIÓN
• el uso de cables de extensión, enchufes múltiples, triples, ambientadores eléctricos u otro dispositivo conectado por cables, EVITE
ya que estos dispositivos pueden sobrecalentarse y causar un riesgo de incendio.
• coloque los cables de alimentación debajo de alfombras, tapetes o muebles. Esto puede dañar el cable o causar que se NO
sobrecaliente y originar un riesgo de incendio
•SIEMPRE colocar el ventilador en una superficie estable, plana y nivelada mientras esté funcionando para evitar que el ventilador se caiga.
• inserte ni permita que introduzcan los dedos u objetos en las aberturas de la parrilla del ventilador mientras este esté en NUNCA
funcionamiento, p3-ya que el ventilador puede dañarse o malograrse.
• bloquee, cubra ni obstruya el flujo de aire hacia o desde el ventilador mientras esté en funcionamiento.NO
• utilice este ventilador al aire libre o cerca del agua o lugares húmedos como bañeras, piscinas o jacuzzis. El uso de este NO
ventilador en un lugar húmedo puede provocar una descarga eléctrica.
• cubra el cable de corriente con tapetes, alfombras estrechas o artículos de coberturas similares. No coloque el cable de cor-NO
riente debajo de muebles o artefactos. Coloque el cable de corriente lejos del tráfico de la habitación, donde las personas no se
tropiecen con éste.
• use un solo cable de extensión para hacer funcionar más de un ventilador u otro aparato eléctrico.NUNCA
• use este ventilador si es que se p3-ha dañado o si no funcione adecuadamente. NO
• Este ventilador no es ESTE VENTILADOR NO CUMPLE CON LOS REQUERIMIENTOS DEL ARTÍCULO 547-7 (2008) DEL NEC.
adecuado para su uso en instalaciones agrícolas, incluyendo las áreas donde el ganado, aves de corral u otros animales están
encerrados. Consulte el Artículo 547-7 (2008) del Código Eléctrico Nacional (NEC) o los códigos o normas locales o
estatales aplicables, relacionados con los requerimientos eléctricos para las instalaciones de agricultura.
•ESTE ARTEFACTO NO CUMPLE CON LOS REQUISITOS DEL ARTÍCULO 500 DEL NATIONAL ELECTRICAL CODE (Código Eléc-
trico Nacional) 2008. Este ventilador no es adecuado para uso en lugares peligrosos. Consulte el Artículo 500 del Código Eléctrico
Nacional (NEC) o LOS CÓDIGOS O NORMAS LOCALES O ESTATALES APLICABLES, RELACIONADOS CON LOS REQUERIMIENTOS
ELÉCTRICOS PARA LOS SITIOS PELIGROSOS.
AVISO: Este equipo p3-ha sido probado y cumple con los límites para aparatos digitales Clase B, conforme a la Parte 15 de las Normas
de la FCC. Estos límites están diseñados para brindar protección razonable contra la interferencia perjudicial en una instalación resi-
dencial. Este equipo genera, utiliza y puede irradiar energía de frecuencias de radio y, si no se instala y utiliza de conformidad con las
instrucciones, puede causar interferencia perjudicial a las comunicaciones de radio. Sin embargo, no hay garantía de que la
interferencia no ocurra en una instalación en particular. Si este equipo no causa interferencia perjudicial a la recepción de radio o
televisión, lo cual se puede determinar al encender y apagar el equipo, el usuario puede intentar corregir la interferencia con una
o más de las siguientes medidas: Reorientar o reubicar la antena receptora. Aumentar la separación entre el equipo y el receptor.
Conectar el equipo en un tomacorriente de un circuito diferente a donde está conectado el receptor. Pedir ayuda al distribuidor o a
un técnico experimentado de televisión y radio. Se informa al usuario que los cambios y las modificaciones realizadas al equipo sin la
aprobación del fabricante pueden anular la autoridad del usuario de operar este equipo.
CONSERVE ESTAS INSTRUCCIONES

Rev. A 10/14 55084415Rev. A 10/14 4 5084415
OPERATING INSTRUCTIONS
WARNING: ALWAYS UNPLUG THE CORD BEFORE MOV-
ING OR SERVICING.
WARNING: DO NOT IMMERSE FAN IN WATER!
CLEANING: Use a soft cloth and mild soap solution such as liquid
dish washing detergent. Dry all parts completely before recon-
necting to power supply.
CAUTION: Do not use gasoline, benzine, thinner, harsh
cleaners, etc. as they will damage the Fan. NEVER use
ALCOHOL OR SOLVENTS.
SERVICING: For servicing, other than general user maintenance,
please contact Customer Service at 800-233-0268, Monday
through Friday, from 8am-5pm Eastern.
LUBRICATION: Precision bearings are sealed at the factory for
life and do not require further lubrication.
STORAGE: Store the Fan, with these instructions, in a clean and dry place.
DISPOSITION: Corrugated packaging materials are recyclable. For
environmentally responsible disposal of this product, contact your
local waste service provider or visit www.1800recycling.com®.
MAINTENANCE
1.
2.
3.
(Inset A)
Cam Gear
90˚
45˚
1. To Operate: Plug cord into a grounded 120V, 60 Hz outlet. Select desired
operating speed with pull cord on the rear of the motor.
CAUTION: FAN MAY START UP WHEN INITIALLY PLUGGED IN.
First Pull:High Third Pull: Low
Second Pull: Medium Fourth Pull: OFF
WARNING: Turn off and unplug the fan before adjusting the head assembly.
2. To Adjust Head Height: While holding upper column firmly, loosen bolt
on column collar (turn counterclockwise). Raise or lower head to desired
position. FIRMLY retighten bolt.
NOTE: This Fan is very heavy. Failure to securely hold onto the head
assembly while adjusting head height or head angle could result in
personal injury.
3. Oscillation: Push down oscillation knob on motor housing to make fan
head move from side to side.
NOTE: FAN IS SHIPPED WITH 90º OSCILLATION ANGLE, FOR 45º OSCIL-
LATION ANGLE, CONNECT THE OSCILLATION LINK TO THE INNERMOST
HOLE IN THE CAM GEAR. (Inset A)
AirKing PRODUCTS, INC. LIMITED WARRANTY VALID IN THE USA, ITS TERRITORIES, AND CANADA ONLY) (
WHAT THIS WARRANTY COVERS: This product is warranted against defects in workmanship and/or materials.
HOW LONG THIS WARRANTY LASTS: This warranty extends only to the original purchaser of the product and lasts for one (1) year from the date of
original purchase or until the original purchaser of the product sells or transfers the product, whichever first occurs.
WHAT AirKing WILL DO: AirKing will, at its sole option, repair or replace any part or parts that prove to be defective or replace the whole product
with the same or comparable model. For all warranty claims, the product must be returned to AirKing Products, Inc. at customer expense with proof
of purchase within the warranty period. Contact the AirKing customer service department to obtain a Return Authorization (“RA”). DO NOT return
products without an RA or the warranty claim will not be processed.
WHAT THIS WARRANTY DOES NOT COVER: This warranty does not apply if the product was damaged or failed because of accident, improper
handling or operation, shipping damage, abuse, misuse, unauthorized repairs made or attempted. This warranty does not cover shipping costs for the
return of products to AirKing for repair or replacement. AirKing will pay return shipping charges from AirKing following warranty repairs or replacement.
ANY AND ALL WARRANTIES, EXPRESSED OR IMPLIED (INCLUDING, WITHOUT LIMITATION, ANY IMPLIED WARRANTY OF MERCHANTABILITY),
LAST ONE YEAR FROM THE DATE OF ORIGINAL PURCHASE OR UNTIL THE ORIGINAL PURCHASER OF THE PRODUCT SELLS OR TRANSFERS
THE PRODUCT, WHICHEVER FIRST OCCURS AND IN NO EVENT SHALL AirKing’S LIABILITY UNDER ANY EXPRESS OR IMPLIED WARRANTY
INCLUDE (I) INCIDENTAL OR CONSEQUENTIAL DAMAGES FROM ANY CAUSE WHATSOEVER, OR (II) REPLACMENT OR REPAIR OF ANY
HOUSE FUSES, CIRCUIT BREAKERS OR RECEPTACLES. NOTWITHSTANDING ANYTHING TO THE CONTRARY, IN NO EVENT SHALL AirKing’S
LIABILITY UNDER ANY EXPRESS OR IMPLIED WARRANTY EXCEED THE PURCHASE PRICE OF THE PRODUCT AND ANY SUCH LIABILITY SHALL
TERMINATE UPON THE EXPIRATION OF THE WARRANTY PERIOD.
Some states and provinces do not allow limitations on how long an implied warranty lasts, or the exclusion or limitation of incidental or consequential
damages, so these exclusions or limitations may not apply to you. This warranty gives you specific legal rights. You may also have other rights which
vary from state to state and province to province.
Proof of purchase is required before a warranty claim will be accepted.
Manual printed in USA
(1) Conjunto de motor de 3 velocidades
(1) Conjunto de columna
(1) Base
(1) Hélice
(1) Parrilla delantera
(1) Parrilla trasera
(1) Bolsa de tornillería
(1) Motor bolsa tornillería
(1) Hoja de instrucciones
INCLUIDO CON EL VENTILADOR:
Ventilador de Pedestal Oscilante de 60,96cm / 76,2cm
MODEL 9125, 9135, 9174, 9175
Ventilador de Pedestal No Oscilante de 60,96cm / 76,2cm
MODEL 9124, 9130, 9171, 9170
Figure 7
Detail A
Detail B
Figure 6
Inset A
Figure 5
LEA Y GUARDE ESTAS INSTRUCCIONES
LEA CUIDADOSAMENTE LAS INSTRUCCIONES ANTES DE INTENTAR
ARMAR, INSTALAR, USAR O DAR MANTENIMIENTO AL PRODUCTO
DESCRITO. PROTÉJASE A SÍ MISMO Y A LOS DEMÁS CUMPLIENDO
CON TODA LA INFORMACIÓN DE SEGURIDAD. EL NO SEGUIR LAS
INSTRUCCIONES PODRÍA RESULTAR EN LESIONES PERSONALES Y/O
DAÑOS A LA PROPIEDAD.
Product specificaties
| Merk: | Air King |
| Categorie: | Ventilator |
| Model: | 9124 |
Heb je hulp nodig?
Als je hulp nodig hebt met Air King 9124 stel dan hieronder een vraag en andere gebruikers zullen je antwoorden
Handleiding Ventilator Air King

6 Juni 2023

4 Juni 2023

31 Mei 2023

31 Mei 2023

25 Mei 2023

20 Mei 2023

17 Mei 2023

14 Mei 2023

11 Mei 2023

9 Mei 2023
Handleiding Ventilator
- EMOS
- Tripp Lite
- Weasy
- Master
- Proficare
- Svan
- Proline
- RestantOutlet
- Velleman
- Superior
- Biltema
- Ardes
- Trotec
- Signature
- Domo
Nieuwste handleidingen voor Ventilator
16 September 2025
15 September 2025
15 September 2025
15 September 2025
15 September 2025

15 September 2025
15 September 2025
15 September 2025
13 September 2025
12 September 2025