ACP Jetwave III DS1400E Handleiding
Bekijk gratis de handleiding van ACP Jetwave III DS1400E (8 pagina’s), behorend tot de categorie Magnetron. Deze gids werd als nuttig beoordeeld door 3 mensen en kreeg gemiddeld 3.7 sterren uit 2 reviews. Heb je een vraag over ACP Jetwave III DS1400E of wil je andere gebruikers van dit product iets vragen? Stel een vraag
Pagina 1/8

Quick Start Reference Guide
Refer to Product Safety Manual for Safety Statements
Complete Owner’s Manual available online
The switching operation of this
microwave oven can cause voltage
fluctuations on the supply line. The
operation of this oven under unfavor-
able voltage supply conditions can
have adverse effects. This device is
intended for the connection to a power
supply system with a maximum
permissible system impedance Zmax
of 1.1 Ohm at the interface point of
the user’s supply. The user has to
ensure that this device is connected
only to a power supply system which
fulfills the requirement above. If
necessary, the user can ask the public
power supply company for the system
impedance at the interface point.
So...how do I use it?
Manual Operation
To cook food using a specific entered time and power level.
1. Press Preheat On/Off pad to start the oven.
•Oven Preheating 450°F displays with Oven Preheating flashing.
(example of 450°F shown)
2. Oven reaches preheat temperature.
• Signal sounds and Ready 450°F displays. (example of 450°F shown)
3. Press Time Entry pad.
• Enter desired cooking time by using numeric keypad.
4. Press Temp Entry pad if cooking temperature differs from preheat temperature.
• Enter the new temperature.
5. Press Power Level pad.
• Press numeric key pad for desired level. Press numeric key pad again to
set power level to 100%.
• For a lower microwave power, press pads 1 (for 10%) through 9 (for 90%).
0 turns off the microwave power and cooking is by convection only.
6. If stage cooking is desired, press STAGE pad and repeat steps 3, 4, and 5.
• Up to 4 different stages can be programmed.
7. Press the Start pad to begin the cooking cycle.
Programming Items
1. Oven must be ON.
• Press Preheat On/Off.
•Oven Preheating 450°F displays with Oven Preheating flashing.
(example of 450°F shown)
2. Oven reaches preheat temperature.
• Signal sounds and Ready 450°F displays with Ready flashing.
(example of 450°F shown)
3. Press Program Save pad.
4. Press pad to be programmed or reprogrammed.
5. Press Time Entry pad to program amount of cooking time.
• The total microwave cooking time (all stages combined) is 20 minutes.
6. Press Temp Entry pad to program the cooking temperature.
• Enter desired temperature by using numeric pads.
7. Press Power Level pad to program level of microwave power.
• Press numeric key pad for desired level. Press numeric key pad again to
set power level to 100%.
• For a lower microwave power, press pads 1 (for 10%) through 9 (for 90%).
0 turns off the microwave power and cooking is by convection only.
8. Press Stage pad.
• Enter cook time, temp and power level as in steps 4. 5 and 6.
• To enter another cooking stage for that pad, press Stage pad again. Up to
four different stages can be programmed.
9. Press the Program Save pad to save the program and changes.
NOTE: To discard changes, press Stop/Reset pad before pressing Program
Save pad.
Programming
Preheat Setting
The factory default preheat setting
is 450°F (230°C). To program the
preheat setting oven must be ON:
1. Press Program Save pad.
2. Press Temp Entry pad.
3. Enter desired temperature by
using the numeric key pads.
4. Preheat temperature is changed.
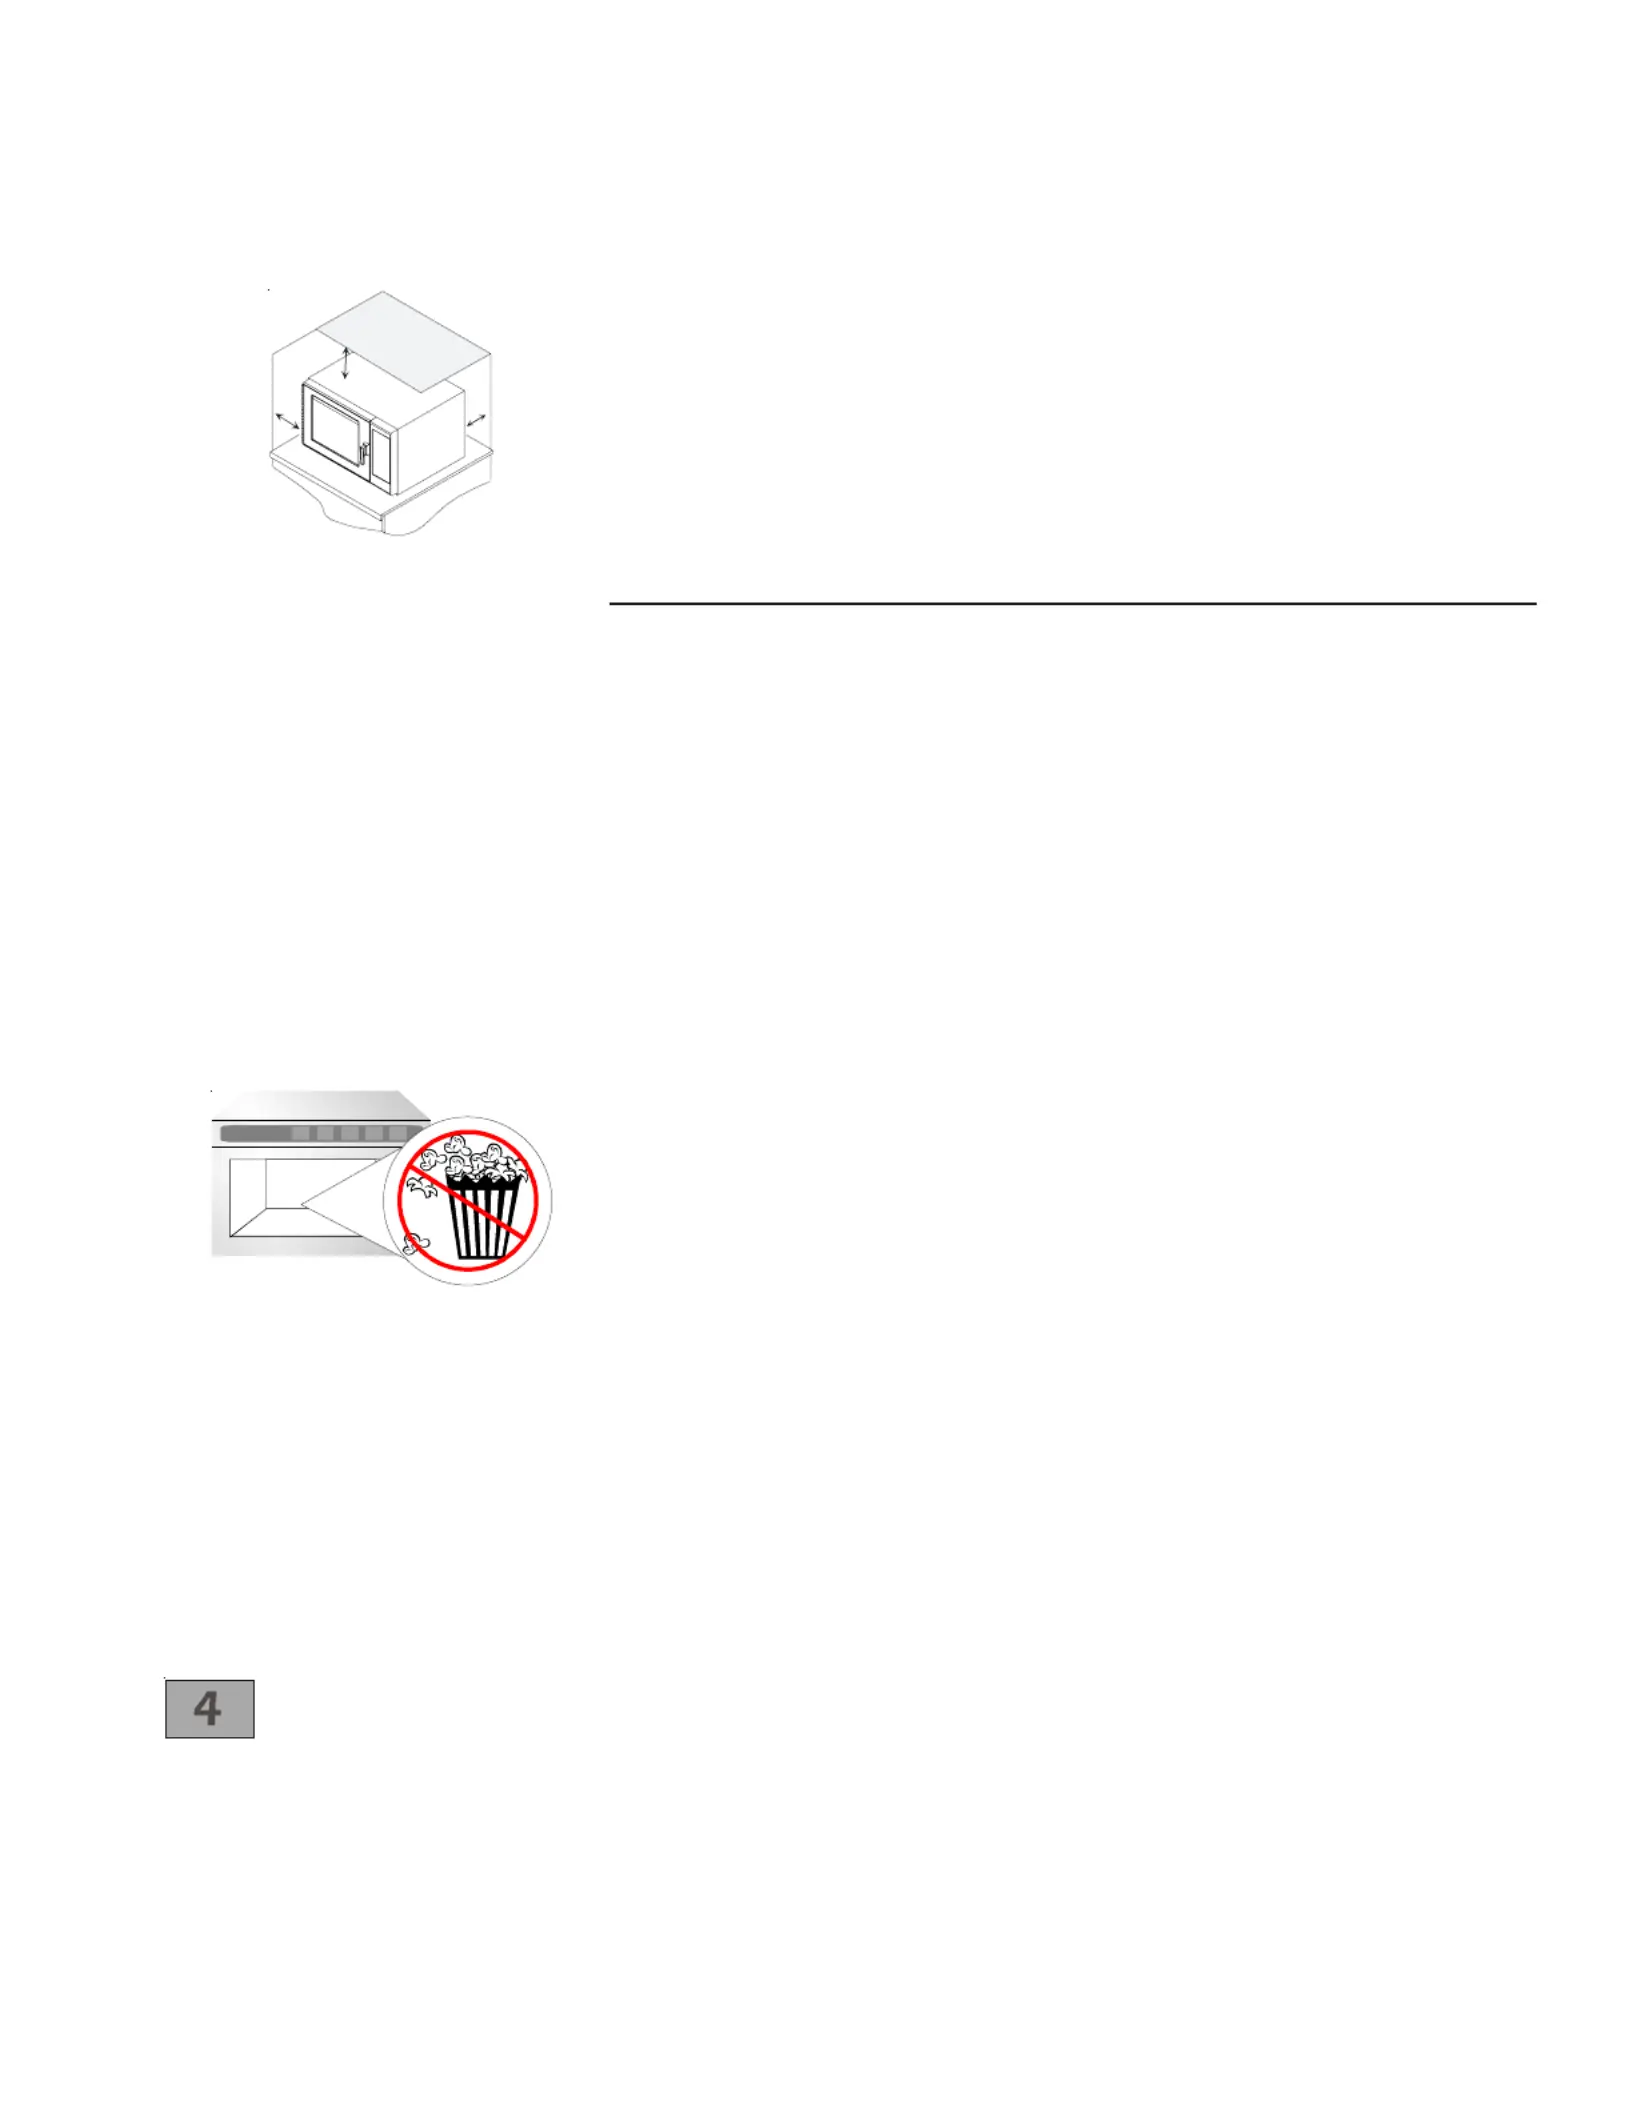
Oven Wall Clearances
A—For North American (UL/CSA) models, allow at least 2” (5.1 cm) of clearance around top of
oven. For International (50 Hz) models, allow at least 7” (17,8 cm) of clearance around top of
oven. Proper air flow around oven cools electrical components. With restricted air flow, oven
may not operate properly and life of electrical parts is reduced.
B—Allow at least 2 9/16” (6,5 cm) between air discharge on back of oven and back wall.
C—Allow at least 1 1/4” (3 cm) of clearance around sides of oven.
C
A
B
Preprogrammed
Pads
To cook food using preprogrammed
cooking sequences.
1. Open oven door and place food
in oven. Close door.
2. Press desired pad.
3. Oven begins to cook.
4. At end of cooking cycle oven
beeps and shuts off.
No popcorn

© 2007 AGA Commercial Products
Amana, Iowa 52204
Part No. 13092801
Printed in U.S.A. 05/07
For full product documentation visit:
www.amanacommercial.com
Quick Start Reference Guide
Refer to Product Safety Manual for Safety Statements
Complete Owner’s Manual available online
DO NOT power spray
Cleaning Teflon
Coated Oven
Cavity
• Wear protective rubber gloves when
cleaning oven.
• Use only a plastic utensil or nylon
scouring pad to aid in removing soil
or build-up from the oven interior.
• Do not use knife, metal utensil, or
steel wool pad to remove baked
on material. This will damage the
teflon coating.
• Refer to warranty for limitations
regarding teflon interior and
cleaning requirements.
Can I change an option?
Options such as single or double pad programming, beep volume,
and maximum cooking time can be changed to suit individual
preferences.
To change options oven STANDBY must display:
1. Press hidden pad.
• Pad is unmarked and located to the direct left of Preheat On/Off pad.
• Nothing will be displayed when hidden pad is pressed.
2. Press Program Save pad.
• The first user option will display. Oven is now in options mode.
3. Press number pad that controls option to be changed.
• See table below for options.
• Current option will display.
4. Press numeric pad again to change the option.
• Each time pad is pressed, option will change.
• Match code displayed with code for desired option.
5. Press Program Save pad to save changes.
• To change additional options, repeat steps 3 and 4.
• Changes take affect after Program Save pad is pressed.
• Press Stop/Reset to return to STANDBY, or open and close oven door.
?
Numbered Pads Display Options (Factory Settings in Bold)
1
Double Digit Entry
Disabled
Enabled
Allows 10 (0-9) preprogrammed pads.
Allows 100 (00-99) preprogrammed pads.
2
Manual Time Entry
Disabled
Enabled
Manual time entry/cooking not allowed
Manual time entry/cooking allowed
3
Reset on Door Open
Disabled
Enabled
Opening oven door does not reset oven back to ready mode
Opening oven door resets the oven back to ready mode
4
Keybeep
Disabled
Enabled
Keys do not beep when pressed (keybeep off)
Keys beep when pressed (keybeep on)
5
Keybeep Volume
OFF
LOW
MEDIUM
HIGH
Keybeep volume OFF
Keybeep volume LOW
Keybeep volume MEDIUM
Keybeep volume HIGH
6
End of Cook Signal
Solid Beep
3 Second Beep
4 Beeps Once
4 Beeps Repeating
Food done signal is a continuous beep until reset by user
Food done signal is a three second beep
Food done signal is four beeps, continuously.
Food done signal is four beeps, four times
7
Keypad Active
15 SECONDS
30 SECONDS
60 SECONDS
120 SECONDS
ALWAYS
Keypad time entry window is 15 seconds
Keypad time entry window is 30 seconds
Keypad time entry window is one minute
Keypad time entry window is two minutes
Keypad time entry window is always active
8
Preheat Warnings
Disabled
Program Temp
Cavity Temp
Both
Both temperature warnings off
Warning only when preheat temperature does not match preprogrammed temperature
Warning only when actual oven cavity temperature is not to preheat temperature
Both temperature warnings on
TEMP PAD
Temperature Scale
Degrees F
Degrees C
Temperatures are displayed in °F for 60 Hz models
Temperatures are displayed in °C for 50 Hz models
CLEAN FILTER
Message Frequency
Disabled
Weekly
Monthly
Quarterly
Oven will not display Clean Filter
Oven will display Clean Filter every seven (7) days
Oven will display Clean Filter every thirty (30) days
Oven will display Clean Filter every ninety (90) days

Guía de Consulta Rápida para el Arranque
Consulte las Normas de Seguridad en el Manual de Seguridad del Producto
Manual del Propietario completo disponible en línea
El funcionamiento intermitente de este
horno microondas puede ocasionar
fluctuaciones de voltaje en la línea de
alimentación. Si la tensión de alimentación
es inadecuada, el funcionamiento de este
horno microondas puede tener efectos
perjudiciales. Este aparato p3-ha sido
diseñado para conectarse a un sistema
de alimentación cuya impedancia admisible
máxima Zmax sea de 1,1 ohmios en el
punto de interconexión de la fuente del
usuario. El usuario debe garantizar que
este dispositivo se conecte sólo a un
sistema de alimentación que cumpla con
este requisito. Si es necesario, el usuario
puede pedirle a la empresa de energía
eléctrica información sobre la impedancia
del sistema en el punto de interconexión.
Y entonces... ¿cómo lo uso?
Funcionamiento Manual
Para cocinar alimentos en un tiempo y a un nivel de potencia específicos de su elección.
1. Oprima la tecla Preheat On/Off (Precalentamiento Activado/Desactivado) para encender
el horno.
•Horno precalentando 450°F aparece con el término Horno precalentando
parpadeando. (aparece ejemplo de 450°F)
2. El horno alcanza la temperatura de precalentamiento.
• La señal del horno suena y se muestra Ready 450°F (Listo 450°F). (aparece ejemplo
de 450°F)
3. Oprima la tecla Time Entry (Ingresar tiempo).
• Ingrese el lapso de cocción deseado mediante el teclado numérico.
4. Oprima la tecla Temp Entry (Ingresar temperatura) si la temperatura de cocción no es igual
a la temperatura de calentamiento.
• Ingrese la nueva temperatura.
5. Oprima la tecla Power Level (Nivel de potencia).
• Oprima la tecla numérica para el nivel deseado. Oprima la tecla numérica para establecer
el nivel de potencia a 100%.
• Para reducir la potencia de microondas, oprima las teclas 1 (10%) a la 9 (90%). 0 apaga la
potencia del microondas y la cocción se lleva a cabo sólo mediante convección.
6. Si desea cocinar por etapas, oprima la tecla STAGE (ETAPA) y repita los pasos 3, 4 y 5.
• Se puede programar hasta 4 etapas distintas.
7. Oprima la tecla Start (Arrancar) para comenzar el ciclo de cocción.
Programación
1. El horno deber estar en la posición ON (ENCENDIDO).
• Oprima Preheat On/Off (Precalentamiento Activado/Desactivado).
•Horno precalentando 450°F aparece con el término Horno precalentando
parpadeando. (aparece ejemplo de 450°F)
2. El horno alcanza la temperatura de precalentamiento.
• La señal del horno suena y se muestra Ready 450°F (Listo 450°F) con el término
Ready (Listo) parpadeando. (aparece ejemplo de 450°F)
3. Oprima la tecla Program Save (Guardar programa).
4. Oprima la tecla que desea programar o reprogramar.
5. Oprima la tecla Time Entry (Ingresar tiempo) para programar el lapso de cocción.
• El lapso de cocción de microondas total (todas las etapas combinadas) es de 20 minutos.
6. Oprima la tecla Temp Entry (Ingresar temperatura) para programar la temperatura de
cocción.
• Ingrese la temperatura deseada mediante las teclas numéricas.
7. Oprima la tecla Power Level (Nivel de potencia) para programar el nivel de potencia de
microondas.
• Oprima la tecla numérica para el nivel deseado. Oprima la tecla numérica para establecer
el nivel de potencia a 100%.
• Para reducir la potencia de microondas, oprima las teclas 1 (10%) a la 9 (90%). 0 apaga la
potencia del microondas y la cocción se lleva a cabo sólo mediante convección.
8. Oprima la tecla Stage (Etapa).
• Ingrese el tiempo de cocción, temperatura y el nivel de potencia como lo hizo en los
pasos 4, 5 y 6.
• Para programar otra etapa de cocción en esa tecla, oprima de nuevo la tecla Stage
(Etapa). Se puede programar hasta cuatro etapas distintas.
9. Oprima la tecla Program Save (Guardar programa) para guardar los cambios que hizo
al programa.
NOTA: Para anular los cambios, oprima la tecla Stop/Reset (Parar/Restaurar) antes de
oprimir la tecla Program Save (Guardar programa).
Cómo programar el ajuste
de precalentamiento
El ajuste de precalentamiento de fábrica es
230°C (450°F). Para programar el ajuste
de precalentamiento el horno debe
estar ENCENDIDO:
1. Oprima la tecla Program Save (Guardar
programa).
2. Oprima la tecla Temp Entry (Ingresar
temperatura).
3. Ingrese la temperatura deseada
mediante las teclas numéricas.
4. Ha cambiado la temperatura de
precalentamiento.
Espacio Libre Alrededor de las Paredes del Horno
A—Para los modelos de América del Norte (UL/CSA), deje al menos 5,1 cm (2 pulg.) de espacio libre alrededor de
la parte superior del horno. Para modelos Internacionales (50 Hz), deje al menos 17,8 cm (7 pulg.) de espacio
libre alrededor de la parte superior del horno. La circulación de aire adecuada alrededor del horno enfría sus
componentes eléctricos. Si se restringe la circulación de aire, posiblemente no funcione correctamente el
horno y se reduzca la duración de las piezas eléctricas.
B—Deje al menos 6,5 cm (2 9/16 pulg.) entre la salida de aire, en la parte posterior del horno, y la pared de fondo.
C—Deje al menos 3 cm (1 1/4 pulg.) de espacio libre por los lados del horno.
C
A
B
Teclas
Preprogramadas
Para cocinar alimentos mediante
secuencias de cocción preprogramadas.
1. Abra la puerta del horno e introduzca
los alimentos. Cierre la puerta.
2. Oprima la tecla deseada.
3. El horno empieza a cocinar los alimentos.
4. Al terminar el ciclo de cocción, el
horno emite un pitido y se apaga.
No use para hacer
palomitas de maíz
Product specificaties
Merk: | ACP |
Categorie: | Magnetron |
Model: | Jetwave III DS1400E |
Heb je hulp nodig?
Als je hulp nodig hebt met ACP Jetwave III DS1400E stel dan hieronder een vraag en andere gebruikers zullen je antwoorden
Handleiding Magnetron ACP
26 Augustus 2025
26 Augustus 2025
25 Augustus 2025
25 Augustus 2025
25 Augustus 2025
25 Augustus 2025
25 Augustus 2025
25 Augustus 2025
20 Augustus 2022
20 Augustus 2022
Handleiding Magnetron
- Curtis
- Cookology
- Electrolux-Rex
- ElectriQ
- Cosmo
- WestBend
- Elba
- Summit
- Continental Edison
- Omega
- Tatung
- Caple
- Guzzanti
- Carrefour Home
- Arcelik
Nieuwste handleidingen voor Magnetron
26 Augustus 2025
26 Augustus 2025
26 Augustus 2025
26 Augustus 2025
26 Augustus 2025
26 Augustus 2025
25 Augustus 2025
25 Augustus 2025
21 Augustus 2025
19 Augustus 2025