4ms Pod 104X Handleiding
4ms
Niet gecategoriseerd
Pod 104X
Bekijk gratis de handleiding van 4ms Pod 104X (4 pagina’s), behorend tot de categorie Niet gecategoriseerd. Deze gids werd als nuttig beoordeeld door 3 mensen en kreeg gemiddeld 4.7 sterren uit 2 reviews. Heb je een vraag over 4ms Pod 104X of wil je andere gebruikers van dit product iets vragen? Stel een vraag
Pagina 1/4

Pod 104X
Eurorack Enclosure from 4ms Company
Usage Guide 1.1 – March 12th, 2025
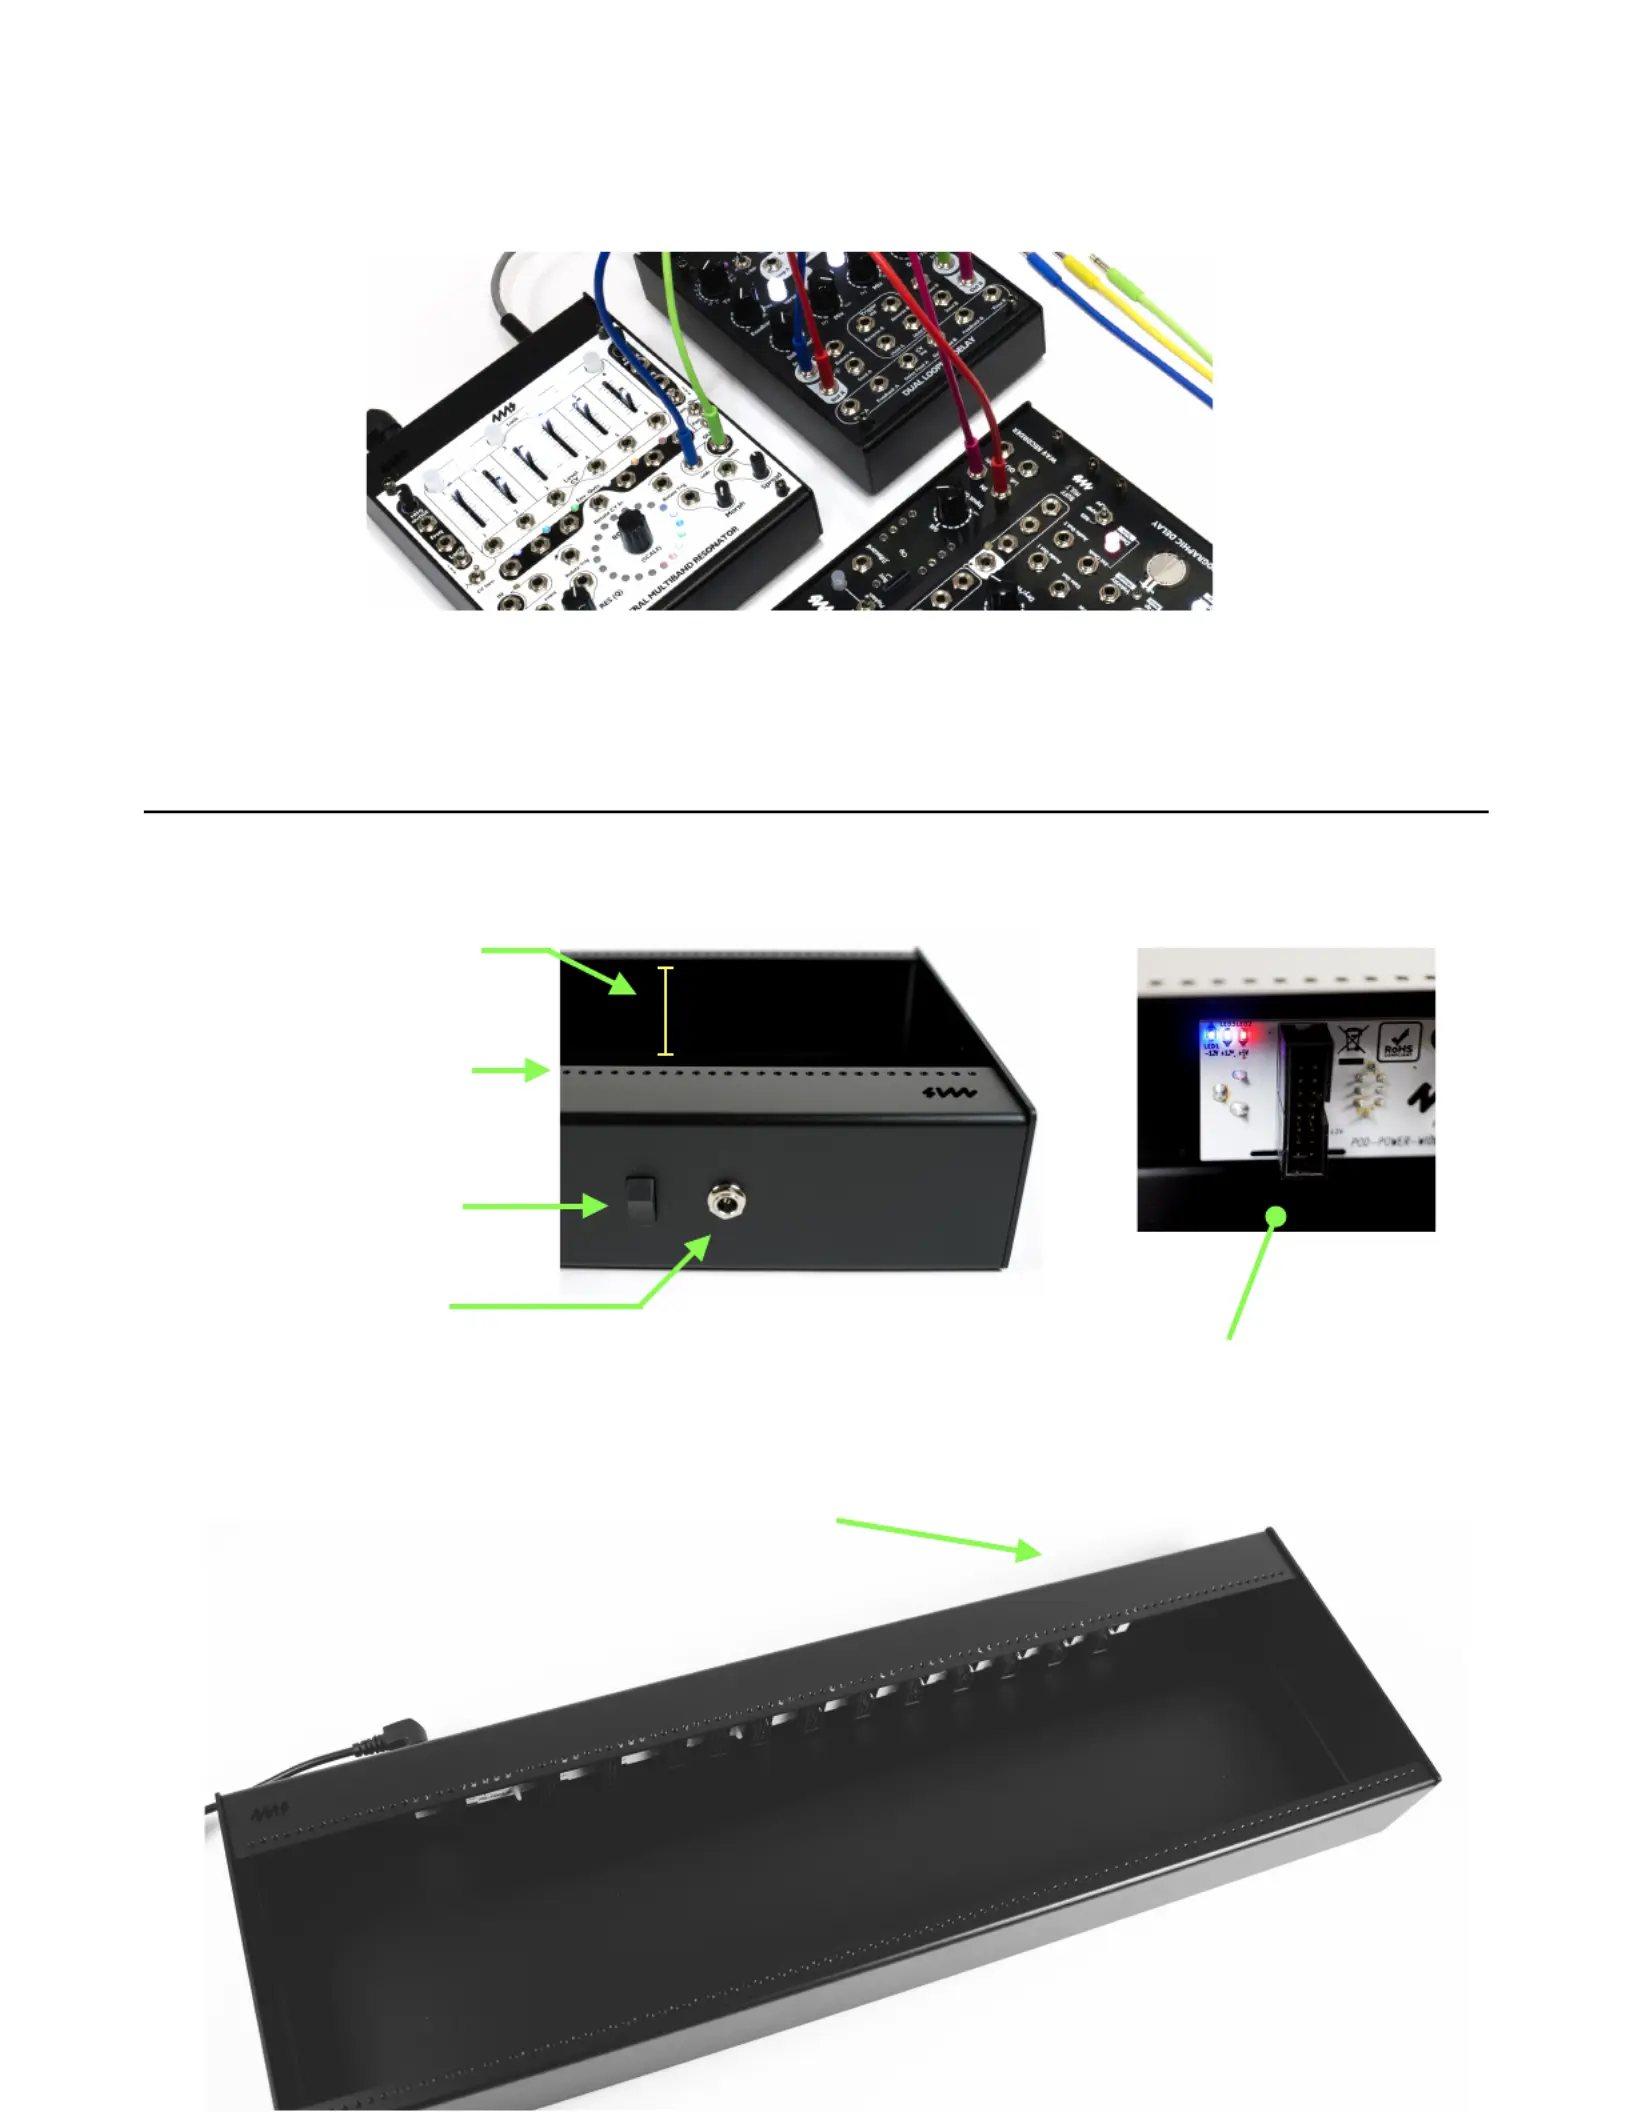
The 4ms Pod104X is a 104HP low-cost, portable, compact enclosure that turns Eurorack modules into
a table-top instrument. Pods come with an integrated power supply which allows you to daisy-chain
multiple units in different configurations using only a single power brick.!
Overview
!
!
"
M3 threads
(Screws included)
Additional Barrel jack
at opposite end
For daisy-chaining Pods
13 Eurorack power headers
Barrel jack
15-24VDC power input
55mm (2.16”)
Maximum module depth
Power Switch

Installing a module
Congratulations on your purchase of a Pod! It’s easy to install a
standard Eurorack module in a Pod:!
(1) Unplug barrel cables and power brick cables from the Pod.!
(2) Attach your module’s power ribbon cable to a 16-pin power
header on the Pod. #
The Pod power header is keyed so that the cable cannot be
inserted upside-down. The red stripe should be down, and
should connect to the -12V on the module.
(3) Connect the other end of the ribbon cable to your Eurorack
module (unless it's already be attached, of course!)!
(4) Place the module into the Pod so that all screw holes on the module’s faceplate line up with the
screw holes on the Pod.!
(5) Use M3 screws (included with Pod) to secure the module’s faceplate to the Pod.!
(6) Repeat steps 2-5 to install more modules. If you need to install more modules than there are power
headers, you can use a Multi Power Cable.!
(7) Power on the Pod by plugging a power brick into either
one of the jacks on the back of the Pod. #
Or, if you already have another Pod that’s receiving
power, you can daisy-chain the new Pod using a barrel
cable.
(8) Optional: you may attach the included adhesive rubber
feet to the bottom of your Pod. To use Pods on a
pedalboard, you may attach Velcro or hook-and-loop
fastener instead (not included)
Power
The Pod104X has an integrated power supply with thirteen standard Eurorack power headers. All
Pods work with all modules that use 10 and/or 16-pin power cables.
Power Bricks
To supply power, plug a Power Brick (sold separately) to
either one of the jacks on the back of the Pod. Wherever
Pods are sold, you can purchase a Power Brick that’s
compatible with the Pods. You also can use the Power
Brick sold for use with the Row Power system (90W
Brick). Or you can use your own power brick as long as it
meets these specifications:!
•
Voltage: 15VDC to 24VDC (19 - 20VDC is common)!
•
Style: 2.1mm positive tip barrel plug (5.5mm outer
diameter)!
•
Wattage or amperage: No particular specification is
required. Virtually every modern power brick will be
able to power a few daisy-chained Pods. We sell a
45W brick and a 90W brick, either of which are
sufficient for a large system of daisy-chained Pods.!
Page of 2 4
Warning: If a screw seems to be unusually
tight or pointing at an angle other than
vertical, back it out and try again. The
threads on the Pod’s screw holes can be
permanently damaged by forcing a screw
that’s the wrong size or installed at an
angle.
Multi Power Cables
If you need to install more than 13 modules in
your Pod, you can use a Multi Power Cable,
available wherever Pods are sold. One end
plugs into the power header on the Pod, and
the other connectors plug directly to
modules. Each Multi Power Cable can power
three modules from one power header. Multi
Power Cables come in two varieties: 10-pin,
and 16-pin. Choose the one that matches the
type of power cable on your modules.

Daisy-chaining
Pods are meant to be daisy-chained. When you plug a
Power Brick into one of the jacks on the back of a Pod,
the other jack can be used to power an additional Pod.
Simply connect a Barrel Cable from one Pod to the next.
You can continue to daisy-chain Pods to make long
chains! With the 45W Power Brick sold for use with
Pods, eight or more Pods can be daisy-chained
(depending on the total power consumption of all the
modules). !
!
Tips
•
Pods use M3 screws (which are included). You may use any other M3 screw, such as Befaco
Knurlies, but do not use screws with other thread sizes to avoid permanently damaging the threads
of the Pod.!
•
The Pod104X has 2.16” (55mm) of depth on the inside. The depth of all modules, including the
power header, must be less than or equal to 55mm. Due to manufacturing variances and the
flexibility of the materials, this dimension may vary +/- 1mm.!
•
Exceeding the maximum power draw for a Pod may cause modules to function poorly (or not at all).
It’s possible that exceeding the maximum ratings may damage your modules (this is true for any
power supply)."
Page of 3 4
Barrel Cables
Barrel Cables are used to daisy-chain Pods.
These same cables can be used in the Row
Power system: You can even daisy-chain a Pod
and a Row Power together!
Never plug more than one power brick
into a Pod or a chain of Pods!
Product specificaties
Merk: | 4ms |
Categorie: | Niet gecategoriseerd |
Model: | Pod 104X |
Heb je hulp nodig?
Als je hulp nodig hebt met 4ms Pod 104X stel dan hieronder een vraag en andere gebruikers zullen je antwoorden
Handleiding Niet gecategoriseerd 4ms
2 Augustus 2025
4 Mei 2024
3 Augustus 2023
3 Augustus 2023
24 Juni 2023
16 Juni 2023
16 Juni 2023
2 Juni 2023
19 Mei 2023
15 Mei 2023
Handleiding Niet gecategoriseerd
- Colt
- MIOPS
- Cameo
- Orbitrek
- Sol Expert
- Vaddio
- CDP
- Tru Components
- Kendall Howard
- Trace Elliot
- Kopul
- Ikelite
- JML
- Badiona
- Esotec
Nieuwste handleidingen voor Niet gecategoriseerd
2 Augustus 2025
2 Augustus 2025
2 Augustus 2025
2 Augustus 2025
2 Augustus 2025
2 Augustus 2025
2 Augustus 2025
2 Augustus 2025
2 Augustus 2025
2 Augustus 2025