Techno Line WS 6830 Handleiding
Techno Line Asztali WS 6830
Bekijk gratis de handleiding van Techno Line WS 6830 (3 pagina’s), behorend tot de categorie Asztali. Deze gids werd als nuttig beoordeeld door 49 mensen en kreeg gemiddeld 4.1 sterren uit 2 reviews. Heb je een vraag over Techno Line WS 6830 of wil je andere gebruikers van dit product iets vragen? Stel een vraag
Pagina 1/3
DE1
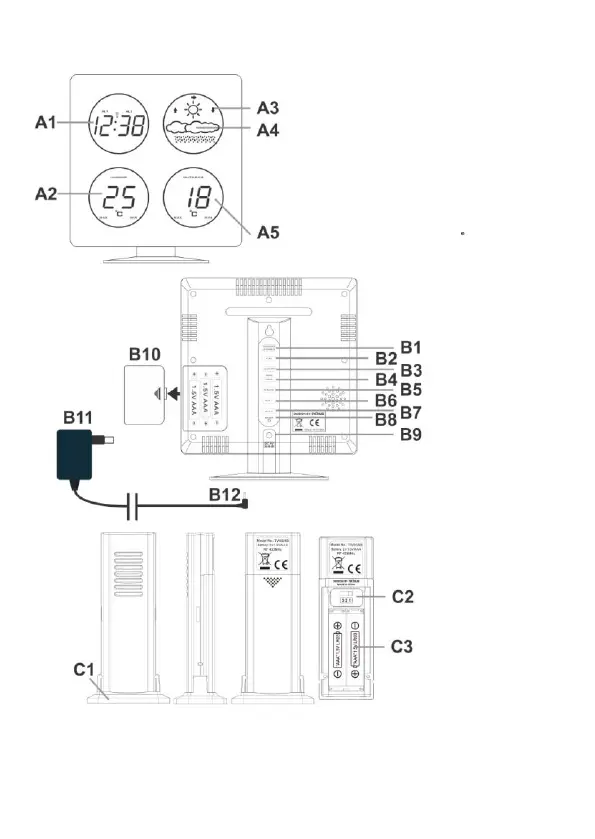
WS6830 - BEDIENUNGSANLEITUNG
LED-WETTERSTATION MIT FUNKUHR UND ALARM
Product specificaties
| Merk: | Techno Line |
| Categorie: | Asztali |
| Model: | WS 6830 |
| Kleur van het product: | Black, Orange |
| Ingebouwd display: | Ja |
| Breedte: | 172 mm |
| Diepte: | 110 mm |
| Hoogte: | 194 mm |
| Stroombron: | Batterij/Accu |
| Alarm functie: | Ja |
| Klok functie: | Ja |
| Ophangsysteem voor aan de muur: | Ja |
| Meetfuncties: | Indoor thermometer, Outdoor thermometer |
| Meetfuncties trend display: | Thermometer |
| weerstation extremum data: | Thermometer |
| Weersvoorspelling: | Ja |
| Type batterij: | AAA |
| Aantal batterijen (receiver): | 2 |
| Aantal batterijen (sensor): | 3 |
| DCF radio klok: | Ja |
| Oudoor sensorbereik: | 30 m |
| Transmissiefrequentie: | 4.3 GHz |
Heb je hulp nodig?
Als je hulp nodig hebt met Techno Line WS 6830 stel dan hieronder een vraag en andere gebruikers zullen je antwoorden
Handleiding Asztali Techno Line

16 Maart 2026
9 Maart 2026
25 November 2025
25 November 2025
3 December 2024
3 December 2024
3 December 2024
3 December 2024
3 December 2024
3 December 2024
Handleiding Asztali
Nieuwste handleidingen voor Asztali
12 Mei 2026
28 April 2026
23 April 2026
20 April 2026
13 Maart 2026
12 Maart 2026
12 Maart 2026
12 Maart 2026
12 Maart 2026
3 Maart 2026