StarTech.com UNIRAILS2U Handleiding
StarTech.com Niet gecategoriseerd UNIRAILS2U
Bekijk gratis de handleiding van StarTech.com UNIRAILS2U (2 pagina’s), behorend tot de categorie Niet gecategoriseerd. Deze gids werd als nuttig beoordeeld door 40 mensen en kreeg gemiddeld 4.4 sterren uit 7 reviews. Heb je een vraag over StarTech.com UNIRAILS2U of wil je andere gebruikers van dit product iets vragen? Stel een vraag
Pagina 1/2
Instruction Manual
DE: Bedienungsanleitung - de.startech.com
FR: Guide de l'utilisateur - fr.startech.com
ES: Guía del usuario - es.startech.com
IT: Guida per l'uso - it.startech.com
NL: Gebruiksaanwijzing - nl.startech.com
PT: Guia do usuário - pt.startech.com
Manual Revision: 10/26/2012
For the most up-to-date information, please visit: www.startech.com
Packaging Contents
• 1x Set Universal Rack Rails
• 8/16/14 x M5 Panel Screws (1U/2U/3U)
• 8/16/14 x M5 Cage Nuts (1U/2U/3U)
• 1x M5 Wrench
System Requirements
• Standard 19in wide rack
• 1U/ 2U/ 3U of rack space
UNIRAILS1U / UNIRAILS2U / UNIRAILS3U
1U/ 2U/ 3U Fixed 19” Adjustable Depth Universal Server Rack Rails
Installation
1. Determine the mounting depth of the rack/cabinet.
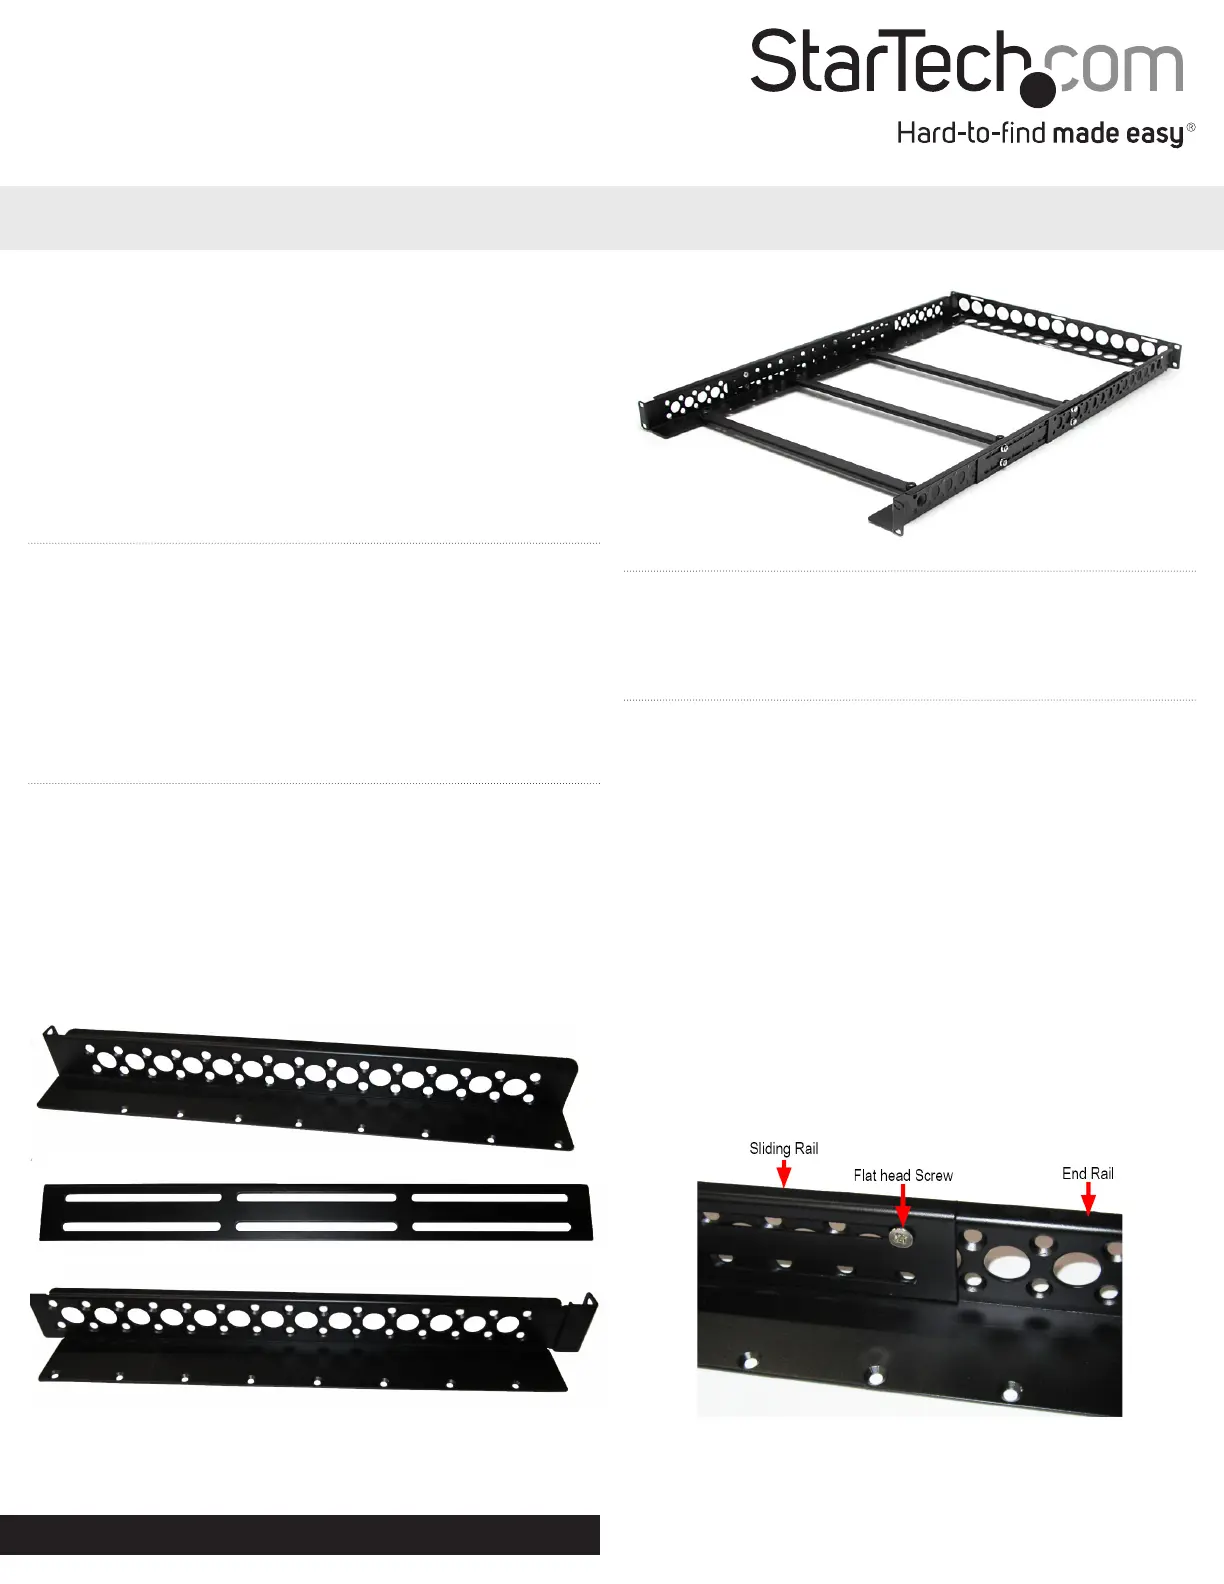
2. Gather the components of the two side rails. Each side rail is
comprised of 3 pieces: two End Rails with the rack mounting
brackets and the at middle section with the adjustable slide cut
outs.
NOTE: Look carefully at the End Rails, as there are two dierent sets.
The lip along the top edge will be taller on one set, than the other.
The side rails use one of each.
End Rail #2
Sliding Rail
End Rail #1
Tools Required
• Phillips screwdriver
3. Lay out the two End Rails end-to-end (rack mounting bracket at
opposite ends), and then place the Sliding Rail over top of the
smaller of the End Rail (see “Inside View” photo for reference).
Place the other End Rail overtop the Sliding Rail, so it is now
sandwiched between the two End Rails.
4. Adjust the length of the rails, such that the rack mounting
brackets are slightly longer than the mounting depth of the rack.
5. Fasten the middle Sliding Rail to each End Rail with 4 screws and
nuts each (2 on the top slide and 2 on bottom) with a screwdriver
and the provided wrench. The screw should go in from the inside
of the rail,with the nut on the outside (underneath the lip).
Inside View
*installation photos are for reference only
*actual product may vary from photos
Product specificaties
| Merk: | StarTech.com |
| Categorie: | Niet gecategoriseerd |
| Model: | UNIRAILS2U |
| Kleur van het product: | Zwart |
| Gewicht: | 3700 g |
| Gewicht verpakking: | 4000 g |
| Breedte verpakking: | 493 mm |
| Diepte verpakking: | 105 mm |
| Hoogte verpakking: | 109 mm |
| Soort: | Rekrail |
| Materiaal behuizing: | Staal |
| Montage gereedschap: | Ja |
| Maximale gewichtscapaciteit: | 45.3 kg |
| Certificering: | CE, UL, REACH, TAA |
| Duurzaamheidscertificaten: | RoHS |
| Inclusief schroeven: | Ja |
| Aantal schroeven: | 16 |
| (Buitenste) hoofdverpakking hoogte: | 109 mm |
| (Buitenste) hoofdverpakking breedte: | 493 mm |
| (Buitenste) hoofdverpakking lengte: | 105 mm |
| Hoeveelheid per (buitenste) hoofdverpakking: | 1 stuk(s) |
| Rackcapaciteit: | 2U |
| Code geharmoniseerd systeem (HS): | 85389099 |
| Inbouwdiepte (max): | 1054 mm |
| Inbouwdiepte (min): | 420 mm |
| Kooimoeren inbegrepen: | Ja |
| Schroef-type: | M5 |
| Aantal kooimoeren: | 16 |
Heb je hulp nodig?
Als je hulp nodig hebt met StarTech.com UNIRAILS2U stel dan hieronder een vraag en andere gebruikers zullen je antwoorden
Handleiding Niet gecategoriseerd StarTech.com

13 Juli 2026
13 Mei 2026
6 Mei 2026
8 April 2026
7 April 2026
6 April 2026
6 April 2026
6 April 2026
25 Maart 2026
14 Maart 2026
Handleiding Niet gecategoriseerd
Nieuwste handleidingen voor Niet gecategoriseerd
23 Juli 2026
23 Juli 2026
23 Juli 2026
23 Juli 2026
23 Juli 2026
23 Juli 2026
23 Juli 2026
23 Juli 2026
23 Juli 2026
22 Juli 2026