StarTech.com UDCMTRAY Handleiding
StarTech.com Niet gecategoriseerd UDCMTRAY
Bekijk gratis de handleiding van StarTech.com UDCMTRAY (2 pagina’s), behorend tot de categorie Niet gecategoriseerd. Deze gids werd als nuttig beoordeeld door 28 mensen en kreeg gemiddeld 4.1 sterren uit 2 reviews. Heb je een vraag over StarTech.com UDCMTRAY of wil je andere gebruikers van dit product iets vragen? Stel een vraag
Pagina 1/2
Quick-Start Guide
To view manuals, FAQs, videos, drivers, downloads, technical drawings, and more, visit www.startech.com/support.
Manual Revision: November 12, 2020
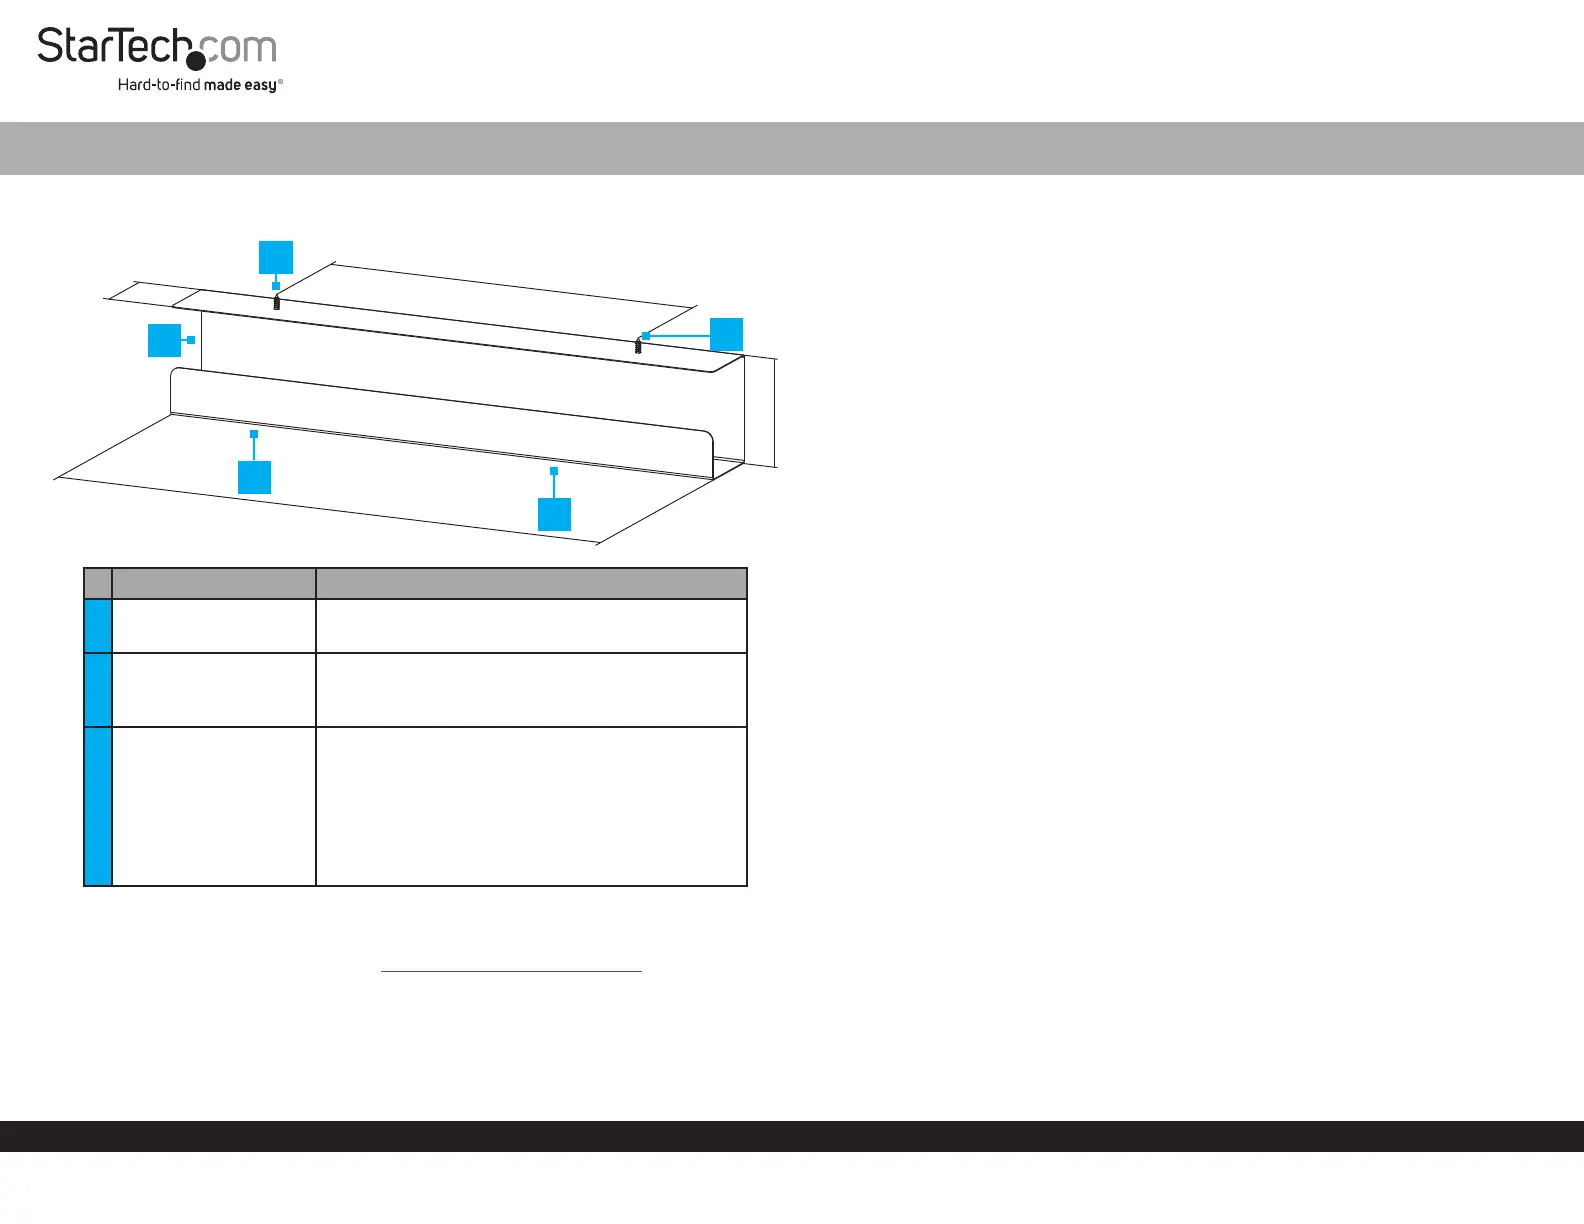
Product Diagram (UDCMTRAY)
ComponentsFunction
1Cable Tray Organizer
• Organize and hide Cables
• Hide a Power Strip
2
Mounting Holes/
Screws
• Mount the Cable Tray Organizer underneath
a Desk
• #12 Phillips® Head Screws
3
Screwdriver Access
Holes
• Cutouts that allow a Phillips Head
Screwdriver or a Phillips Head Drill Bit to
pass through the bottom of the Cable Tray
Organizer
Note: A long Phillips Head Screwdriver or a
Drill Bit Extension may be required to fasten the
Mounting Screws.
Requirements
For the latest requirements, please visit www.startech.com/UDCMTRAY.
• #3 Phillips Head Screwdriver or a Power Drill with a Phillips Head Bit x 1
• Power Drill with a Drill Bit x 1
• Pencil x 1
• (Optional) Drill Bit Extension x 1
Under Desk Cable Tray Organizer
Installation
Note: It is easier to complete the following installation steps with two people.
1. Hold the Cable Tray Organizer in the desired location under the Desk, with the
Mounting Holes resting against the underside of the Desk.
2. Mark the location of the Mounting Holes using a Pencil.
3. Use a Power Drill with an appropriately sized Drill Bit to drill Pilot Holes into the
locations of the Mounting Holes.
Notes: The Pilot Holes should be the same depth as the length of the Mounting
Screws. A small piece of tape can be placed on the Drill Bit to mark the proper depth
of the Pilot Holes.
The Drill Bit size will be determined by the wood used to construct the Desk. Consult a
professional if you are unable to determine the proper Drill Bit size.
4. Insert the Mounting Screws through the Mounting Holes and into the Desk.
(Figure 1)
5. Fasten the Screws into the Desk using a Phillips Head Screwdriver or a Power
Drill with a Phillips Head Bit.
114mm
76mm
600mm
400mm
1
2
2
3
3
Product specificaties
| Merk: | StarTech.com |
| Categorie: | Niet gecategoriseerd |
| Model: | UDCMTRAY |
| Kleur van het product: | Zwart |
| Gewicht: | 1200 g |
| Breedte: | 600 mm |
| Diepte: | 120 mm |
| Hoogte: | 80 mm |
| Gewicht verpakking: | 1300 g |
| Breedte verpakking: | 615 mm |
| Diepte verpakking: | 120 mm |
| Hoogte verpakking: | 80 mm |
| Soort: | Kabelgoot |
| Snelstartgids: | Ja |
| Materiaal: | Staal |
| Bedoeld voor: | Bureau |
| Duurzaamheidscertificaten: | RoHS |
| Aantal per verpakking: | 1 stuk(s) |
| Inclusief schroeven: | Ja |
| Aantal schroeven: | 2 |
| (Buitenste) hoofdverpakking hoogte: | 355 mm |
| (Buitenste) hoofdverpakking breedte: | 640 mm |
| (Buitenste) hoofdverpakking lengte: | 390 mm |
| Hoeveelheid per (buitenste) hoofdverpakking: | 12 stuk(s) |
| Code geharmoniseerd systeem (HS): | 85389099 |
Heb je hulp nodig?
Als je hulp nodig hebt met StarTech.com UDCMTRAY stel dan hieronder een vraag en andere gebruikers zullen je antwoorden
Handleiding Niet gecategoriseerd StarTech.com

13 Juli 2026
13 Mei 2026
6 Mei 2026
8 April 2026
7 April 2026
6 April 2026
6 April 2026
6 April 2026
25 Maart 2026
14 Maart 2026
Handleiding Niet gecategoriseerd
Nieuwste handleidingen voor Niet gecategoriseerd
23 Juli 2026
23 Juli 2026
23 Juli 2026
23 Juli 2026
23 Juli 2026
23 Juli 2026
23 Juli 2026
23 Juli 2026
23 Juli 2026
22 Juli 2026