StarTech.com SU2DUPERA11 Handleiding
StarTech.com Niet gecategoriseerd SU2DUPERA11
Bekijk gratis de handleiding van StarTech.com SU2DUPERA11 (16 pagina’s), behorend tot de categorie Niet gecategoriseerd. Deze gids werd als nuttig beoordeeld door 54 mensen en kreeg gemiddeld 4.8 sterren uit 9 reviews. Heb je een vraag over StarTech.com SU2DUPERA11 of wil je andere gebruikers van dit product iets vragen? Stel een vraag
Pagina 1/16
Quick-start guide
Manual Revision: 08/16/2024
For the latest information, technical specications, and support for
this product, please visit www.StarTech.com/SU2DUPERA11.
Package contents
• 1 x SATA/USB duplicator and eraser
• 1 x universal power adapter (NA/JP, UK, EU, AU)
• 2 x drive-connector cables
• 2 x drive pads
• 1 x quick-start guide
System requirements are subject to change. For the latest
requirements, please visit www.StarTech.com/SU2DUPERA11.
SU2DUPERA11
Standalone Drive Duplicator and Eraser for USB Flash Drives and 2.5”/3.5” SATA SSDs /HDDs
*actual product may vary from photos
Important: Read and understand the entire manual before
you use this product, and follow the instructions as they are
outlined in the manual.
Failure to do so might result in property damage or device
failure.
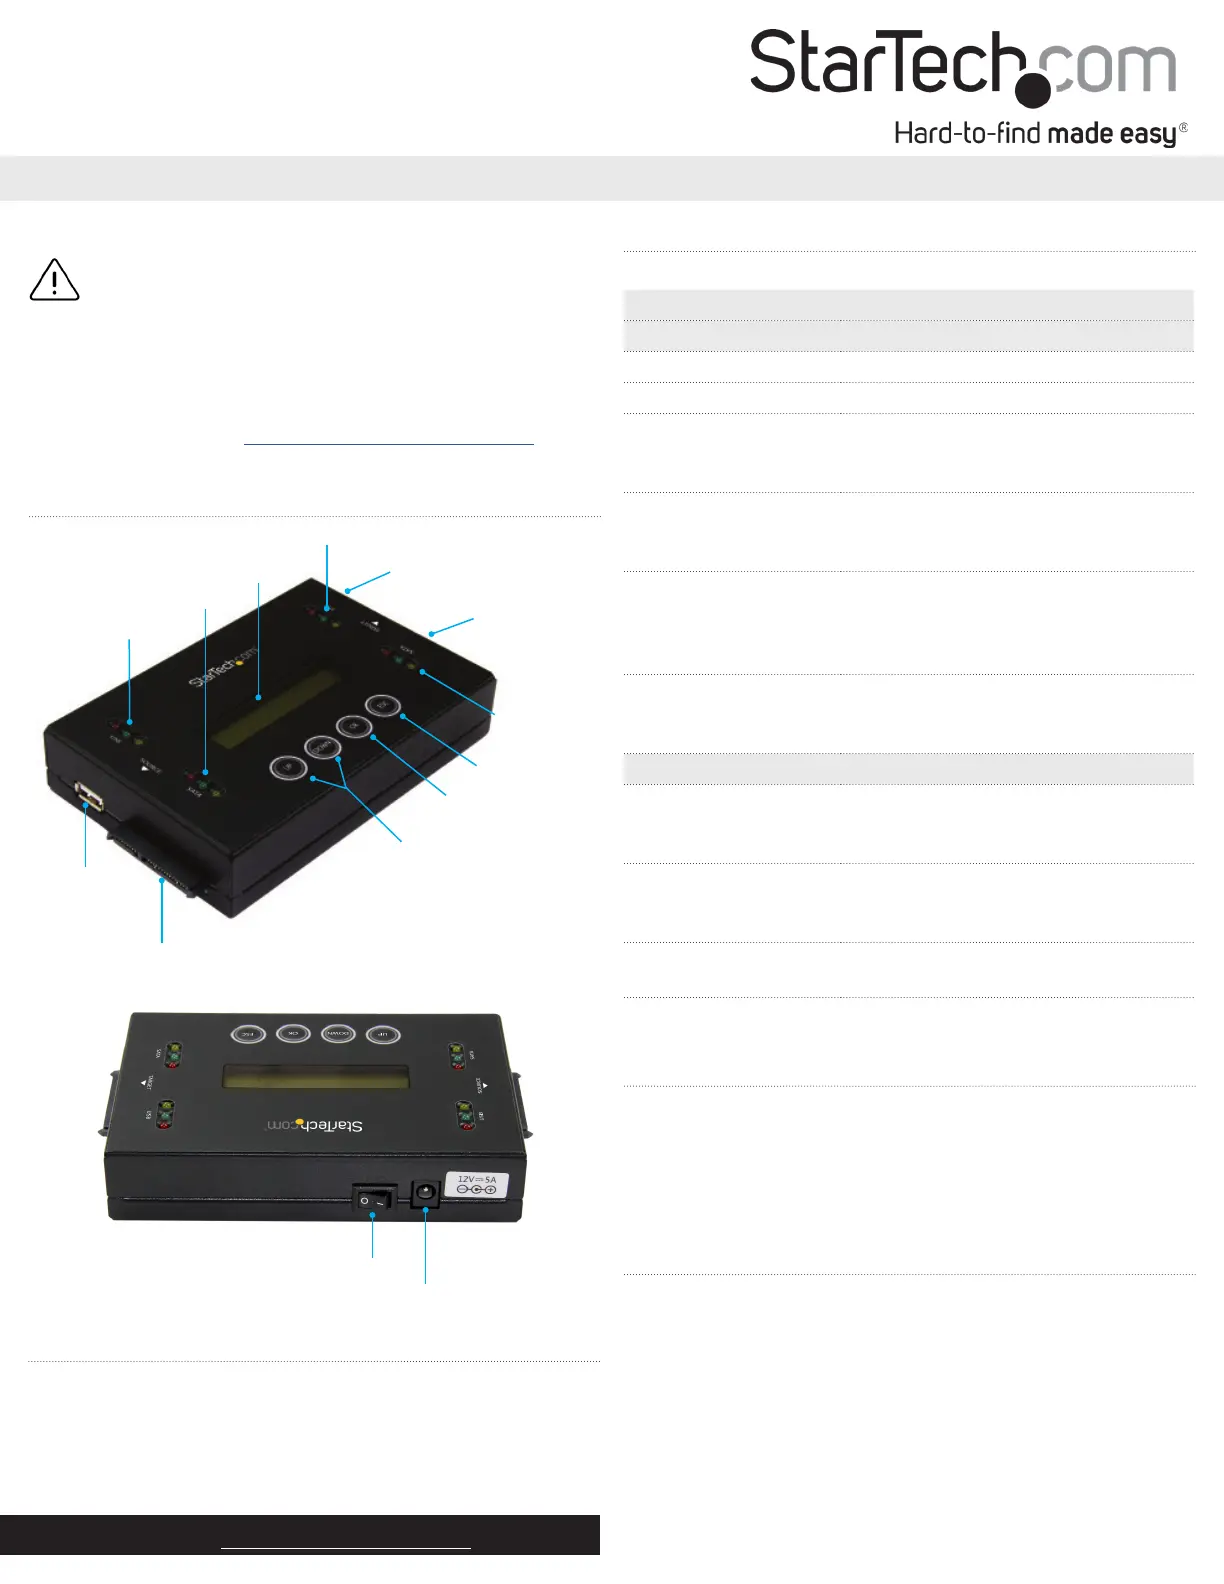
Product diagram
USB source
port
SATA source port
LCD display
Menu navigation
buttons
OK button
Exit button
USB source LEDs
SATA source LEDs
USB target port
SATA target
port
USB target LEDs
SATA
target LEDs
Power switch
Power jack
Erase and copy modes
The SU2DUPERA11 supports ve erase modes and four copy modes.
ModeDenition
Erase modes
Quick eraseThe partition table is quickly erased.
Full eraseThe entire drive is erased.
DoD 5220.22-M eraseA three-pass overwrite based on
DoD 5220.22-M specications
is completed.
DoD 5220.22-M erase
and compare
A three-pass overwrite based on
DoD 5220.22-M specications
is completed and compared.
Secure eraseThe ATA Secure Erase feature of the
drive is executed.
Note: The Secure Erase feature isn’t
supported on USB drives.
Cryptographic EraseLeverages the drive’s built-in encryption
capabilities to securely erase data by
deleting the encryption key.
Copy modes
Copy system and lesOnly the data area of the source drive is
copied and the empty space
isn’t copied.
Copy all partitionsAll of the partitions and data, including
blank partitions, are copied. Blank space
and nonpartition space isn’t copied.
Copy the whole driveThe entire drive is copied, including
empty space.
Copy a percentageA specied percentage range of the
drive is copied.
About copying drives
You can use the SU2DUPERA11 to copy SATA drives in any of the
following congurations:
• SATA drive to SATA drive
• SATA drive to USB drive
• USB drive to USB drive
• USB drive to SATA drive
Copy a SATA or USB drive
Note: You should avoid plugging SATA drives directly into the
SU2DUPERA11, as it puts undue strain on the device connectors. Use
the drive-connector cables instead.
Warning! Make sure that the storage capacity of the target drive
is larger than or equal to the storage capacity of the source drive.
Otherwise, you will get an error when you try to copy your drive.
Warning! After you begin copying a drive, don’t disconnect either
drive or interrupt the process before it has nished. Doing so might
result in damage to the drive or lost data.
Product specificaties
| Merk: | StarTech.com |
| Categorie: | Niet gecategoriseerd |
| Model: | SU2DUPERA11 |
| Kleur van het product: | Zwart |
| Gewicht: | 462 g |
| Type stekker: | Type M |
| Gewicht verpakking: | 1900 g |
| Breedte verpakking: | 185 mm |
| Diepte verpakking: | 265 mm |
| Hoogte verpakking: | 100 mm |
| Gebruikershandleiding: | Ja |
| Materiaal behuizing: | Staal |
| LED-indicatoren: | Activity, Power |
| Stroom: | 1.4 A |
| Beeldscherm: | LCD |
| Inclusief AC-adapter: | Ja |
| Certificering: | CE, FCC |
| Duurzaamheidscertificaten: | RoHS |
| Temperatuur bij opslag: | -20 - 85 °C |
| Aantal ventilatoren: | 0 ventilator(en) |
| Output current: | 5 A |
| Spanning: | 12 V |
| Afmetingen (B x D x H): | 90 x 135 x 29 mm |
| Ondersteunde HDD-groottes: | 2.5, 3.5 " |
| Chipset: | Xlinx - Spartan-6 |
| (Buitenste) hoofdverpakking hoogte: | 290 mm |
| (Buitenste) hoofdverpakking breedte: | 395 mm |
| (Buitenste) hoofdverpakking lengte: | 470 mm |
| Hoeveelheid per (buitenste) hoofdverpakking: | 8 stuk(s) |
| AC-ingangsspanning: | 100-240 V |
| Stroomverbruik (typisch): | 60 W |
| Bedrijfstemperatuur (T-T): | 5 - 45 °C |
| Relatieve vochtigheid in bedrijf (V-V): | 5 - 95 procent |
| Type product: | HDD-duplicator |
| Inbegrepen soorten voedingsstekkers: | AU, EU, NA, UK |
| Ondersteunde HDD aansluitingen: | Serial ATA, Serial ATA II, Serial ATA III |
| Aantal gelijktijdige kopien: | 2 kopieën |
| Duplicator operating modes: | Copy, Erase |
| Aantal pads inbegrepen: | 2 |
| Poort-multiplier: | Nee |
| Transfer aantal: | 6.6 GB/min |
Heb je hulp nodig?
Als je hulp nodig hebt met StarTech.com SU2DUPERA11 stel dan hieronder een vraag en andere gebruikers zullen je antwoorden
Handleiding Niet gecategoriseerd StarTech.com

13 Juli 2026
13 Mei 2026
6 Mei 2026
8 April 2026
7 April 2026
6 April 2026
6 April 2026
6 April 2026
25 Maart 2026
14 Maart 2026
Handleiding Niet gecategoriseerd
Nieuwste handleidingen voor Niet gecategoriseerd
23 Juli 2026
23 Juli 2026
23 Juli 2026
23 Juli 2026
23 Juli 2026
23 Juli 2026
23 Juli 2026
23 Juli 2026
23 Juli 2026
22 Juli 2026