StarTech.com SDOCK4U33E Handleiding


Lees hieronder de 📖 handleiding in het Nederlandse voor StarTech.com SDOCK4U33E (2 pagina's) in de categorie Cradle/docking station. Deze handleiding was nuttig voor 22 personen en werd door 2 gebruikers gemiddeld met 4.5 sterren beoordeeld

Pagina 1/2
Quick start guide
FR: Guide de l’utilisateur - fr.startech.com
DE: Bedienungsanleitung - de.startech.com
ES: Guía del usuario - es.startech.com
NL: Gebruiksaanwijzing - nl.startech.com
PT: Guia do usuário - pt.startech.com
IT: Guida per l’uso - it.startech.com
Manual Revision: 10/14/2015
For the latest information, technical specications, and support for
this product, please visit www.startech.com/SDOCK4U33E.
Packaging contents
1 x 4-bay drive docking station
1 x universal power adapter
4 x power cords (NA/UK/EU/AU)
1 x USB A to B cable
1 x eSATA cable
1 x quick start guide
System requirements
Computer system with an available USB or eSATA port
Note: The eSATA port needs to support port-multiplier technology.
Up to four 2.5 in. or 3.5 in. SATA hard drives (HDD) or solid-state
drives (SSD)
The SDOCK4U33E is OS independent and doesn’t require any
additional drivers or software.
SDOCK4U33E
4-Bay Docking Station - eSATA, USB 3.0 to SATA (6Gbps)
*actual product may vary from photos
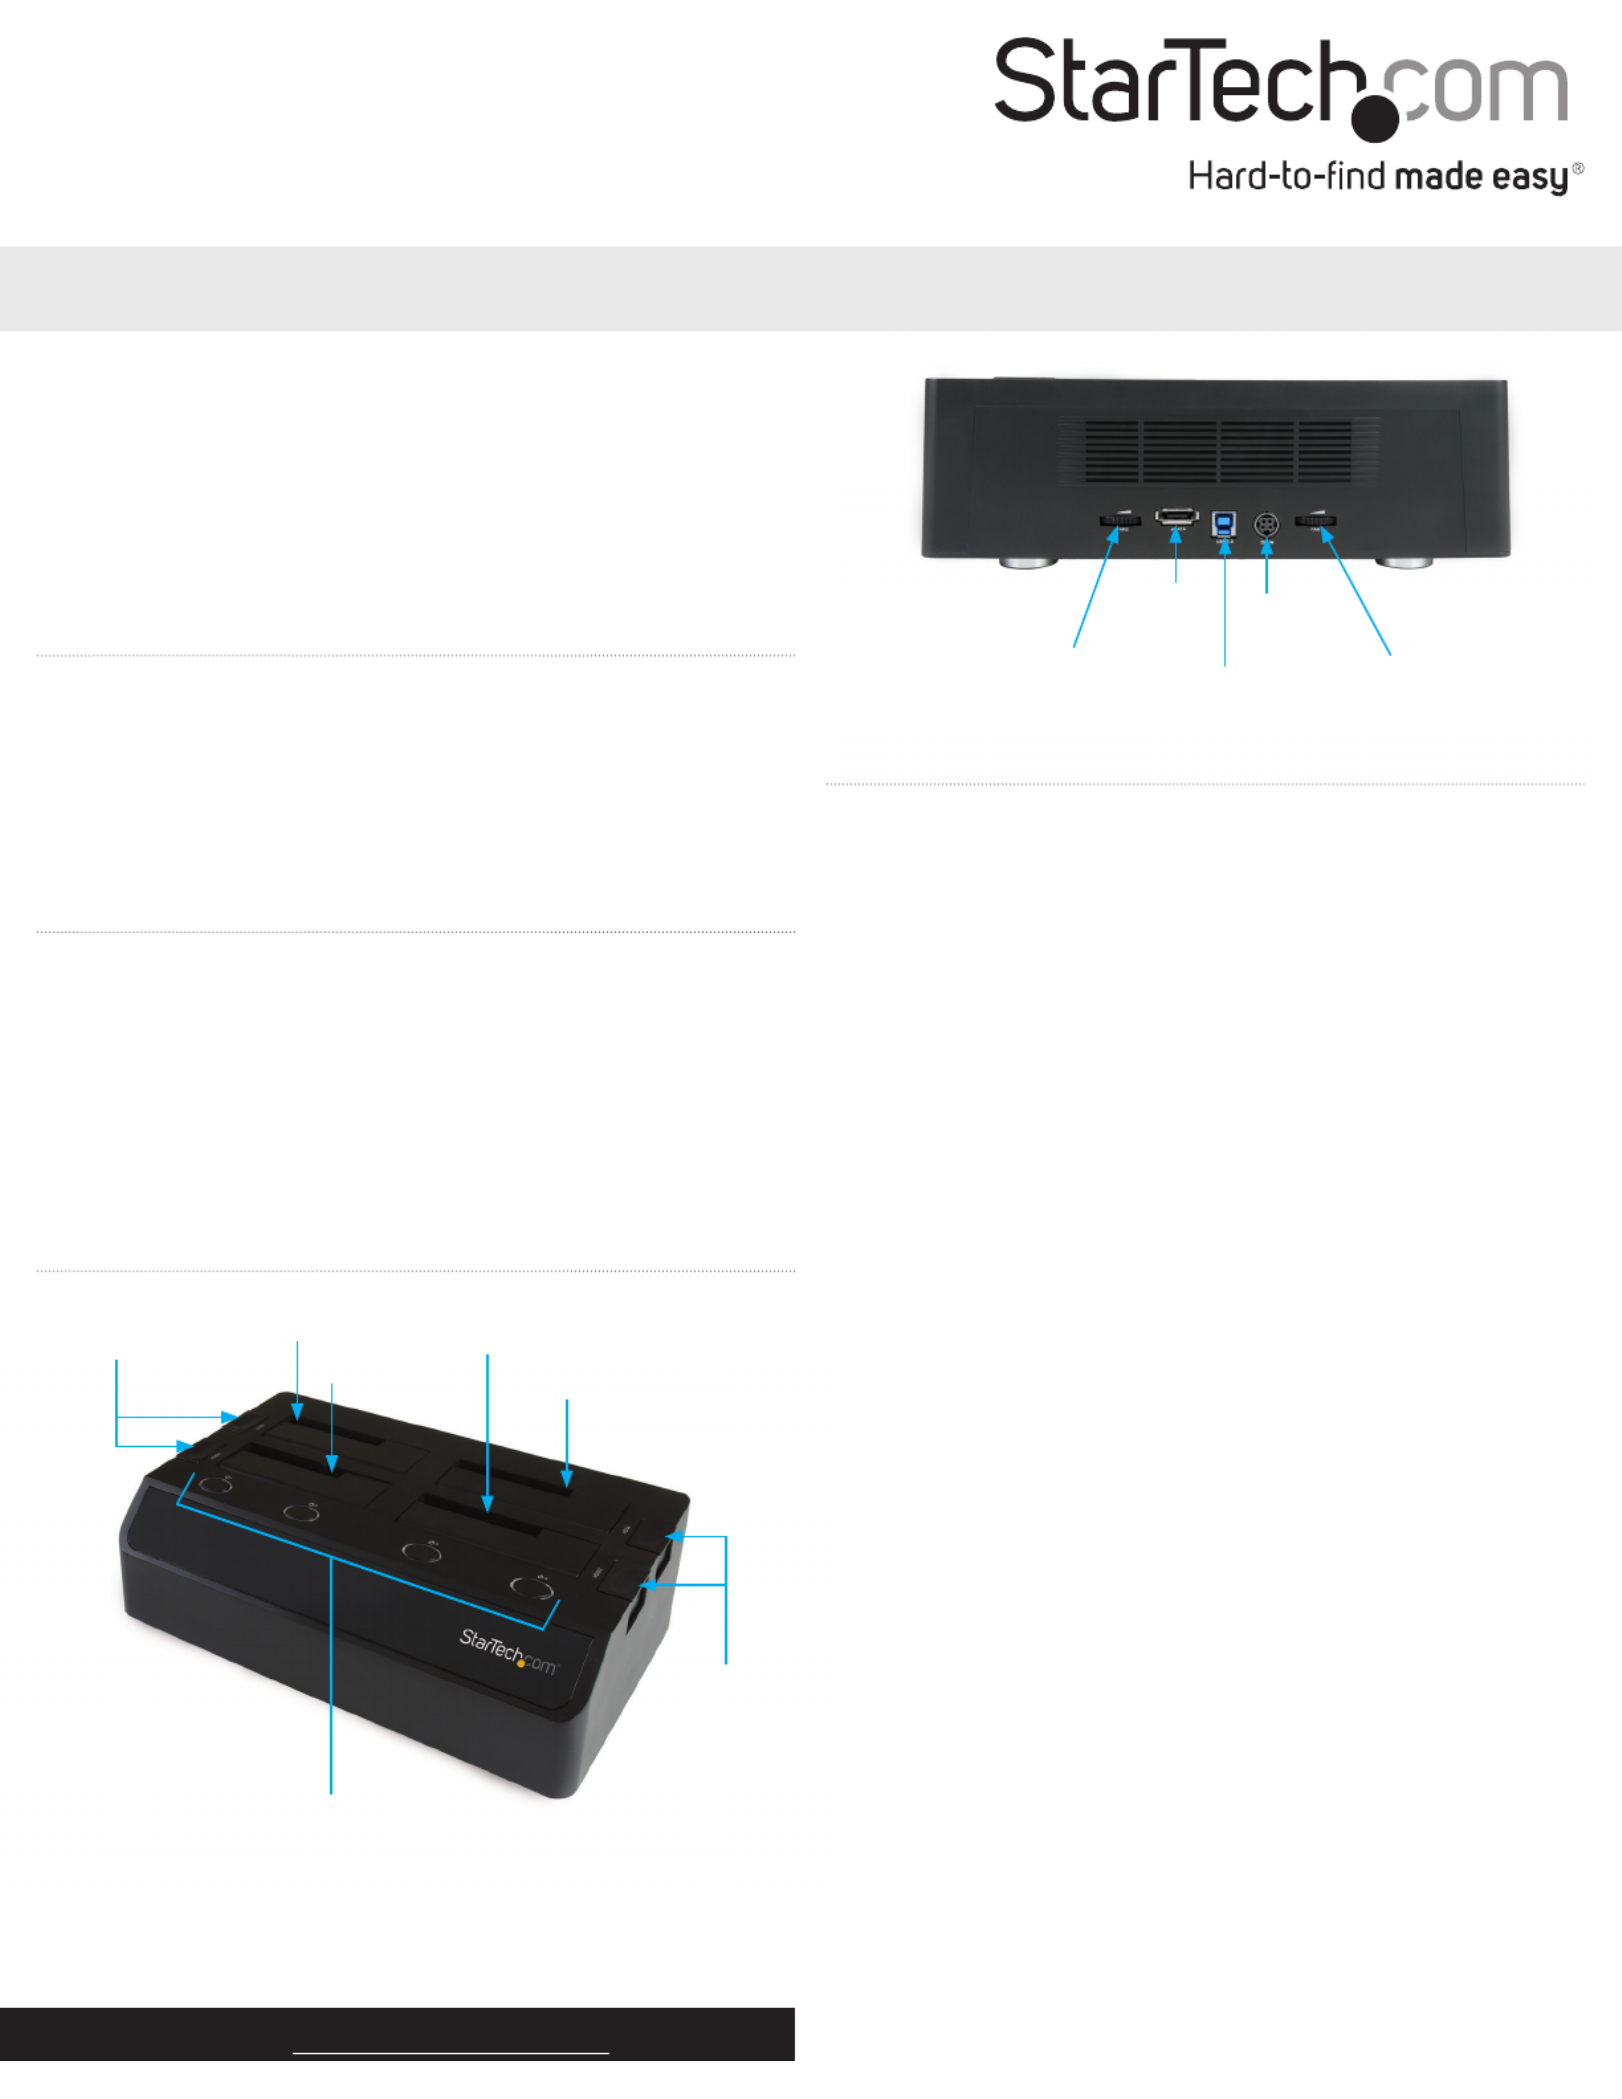
Product diagram
Rear view
Fan 2 speed
control
eSATA
connector
USB 3.0
connector
DC power
connector
Fan 1 speed
control
Installation
Connect the dock
Warning! Drives and storage enclosures should be handled carefully,
especially when theyre transported. If youre not careful with your
drives, you may lose data as a result. Always handle storage devices
with caution.
1. Connect the external power adapter from the dock to a power
outlet.
2. Do one of the following:
Connect the included USB cable from the dock to a USB port on
your computer system. Your computer can either be turned on
or turned o when you connect the USB cable.
Connect the included eSATA cable from the dock to an eSATA
port on your computer system. Your computer can either be
turned on or turned o when you connect the USB cable.
Note: The host eSATA port needs to support port-multiplier
technology. If the eSATA port doesn’t support port multiplication,
only one of the installed SATA drives will be accessible.
3. Press the Power button on the top of the dock for each of the
slots that contain a drive. The LED indicator should light up to
indicate that the dock is turned on.
Install a drive
1. Carefully align a 2.5 in. or 3.5 in. SATA drive with a drive slot on the
dock, so that the SATA power and data connectors on the drive
are aligned with the corresponding connectors that are inside of
the drive slot.
2. Insert the 2.5 in. or 3.5 in. SATA drive into one of the drive slots.
3. Press the Power button to turn on the duplicator dock. The LED
indicator should light up to indicate that the dock is turned on.
After the drive is installed and the dock is turned on, your computer
automatically recognizes the drive and it’s accessible as though the
drive is installed internally in the system. If your computer doesn’t
automatically recognize the drive, see the Prepare a drive for use
topic.
Eject buttons
Eject buttons Drive 2 slot
Drive 1 slot
Drive 4 slot
Drive 3 slot
Drive power buttons and LEDs
FCC Compliance Statement
This equipment has been tested and found to comply with the limits for a Class B digital device, pursuant to part 15 of the FCC Rules. These limits are designed to provide reasonable protection against
harmful interference in a residential installation. This equipment generates, uses and can radiate radio frequency energy and, if not installed and used in accordance with the instructions, may cause
harmful interference to radio communications. However, there is no guarantee that interference will not occur in a particular installation. If this equipment does cause harmful interference to radio or
television reception, which can be determined by turning the equipment o and on, the user is encouraged to try to correct the interference by one or more of the following measures:
Reorient or relocate the receiving antenna.
Increase the separation between the equipment and receiver.
Connect the equipment into an outlet on a circuit dierent from that to which the receiver is connected.
Consult the dealer or an experienced radio/TV technician for help
This device complies with part 15 of the FCC Rules. Operation is subject to the following two conditions: (1) This device may not cause harmful interference, and (2) this device must accept any
interference received, including interference that may cause undesired operation. Changes or modications not expressly approved by StarTech.com could void the user’s authority to operate the
equipment.
Industry Canada Statement
This Class B digital apparatus complies with Canadian ICES-003.
Cet appareil numérique de la classe [B] est conforme à la norme NMB-003 du Canada.
CAN ICES-3 (B)/NMB-3(B)
Use of Trademarks, Registered Trademarks, and other Protected Names and Symbols
This manual may make reference to trademarks, registered trademarks, and other protected names and/or symbols of third-party companies not related in any way to
StarTech.com. Where they occur these references are for illustrative purposes only and do not represent an endorsement of a product or service by StarTech.com, or an endorsement of the product(s)
to which this manual applies by the third-party company in question. Regardless of any direct acknowledgement elsewhere in the body of this document, StarTech.com hereby acknowledges that all
trademarks, registered trademarks, service marks, and other protected names and/or symbols contained in this manual and related documents are the property of their respective holders.
Technical Support
StarTech.coms lifetime technical support is an integral part of our commitment to provide industry-leading solutions. If you ever need help with your product, visit www.startech.com/support and
access our comprehensive selection of online tools, documentation, and downloads.
For the latest drivers/software, please visit www.startech.com/downloads
Warranty Information
This product is backed by a two-year warranty.
StarTech.com warrants its products against defects in materials and workmanship for the periods noted, following the initial date of purchase. During this period, the products may be returned for
repair, or replacement with equivalent products at our discretion. The warranty covers parts and labor costs only. StarTech.com does not warrant its products from defects or damages arising from
misuse, abuse, alteration, or normal wear and tear.
Limitation of Liability
In no event shall the liability of StarTech.com Ltd. and StarTech.com USA LLP (or their ocers, directors, employees or agents) for any damages (whether direct or indirect, special, punitive, incidental,
consequential, or otherwise), loss of prots, loss of business, or any pecuniary loss, arising out of or related to the use of the product exceed the actual price paid for the product. Some states do not
allow the exclusion or limitation of incidental or consequential damages. If such laws apply, the limitations or exclusions contained in this statement may not apply to you.
About driver installation
No driver or software installation is required for this product because
the drive dock is natively supported and the drivers are already
installed.
Prepare a drive for use
If you install a drive that already has data on it, after you plug in the
drive, it appears under My Computer Computer or with a drive letter
assigned to it.
If you install a brand-new drive that doesn’t contain any data, you
must prepare the drive for use.
If you use a computer thats running a version of Windows®, do the
following:
1. On the taskbar, click the Windows icon.
2. In the eld, type .Search disk management
3. In the search results, click .Disk Management
4. Locate the disk that is labeled . To conrm that the Unallocated
drive is the correct one, check the drive capacity.
5. Right-click the section of the window that says and Unallocated
click .New Partition
6. To initialize the drive in the format of your choice, complete the
on-screen instructions.
When the drive is successfully installed, it appears under My
Computer Computer or with a drive letter assigned to it.
Remove a drive
Note: Make sure that the drive isn’t being accessed by the computer
before you proceed.
1. To remove the drive from the operating system, do one of the
following:
On computers running a version of Windows, click Safely
Remove Device.
On computers running a version of Mac OS, drag the drive to
the icon.trash can
For more information, see the documentation that came with your
operating system.
2. Press the button on the top of the dock and wait for the Power
dock to nish powering down.
3. To release the disk drive, press the corresponding Eject button on
the top of the dock.
4. Pull the disk drive from the drive slot.
Warning! Pressing the power button to turn o a drive will
momentarily restart the other drive bays. Make sure that the other
drives are not being accessed when you power o any other drives.
About LED indicators
The SDOCK4U33E includes a power and activity LED indicator for
each of the four drive slots. If the LED is illuminated blue, it means
that the drive slot is powered on. If the LED is blinking red, it means
that the drive is currently reading or writing.
Warning! If the LED is blinking red on one of the drive slots, don’t
interrupt the process by turning o the power or trying to remove
the drive from the slot.


Product specificaties

Merk: StarTech.com
Categorie: Cradle/docking station
Model: SDOCK4U33E
Kleur van het product: Zwart
Gewicht: 1030 g
Breedte: 171.2 mm
Diepte: 290.5 mm
Hoogte: 87.3 mm
Gewicht verpakking: 2399 g
Breedte verpakking: 215 mm
Diepte verpakking: 343 mm
Hoogte verpakking: 170 mm
LED-indicatoren: Activity, Power
Stroom: 2 A
Meegeleverde kabels: AC, USB, eSATA
Inclusief AC-adapter: Ja
Ingebouwde ventilator: Ja
Afmetingen verpakking (BxDxH): 168 x 340 x 213 mm
Certificering: CE, FCC
Aansluiting voor netstroomadapter: Ja
Materiaal: Kunststof
Opslagmedia-type: HDD, SSD
Duurzaamheidscertificaten: RoHS
Plug and play: Ja
Temperatuur bij opslag: -20 - 50 °C
Aantal ventilatoren: 2 ventilator(en)
Output current: 6.5 A
Spanning: 12 V
Snelle installatiehandleiding: Ja
Mean time between failures (MTBF): 30000 uur
Hostinterface: USB 3.2 Gen 1 (3.1 Gen 1) Type-B + eSATA
Opslag schijf-interface: Serial ATA, Serial ATA II, Serial ATA III
Maximale opslagcapaciteit: 6 TB
Chipset: JMicron - JMS567, JMicron - JBM575
Overdrachtssnelheid: 5000 Mbit/s
Aantal storage drives ondersteund: 4
Opslagschijf afmetingen ondersteund: 2.5, 3.5 "
AC-ingangsspanning: 100-240 V
Bedrijfstemperatuur (T-T): 5 - 35 °C
Relatieve vochtigheid in bedrijf (V-V): 20 - 80 procent
Hot-swap: Ja
Ventilator diameter: 60 mm
UASP-ondersteuning: Ja

Heb je hulp nodig?

Als je hulp nodig hebt met StarTech.com SDOCK4U33E stel dan hieronder een vraag en andere gebruikers zullen je antwoorden


Handleiding Cradle/docking station StarTech.com

Handleiding Cradle/docking station

Nieuwste handleidingen voor Cradle/docking station