StarTech.com MONSTND Handleiding
StarTech.com Niet gecategoriseerd MONSTND
Bekijk gratis de handleiding van StarTech.com MONSTND (2 pagina’s), behorend tot de categorie Niet gecategoriseerd. Deze gids werd als nuttig beoordeeld door 53 mensen en kreeg gemiddeld 4.7 sterren uit 8 reviews. Heb je een vraag over StarTech.com MONSTND of wil je andere gebruikers van dit product iets vragen? Stel een vraag
Pagina 1/2
Quick-Start Guide
To view manuals, FAQs, videos, drivers, downloads, technical drawings, and more, visit www.startech.com/support.
Manual Revision: March 25, 2019 2:04 PM
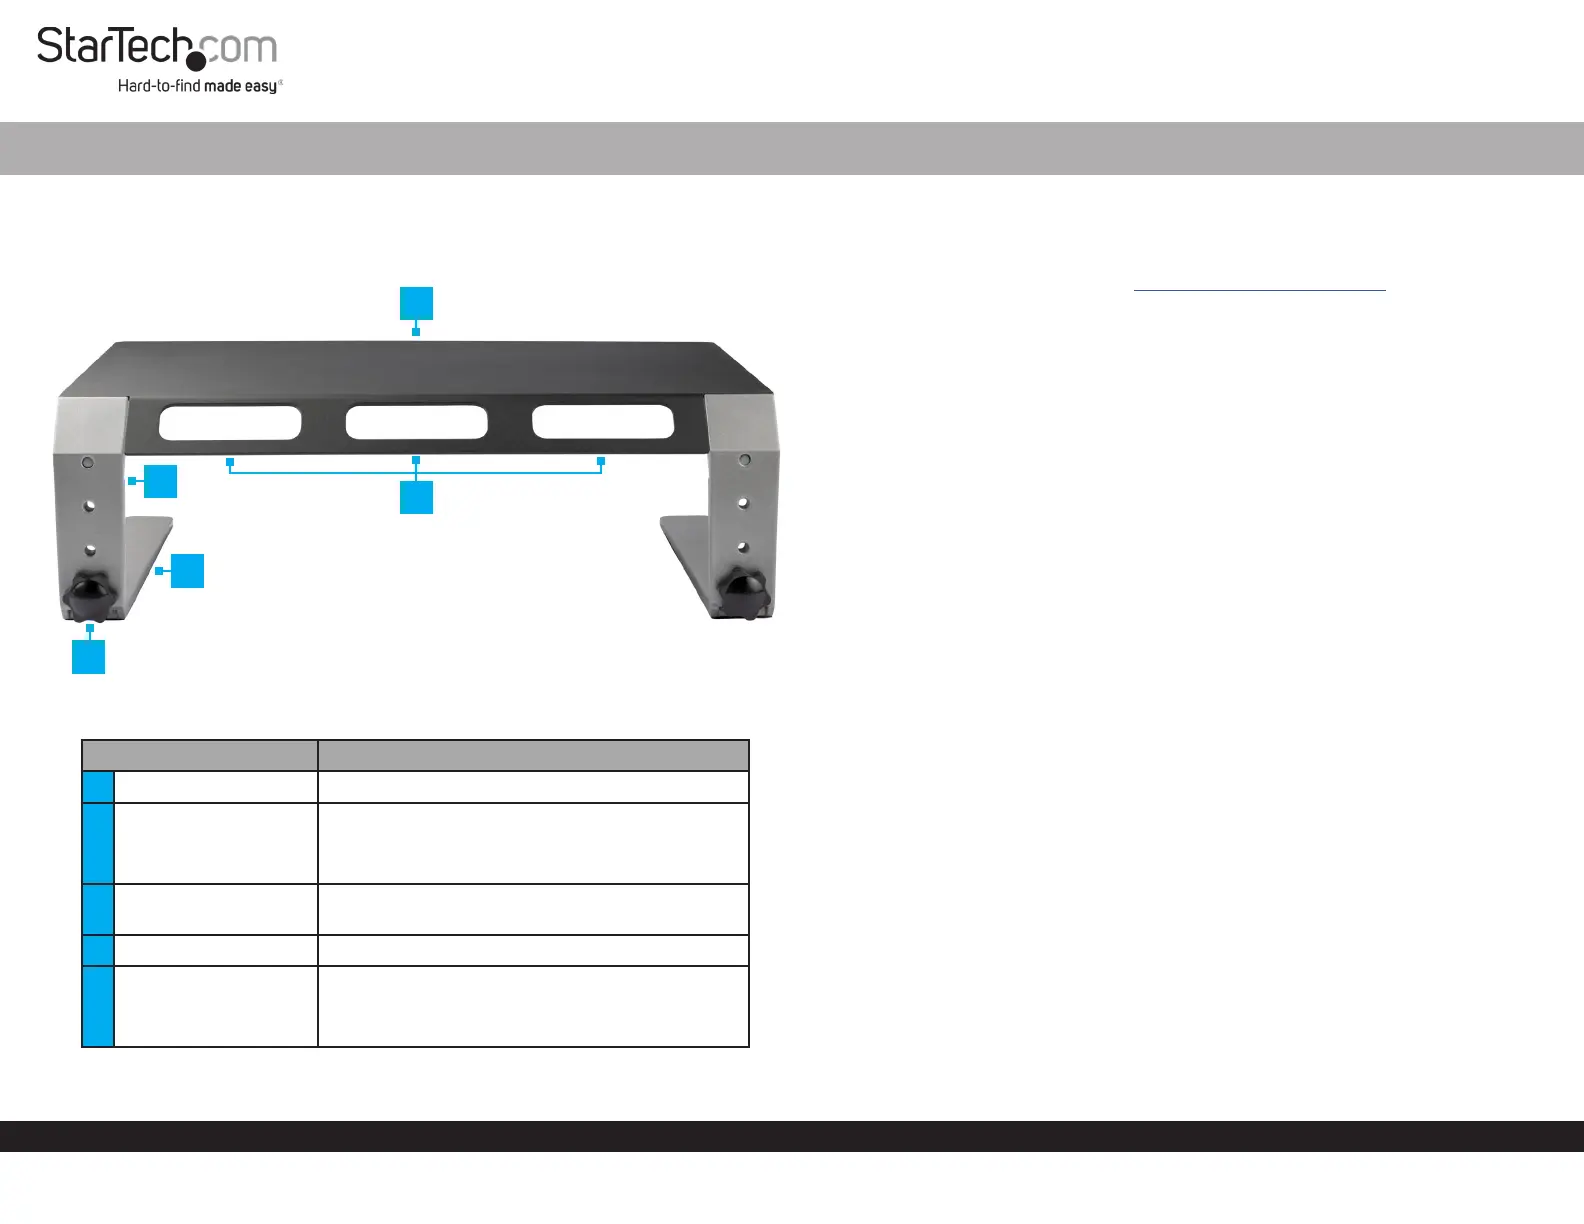
Product Diagram (MONSTND)
Rear View
PartFunction
1Top Plate• Used as a platform for a Monitor or Laptop
2Upper Leg
• Attaches to the Top Plate
• Congurable with three height-adjustment
settings
3
Cable-Management
Slots
• Used for organizing and routing Cables
4Lower Leg• Attaches to the Upper Leg
5
Height-Adjustment
Screw
• Used to secure the Upper Legs and Lower
Legs together
• Can be removed to adjust height settings
Monitor Riser - Metal - Height Adjustable
1
Requirements
• Clean, Flat, and Stable Surface x 1
For the latest requirements please visit: www.startech.com/MONSTND.
Installation
Assembly
1. Place the Top Plate, top side down, onto a Clean, Flat, and Stable Surface.
2. Place the Upper Legs onto the Top Plate. Ensure the Holes in the Upper Legs are
aligned with the Holes in the Top Plate. The slanted portion of the Upper Legs
should be aligned with the slanted portion of the Top Plate.
3. Secure the Upper Legs to the Top Plate, using two M6x10 mm Screws for each
side. Fasten the M6x10 mm Screws using the 4 mm Hex Key.
4. Align the Lower Leg against the Upper Leg at the desired Monitor height setting.
5. Insert the Height-Adjustment Screw through the Upper Leg and into the Lower
Leg, then hand-tighten.
Note: Tighten the Height-Adjustment Screws by hand. Do not over-tighten.
6. Repeat steps 4 and 5 to attach the second Lower Leg.
7. Turn the Monitor Riser Assembly upright.
Operation
Height Adjustment
1. Place the assembled Monitor Riser, top side down, on a Clean, Flat, and Stable
Surface.
2. Remove the Height-Adjustment Screws.
3. Adjust the height of the Lower Legs to the desired height.
4. Insert the Height-Adjustment Screws through the Upper Legs and into the Lower
Legs, then hand-tighten.
5. Turn the Monitor Riser Assembly upright.
2
5
4
3
Product specificaties
| Merk: | StarTech.com |
| Categorie: | Niet gecategoriseerd |
| Model: | MONSTND |
| Kleur van het product: | Zwart, zilver |
| Gewicht: | 3700 g |
| Breedte: | 266.7 mm |
| Diepte: | 406.5 mm |
| Hoogte: | 125 mm |
| Gewicht verpakking: | 3750 g |
| Breedte verpakking: | 350 mm |
| Diepte verpakking: | 460 mm |
| Hoogte verpakking: | 80 mm |
| Gebruiksaanwijzing: | Ja |
| In hoogte verstelbaar: | Ja |
| Maximale gewichtscapaciteit: | 10 kg |
| Duurzaamheidscertificaten: | CE, RoHS |
| Frame materiaal: | Aluminium, Steel |
| Naleving van duurzaamheid: | Ja |
| Inclusief schroeven: | Ja |
| Aantal schroeven: | 6 |
| Aantal displays ondersteund: | 1 |
| Verbeterd kabelbeheer: | Ja |
| Maximale schermgrootte: | 32 " |
| Code geharmoniseerd systeem (HS): | 94038900 |
| Type moersleutel: | Zeskantsleutel |
| Hoogte verstelbaarheidsbereik: | 125 - 175 mm |
| Werkoppervlakte: | 410 - 270 mm |
Heb je hulp nodig?
Als je hulp nodig hebt met StarTech.com MONSTND stel dan hieronder een vraag en andere gebruikers zullen je antwoorden
Handleiding Niet gecategoriseerd StarTech.com

13 Juli 2026
13 Mei 2026
6 Mei 2026
8 April 2026
7 April 2026
6 April 2026
6 April 2026
6 April 2026
25 Maart 2026
14 Maart 2026
Handleiding Niet gecategoriseerd
Nieuwste handleidingen voor Niet gecategoriseerd
23 Juli 2026
23 Juli 2026
23 Juli 2026
23 Juli 2026
23 Juli 2026
23 Juli 2026
23 Juli 2026
23 Juli 2026
23 Juli 2026
22 Juli 2026