StarTech.com M2-USB-C-NVME-SATA Handleiding
StarTech.com Niet gecategoriseerd M2-USB-C-NVME-SATA
Bekijk gratis de handleiding van StarTech.com M2-USB-C-NVME-SATA (2 pagina’s), behorend tot de categorie Niet gecategoriseerd. Deze gids werd als nuttig beoordeeld door 29 mensen en kreeg gemiddeld 4.6 sterren uit 2 reviews. Heb je een vraag over StarTech.com M2-USB-C-NVME-SATA of wil je andere gebruikers van dit product iets vragen? Stel een vraag
Pagina 1/2
Quick-Start Guide
To view manuals, FAQs, videos, drivers, downloads, technical drawings, and more, visit www.startech.com/support.
Manual Revision: November 6, 2021 12:28 AM
To view manuals, FAQs, videos, drivers, downloads, technical drawings, and more, visit www.startech.com/support.
Product ID
M2-USB-C-NVME-SATA
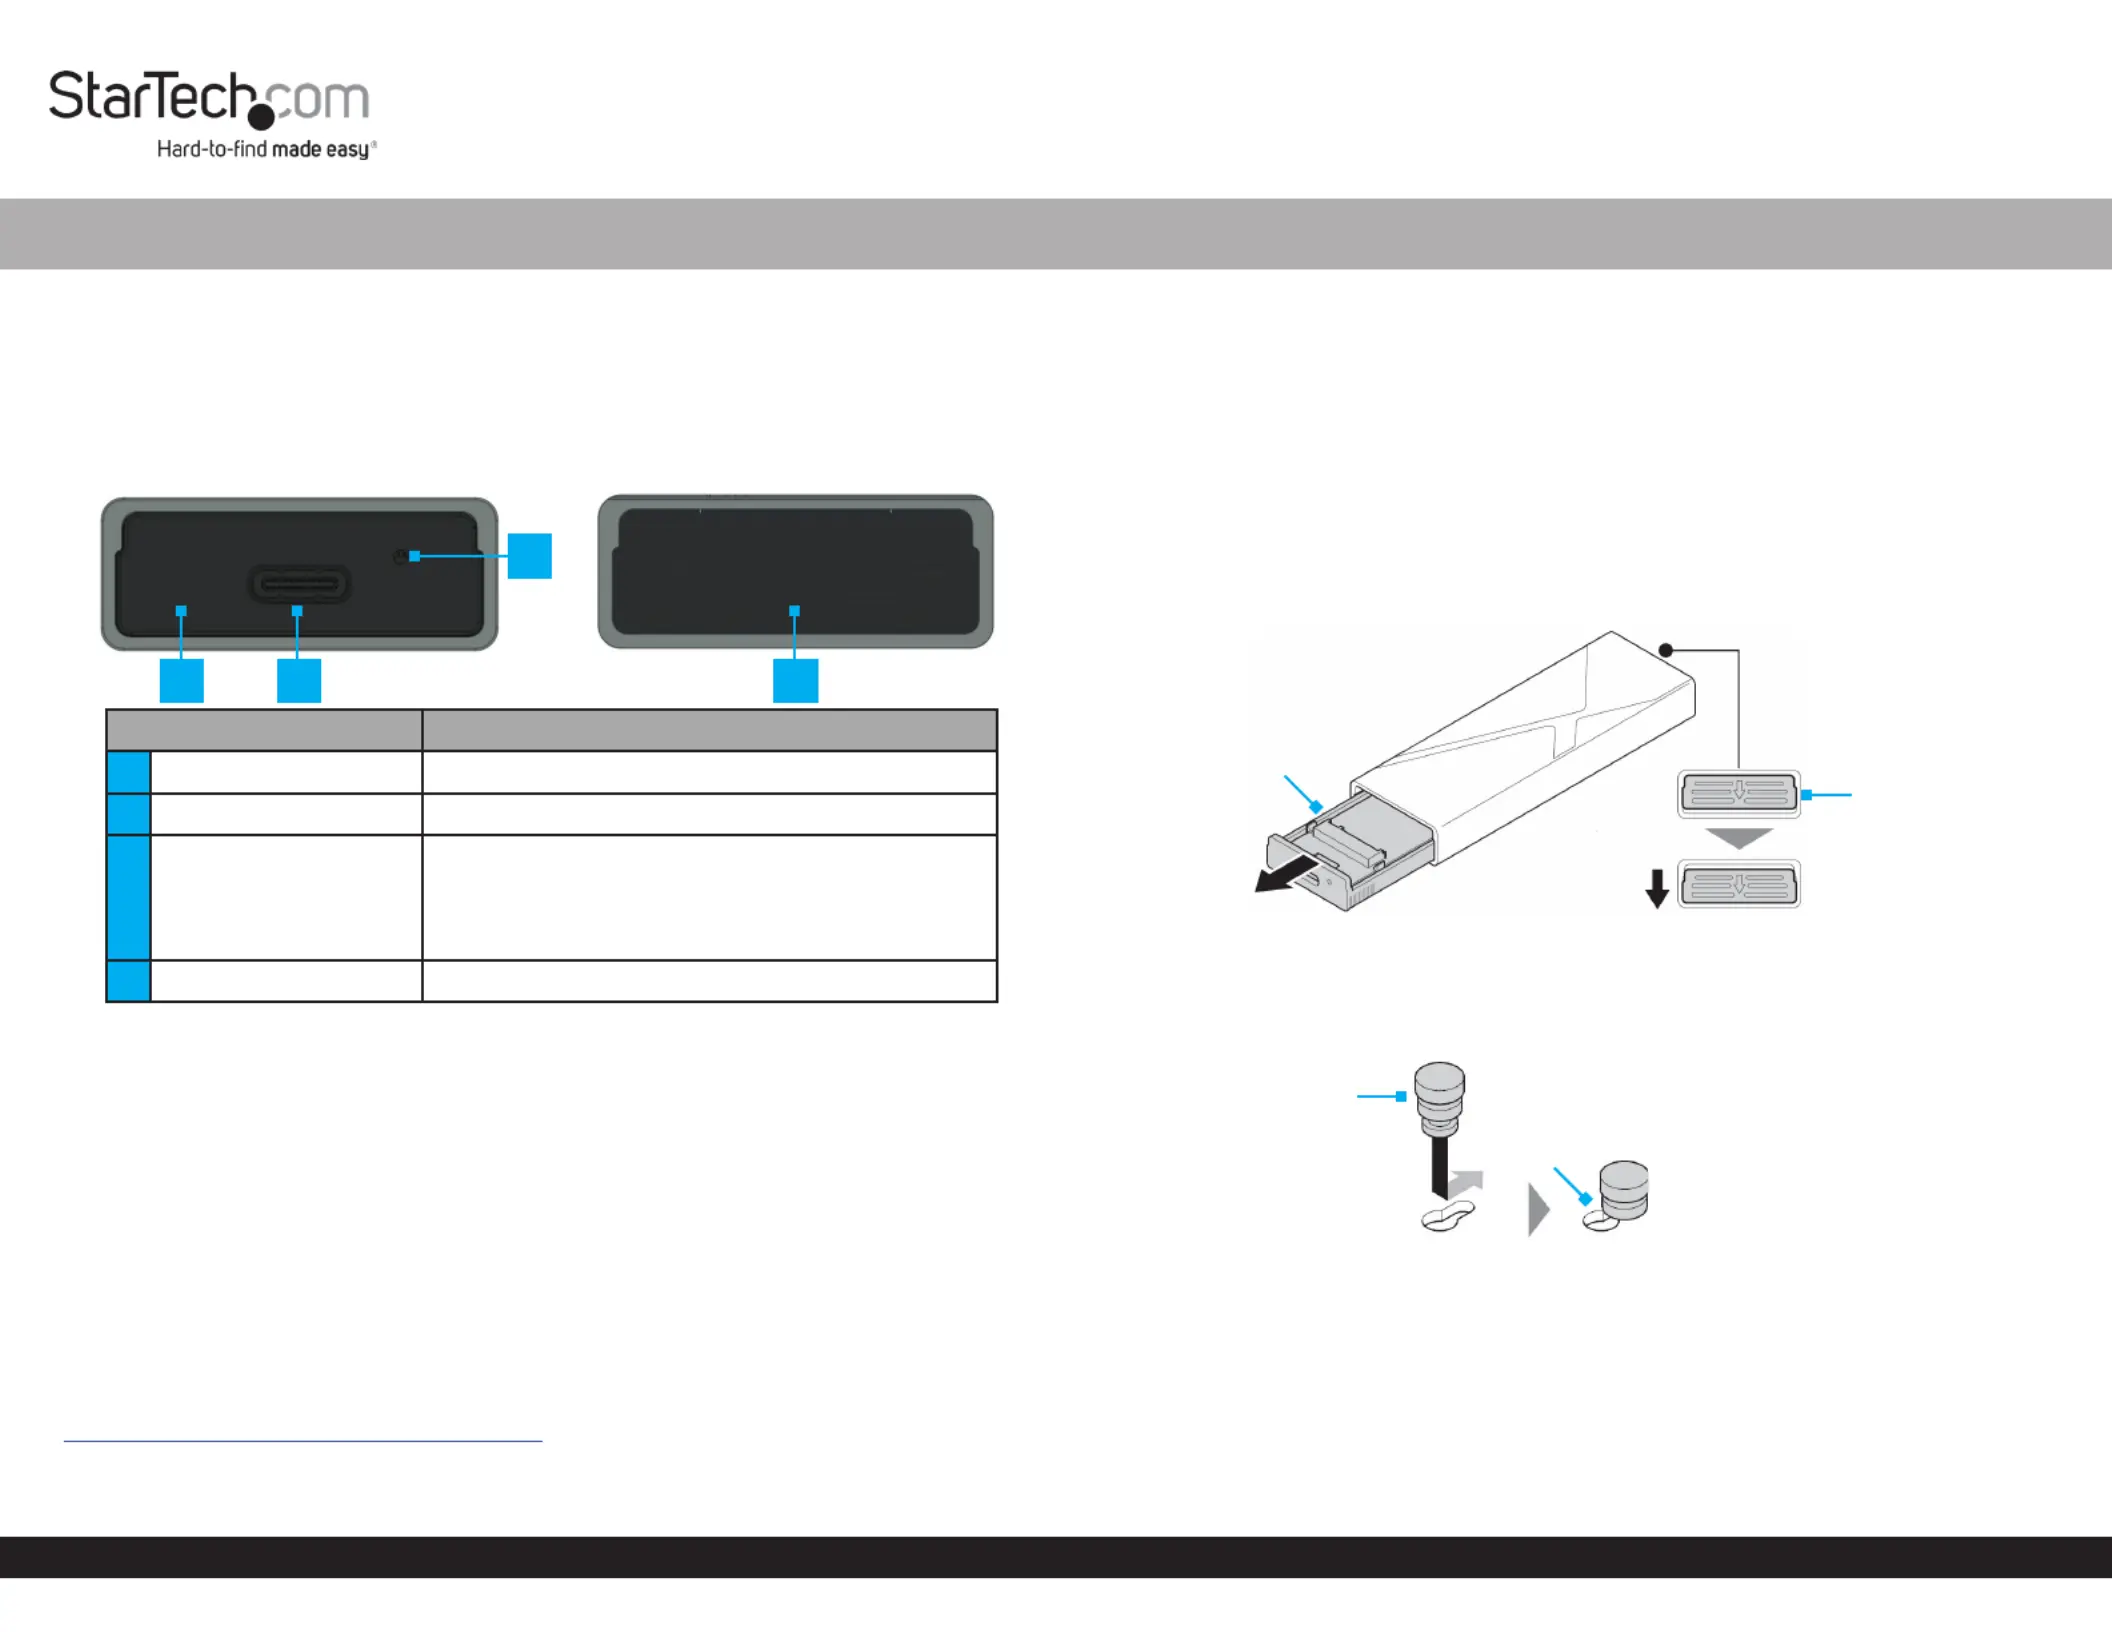
Product Diagram
Front Back
ComponentFunction
1Drive Tray Cover• Enclosure component
2USB-C Port• Connect the to the Enclosure Host Computer
3
Power and Activity
LED Indicator
• Solid BlueEnclosure indicates the is receiving
power
• Flashing BlueDrive indicates read/write
activity
4Drive Tray Release Tab• Pull down to eject the Drive Tray
Package Contents
• M.2 SSD Enclosure x 1
• USB-C to USB-C Cable x 1
• USB-C to USB-A Cable x 1
• Thermal Pad x 1
• SSD Fastener Pegs x 2
• Quick-Start Guide
Product Information
For the latest product information, technical specications, manuals, and Declarations
of Conformance, please visit:
www.StarTech.com/M2-USB-C-NVME-SATA
M.2 SATA/NVMe SSD Enclosure - Tool-less - USB 3.2 (10Gbps) w/ USB-C and USB-A Cables
Product Requirements
• SSD x 1
• M-Key and B+M-Key PCI Express M.2 NVMe and M.2 SATA
• 30 mm, 42 mm, 60 mm, or 80 mm Drive Length
Installation
Install a Drive
Warning! Handle with care.Drives
1. Pull the down to eject the . (Figure 1)Drive Tray Release Tab Drive Tray
2. Carefully pull the out of the . Drive TrayEnclosure
3. Insert one into the that corresponds with the SSD Fastener PegDrive Tray Hole
length of the and slide the into the . (Figure 2)DriveSSD Fastener PegNotch
4. Gently slide the on the at a 30-degree angle into the ConnectorDrive
corresponding , located on the . (Figure 3)Drive ConnectorDrive Tray
Note: The on the is keyed so that it only ts one way.Connector Drive
5. Pull the away from the , lightly push the down into SSD Fastener PegDriveDrive
position on the , and release the . (Figure 3)Drive TraySSD Fastener Peg
1
3
24
Figure 2
SSD Fastener Peg
Notch
Figure 1
Drive Tray
Drive Tray
Release Tab
Product specificaties
| Merk: | StarTech.com |
| Categorie: | Niet gecategoriseerd |
| Model: | M2-USB-C-NVME-SATA |
| Kleur van het product: | Grijs |
| Gewicht: | 52 g |
| Breedte: | 35 mm |
| Diepte: | 106 mm |
| Hoogte: | 14 mm |
| Snoerlengte: | 0.3 m |
| Gewicht verpakking: | 75 g |
| Breedte verpakking: | 170 mm |
| Diepte verpakking: | 142 mm |
| Hoogte verpakking: | 28 mm |
| Gebruikershandleiding: | Ja |
| LED-indicatoren: | Activity, Power |
| USB-connectortype: | USB Type-C |
| Type stroombron: | USB |
| Meegeleverde kabels: | USB Type-A to USB Type-C, USB Type-C to USB Type-C |
| Aantal USB-aansluitingen: | 1 |
| USB-versie: | 3.2 Gen 2 (3.1 Gen 2) |
| Materiaal: | Aluminium |
| Temperatuur bij opslag: | -10 - 65 °C |
| USB-aansluiting: | Ja |
| Luchtvochtigheid bij opslag: | 5 - 95 procent |
| Mean time between failures (MTBF): | 112000 uur |
| Opslag schijfgrootte: | M.2 " |
| Ondersteunde opslagstationinterfaces: | M.2 |
| Chipset: | Realtek - RTL9210B |
| (Buitenste) hoofdverpakking hoogte: | 415 mm |
| (Buitenste) hoofdverpakking breedte: | 364 mm |
| (Buitenste) hoofdverpakking lengte: | 305 mm |
| Hoeveelheid per (buitenste) hoofdverpakking: | 40 stuk(s) |
| Overdrachtssnelheid: | 10 Gbit/s |
| Aantal storage drives ondersteund: | 1 |
| Bedrijfstemperatuur (T-T): | 0 - 40 °C |
| Relatieve vochtigheid in bedrijf (V-V): | 10 - 90 procent |
| Type product: | SDD-behuizing |
| Code geharmoniseerd systeem (HS): | 84733080 |
| Geïntegreerde USB-kabel: | Nee |
| Geslacht USB-connector: | Vrouwelijk |
| UASP-ondersteuning: | Ja |
| Ondersteunde lengtes van opslagschijven: | 30, 42, 60, 80 mm |
Heb je hulp nodig?
Als je hulp nodig hebt met StarTech.com M2-USB-C-NVME-SATA stel dan hieronder een vraag en andere gebruikers zullen je antwoorden
Handleiding Niet gecategoriseerd StarTech.com

13 Juli 2026
13 Mei 2026
6 Mei 2026
8 April 2026
7 April 2026
6 April 2026
6 April 2026
6 April 2026
25 Maart 2026
14 Maart 2026
Handleiding Niet gecategoriseerd
Nieuwste handleidingen voor Niet gecategoriseerd
23 Juli 2026
23 Juli 2026
23 Juli 2026
23 Juli 2026
23 Juli 2026
23 Juli 2026
23 Juli 2026
23 Juli 2026
23 Juli 2026
22 Juli 2026