StarTech.com LTANCHOR Handleiding
StarTech.com Niet gecategoriseerd LTANCHOR
Bekijk gratis de handleiding van StarTech.com LTANCHOR (2 pagina’s), behorend tot de categorie Niet gecategoriseerd. Deze gids werd als nuttig beoordeeld door 35 mensen en kreeg gemiddeld 4.6 sterren uit 5 reviews. Heb je een vraag over StarTech.com LTANCHOR of wil je andere gebruikers van dit product iets vragen? Stel een vraag
Pagina 1/2
Quick-Start Guide
To view manuals, FAQs, videos, drivers, downloads, technical drawings, and more, visit www.startech.com/support.
Manual Revision: November 22, 2018 11:38 AM
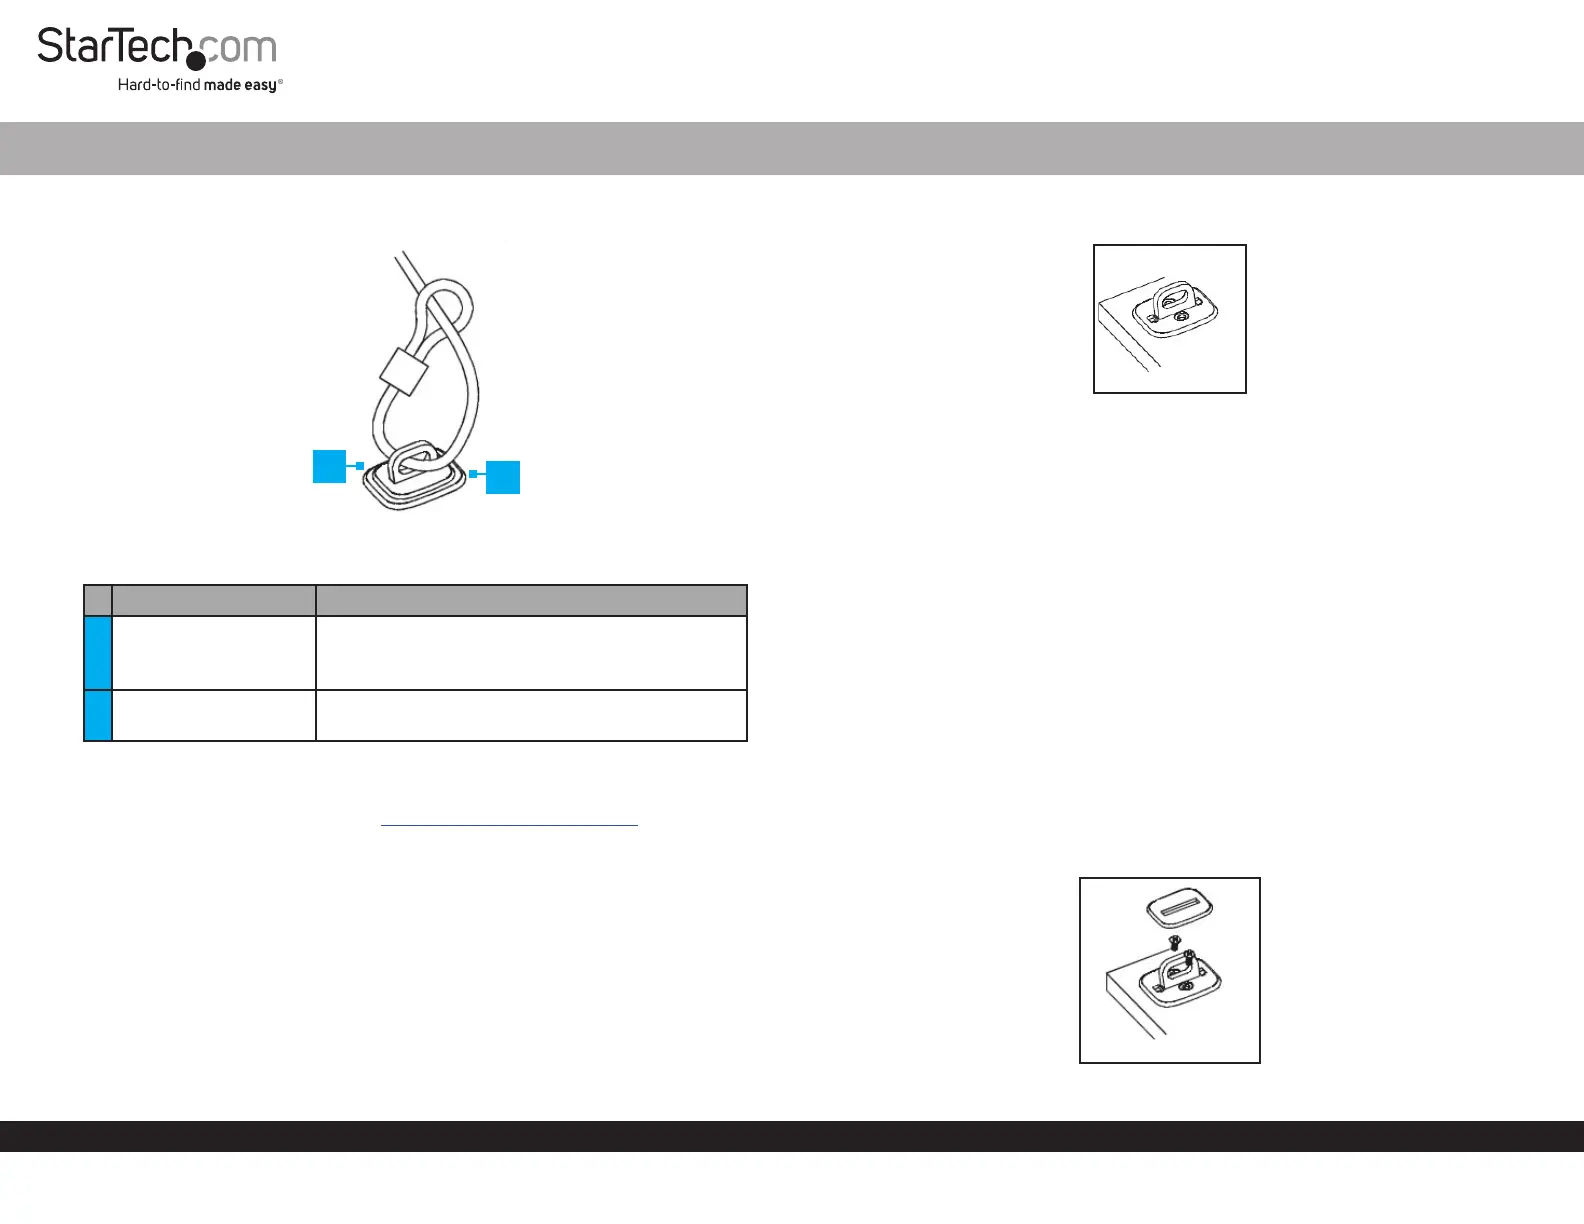
Product Diagram (LTANCHOR)
Note: Security Cable and Lock sold separately.
PortFunction
1Security Plate
• Used to hide the Mounting Screws.
• Used to prevent access to the Mounting
Screws.
2Desk Anchor
• Used in place of a stationary object to secure a
connected Device.
Requirements
For the latest requirements, please visit www.startech.com/LTANCHOR.
Installation
Notes: The Desk Anchor is not recommend for use in high humidity conditions, on
glass, ceramic tile, or water absorbent materials.
The following surface types must have a primer applied before the Desk Anchor can
be properly installed: copper, brass, or plasticized vinyl.
For maximum security, it is recommended that both Adhesive Backing and
Mounting Screws are used when installing the Desk Anchor.
Desk Anchor for Cable Lock
1
1. Position the Desk Anchor on the surface you wish to mount it to.
Desk Anchor
Note: Use a pencil to draw an outline around the Desk Anchor. This will ensure that
you know the area you need to score using the Abrasive Pad.
2. Use the Abrasive Pad (included) to score the surface area you intend to mount the
Desk Anchor on. Be careful to only score the surface that the Desk Anchor will
cover.
3. Use the Alcohol Pad (included) to clean the scored surface prior to installation.
Allow the alcohol to dry before installing the Desk Anchor on the surface.
Note: (Optional) Use the Screw Holes on the Desk Anchor as a guide to drill pilot
holes.
4. Remove the Adhesive Backing on the back of the Desk Anchor, exposing the
adhesive surface. Secure the Desk Anchor to the scored area. Apply the adhesive
backing to the surface at room temperature 60 Fahrenheit (16 Celsius).
5. Before connecting a Security Cable to the Desk Anchor, allow the adhesive
backing at least 24 hours to bond to the surface.
6. Insert the Mounting Screws (x2) into the Mounting Holes on the Desk Anchor.
Installing the Mounting Screws
2
Product specificaties
| Merk: | StarTech.com |
| Categorie: | Niet gecategoriseerd |
| Model: | LTANCHOR |
| Kleur van het product: | Zilver |
| Gewicht: | 61 g |
| Breedte: | 44 mm |
| Diepte: | 45.8 mm |
| Hoogte: | 28 mm |
| Gewicht verpakking: | 100 g |
| Breedte verpakking: | 130 mm |
| Diepte verpakking: | 223 mm |
| Hoogte verpakking: | 27.8 mm |
| Soort: | Kabelbindmontage |
| Snelstartgids: | Ja |
| Certificering: | CE, TAA, REACH |
| Materiaal: | Staal |
| Bedoeld voor: | Bureau |
| Duurzaamheidscertificaten: | RoHS |
| Aantal per verpakking: | 1 stuk(s) |
| Inclusief schroeven: | Ja |
| Aantal schroeven: | 2 |
| (Buitenste) hoofdverpakking hoogte: | 237 mm |
| (Buitenste) hoofdverpakking breedte: | 290 mm |
| (Buitenste) hoofdverpakking lengte: | 320 mm |
| Hoeveelheid per (buitenste) hoofdverpakking: | 60 stuk(s) |
| Ring kwantiteit: | 1 |
Heb je hulp nodig?
Als je hulp nodig hebt met StarTech.com LTANCHOR stel dan hieronder een vraag en andere gebruikers zullen je antwoorden
Handleiding Niet gecategoriseerd StarTech.com

13 Juli 2026
13 Mei 2026
6 Mei 2026
8 April 2026
7 April 2026
6 April 2026
6 April 2026
6 April 2026
25 Maart 2026
14 Maart 2026
Handleiding Niet gecategoriseerd
Nieuwste handleidingen voor Niet gecategoriseerd
23 Juli 2026
23 Juli 2026
23 Juli 2026
23 Juli 2026
23 Juli 2026
23 Juli 2026
23 Juli 2026
23 Juli 2026
23 Juli 2026
22 Juli 2026