StarTech.com KEYBOARD-TRAY-CLAMP1 Handleiding
StarTech.com Niet gecategoriseerd KEYBOARD-TRAY-CLAMP1
Bekijk gratis de handleiding van StarTech.com KEYBOARD-TRAY-CLAMP1 (2 pagina’s), behorend tot de categorie Niet gecategoriseerd. Deze gids werd als nuttig beoordeeld door 35 mensen en kreeg gemiddeld 4.5 sterren uit 9 reviews. Heb je een vraag over StarTech.com KEYBOARD-TRAY-CLAMP1 of wil je andere gebruikers van dit product iets vragen? Stel een vraag
Pagina 1/2
Quick-Start Guide
To view manuals, FAQs, videos, drivers, downloads, technical drawings, and more, visit www.startech.com/support
Manual Revision: January 28, 2022 3:27 PM
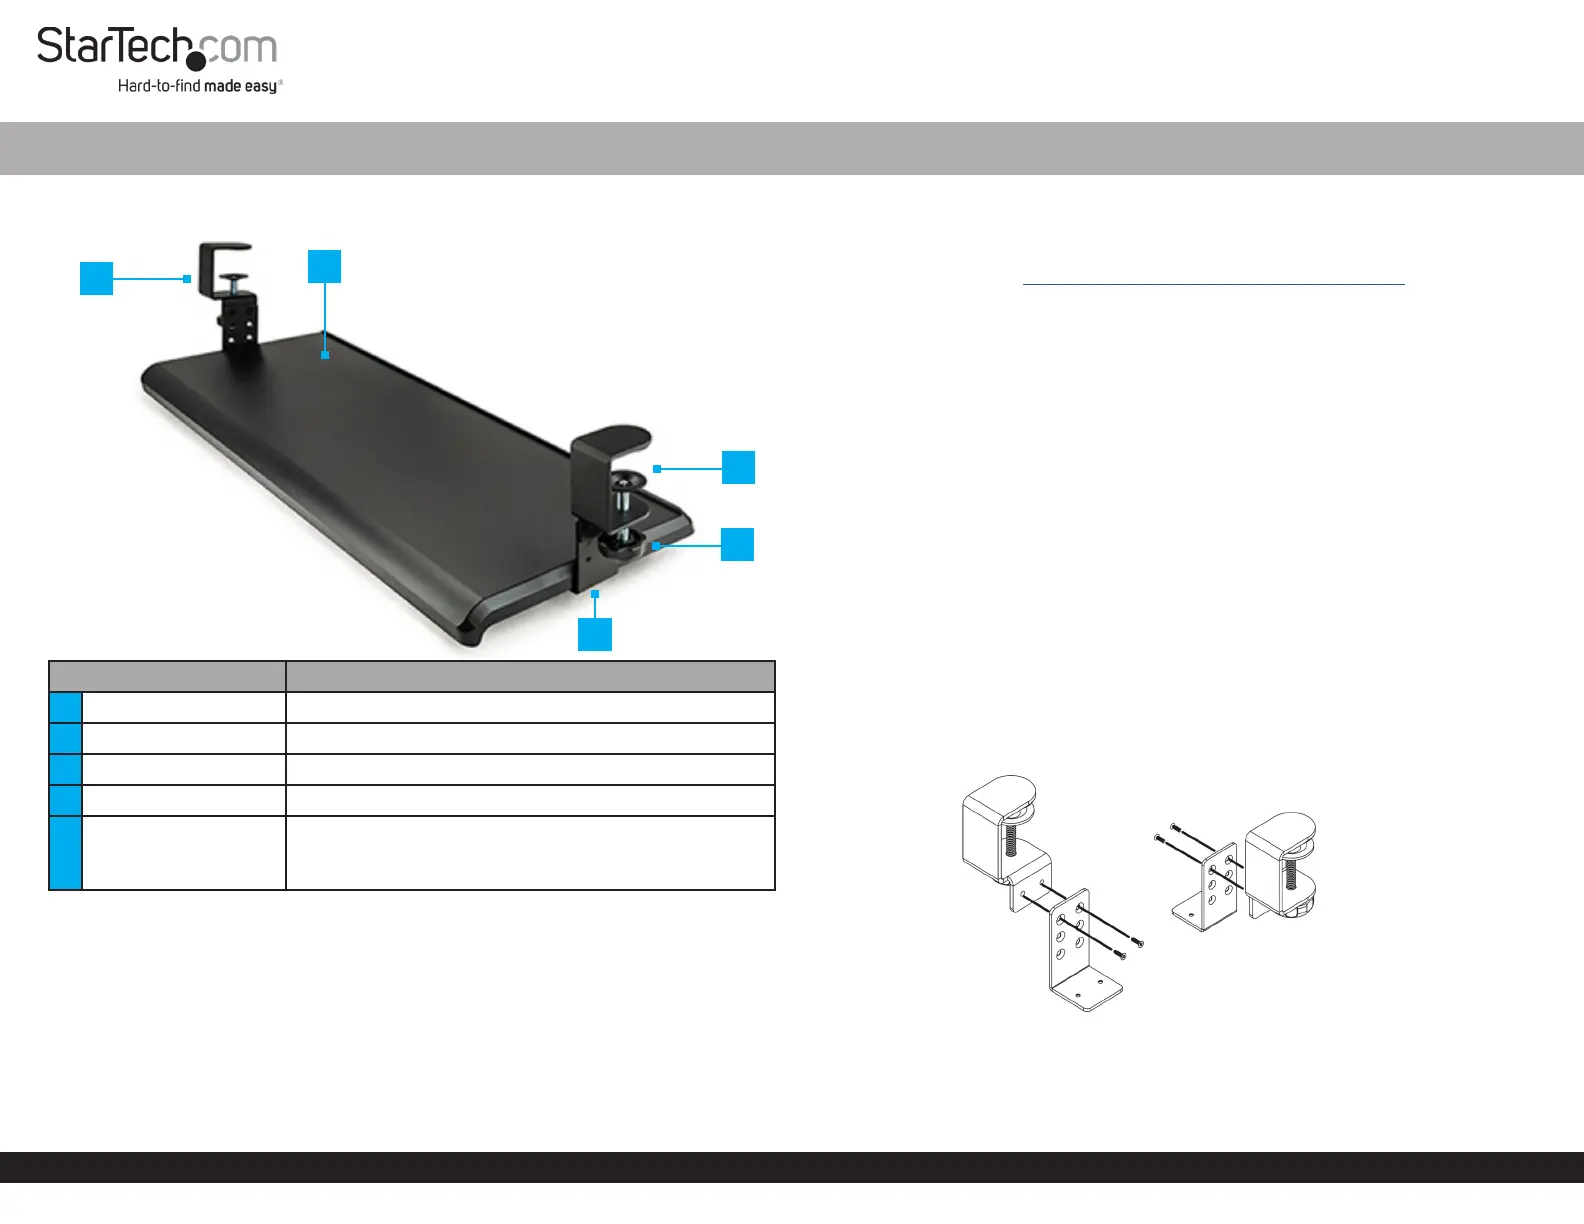
Product Diagram (KEYBOARD-TRAY-CLAMP1)
ComponentFunction
1Desk Clamp, Left• Attach the Keyboard Tray to the Desk
2Keyboard Tray• Place a keyboard and a mouse on the Keyboard Tray
3Desk Clamp, Right• Attach the Keyboard Tray to the Desk
4Clamp Knob• Turn by hand to secure the Clamp to the Desk
5
Height Adjustment L
Bracket
• Adjust the height between the Desk and the
Keyboard Tray
• Attach the Keyboard Tray to the Desk Clamp
Package Contents
• Keyboard Tray x 1
• Height Adjustment Screws x 5
• Tray Mounting Screws x 5
• Height Adjustments L Brackets x 2
• Desk Clamp Left x 1
• Desk Clamp Right x 1
• Quick-star Guide x1
Desk Clamp Keyboard Tray
Requirements
For the latest manuals, product information, technical specications, and declarations of
conformance, please visit: www.startech.com/KEYBOARD-TRAY-CLAMP1
• Phillips Head Screwdriver
Installation
WARNING!
Do not exceed the weight capacity of this product. Overloading this product might
result in injury or property damage. This product can support the following weight: up
to 11.8 kg (26 lbs).
Ensurethe mounted Keyboard Tray is properly secured to the Desk before use.
Attach the Desk Clamp to the Height Adjustment L
Brackets
1. Determine the desired height between the Desk and the Keyboard Tray: 100,
120, or 140 mm (3.9, 4.7, or 5.5 in). Each row of holes on the Height Adjustment
L Bracket are spaced 20 mm apart. The row of holes, located closest to the bend
of the Height Adjustment L Brackets, provides the minimum height adjustment
setting of 100 mm (3.9 in).
2. Secure the Height Adjustment L Bracket to the Desk Clamps using the Height
Adjustment Screws (x2 shorter screws) and tighten using a Phillips Head
Screwdriver to complete the rst Desk Clamp Assembly (Figure 1).
3. Repeat steps 2 and 3 to install the second Desk Clamp Assembly
Attach the Desk Clamp Assemblies to the Keyboard Tray
1. Flip the Keyboard Tray upside down and align the mounting holes located on
3
1
2
5
4
Figure 1
Product specificaties
| Merk: | StarTech.com |
| Categorie: | Niet gecategoriseerd |
| Model: | KEYBOARD-TRAY-CLAMP1 |
| Kleur van het product: | Zwart |
| Breedte: | 310 mm |
| Diepte: | 700 mm |
| Hoogte: | 32 mm |
| Gewicht verpakking: | 3200 g |
| Breedte verpakking: | 830 mm |
| Diepte verpakking: | 340 mm |
| Hoogte verpakking: | 62 mm |
| Gebruiksaanwijzing: | Ja |
| Maximale gewichtscapaciteit: | 12 kg |
| Vorm: | Rechthoekig |
| Materiaal: | Staal |
| Inclusief schroeven: | Ja |
| Aantal schroeven: | 10 |
| (Buitenste) hoofdverpakking hoogte: | 370 mm |
| (Buitenste) hoofdverpakking breedte: | 840 mm |
| (Buitenste) hoofdverpakking lengte: | 280 mm |
| Hoeveelheid per (buitenste) hoofdverpakking: | 4 stuk(s) |
| Toetsenbordblad max. gewicht: | 12 kg |
| Keyboardlade: | Ja |
| Toetsenbordblad (WxD): | 700 x 310 mm |
Heb je hulp nodig?
Als je hulp nodig hebt met StarTech.com KEYBOARD-TRAY-CLAMP1 stel dan hieronder een vraag en andere gebruikers zullen je antwoorden
Handleiding Niet gecategoriseerd StarTech.com

13 Juli 2026
13 Mei 2026
6 Mei 2026
8 April 2026
7 April 2026
6 April 2026
6 April 2026
6 April 2026
25 Maart 2026
14 Maart 2026
Handleiding Niet gecategoriseerd
Nieuwste handleidingen voor Niet gecategoriseerd
23 Juli 2026
23 Juli 2026
23 Juli 2026
23 Juli 2026
23 Juli 2026
23 Juli 2026
23 Juli 2026
23 Juli 2026
23 Juli 2026
22 Juli 2026