Smeg PX1402 Handleiding
Bekijk gratis de handleiding van Smeg PX1402 (16 pagina’s), behorend tot de categorie Fornuis. Deze gids werd als nuttig beoordeeld door 54 mensen en kreeg gemiddeld 4.3 sterren uit 27.5 reviews. Heb je een vraag over Smeg PX1402 of wil je andere gebruikers van dit product iets vragen? Stel een vraag
Pagina 1/16

Table of Contents
19
1. Precautions for safety and use ________________________ 20
2. Fitting the appliance in the top ________________________ 21
2.1 Fixing to the supporting structure _______________________________________ 21
2.2 Fitting the gasket ___________________________________________________ 22
2.3 Fixing using brackets ________________________________________________ 22
3. Electrical connection ________________________________ 23
4. Gas connection ____________________________________ 24
4.1 Bottled gas connection _______________________________________________ 24
4.2 Room ventilation ____________________________________________________ 24
4.3 Combustion gas discharge ____________________________________________ 24
5. Adapting to different types of gas ______________________ 25
5.1 Removing the hob skin _______________________________________________ 25
5.2 Adjusting for bottled gas ______________________________________________ 26
5.3 Adjusting for natural gas ______________________________________________ 27
5.4 Adjusting the primary air flow __________________________________________ 27
5.5 Reassembling the hob skin ____________________________________________ 28
5.6 Adjusting the minimum for natural gas ___________________________________ 28
5.7 Adjusting the minimum for bottled gas ___________________________________ 28
5.8 Hob burner layout ___________________________________________________ 28
5.9 Greasing the gas taps ________________________________________________ 28
6. Description of controls ______________________________ 29
6.1 The front panel _____________________________________________________ 29
7. Using the hob _____________________________________ 30
7.1 Fitting the Pan Stands _______________________________________________ 30
7.2 Lighting burners with safety device ______________________________________ 32
7.3 Practical hints for using the burners _____________________________________ 32
7.4 Pan diameters ______________________________________________________ 33
8. Cleaning and maintenance ___________________________ 34
8.1 Cleaning the hob ____________________________________________________ 34
8.2 Cleaning the components _____________________________________________ 34
THESE INSTRUCTIONS ONLY APPLY TO THE COUNTRIES OF DESTINATION WHOSE
IDENTIFICATION SYMBOLS ARE LISTED ON THE COVER OF THIS MANUAL.
THIS BUILT-IN HOB IS CLASSIFIED AS CLASS 3.
INSTRUCTIONS FOR THE INSTALLER: these are intended for the qualified
engineer who is to check the gas supply system and install, commission and test the
appliance.
INSTRUCTIONS FOR THE USER: these provide recommendations for use, a
description of the controls and the correct procedures for cleaning and maintaining the
appliance.

Precautions for Safety and Use
20
1. Precautions for safety and use
THIS MANUAL IS AN INTEGRAL PART OF THE APPLIANCE. TAKE GOOD CARE OF IT AND KEEP IT
TO HAND THROUGHOUT THE HOB'S LIFE CYCLE. USERS ARE ADVISED TO READ THIS MANUAL
AND ALL THE INSTRUCTIONS IT CONTAINS BEFORE USING THE HOB. ALSO KEEP THE SET OF
NOZZLES PROVIDED IN A SAFE PLACE. INSTALLATION MUST BE CARRIED OUT BY QUALIFIED
STAFF IN COMPLIANCE WITH THE RELEVANT REGULATIONS. THIS APPLIANCE IS INTENDED FOR
HOUSEHOLD USE AND COMPLIES WITH THE EEC DIRECTIVES CURRENTLY IN FORCE. THE
APPLIANCE IS BUILT TO PROVIDE THE FOLLOWING FUNCTION: COOKING AND HEATING FOODS;
ALL OTHER USES ARE TO BE CONSIDERED IMPROPER.
THE MANUFACTURER DECLINES ALL LIABILITY FOR USES OTHER THAN THOSE STATED ABOVE.
NEVER LEAVE PACKAGING RESIDUES UNATTENDED IN THE HOME. SEPARATE WASTE
PACKAGING MATERIALS BY TYPE AND CONSIGN THEM TO THE NEAREST SEPARATE DISPOSAL
CENTRE.
THE APPLIANCE MUST BE CONNECTED TO EARTH IN COMPLIANCE WITH ELECTRICAL SYSTEM
SAFETY REGULATIONS.
THE PLUG TO BE CONNECTED TO THE POWER SUPPLY LEAD AND THE RELATIVE SOCKET MUST
BE OF THE SAME TYPE AND COMPLY WITH THE RELEVANT REGULATIONS.
THE POWER SUPPLY SOCKET MUST BE ACCESSIBLE EVEN AFTER THE APPLIANCE HAS BEEN
BUILT-IN
NEVER DISCONNECT THE PLUG BY PULLING ON THE POWER SUPPLY LEAD.
IMMEDIATELY AFTER INSTALLATION, CARRY OUT A QUICK TEST ON THE HOB FOLLOWING THE
INSTRUCTIONS PROVIDED LATER IN THIS MANUAL. IF THE APPLIANCE FAILS TO OPERATE,
DISCONNECT IT FROM THE ELECTRICAL MAINS AND CONTACT YOUR NEAREST SERVICE
CENTRE.
NEVER ATTEMPT TO REPAIR THE APPLIANCE YOURSELF.
AFTER EACH USE OF THE HOB, ALWAYS CHECK THAT THE CONTROL KNOBS ARE TURNED TO
"ZERO" (OFF).
NEVER PLACE PANS WITH BOTTOMS WHICH ARE NOT PERFECTLY FLAT AND SMOOTH ON THE
HOB PAN STANDS.
NEVER USE PANS OR GRIDDLE PLATES WHICH PROJECT BEYOND THE OUTSIDE EDGE OF THE
HOB.
THE NAMEPLATE WITH THE TECHNICAL DATA, SERIAL NUMBER AND MARK IS IN A VISIBLE
POSITION UNDERNEATH THE CASING, ANNEXED TO THIS MANUAL AND APPLIED TO THE QUALITY
CERTIFICATE.
THIS NAMEPLATE MUST NEVER BE REMOVED.
THE APPLIANCE IS INTENDED FOR USE BY ADULTS. KEEP CHILDREN AT A SAFE DISTANCE AND
NEVER ALLOW THEM TO PLAY WITH IT.
THIS APPLIANCE IS TAGGED UNDER EUROPEAN DIRECTIVE 2002/96/EC ON WASTE ELECTRICAL
AND ELECTRONIC EQUIPMENT (WEEE).
THIS DIRECTIVE CONTAINS THE REGULATIONS GOVERNING THE COLLECTION AND RECYCLING
OF DECOMMISSIONED APPLIANCES THROUGHOUT THE EUROPEAN UNION.
The manufacturer declines all responsibility for injury or damage caused by failure to comply
with the above regulations or deriving from tampering with even just one part of the appliance
and the use of non-original spare parts.

Instructions for the Installer
21
2. Fitting the appliance in the top
The procedures required below must be carried out by a skilled builder and/or joiner.
The hob can be installed on various materials, including masonry, metal, solid wood
and wood finished with plastic laminates, provided the material is heat-resistant (T 90°
C).
2.1 Fixing to the supporting structure
Make a hole in the cabinet top with the dimensions shown here, maintaining a
distance of at least 100 mm from the rear edge. This appliance may be installed
against walls higher than the worktop surface, provided the distance shown here is
maintained, in order to prevent damage due to overheating. Make sure that there is at
least 750 mm between the hob burners and a shelf
or hood (if any) placed vertically
above them.
A (mm) B (mm) C (mm) D (mm) E (mm) X (mm) Y (mm) L (mm)
min 200 min 460 min 750 min 100 20÷60 1000 364÷367 842÷847
If the hob is installed above an oven, the oven must be fitted with a cooling fan.
If the hob is installed above a cupboard with doors, a separator panel must be
installed underneath it. Leave a gap of at least 10 mm between the bottom of the hob
and the surface of the panel, which must be easily removable to allow sufficient
access for any servicing procedures.
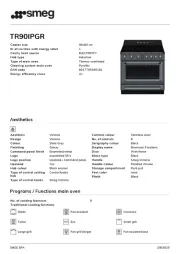
Product specificaties
| Merk: | Smeg |
| Categorie: | Fornuis |
| Model: | PX1402 |
| Apparaatplaatsing: | Ingebouwd |
| Soort bediening: | Draaiknop |
| Kleur van het product: | Roestvrijstaal |
| Ingebouwd display: | Nee |
| Gewicht: | 15700 g |
| Breedte: | 1000 mm |
| Diepte: | 395 mm |
| Hoogte: | 53 mm |
| Snoerlengte: | 1.2 m |
| Gewicht verpakking: | 18600 g |
| Breedte verpakking: | 1115 mm |
| Diepte verpakking: | 520 mm |
| Hoogte verpakking: | 185 mm |
| Soort materiaal (bovenkant): | Roestvrijstaal |
| Vermogen brander/kookzone 2: | 1050 W |
| Vermogen brander/kookzone 3: | 1700 W |
| Vermogen brander/kookzone 1: | 4200 W |
| Aantal branders/kookzones: | 4 zone(s) |
| Type kookplaat: | Gaskookplaat |
| Electronische ontsteking: | Ja |
| Type brander/kookzone 1: | Extra groot |
| Type brander/kookzone 2: | Sudderen |
| Type brander/kookzone 3: | Regulier |
| Makkelijk schoon te maken: | Ja |
| Aantal gaspitten: | 4 zone(s) |
| Aantal elektronische kook zones: | 0 zone(s) |
| Controle positie: | Boven voorzijde |
| Aangesloten lading (elektrisch): | 5 W |
| Installatie compartiment breedte: | 847 mm |
| Installatie compartiment diepte: | 371 mm |
| Aangesloten lading (gas): | 9950 W |
| Breedte kookplaat: | 100 cm |
| Materiaal pannensteun: | Gietijzer |
| Veiligheidsklep: | Ja |
| Installatie compartiment diepte (min): | 367 mm |
| Land van herkomst: | Italië |
| Frame type: | Frameloos |
| Type brander/kookzone 4: | Groot |
| Vermogen brander/kookzone 4: | 3000 W |
| Voedingsbron brander/kookzone 1: | Gas |
| Voedingsbron brander/kookzone 2: | Gas |
| Voedingsbron brander/kookzone 3: | Gas |
| Voedingsbron brander/kookzone 4: | Gas |
| Installatie compartiment diepte (max): | 371 mm |
| Wokbrander: | 4200 W |
| Wokbrander positie: | Links |
| Positie brander/kookzone 1: | Links |
| Positie brander/kookzone 2: | Centraal links |
| Positie brander/kookzone 3: | Centraal rechtsvoor |
| Positie brander/kookzone 4: | Rechts |
| Type finish: | Mat |
| Kookzone 1 vorm: | Rond |
| Kookzone 2 vorm: | Rond |
| Kookzone 3 vorm: | Rond |
| Kookzone 4 vorm: | Rond |
| AC-ingangsspanning: | 220 - 240 V |
| AC-ingangsfrequentie: | 50 / 60 Hz |
| Inbouw afzuigkap: | Nee |
| Aantal fases: | 1 |
| Chemische belasting (Zweden): | Nee |
Heb je hulp nodig?
Als je hulp nodig hebt met Smeg PX1402 stel dan hieronder een vraag en andere gebruikers zullen je antwoorden
Handleiding Fornuis Smeg
12 Augustus 2025
12 Augustus 2025

11 Augustus 2025

11 Augustus 2025

15 Juni 2025
15 Juni 2025

15 Juni 2025

15 Juni 2025
15 Juni 2025
15 Juni 2025
Handleiding Fornuis
- MBM
- Nabo
- Chef
- Foster
- James
- Korona
- Asko
- Nestor Martin-Electrolux
- Fulgor Milano
- Spring USA
- Artusi
- Girmi
- Wilfa
- Cookology
- La Germania
Nieuwste handleidingen voor Fornuis

12 September 2025

12 September 2025

12 September 2025

10 September 2025
9 September 2025
9 September 2025

9 September 2025
9 September 2025
9 September 2025
9 September 2025