Skandika Jasper II Handleiding
Bekijk gratis de handleiding van Skandika Jasper II (2 pagina’s), behorend tot de categorie Tent. Deze gids werd als nuttig beoordeeld door 82 mensen en kreeg gemiddeld 4.2 sterren uit 7 reviews. Heb je een vraag over Skandika Jasper II of wil je andere gebruikers van dit product iets vragen? Stel een vraag
Pagina 1/2
- 1 -
www.skandika.de
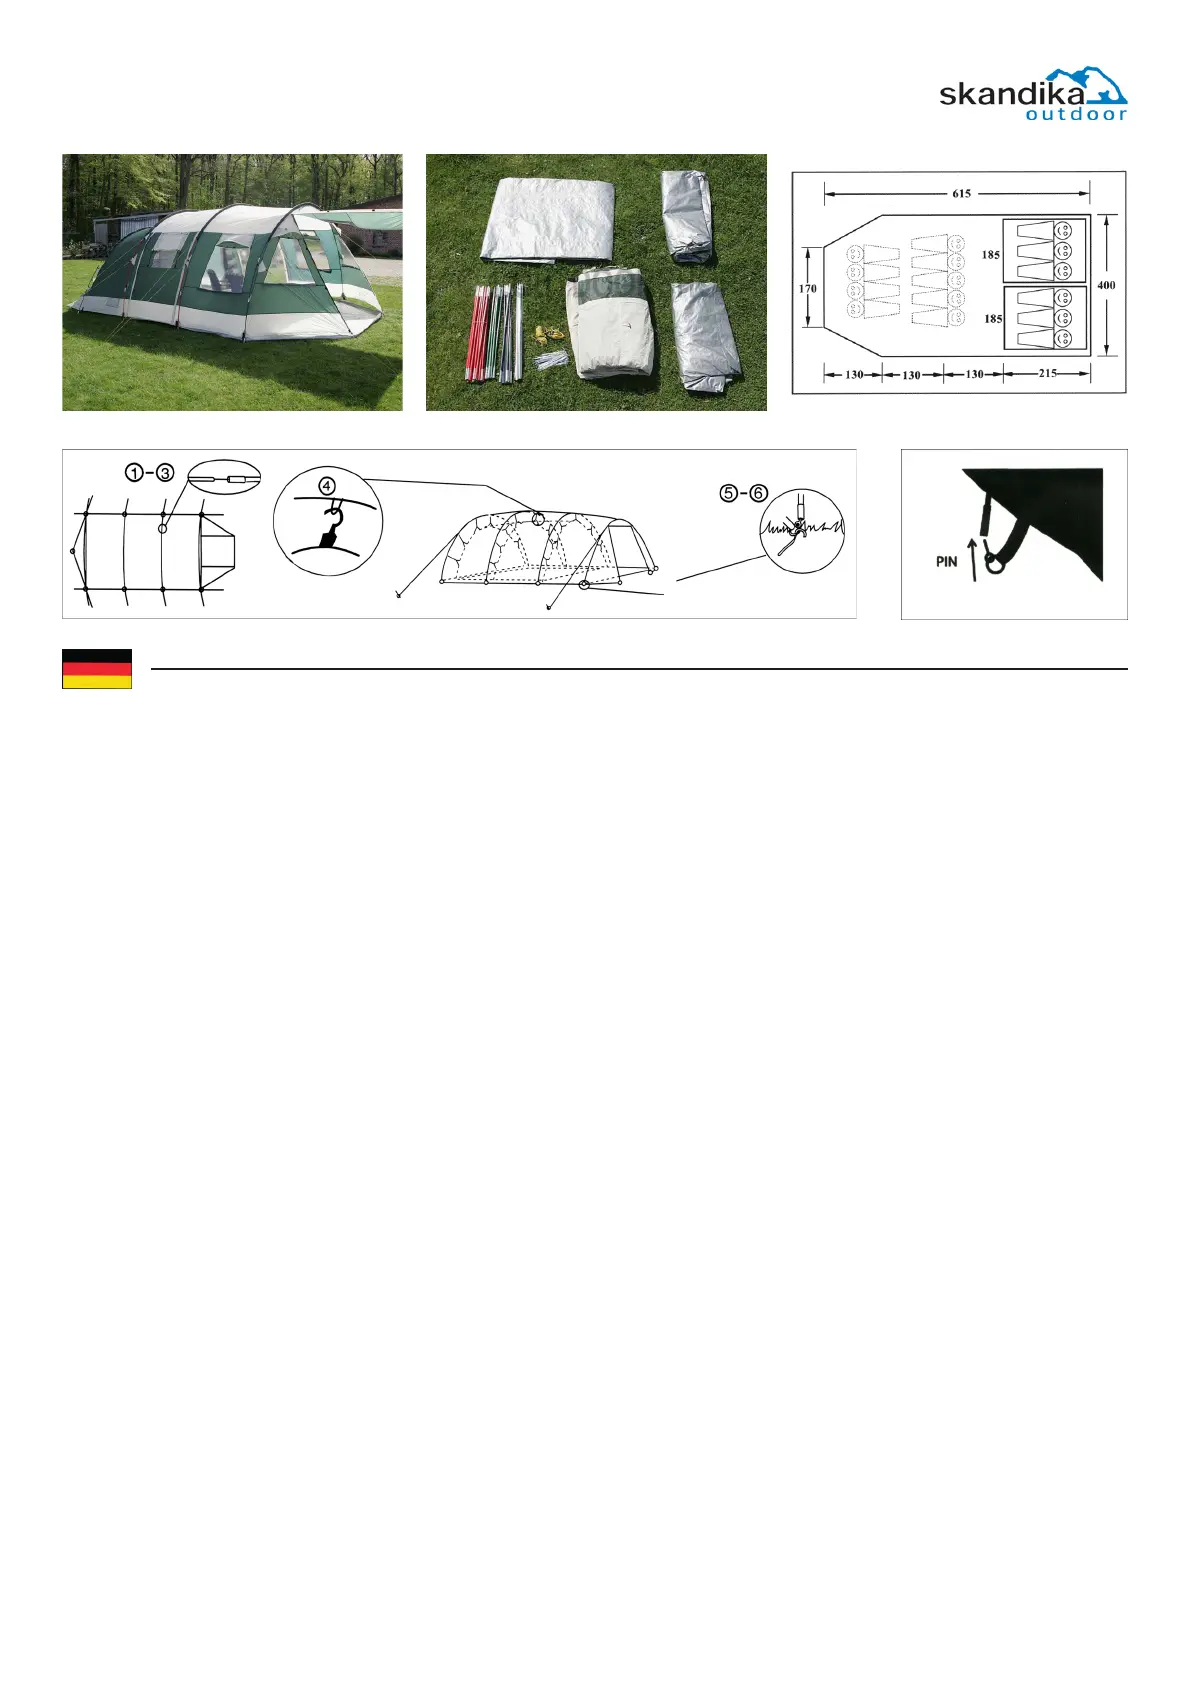
Skandika JASPER II
Art.-Nr. 1936
Wir freuen uns, dass Sie sich für ein Skandika-Zelt entschieden haben.
Es bietet Ihnen viel Platz und Komfort in bekannt hoher Skandika-Qualität.
Bauen Sie das Zelt sicherheitshalber vor dem Urlaub einmal zu Hause auf.
Aufbauanleitung
Bitte gehen Sie Punkt für Punkt vor, die Reihenfolge ist wichtig.
•Gestänge und Zubehör: Entfernen Sie den kompletten Inhalt aus der
Zelt-Tasche
•Stecken Sie alle Zeltstangen vorsichtig zusammen.
•Breiten Sie die Zeltbodenunterlage und das Außenzelt auf einem mög-
lichst glatten und sauberen Untergrund aus.
Außenzelt
•Jede Zeltstange ist farbig markiert entsprechend den zugehörigen
Gestängekanälen am Außenzelt
•Führen Sie jede Stange in einen Gestängekanal des Außenzeltes vom
einen Ende zum anderen
•SteckenSiedieMetallPins(zundenanderunterenKantedes
Außenzeltes) in beide Enden jeder Zeltstange
•Das Außenzelt steht jetzt von selbst und kann durch Verankerung
mittels der Stahlnägel gesichert werden.
•Die Spannung des Außenzelts kann durch die Abspannleinen und
Schnallen reguliert werden.
Innenzelte
•Bringen Sie das Innenzelt innerhalb des aufgestellten Außenzeltes an
die passende Stelle
•Beginnend von der Rückseite des Innenzeltes befestigen Sie die
Ecken entlang der unteren Kante des Außenzeltes
•Haken Sie das Innenzelt an der Unterseite des Außenzeltes ein begin-
nend von der unteren Rückseite and arbeiten Sie sich nach vorne vor
unter Benutzung der Clips auf der Außenwand des
•Innenzeltes and den entsprechenden Ringen an der Unterseite des
Außenzeltes
Achtung
Skandika-ZeltezeichnensichdurcheinenleichtenAufbauaus.Empnden
Sie einen Aufbauschritt als schwergängig, wenden Sie keine Gewalt an,
sondernmachenSiedenFehlerausndig.
Pege
•Das Zelt muss beim Aufbau und Zusammenfalten völlig trocken sein.
Ansonsten besteht Verschimmelungs- und Verrottungsgefahr.
•Heringe und Nägel sollten immer getrennt von Außen- und Innenzelt
verpackt werden.
•Die Bodenwanne des Innenzeltes sollte vor dem Zusammenfalten
gereinigt werden.
•Schmutz an der Zeltwand entfernen Sie bitte ausschließlich mit einem
weichen Schwamm und klarem Wasser. Verwenden Sie keine Reini-
gungsmitte, da diese der Imprägnierung schaden können.
•Ziehen Sie Heringe und Nägel nicht an den Ringen bzw. Abspannlei-
nen aus dem Boden.
Product specificaties
| Merk: | Skandika |
| Categorie: | Tent |
| Model: | Jasper II |
Heb je hulp nodig?
Als je hulp nodig hebt met Skandika Jasper II stel dan hieronder een vraag en andere gebruikers zullen je antwoorden
Handleiding Tent Skandika

6 Oktober 2025
5 Juli 2025
2 Juli 2025
2 Juli 2025
1 Juli 2025
1 Juli 2025
1 Juli 2025
1 Juli 2025
1 Juli 2025
1 Juli 2025
Handleiding Tent
Nieuwste handleidingen voor Tent
18 Juli 2026
18 Juli 2026
23 Juni 2026
20 Juni 2026
19 Juni 2026
16 Juni 2026
16 Juni 2026
16 Juni 2026
16 Juni 2026
15 Juni 2026