Sharp Aquos Phone mini SHL24 Handleiding
Sharp Smartphone Aquos Phone mini SHL24
Bekijk gratis de handleiding van Sharp Aquos Phone mini SHL24 (2 pagina’s), behorend tot de categorie Smartphone. Deze gids werd als nuttig beoordeeld door 85 mensen en kreeg gemiddeld 4.8 sterren uit 9 reviews. Heb je een vraag over Sharp Aquos Phone mini SHL24 of wil je andere gebruikers van dit product iets vragen? Stel een vraag
Pagina 1/2
Setting Guide
Please read this manual first
Thank you for buying the “AQUOS PHONE SERIE mini SHL24”
(simply called the “product” from here on).
This manual describes the settings and precautions for using the
product. For detailed descriptions of various functions, refer to the
“Instruction Manual application” (Japanese version) that can be
used on the product.
*For illustrations and descriptions in this manual, refer to “Basic
Manual” available on the au homepage and on the product.
*The company names and product names appearing in this manual
are trademarks or registered trademarks of their respective holders.
February 2014, 1st Edition
Basic Operations
Describes names of parts and basic operations.
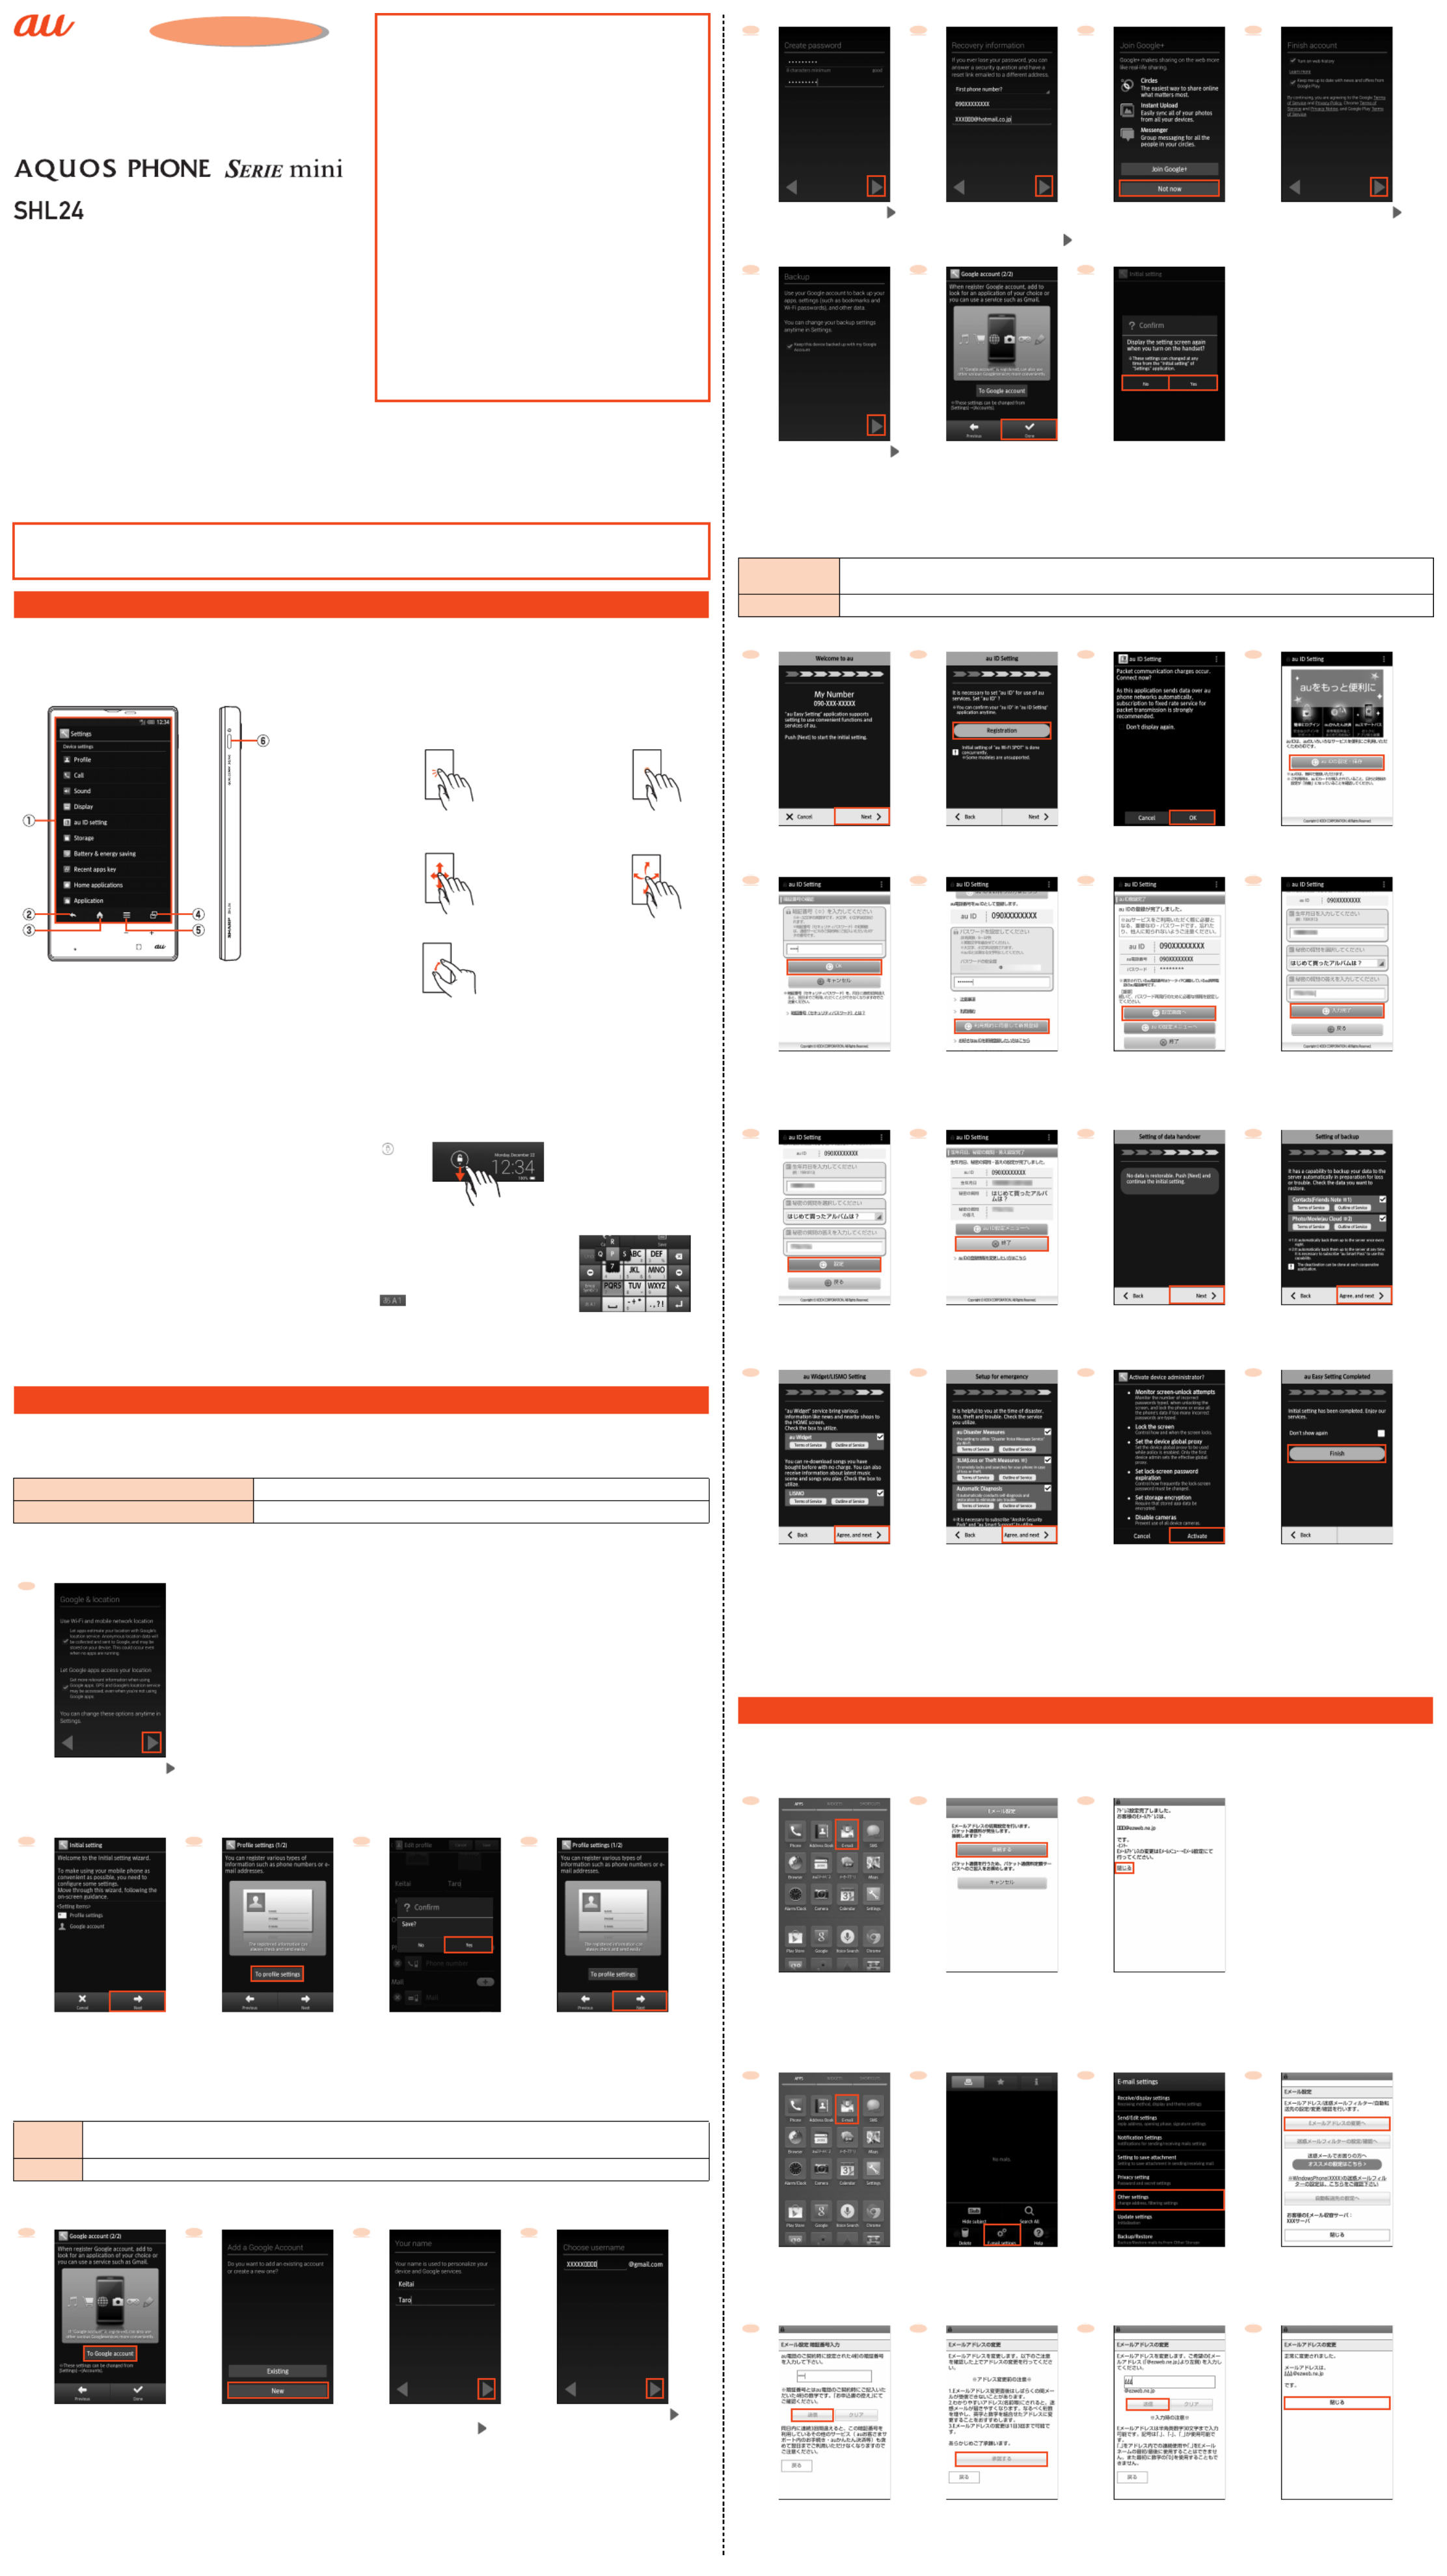
Initial Settings
■STEP1: Using Google Location Service
Set for using Google’s location service.
■STEP2: Profile Settings
Set information such as your phone number and mail address.
■STEP3: Google Account Settings
Set up a Google account for using services such as Google Play and
Gmail.
■STEP4: auかんたん設定 (au Easy Setting)
Set an au ID etc. to use various services provided by au.
E-mail Settings and Changing E-mail Address
Set for using E-mail (@ezweb.ne.jp). An e-mail address is set
automatically in the initial settings. You can change the e-mail
address set in the initial settings.
Making/Receiving Calls
You can make/receive a call.
Transferring and Backing Up Data
You can transfer/back up your data.
Infrared Communication
You can send/receive data with devices which support the infrared
communication function.
Reducing Battery Consumption
You can switch the setting of “function buttons” to reduce the battery
consumption.
Sold by: KDDI CORPORATION, OKINAWA CELLULAR TELEPHONE COMPANY
Manufactured by: SHARP CORPORATION
For detailed operations, refer to the “Instruction Manual application” (Japanese version) that can be used on the product.
●取扱説明書When the display language is Japanese, on the home screen, tap [アプリ] (APPS) [[] (Instruction Manual).
You can switch the display language for function names and other items to English.
●アプリ言語と文字入力言語On the home screen, tap [] (APPS) [[設定] (Settings) [[] (Language & input) [[ (Language)を選択]
(Select language) [[English].
■Character Input Method
You can switch input methods for character entry.
While the keyboard is displayed, open the notification panel [Choose input method] [
[[English (US)]/[Japanese].
●Following operation explanations use “Japanese - iWnn IME - SH edition”.
You can enter characters by flick input or tapping keys repeatedly. Tap “” to switch the input modes.
Flick input
By touching a key, the candidates that can be entered by flick input are displayed as shown on the right. By
flicking the key in the direction of a desired character being displayed, the character is entered in the
character entry area.
The Google location service screen and initial settings screen are displayed automatically when you switch the display language to English
and turn the power of the product off and on after turning it on for the first time. Follow the on-screen instructions to set each function.
■STEP1: Using Google Location Service
*1Alternatively, on the home screen, tap [APPS] [[Settings] [[Location services] and slide [OFF]/[ON] in [Access to my location] to the right/left to
set up (“Wi-Fi & mobile network location” is enabled/disabled).
*2
Alternatively, set by the following operation. On the home screen, tap [APPS]
[
[Google Settings]
[
[Location] and follow the on-screen instructions.
■STEP2: Profile Settings
●Alternatively, on the home screen, tap [APPS] [ [[Settings] [Initial setting] to display the initial settings screen.
■STEP3: Google Account Settings
You can use applications provided by Google Inc. such as “Gmail”, “Play Store” and “Hangouts” by setting up a Google account. You can
use the product without a Google account set, but in such case some applications are not available.
The main setting items are as follows (For “Recovery email address”, leave it blank when you do not have another mail address).
●
The Google account setup screen is also displayed when you activate an application for which a Google account is required for the first time.
●Depending on how you operate, screens other than those below may be displayed.
When using the product
●The battery is built into the product, and cannot be removed by the customer.
●To force the power off, hold f down for 8 or more seconds (Release your finger after the product vibrates to turn the power off).
Basic Operations
ADisplay
Touch it directly with your fingers to operate.
Tap/Double tap
Tap: Gently touch the
screen and then
immediately release
your finger.
Double tap: Tap the
same position twice.
Long touch
Keep touching an
item etc. with your
finger.
Slide/Drag
While your finger is
gently touching the
screen, an item, etc.,
trace it to the desired
direction or position.
Flick
Touch the screen and
then quickly move
(flick) your finger up,
down, right or left.
Pinch
Touch the screen with
two fingers and widen
(pinch-out) or narrow
(pinch-in) the fingers’
distance.
B^ (Back key): Tap it to return to the previous screen.
C# (Home key): Tap it to display the home screen.
D$ (Recent Apps key): Tap it to display Quick Launcher. Long touch it to display
the notification/status panel.
Ee (Menu key): Tap it to display available functions (menus).
Ff (Power key): Hold it down to turn the power on. Hold it down while the power
is turned on [[Power off] [[OK] to turn it off.
Unlock
Unlock by sliding
down.
Initial Settings
Use Wi-Fi and mobile network location
*1 Set whether to obtain location information by using Wi-Fi® or mobile network.
Let Google apps access your location*2 Set whether to use GPS-obtained location information with Google applications.
1
Confirm the contents [[ ].
1 2 3 4
zzz
[Next].[Save] [To profile settings].Register each item [
[[Yes].
[Next].
User nameRegister your Google account (user ID) and any characters which you want to use as a mail address. You can register any
user name but you cannot set the same user name as another user’s.
PasswordRegister the password for using your Google account.
1 2 3 4
z z z z
[To Google account].[New].*1 Enter your “first name” and
“last name” [[ ].
Enter your user name [[ ].
《 》Character entry screen (12 Key)
*1If you already have a Google account, tap [Existing].
*2Tap [Join Google+] to join Google+.
■STEP4: auかんたん設定(au Easy Setting)
You can use various services provided by au such as au Smart Pass and “au Simple Payment Service” in which you can purchase
applications displayed on Google Play by setting an au ID.
●Alternatively, on the home screen, tap [APPS] [[au Easy Setting] to set up.
*1The default value is the four-digit security code you wrote on the application form.
*2Tap “お好きなau IDを新規登録したい方はこちら” (For registering any au ID) to register a new au ID with other than au phone numbers. Tap “au ID
をお持ちの方はこちら” (For using the au ID you already have) to set the au ID you have already had.
*3au ID registration is complete. Next, set the information for reissuing the password.
*4When the confirmation screen is displayed, follow the on-screen instructions.
*5This screen is displayed when “3LM(Loss or Theft Measures ※)” is enabled.
E-mail (@ezweb.ne.jp) is a service which enables you to exchange e-mails with other cell phones which support e-mail and with PCs. An
e-mail address is set automatically in the initial settings. You can change the e-mail address set in the initial settings.
■Initial Settings
*When the information on E-mail update is displayed, confirm the contents and follow the on-screen instructions.
■Changing E-mail Address
5 6 7 8
z z z z
Enter the password [[ ].
Enter the question and answer for
protecting security and the
recovery email address
[
[ ].
[Not now].*2 Confirm the contents [[ ].
910 11
z z
Confirm the contents [[ ].[Done].[Yes]/[No].
au IDRegister your au phone number or any other characters as an au ID. The same “au ID” as another user’s cannot be
registered.
au ID passwordRegister the password for using your au ID.
1 2 3 4
z z z z
[Next].[Registration].[OK].Confirm the contents [[au IDの設定・保存]
(Set/Save au ID).
5 6 7 8
z z z z
Enter the security code
[[OK].*1
Enter the password [[利用規
約に同意して新規登録] (Agree
with the terms of service and
register newly).*2
[設定画面へ] (Go to the setting
screen).*3
Enter your date of birth, the
secret question and its answer
[[入力完了] (Finish entering).
910 11 12
z z z z
[[[Next].設定] (Set).終了] (End).Confirm the contents and follow
the on-screen instructions
[[Agree, and next]*4/[Next].
13 14 15 16
zzz
Confirm the contents and follow
the on-screen instructions
[[Agree, and next]/[Next].
Confirm the contents and follow
the on-screen instructions
[[Agree, and next]/[Next].
Confirm the contents
[[Activate].*5
[Finish].
E-mail Settings and Chang gin E-mail Address
1 2 3
z z
On the home screen, [APPS]
[[E-mail].
Confirm the contents
[[接続する] (Connect).
Confirm the contents
[[閉じる] (Close).*
1 2 3 4
z z z z
On the home screen, [APPS]
[[E-mail].
[e] [[E-mail settings].[Other settings].Confirm the contents
[[接続する] (Connect)
[[Eメールアドレスの変更へ]
(To change e-mail address).
5 6 7 8
zzz
Enter the security code
[[送信] (Send).
Confirm the contents
[[承諾する] (Accept).
Enter an e-mail address
[[送信] (Send).
[OK] [[閉じる] (Close).
Product specificaties
| Merk: | Sharp |
| Categorie: | Smartphone |
| Model: | Aquos Phone mini SHL24 |
Heb je hulp nodig?
Als je hulp nodig hebt met Sharp Aquos Phone mini SHL24 stel dan hieronder een vraag en andere gebruikers zullen je antwoorden
Handleiding Smartphone Sharp

15 Juni 2023
15 Juni 2023
15 Juni 2023
15 Juni 2023
15 Juni 2023
15 Juni 2023
15 Juni 2023
15 Juni 2023
15 Juni 2023
15 Juni 2023
Handleiding Smartphone
Nieuwste handleidingen voor Smartphone
20 Juli 2026
20 Juli 2026
15 Juli 2026
13 Juli 2026
13 Juli 2026
12 Juli 2026
11 Juli 2026
8 Juli 2026
27 Juni 2026
25 Juni 2026