Rapoo VT350 Handleiding

Rapoo Muis VT350

Lees hieronder de 📖 handleiding in het Nederlandse voor Rapoo VT350 (2 pagina's) in de categorie Muis. Deze handleiding was nuttig voor 31 personen en werd door 2 gebruikers gemiddeld met 4.5 sterren beoordeeld

Pagina 1/2
Wired/Wireless Gaming Mouse/Souris de jeu filaire/sans fil/
Gaming-Maus für Kabel-/Drahtlosbetrieb
Installation/Installation Installation Installazione/Instalación/Installatie// /
Instalação/Установка/нсталяц яІ і
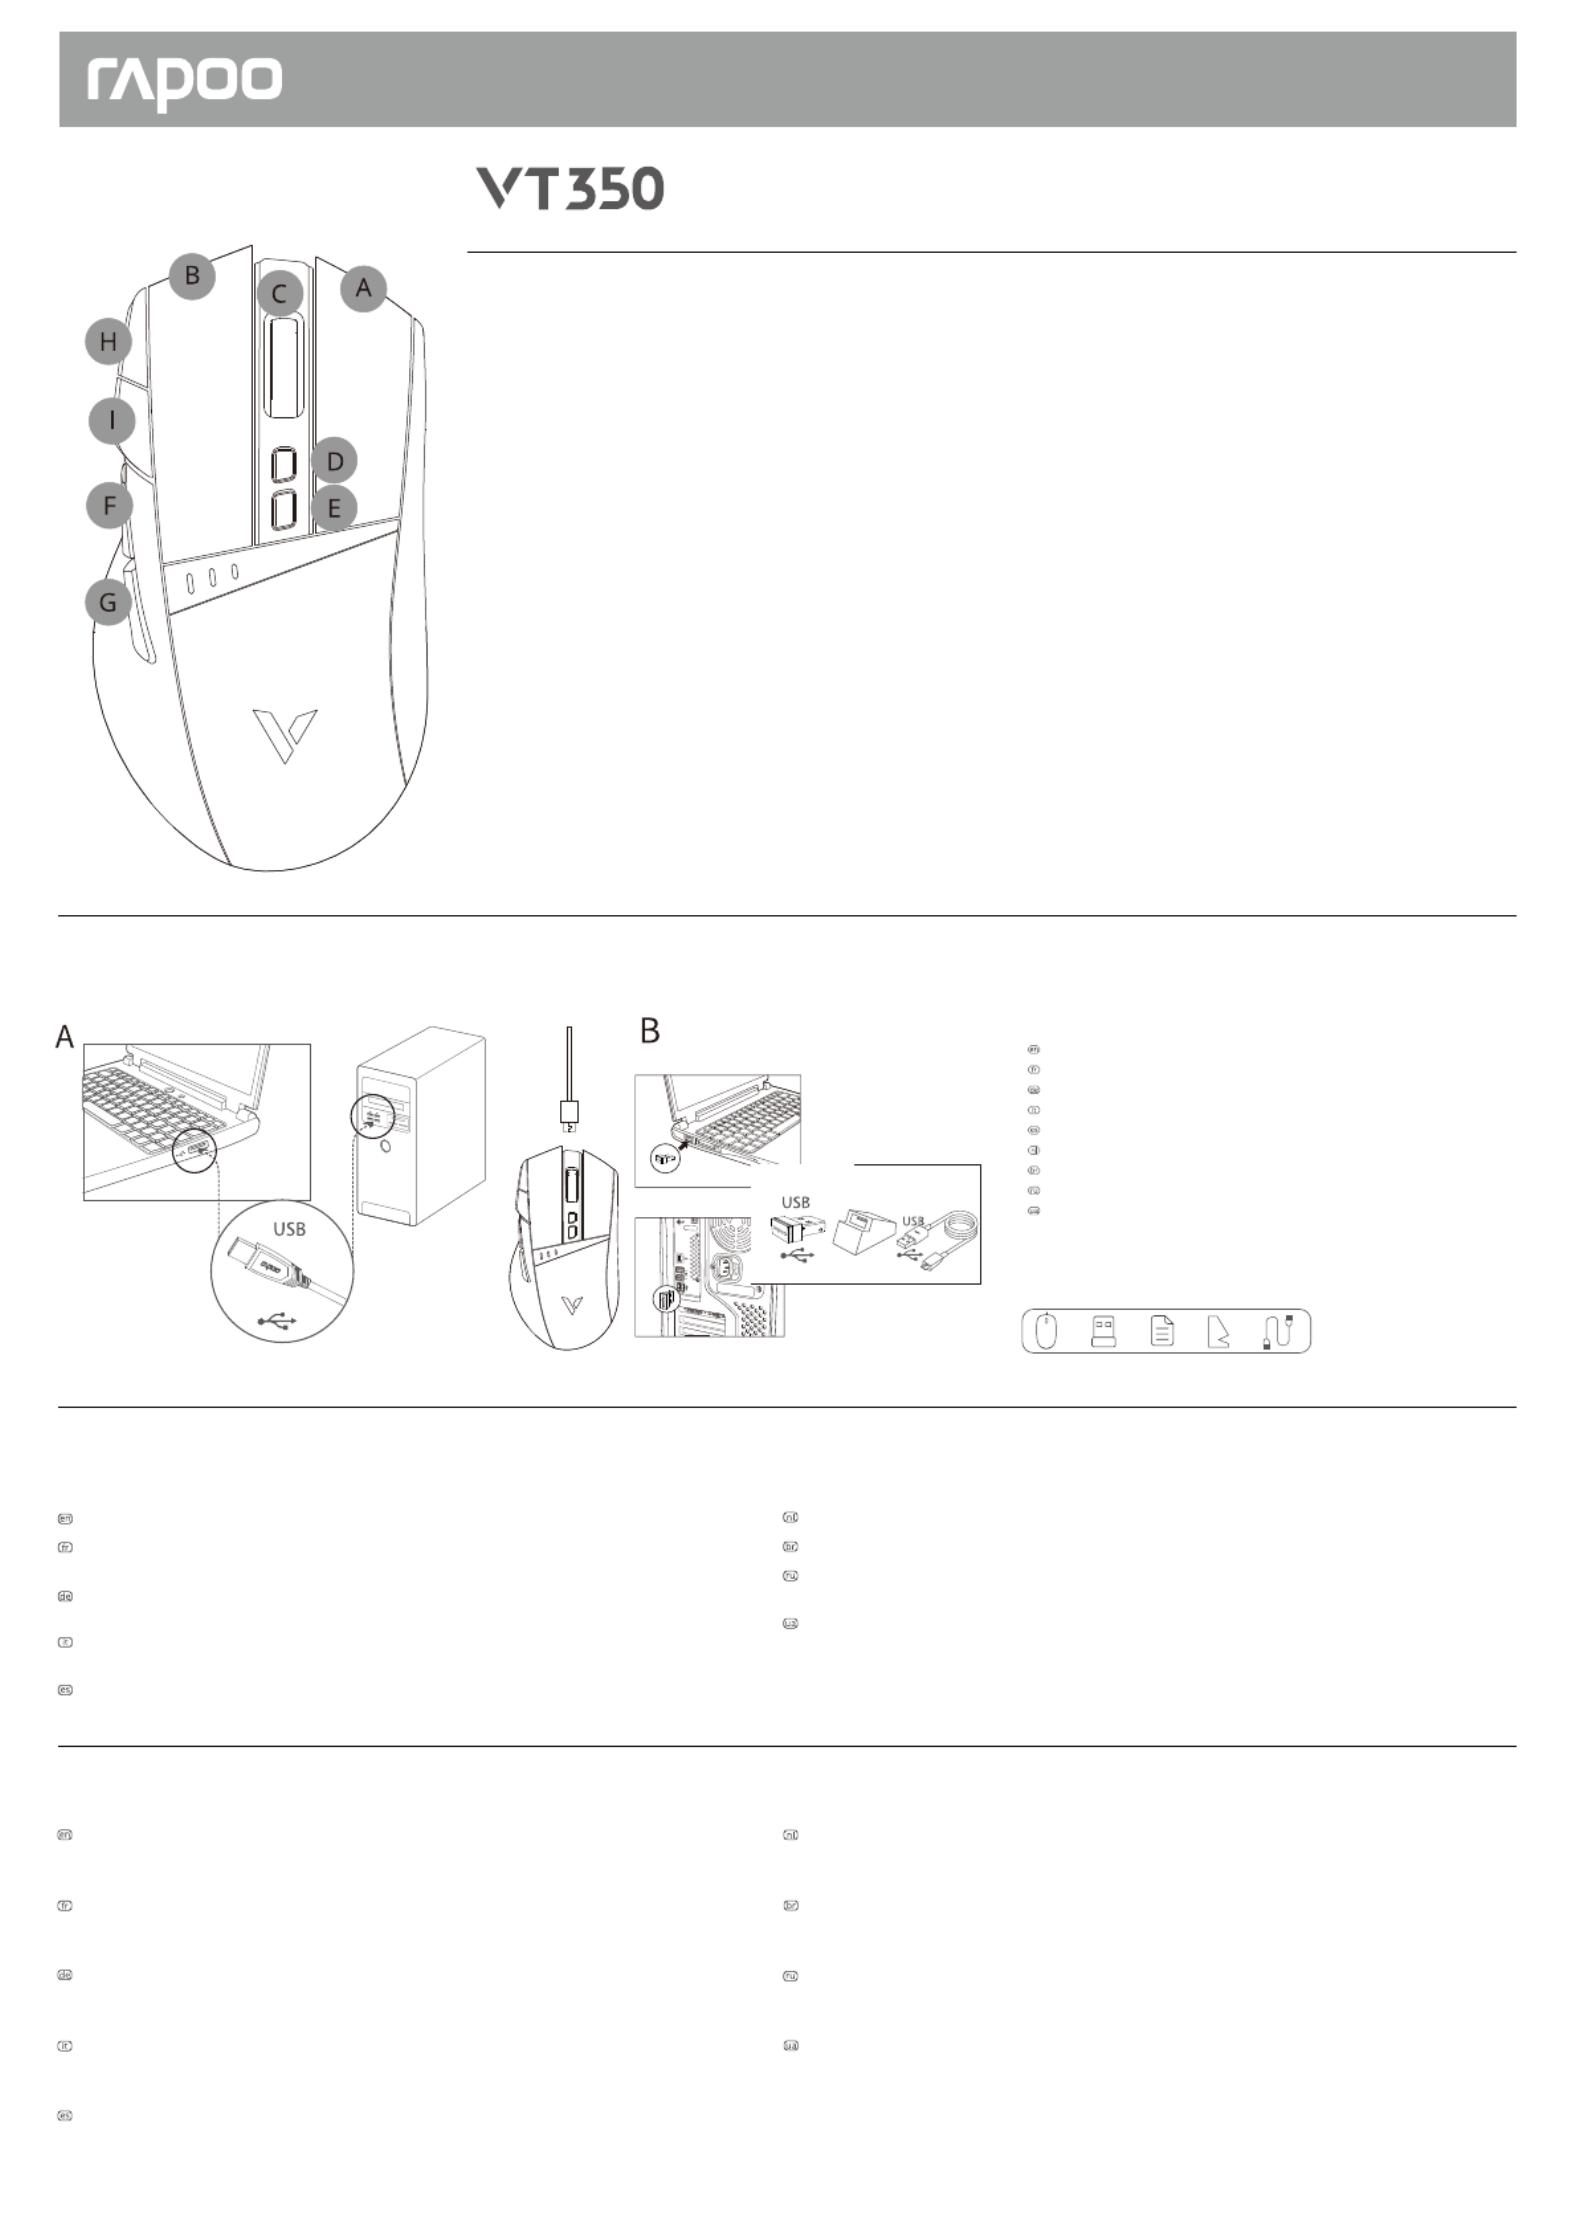
A Right button/Bouton droit/Rechte Taste/Tasto destro/Botón derecho/Rechterknop/Botão direito/Правая кнопка/Права кнопка
B Left button/Bouton gauche/Linke Maustaste/Tasto sinistro/Botón izquierdo/Linkerknop/Botão esquerdo/Левая кнопка/Ліва кнопка
C Scroll wheel & Middle button/Molette de défilement et bouton central/Scrollrad und mittlere Taste/Rotella di scorrimento e tasto centrale/
Rueda de desplazamiento y botón central/Scrollwiel & middelste knop/Roda de deslocamento e botão do meio/Колесо прокрутки и средняя
кнопка/Коліщатко прокручення і середня кнопка
D CPI+ button/Bouton CPI+/Taste CPI+/Tasto CPI+/Botón CPP+/CPI+ knop/Botão CPI+/Кнопка CPI+/Кнопка CPI+
E CPI-button/Bouton CPI-/Taste CPI-/Tasto CPI-/Botón CPP-/CPI-knop/Botão CPI-/Кнопка CPI- /Кнопка CPI-
F Customized button 1 /Bouton personnalisé 1 (Avance par défaut)/Angepasste Taste 1 (Standard-Vorlauf)/Tasto ( )Default forward personalizza-
to 1 (Avanti predefinito)/Botón personalizado 1 (Avance predeterminado)/Aangepaste knop 1 (Standaard doorsturen)/Botão personalizado 1
(Encaminhamento padrão)/Переназначаемая кнопка 1 (Вперед по умолчанию)/Пристосовувана кнопка 1 (За промовчанням вперед)
G Customized button 2 /Bouton personnalisé 2 (Retour par défaut)/Angepasste Taste 2 (Standard-Rücklauf)/Tasto personalizzato ( )Default back
2 (Indietro predefinito)/Botón personalizado 2 (Retroceso predeterminado)/Aangepaste knop 2 (Standaard achteruit)/Botão personalizado 2
(Retorno padrão)/Переназначаемая кнопка 2 (Назад по умолчанию)/Пристосовувана кнопка 2 (За промовчанням назад)
H Customized button 3 Default 1 /Bouton personnalisé 3 (Par défaut 1)/Angepasste Taste 3 ( Standard 1)/Tasto personalizzato 3 (Predefinito ( )
1)/Botón personalizado 3 (Predeterminado 1)/Aangepaste knop 3 (Standaard 1)/Botão personalizado 3 (Padrão 1)/Переназначаемая кнопка
3 (по умолчанию 1)/Пристосовувана кнопка 3 (За замовчуванням 1)
I Customized button 4 Default 3 /Bouton personnalisé 4 (Par défaut 3)/Angepasste Taste 4 ( Standard 3)/Tasto personalizzato 4 (Predefinito ( )
3)/Botón personalizado 4 (Predeterminado 3)/Aangepaste knop 4 (Standaard 3)/Botão personalizado 4 (Padrão 3)/Переназначаемая кнопка
4 (по умолчанию 3)/Пристосовувана кнопка 4 (За замовчуванням 3)
Spectrum cycling backlight (default)/Rétroéclairage cyclique spectral (par défaut)/Hintergrundbeleuchtung mit Spekralwechsel (Standard)/Ret-
roilluminazione ciclo spettrale (predefinito)/Retroiluminación cíclica de espectro (predeterminado)/Spectrum wisselende achtergrondverlichting
(standaard)/Luz de fundo rodando espectro (padrão)/Подсветка с цикличной сменой цветов (по умолчанию)/Прохід по колу по спектру
підсвічення (за замовчуванням)
To customize the gaming mouse for each operation, please download the software from www.rapoo.com.
Pour personnaliser la souris de jeu chaque opération, veuillez télécharger le logiciel sur www.rapoo.com et
l’installer.
Bitte laden Sie zum Anpassen von Gaming-Maus je nach Betrieb die Software von www.rapoo.com
herunter und installieren sie.
Per personalizzare il gaming mouse per ogni operazione, scaricare il software dal sito www.rapoo.com e
installarlo.
Para personalizar el ratón para juegos para cada operación, descargue el software desde www.rapoo.com
e inslelo.
Overview/Vue d'ensemble/Überblick/Descrizione/Visión general/Overzicht/
Visão geral/Обзор/Загальний огляд
Package contents/Contenu de l’emballage/Packungsinhalt/Contenuto della confezione/
Contenidos del Embalaje/Inhoud van de verpakking/Conteúdos da embalagem/
Комплект поставки/Вміст пакунку
Install driver/Pilote d'installation/Treiber installieren/Installazione del driver/Instalar el controlador/Stuurprogramma installeren/Instalar o
controladorстановить драйвер/Інсталяція драйвера
System Requirements/Exigences du système/Systemvoraussetzungen/Requisiti di sistema/
Requerimientos del sistema/Systeemvereisten/Requisitos do Sistema/
Системные требования/Системні вимоги
Windows ® XP/Vista/7/8/10 or later, USB port
Windows ® XP/Vista/7/ 8/10 ou version ultérieure, Port USB
Windows ® XP/Vista/7/ 8/10 oder höher, USB-Anschluss
Windows ® XP/Vista/7/8/10 o versioni successive, Porta USB
Windows ® XP/Vista/7/8/10 o posterior, Puerto USB
Windows ® XP/Vista/7/8/10 of later, USB-poort
Windows ®
XP/Vista/7/8/10 ou mais recente, porta USB
Windows ® XP/Vista/7/8/10 или более поздней версии, USB порт
Windows ® XP/Vista/7/8/10 або вище, порт USB
Om de gamemuis aan te passen voor elke bewerking, downloadt u de software van www.rapoo.com en installeert u deze.
Para personalizar o rato para jogos para cada operação, transfira o software a partir de www.rapoo.com e instale-o.
Чтобы настроить игровую мышь для каждой операции, загрузите ПО с веб-сайта www.rapoo.com и установите
его.
Щоб пристосувати ігрові мишу для кожної операції, будь ласка, завантажте ПЗ з www.rapoo.com та інсталюйте
його.
CPI adjustment/Réglage CPI/CPI-Anpassung/CPI-Anpassung/Ajuste de CPI/CPI-aanpassing/Ajuste de CPI/Настройка CPI/Регулювання CPI
You can switch CPI values among 5 levels which is up to 5000 CPI. The backlight color changes when
you press the CPI button. If the current level is the fifth, pressing the CPI button will switch to the first
level.
Vous pouvez changer librement les valeurs de CPI parmi 5niveaux jusqu'à 5000CPI. La couleur du
rétroéclairage change lorsque vous appuyez sur le bouton CPI. Si vous appuyez sur le bouton CPI au
5ème niveau, le CPI passe au premier niveau.
Sie können den CPI-Wert frei zwischen 5 Stufen auf bis zu 5000 cpi einstellen. Die Farbe der
Hintergrundbeleuchtung ändert sich bei Betätigung der CPI-Taste. Wenn Sie bei Erreichen der 5. Stufe
die CPI-Taste drücken, wechselt der CPI-Wert zur ersten Stufe.
È possibile cambiare liberamente i valori CPI tra 5 livelli fino a 5000 CPI. Il colore della retroilluminazi-
one cambia quando si preme il tasto CPI. Al quinto livello, premendo il tasto CPI, il CPI passa al primo
livello.
Puede cambiar los valores de CPP libremente eligiendo uno de los 5 niveles hasta 5000 CPP. El color
de la retroiluminación cambiará cuando presione el botón CPP. Si el nivel se encuentra en el quinto
nivel, presione el botón CPP y el valor de CPP cambiará al primer nivel.
U kunt CPI-waarden vrijelijk omschakelen tussen 5 levels, wat tot 5000CPI is. De achtergrondkleur wijzigt wanneer u
drukt op de CPI-knop. Als u tot aan het 5e level bent, drukt u op de CPI-knop en de CPI schakelt over naar het eerste
level.
Você pode alterar os valores de CPI livremente entre 5 níveis, que são até 5000CPI. A cor da luz de fundo vai mudar
quando você pressiona o botão CPI. Se o nível for até ao vel, pressione o botão CPI, o CPI mudará para o primeiro
nível.
Переключение значений CPI осуществляется свободно между 5 уровнями, самым высоким из которых является
5000CPI. После нажатия кнопки CPI цвет подсветки будет меняться. Если повышение уровней дошло до 5-го
уровня, нажмите кнопку CPI, после чего CPI переключится на первый уровень.
Можна перемикати значення CPI між 5 рівнями, тобто до 5000 CPI. При натисканні на кнопку CPI змінюється колір
підсвічення. Якщо на 5-му рівні натиснути кнопку CPI, то значення CPI перемкнеться на перший рівень.
Schnellstartanleitung
Quick Start Guide/ Guide de démarrage rapide
Trouble shooting/Dépannage/Problemlösung/Risoluzione dei problemi/Solucionar problemas/
Problemen oplossen/Resolução de problemas/Устранение неисправностей/Усунення несправностей
How to turn off the backlight?
You can set the backlight mode by driver, turn on or off the backlight.
Why does the cursor drift appear when I set the reporting rate to above 125Hz?
The algorithm of enhanced pointer precision is not suitable for Windows systems. To ensure you can use your mouse
normally, please take the following steps:
1) Open the “control panel”;
2) Click the “Mouse” icon;
3) Select the “Pointer Options”;
4) Disable the ""Enhanced pointer precision"" option.
5601-10L01-222
Warranty / Garantie / Garantie / Garanzia / Garantía / Garantie / Garantia / Гарантия / Гарантія
www.rapoo.com
The device is provided with two-year limited hardware warranty from the purchase day. Please see www.rapoo.com for more information.
L'appareil est fourni avec deux ans de garantie matérielle limitée à compter du jour d'achat. Merci de consulter www.rapoo.com pour plus d'informations.
Wir gewähren eine zweijährige, eingeschränkte Hardware-Garantie ab Kaufdatum. Weitere Informationen finden Sie hier: www.rapoo.com.
il dispositivo viene fornito con due anni di garanzia hardware limitata a parite dalla data di acquisto. Per ulteriori informazioni consultare www.rapoo.com.
El dispositivo se proporciona con una garantía de hardware limitada de dos años a partir de la fecha de compra. Consulte la dirección www.rapoo.com para obtener más información.
Het toestel wordt met een tweejarige beperkte hardware-garantie vanaf de aankoopdatum geleverd. Raadpleeg www.rapoo.com voor meer informatie.
O dispositivo é fornecido com garantia de hardware limitada de dois anos a partir do dia da compra. Por favor consulte www.rapoo.com para obter mais informações.
Данное устройство предоставляется с ограниченной гарантией на аппаратное обеспечение сроком два года со дня покупки. Более подробную информацию можно найти по адресу www.rapoo.com.
Строк дії обмеженої гарантії для апаратного забезпечення - два роки з дати придбання. Більше інформації ви знайдете на www.rapoo.com.
We, the manufacturer
Shenzhen Rapoo Technology Co., Ltd.
Fax: +86-0755-2858 8555
Declare that the product
Product Name IRopticalgamingmouse
Model No VT350
Complies with the following norms of :
Kai Guo, Manager
R&D Department Date of Issue: A .ug
30, 2019
Declaration of Conformity
Manufacturer/Authorised representative
EN 62479:2010
EN 50663:2017
EN 60950-1:2006+A11:2009+A1:2010+A12:2011+A2:2013
The product is in compliance with the essential requirements of Radio
Equipment Directive 2014/53/EU,and the RoHS Directive 2011/65/EU.
FCC Statement
This has been tested and found to equipment comply with the limits for a Class B digital device, pursuant to part 15 of the rules. These FCC limits are designed to reasonable protection against interference provide harmful
in a residential installation. This uses and can radiate radio if not installed and used in accordance with the cause interference to radio equipment generates, frequency energy and, instructions, may harmful
communications. However, there is no guarantee that interference will not occur in a particular installation. If this equipment does cause harmful interference
to radio or television reception, which can be determined by turning the equipment off and on, the user is encouraged to try to correct the interference by one or more of the following measures:
-Reorient or relocate the receiving antenna.
-Increase the separation between the equipment and receiver.
-Connect the equipment into an outlet on a circuit different from that to which the receiver is connected.
-Consult the dealer or an experienced radio/TV technician for help.
To assure continued changes or not the responsible for could the user’s to operate this use shielded compliance, any modifications expressly approved by party compliance void authority equipment. (Example- only
interface cables when connecting to computer or peripheral devices).
FCC Radiation Exposure Statement
This equipment complies with FCC RF radiation exposure limits set forth for an uncontrolled environment. This transmitter must not be co-located or operating in conjunction with any other antenna or transmitter.
This equipment complies with Part 15 of the FCC Rules.Operation is subject to the following two conditions:
(1) This device may not cause harmful interference, and
(2) This device must accept any interference received, including interference that may cause undesired operation.
Caution!
The manufacturer is not responsible for any radio or TV interference caused by unauthorized modifications to this equipment. Such modifications could void the user authority to operate the equipment.
ISEDC RSS warning
This device complies with Industry Canada licence-exempt RSS standard (s). Operation is subject to the following two conditions:
(1) this device may not cause interference, and
(2) this device must accept any interference,including interference that may cause undesired operation of the device.
Le présent appareil est conforme aux CNR d'Industrie Canada applicables aux appareils radio exempts de licence.
L'exploitation est autorisée aux deux conditions suivantes:
(1) l'appareil ne doit pas produire de brouillage, et
(2) l'utilisateur de l'appareil doit accepter tout brouillage radioélectrique subi, même si le brouillage est susceptible d'en compromettre le fonctionnement.
It is forbidden to reproduce any part of this quick start guide without the permission of Shenzhen Rapoo Technology Co., Ltd.
ISEDC Radiation Exposure Statement:
This equipment complies with ISEDC RF radiation exposure limits set forth for an uncontrolled environment. This transmitter must not be co-located or operating in conjunction with any other antenna or transmitter.
Cet appareil est conforme aux limitesd'exposition de rayonnement RF ISEDC établiespour un environnement non contrôlé.
Cetémetteur ne doit pas être co-implanté oufonctionner en conjonction avec toute autreantenne ou transmetteur.
Any Changes or modifications not expressly approved by the party responsible for compliance could void the user’s authority to operate the equipment.
EN 300 440 V2.1.1(2017-03)
EN 300 328 V2.1.1(2016-11)
EN 301 489-1 V2.2.0(2017-03)
EN 301 489-3 V2.1.1(2017-03)
EN 301 489-17 V3.2.0(2017-03)
Comment éteindre la lumière à pulsations ?
Vous pouvez régler la lumière à pulsations sur allumée, pulsations ou éteinte dans le menu du pilote.
Pourquoi le mouvement du curseur apparaît quand je gle le taux de rapport au-dessus de 125 Hz ?
L'algorithme de précision améliorée du pointeur n'est pas adapté aux sysmes Windows. Pour vous assurer que vous
pouvez utiliser normalement votre souris, veuillez effectuer les étapes suivantes :
1) Ouvrez le « panneau de configuration »,
2) Cliquez sur l'icône « Souris »,
3)lectionnez les « Options de pointeur »,
4) Désactivez l'option « Précision amélioe du pointeur ».
Wie lässt sich die Impulsbeleuchtung ausschalten?
Über das Treibermenü schalten Sie die Beleuchtung bequem ein, aus oder in den Impulsmodus.
Warum verschiebt sich der Mauszeiger, wenn ich die Abfragegeschwindigkeit auf mehr als 125 Hz einstelle?
Der spezielle Algorithmus, der für besonders präzise Mausbewegungen sorgt, eignet sich nicht für Windows-Systeme.
Damit Ihre Maus normal und zuverlässig funktioniert, führen Sie bitte die folgenden Schritte aus:
1) Öffnen Sie die Systemsteuerung.
2) Klicken Sie auf „Maus“.
3) Öffnen Sie das „Zeigeroptionen“-Register.
4) Deaktivieren Sie die Option „Erweiterte Zeigerpräzision“.
Come si spegne la luce pulsante?
Nel menu del driver è possibile impostare la luce su On (Attiva), Breathing (Pulsazione) o Off (Disattiva).
Perché il cursore va alla deriva quando imposto la velocità sopra i 125Hz?
L'algoritmo di precisione ottimizzata del puntatore non è adatto per i sistemi Windows. Attenersi alla procedura che
segue per garantire l’uso normale del mouse:
1) Aprire il “Pannello di controllo”;
2) Fare clic sull'icona “Mouse”;
3) Selezionare “Opzioni puntatore”;
4) Disabilitare l'opzione "Enhanced pointer precision" (Precisione ottimizzata del puntatore).
¿Cómo desactivo el efecto de breathing?
Puede establecer la luz de efecto de respiración a encendida, respiracn o apagada en el menú del controlador.
¿Por q aparece la desviacn del cursor cuando establezco la tasa de informes por encima de 125 Hz?
El algoritmo de la precisión del puntero mejorada no es adecuado para sistemas Windows. Para garantizar que puede
utilizar el ratón con normalidad, lleve a cabo los pasos siguientes:
1) Abra el “Panel de control”;
2) Haga clic en el icono “Ratón”;
3) Seleccione “Opciones del puntero”;
4) Deshabilite de la opción "Precisión mejorada del puntero".
Hoe kan het breathing light worden uitgeschakeld?
U kunt het breathing instellen op Aan, Breathing of Uit in het menu van het stuurprogramma.
Waarom is er een cursorverschuiving wanneer ik de rapportsnelheid instel tot meer dan 125Hz?
Het algoritme van de verbeterende aanwijzerprecisie is niet geschikt voor Windows-systemen. Volg de onderstaande stappen
om zeker te zijn dat u de muis normaal kunt gebruiken:
1) Open het “Configuratiescherm;
2) Klik op het pictogramMuis”;
3) SelecteerAanwijzeropties;
4) Schakel de optie "Precisie van de aanwijzer verbeteren" uit.
Como apagar a luz intermitente?
No menu do controlador, é possível ajustar as definições da luz para: acesa, intermitente ou apagada.
Porque é que o rasto do cursor aparece quando defino uma freqncia de atualização superior a 125Hz?
O algoritmo de precisão melhorada do ponteiro não é adequado para sistemas Windows. Para garantir que pode
utilizar o rato de forma normal, execute os passos seguintes:
1) Abra o “Painel de controlo”;
2) Clique no ícone do “Rato”;
3) Selecione “Opções do ponteiro”;
4) Desative a opção "Melhorar a precisão do ponteiro".
Как отключить подсветку?
Пользователь может задать режим подсветки с помощью драйвера, а также включить или выключить подсветку.
Почему возникает смещение курсора, когда я задаю значение частоты опроса сенсора выше 125 Гц?
Алгоритм повышенной точности указателя не подходит для систем Windows. Для нормальной работы мыши
выполните следующие действия:
1) откройте «Панель управления»;
2) нажмите значок «Мышь»;
3) выберите «Параметры указателя»;
4) отключите параметр «Повышенная точность указателя».
Як вимкнути пульсацію світла?
Встановити пульсацію світла на „увімкнено”, „пульсацію" або „вимкнутиможна в меню драйвера.
Чому курсор ніби гальмує, коли частоту звітів встановлено на понад 125 Гц?
Алгоритм високої точності указки не підходить системі Windows. Щоб забезпечити нормальну роботу миші,
будь ласка, зробіть наступне:
1) Відкрийте контрольну панель;
2) Клацніть по піктограмі „Миша”;
3) Виберіть „Опції указки”;
4) Відключіть опцію "Висока точність указки”.


Product specificaties

Merk: Rapoo
Categorie: Muis
Model: VT350
Kleur van het product: Zwart
Gewicht: 127 g
Snoerlengte: 1.8 m
Stroombron: Batterijen/kabel
Vormfactor: Rechtshandig
Frequentieband: 2.4 GHz
Bedoeld voor: Gamen
Ondersteunt Windows: Ja
Ergonomisch ontwerp: Ja
Aantal: 1
Aansluitbereik: 10 m
Aantal knoppen: 11
Aansluiting: RF Wireless + USB Type-A
Oppervlakte kleur: Monochromatisch
Scroll type: Wiel
Bewegingsresolutie: 5000 DPI
Aantal programmeerbare knoppen: 11
Soort knoppen: Drukknoppen
Wireless ontvanger interface: USB Type-A
Belichting: Ja
Programmeerbare muisknoppen: Ja
Trackingsnelheid muis: 200 ips

Heb je hulp nodig?

Als je hulp nodig hebt met Rapoo VT350 stel dan hieronder een vraag en andere gebruikers zullen je antwoorden


Handleiding Muis Rapoo

Handleiding Muis

Nieuwste handleidingen voor Muis