Panasonic AJ-SDC 905P Handleiding
Bekijk gratis de handleiding van Panasonic AJ-SDC 905P (108 pagina’s), behorend tot de categorie Camcorder. Deze gids werd als nuttig beoordeeld door 5 mensen en kreeg gemiddeld 4.6 sterren uit 3 reviews. Heb je een vraag over Panasonic AJ-SDC 905P of wil je andere gebruikers van dit product iets vragen? Stel een vraag
Pagina 1/108

Operating Instructions
Camera/VTR
Before operating this product, please read the instructions carefully and save this manual for future use.
Printed in Japan
VQT0N11 F0904W0 -F @
P
Model No. AJ- P
Model No. AJ- P

2
indicates safety information.
CAUTION
RISK OF ELECTRIC SHOCK
DO NOT OPEN
CAUTION: TO REDUCE THE RISK OF ELECTRIC SHOCK,
DO NOT REMOVE COVER (OR BACK).
NO USER SERVICEABLE PARTS INSIDE.
REFER TO SERVICING TO QUALIFIED SERVICE PERSONNEL.
The lightning flash with arrowhead symbol,
within an equilateral triangle, is intended to
alert the user to the presence of uninsulated
“dangerous voltage” within the product’s
enclosure that may be of sufficient magnitude
to constitute a risk of electric shock to
persons.
The exclamation point within an equilateral
triangle is intended to alert the user to the
presence of important operating and
maintenance (service) instructions in the
literature accompanying the appliance.
CAUTION:
TO REDUCE THE RISK OF FIRE OR SHOCK
HAZARD AND ANNOYING INTERFERENCE,
USE THE RECOMMENDED ACCESSORIES
ONLY.
FCC Note:
This equipment has been tested and found to comply
with the limits for a class A digital device, pursuant to
Part 15 of the FCC Rules. These limits are designed
to provide reasonable protection against harmful
interference when the equipment is operated in a
commercial environment. This equipment generates,
uses, and can radiate radio frequency energy and, if
not installed and used in accordance with the
instruction manual, may cause harmful interference to
radio communications.
Operation of this equipment in a residential area is
likely to cause harmful interference in which case the
user will be required to correct the interference at his
own expense.
Warning:
To assure continued FCC emission limit compliance,
the user must use only shielded interface cables when
connecting to external units. Also any unauthorized
changes or modifications to this equipment could void
the user’s authority to operate it.
ATTENTION:
The product you have purchased is powered by a
nickel cadmium battery which is recyclable. At the
end of it’s useful life, under various state and local
laws, it is illegal to dispose of this battery into your
municipal waste stream.
Please call 1-800-8-BATTERY for information on how
to recycle this battery.
Ni-Cd
RBRC
RBRC
CAUTION:
TO REDUCE THE RISK OF FIRE OR SHOCK
HAZARD, REFER MOUNTING OF THE
OPTIONAL INTERFACE BOARD TO
QUALIFIED SERVICE PERSONNEL.
Replace battery with part No. CR2032 only.
Use of another battery may present a risk of fire or
explosion.
Caution—Battery may explode if mistreated.
Do not recharge, disassemble or dispose of in fire.
WARNING:
OTO REDUCE THE RISK OF FIRE OR SHOCK
HAZARD, DO NOT EXPOSE THIS EQUIPMENT
TO RAIN OR MOISTURE.
OTO REDUCE THE RISK OF FIRE OR SHOCK
HAZARD, KEEP THIS EQUIPMENT AWAY FROM
ALL LIQUIDS—USE AND STORE ONLY IN
LOCATIONS WHICH ARE NOT EXPOSED TO
THE RISK OF DRIPPING OR SPLASHING
LIQUIDS, AND DO NOT PLACE ANY LIQUID
CONTAINERS ON TOP OF THE EQUIPMENT.
The descriptions contained throughout the text of these instructions apply to both the AJ-SDC615 and AJ-SDC905.
However, descriptions which apply solely to the AJ-SDC615 are indicated by ; similarly, descriptions which apply
solely to the AJ-SDC905 are indicated by .
SDC905
SDC615

3
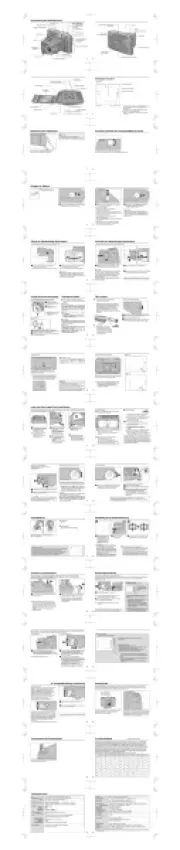
Contents
Chapter 1 General .................................... 5
1-1 Features of the camera unit ...................... 5
1-2 Features of the VTR unit ........................... 6
1-3 System configuration ................................ 7
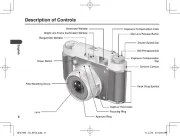
Chapter 2 Parts and their functions ....... 8
2-1 Power supply and accessory
mounting section ....................................... 8
2-2 Audio function section .............................. 9
2-3 Shooting and recording/playback
function section ....................................... 11
2-4 Menu operation section ........................... 14
2-5 Time code related section ....................... 15
2-6 Warning/status display section .............. 16
2-7 Display window and its displays ............ 16
2-8 Viewfinder section ................................... 18
Chapter 3 Recording and playback ...... 19
3-1 Cassette tapes .......................................... 19
3-2 Basic procedures ..................................... 20
3-3 Scene-to-scene continuity ...................... 22
3-4 NEWS REC function .................. 22
3-5 PRE-RECORDING function ........ 23
3-6 INTERVAL REC function .......................... 23
3-7 RETAKE function ..................................... 25
3-8 Rec-review function ................................. 25
3-9 Normal playback and playback
at different speeds ................................... 25
Chapter 4 Adjustments and settings for
recording ............................... 26
4-1 Adjusting the white balance and
black balance ........................................... 26
4-1-1 Adjusting the white balance ......................... 26
4-1-2 Adjusting the black balance ......................... 28
4-2 Setting the electronic shutter ................. 29
4-2-1 Shutter modes ............................................. 29
4-2-2 Setting the shutter mode and speed ........... 29
4-2-3 Setting the synchro scan mode ................... 30
4-3 Selecting the recording signals and
recording system ..................................... 30
4-3-1 Selecting the recording signals ................... 30
4-3-2 Selecting the recording system ................... 31
4-4 Selecting the audio input signals and
adjusting their recording levels .............. 31
4-4-1 Selecting the audio input signals ................. 31
4-4-2 Adjusting the audio signal recording levels . 31
SDC905
SDC615
4-5 Setting the time data ................................ 32
4-5-1 Setting the user bits ..................................... 32
4-5-2 Setting the internal clock’s date and time .... 33
4-5-3 Setting the time code ................................... 34
4-5-4 Externally locking the time code .................. 34
4-5-5 Setting the UMID information ...................... 35
4-6
Menu displays on the viewfinder screen
....... 36
4-6-1 Menu configuration ...................................... 36
4-6-2 Basic menu operations ................................ 36
4-6-3 Selecting the user menus ............................ 37
4-7 Viewfinder screen status displays ......... 38
4-7-1 Viewfinder lamp displays.............................. 38
4-7-2 Viewfinder screen status display
configuration..................................................38
4-7-3 Selecting the viewfinder screen display
items ............................................................ 38
4-7-4 Display modes and setting
changes/adjustment result messages ......... 44
4-7-5 Setting the marker displays ......................... 44
4-7-6 Setting the camera ID .................................. 44
4-7-7 Mode check screen displays
(MODE CHECK button function) ................. 45
4-7-8 Marker check screen displays
(MARKER SELECT button function) ........... 45
4-7-9 Checking the return video signal on the
viewfinder .................................................... 45
4-8 Menu-driven function setup .................... 46
4-8-1 Setting the USER SW GAIN switching ........ 46
4-8-2 Selecting the video output signals ............... 46
4-8-3 Selecting the F.AUDIO LEVEL
control function ............................................ 47
4-8-4 Allocating functions to the USER MAIN,
USER1 and USER2 buttons ........................ 47
4-8-5 Setting the color temperature manually ....... 48
4-9 Data handling ........................................... 48
4-9-1 Handling the setup card .............................. 48
4-9-2 Setup card operations ................................. 49
4-9-3 How to use the user data ............................ 52
4-9-4 How to use the scene file data .................... 53
4-9-5 How to return the menus settings to the
user standard settings ................................. 56
4-9-6 How to return the menus settings to the
factory standard settings ............................. 56
4-9-7 How to use the lens file data ....................... 56
Chapter 5 Preparation ........................... 57
5-1 Supplying the power ................................ 57
5-1-1 Attaching the battery and setting the
battery type .................................................. 57
5-1-2 Using an AC power supply .......................... 60
5-2 Attaching the viewfinder and adjusting its
position ..................................................... 60
5-3 Attaching the lens and performing the
flange back and white shading
adjustments .............................................. 61
Product specificaties
| Merk: | Panasonic |
| Categorie: | Camcorder |
| Model: | AJ-SDC 905P |
Heb je hulp nodig?
Als je hulp nodig hebt met Panasonic AJ-SDC 905P stel dan hieronder een vraag en andere gebruikers zullen je antwoorden
Handleiding Camcorder Panasonic
10 April 2025
4 April 2025
4 April 2025
4 April 2025
4 April 2025

2 April 2025

27 Maart 2025

27 Maart 2025
25 Februari 2025
25 Februari 2025
Handleiding Camcorder
- Bauer
- Overmax
- VTech
- Ricoh
- Mediacom
- Leica
- Contour
- DXG
- Activeon
- Replay
- Best Buy
- Polaroid
- Renkforce
- Canon
- TomTom
Nieuwste handleidingen voor Camcorder

15 September 2025
8 September 2025
1 September 2025
6 Augustus 2025
9 Juli 2025
9 Juli 2025
6 Juli 2025
5 Juli 2025

5 Juli 2025
4 Juli 2025