Nexa MJLR-2001 Handleiding
Nexa Niet gecategoriseerd MJLR-2001
Bekijk gratis de handleiding van Nexa MJLR-2001 (4 pagina’s), behorend tot de categorie Niet gecategoriseerd. Deze gids werd als nuttig beoordeeld door 44 mensen en kreeg gemiddeld 4.7 sterren uit 5 reviews. Heb je een vraag over Nexa MJLR-2001 of wil je andere gebruikers van dit product iets vragen? Stel een vraag
Pagina 1/4
MJLR-2001
Inbyggnadsmottagare
för motor/markisstyrning
TEKNISK DATA
Declaration of conformity nns tillgänglig på www.nexa.se
MJLR-2001
Strömkälla 220-240 V~50 Hz
Max. last 1000 W
Protokoll System Nexa (433,92 MHz)
Räckvidd upp till 30 m
Minnesplatser 32 st
Drifttemperatur 0–40 °C
Egenförbrukning< 1 W
IP klassicering IP20 Inomhusbruk
Mått48 x 48 x 24,5 mm
Inbyggnadsmottagare med potentialfria reläkontakter för fast
installation, placeras i kopplings- eller apparatdosa. MJLR-2000 har
två potentialfria reläutgångar med gemensam ingång vilket möjliggör
styrning av valfri spänning.Mottagaren har full kompatibilitet med
övriga produkter i System Nexa.
SÄKERHET
Läs igenom hela instruktionen först. Anlita fackman vid behov. Nexa
kan ej hållas ansvarig om produkten används till annat än den är
konstruerad för eller om instruktionen inte följs.
Anslut aldrig lampor eller utrustning som överskrider mottagarens
maximala angivna belastning, det kan leda till fel, kortslutning eller
brand.
Försök inte att reparera produkten. Produkten innehåller inga
reparerbara delar.
INSTALLATION
Säkerställ att ledarna är spänningsfria genom att slå av
strömmen i elcentralen.
Se inkopplingsscheman för den typ av motor som skall användas.
INLÄRNING
För att styra MJLR-2000 med en System Nexa fjärrkontroll (eller
annan enhet) måste sändare och mottagare kopplas ihop enligt
följande;
1.Spänningssätt MJLR-2001
2.Tryck kort på inlärningsknappen, LED-indikeringen börjar
blinka långsamt
3.Tryck på ”PÅ” knapp för vald kanal på en System Nexa
fjärrkontroll inom 12 sekunder
BEKRÄFTELSE INLÄRNING
LED-indikering på mottagaren blinkar snabbt under 2 sekunder.
RADERING AV ENSKILD MINNESPLATS
1Spänningssätt MJLR-2001
2Tryck kort på inlärningsknappen, LED-indikeringen börjar
blinka långsamt
Tryck på ”AV” knapp för vald kanal som skall raderas på en
System Nexa fjärrkontroll inom 12 sekunder
SVENSKA
RADERING AV ALLA MINNESPLATSER.
1. Spänningssätt MJLR-2001
2. Tryck på och håll ner inlärningsknappen i 6 sekunder, LED-
indikeringen börjar blinka snabbt.
3. Släpp upp inlärningsknappen och gör sedan ett kort tryck
igen.
MINNE
MJLR-2001 har 32st minnesplatser och kan styras från upp till 32st
olika enheter (fjärrkontroller, Bridge mfl). Om alla minnesplatser är
upptagna raderas den äldsta platsen när en ny lärs in.
STYRNING
Mottagaren kan styras på flera sätt.
1. Med inlärd System Nexa Fjärrkontroll
2. Med övriga inlärda System Nexa sändare
3. Med Nexa Smart Hub
4.Med Nexa Bridge
ANVÄNDNING
VID INKOPPLING AV DC MOTOR
Försäkra Dig om att Din DC motor kan kopplas in till
permanentspänning och styras enligt schemat.
NEXA AB, DATAVÄGEN 37B, 436 32 ASKIM, SWEDEN
[email protected] | www.nexa.se
SÄKERHET OCH INFORMATION
Räckvidd inomhus: upp till 30 m (optimala förhållanden). Räckvidden är
starkt beroende av lokala förhållanden, till exempel om det finns metaller
i närheten. Exempelvis har den tunna metallbeläggning i energiglas med
låg emissivitet negativ inverkan på radiosignalernas räckvidd. Det kan
finnas begränsningar
för användningen av enheten utanför EU. Om tillämpligt bör du
kontrollera att enheten överensstämmer med lokala föreskrifter. Max
belastning: Anslut aldrig lampor eller utrustning som överskrider
mottagarens maximala belastning. Det kan leda till fel, kortslutning eller
brand.
Livsuppehållande utrustning: Använd aldrig Nexas produkter till
livsuppehållande utrustning eller andra apparater där fel eller störningar
kan få livshotande följder.
Störningar: Alla trådlösa enheter kan drabbas av störningar som kan
påverka prestandan och räckvidden. Det minsta avståndet mellan två
mottagare bör därför vara åtminstone 50 cm Reparation: Försök inte att
reparera produkten. Den innehåller inga reparerbara delar.
Vattentäthet: Produkten är inte vattentät. Se till att den alltid är torr. Fukt
gör att elektroniken inuti fräts sönder och kan leda till kortslutning, fel och
risk för elstötar.
Rengöring: Rengör produkten med en torr trasa. Använd inte kemikalier,
lösningsmedel eller starka rengöringsmedel.
Miljö: Utsätt inte produkten för stark värme eller kyla, eftersom det kan
skada eller förkorta de elektroniska kretsarnas livslängd.
kan skada eller förkorta
Med inlärd fjärrkontroll, väggsändare eller Nexa Bridge
Starta riktning UPP
Skicka PÅ-signal
Stoppa riktning UPP
Skicka PÅ-signal igen
Starta riktning NED
Skicka AV-signal
Stoppa riktning NED
Skicka AV-signal igen
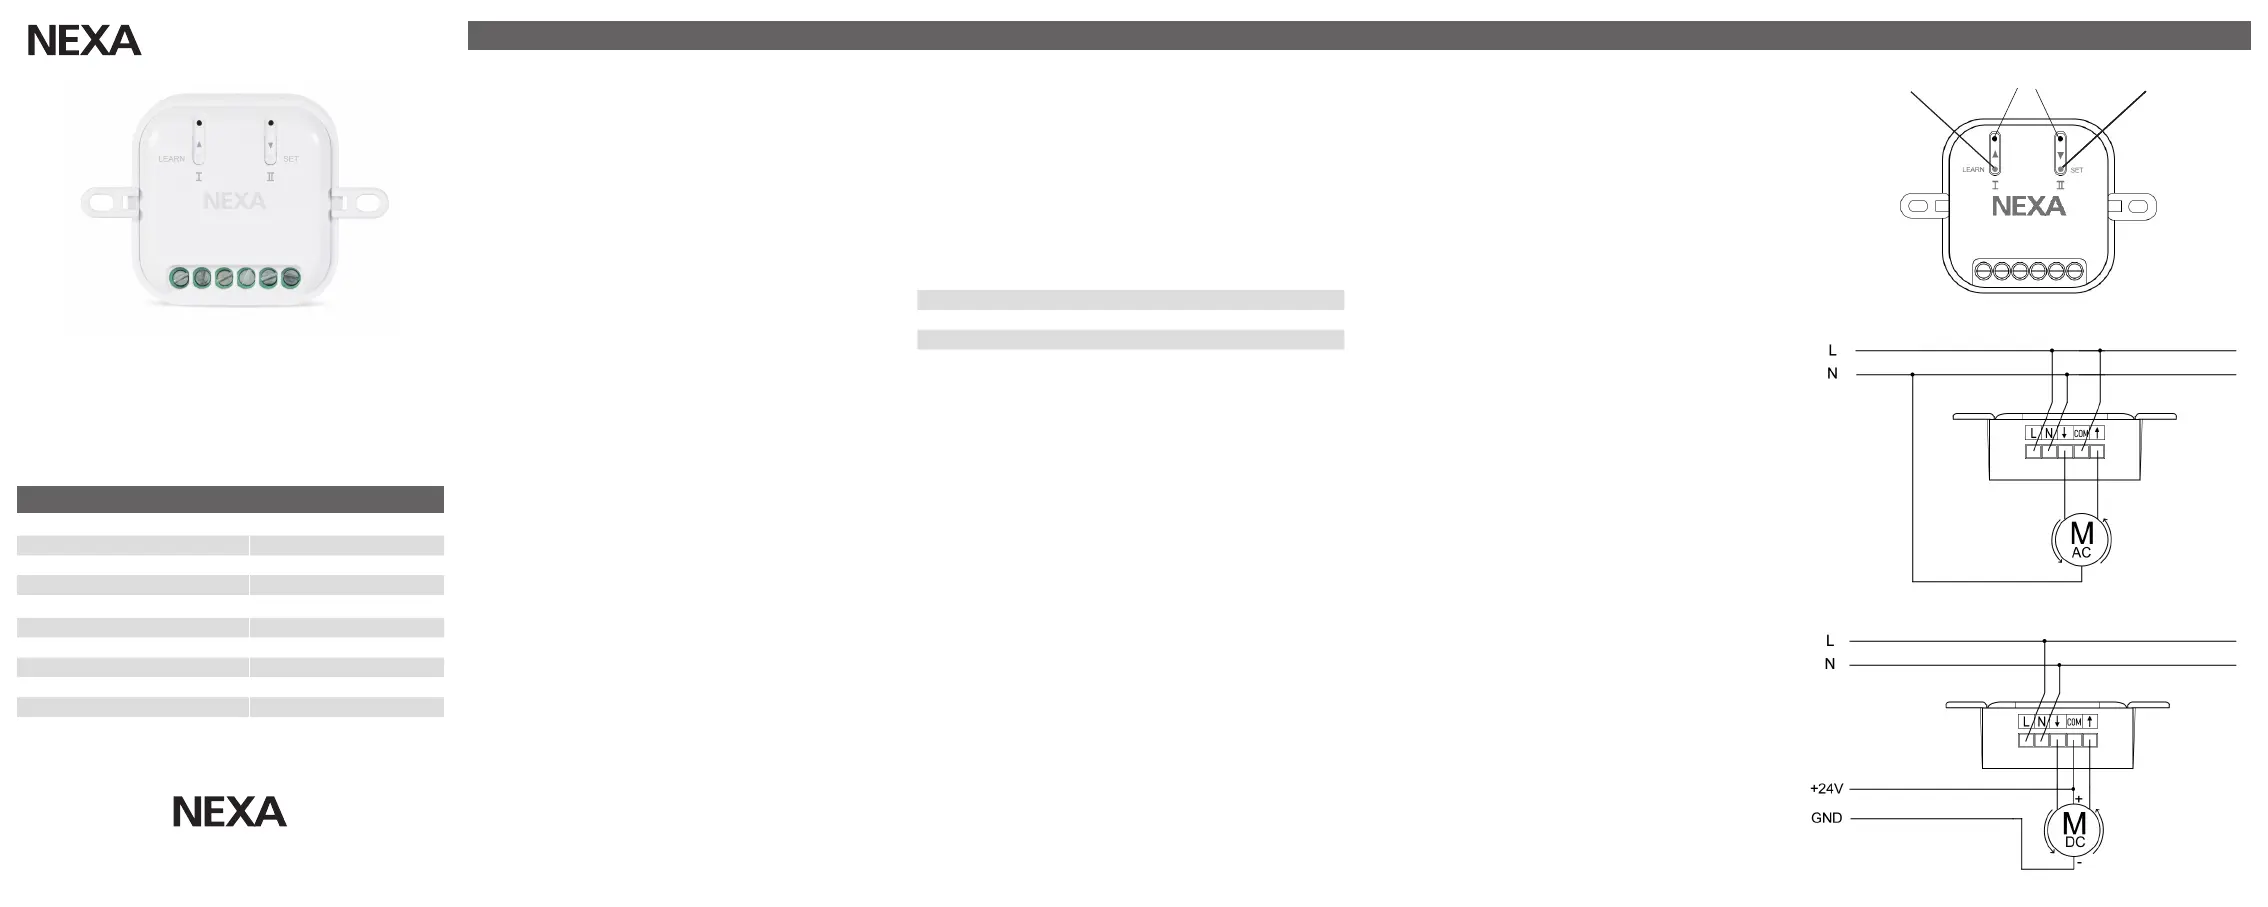
Inlärningsknapp
LED-indikeringar
Kopplingsschema 230V AC Motor
Kopplingsschema 12-24V DC Motor
Kalibreringsknapp
BEKRÄFTELSE AV RADERING
LED-indikering på mottagaren blinkar snabbt under 2 sekunder.
KALIBRERING
Det finns ett stort utbud av gardiner, filmdukar och annan motoriserad
elektronik på marknaden och för optimal funktion måste max- och min-
stopplägen programmeras in i mottagarens minne.
1.Tryck på mottagarens kalibreringsknapp i 3 sekunder, båda LED
indikeringarna börjar blinka.
2.Tryck kort på mottagarens knapp "NED " för att starta riktning
nedåt. När önskad position är uppnådd, tryck kort på knappen "NED
" igen.
3.Tryck kort på mottagarens knapp "UPP " för att starta riktning
uppåt. När önskad position är uppnådd, tryck kort på knappen "UPP
" igen.
4.Tryck och håll inne kalibreringsknappen mer än 3 sekunderför att
avsluta och spara kalibreringen.
Båda LED indikeringarna blinkar snabbt som bekräftelse.
OBS.
Om ingen knapp trycks ned inom 30 sekunder från aktivering av
kalibreringsläge återgår mottagaren till driftläge igen.
KALIBRERING UTAN FJÄRRKONTROLL
KALIBRERING MED INLÄRD
FJÄRRKONTROLL
1.
2.
Tryck på mottagarens kalibreringsknapp i 3 sekunder, båda LED
indikeringarna börjar blinka.
Tryck kort fjärrkontrollens "AV" knappför att starta riktning nedåt.
När önskad position är uppnådd, tryck kort på"AV" knappenigen.
3.Tryck kort på mottagarens "PÅ" knapp för att starta riktning uppåt.
När önskad position är uppnådd, tryck kort på knappen "PÅ" igen.
4.Tryck och håll inne kalibreringsknappen mer än 3 sekunder för att
avsluta och spara kalibreringen.
Båda LED indikeringarna blinkar snabbt som bekräftelse.
Product specificaties
| Merk: | Nexa |
| Categorie: | Niet gecategoriseerd |
| Model: | MJLR-2001 |
Heb je hulp nodig?
Als je hulp nodig hebt met Nexa MJLR-2001 stel dan hieronder een vraag en andere gebruikers zullen je antwoorden
Handleiding Niet gecategoriseerd Nexa

2 Maart 2026
23 September 2024
23 September 2024
23 September 2024
23 September 2024
26 Maart 2024
26 Maart 2024
26 Maart 2024
26 Maart 2024
26 Maart 2024
Handleiding Niet gecategoriseerd
Nieuwste handleidingen voor Niet gecategoriseerd
18 Maart 2026
18 Maart 2026
18 Maart 2026
18 Maart 2026
18 Maart 2026
18 Maart 2026
18 Maart 2026
18 Maart 2026
18 Maart 2026
18 Maart 2026