Marquant MPR-88 Handleiding

Marquant Radio MPR-88

Lees hieronder de 📖 handleiding in het Nederlandse voor Marquant MPR-88 (20 pagina's) in de categorie Radio. Deze handleiding was nuttig voor 19 personen en werd door 2 gebruikers gemiddeld met 4.5 sterren beoordeeld

Pagina 1/20
WARNING
CAUTION
CAUTION!
TO REDUCE THE RISK OF FIRE OR ELECTRIC SHOCK, DO NOT EXPOSE
THIS APPLIANCE TO RAIN OR MOISTURE.
Use of controls or adjustments or performance of procedures
other than those specified herein may result in hazardous
radiation exposure.
This Compact Disc player is classified as CLASS 1 LASER product.
Invisible laser radiation when open and interlocks defeated. Avoid
exposure to beam.
A CONTROLS
Read the Operating Instructions carefully and completely
before operating the unit. Be sure to keep the Operating
Instructions for future reference. All warnings and cautions
in the Operating Instructions and on the unit should be
strictly followed, as well as the safety suggestions below.
Installation
1 Water and moisture - Do not use this unit near water,
such as near a bathtub, washbowl, kitchen sink, laundry
tub, in a wet basement, swimming pool, or the like.
2 Heat - Do not use this unit near sources of heat, including
heating vents, stoves, or other appliances that generate
heat.
3 Mounting surface - Place the unit on a flat, even surface.
4 Ventilation - The unit should be situated with adequate
space around it so that proper heat ventilation is assured.
Allow 10 cm(4 in.) clearance from the rear and the top of
the unit and 5 cm (2 in.) from each side.
- Do not place the unit on a bed, rug, or similar surface
that may block the ventilation openings.
- Do not install the unit in a bookcase, cabinet,
or airtight rack where ventilation may be impeded.
5 Objects and liquid entry - Take care that objects
or liquids do not get inside the unit through the
ventilation openings.
6 Condensation - Moisture may form on the CD Pickup
lens when:
- The unit is moved from a cold spot to a warm spot
- the heating system has just been turned on
- the unit is used in a very humid room
- the unit is cooled by an air conditioner
When this unit has condensation inside, it may not
function normally. Should this occur, leave the unit for
a few hours, then try to operate again.
Electric Power
1 Power sources - Use on batteries or AC house current,
as specified in the Operating Instructions and marked
on the unit.
2 AC power cord
When disconnecting the AC power cord, pull it out by-
the AC power plug. Do not pull the cord itself.
Never handle the AC power plug with wet hands, as-
this could result in fire or shock.
Power cords should be firmly secured to avoid being -
bent, pinched, or walked upon. Pay particular attention
to the cord from the unit to the power socket.
Avoid overloading AC power plugs and extension -
cords. beyond their capacity, as this could result in fire
or shock.
3 When not in use - Unplug the AC power cord from the
AC outlet or remove all the batteries if the unit will not
be used for several months or more. When the cord is
plugged in ,a small amount of current continues to flow
to the unit, even when the power is turned off.
B PRECAUTIONS
CLASS 1 LASER PRODUCT
KLASSE 1 LASER PRODUKT
LUOKAN 1 LASER LAITE
KLASS 1 LASER APPARAT
PORTABLE CD SYSTEM MPR-88
OPERATING INSTRUCTION
8 8
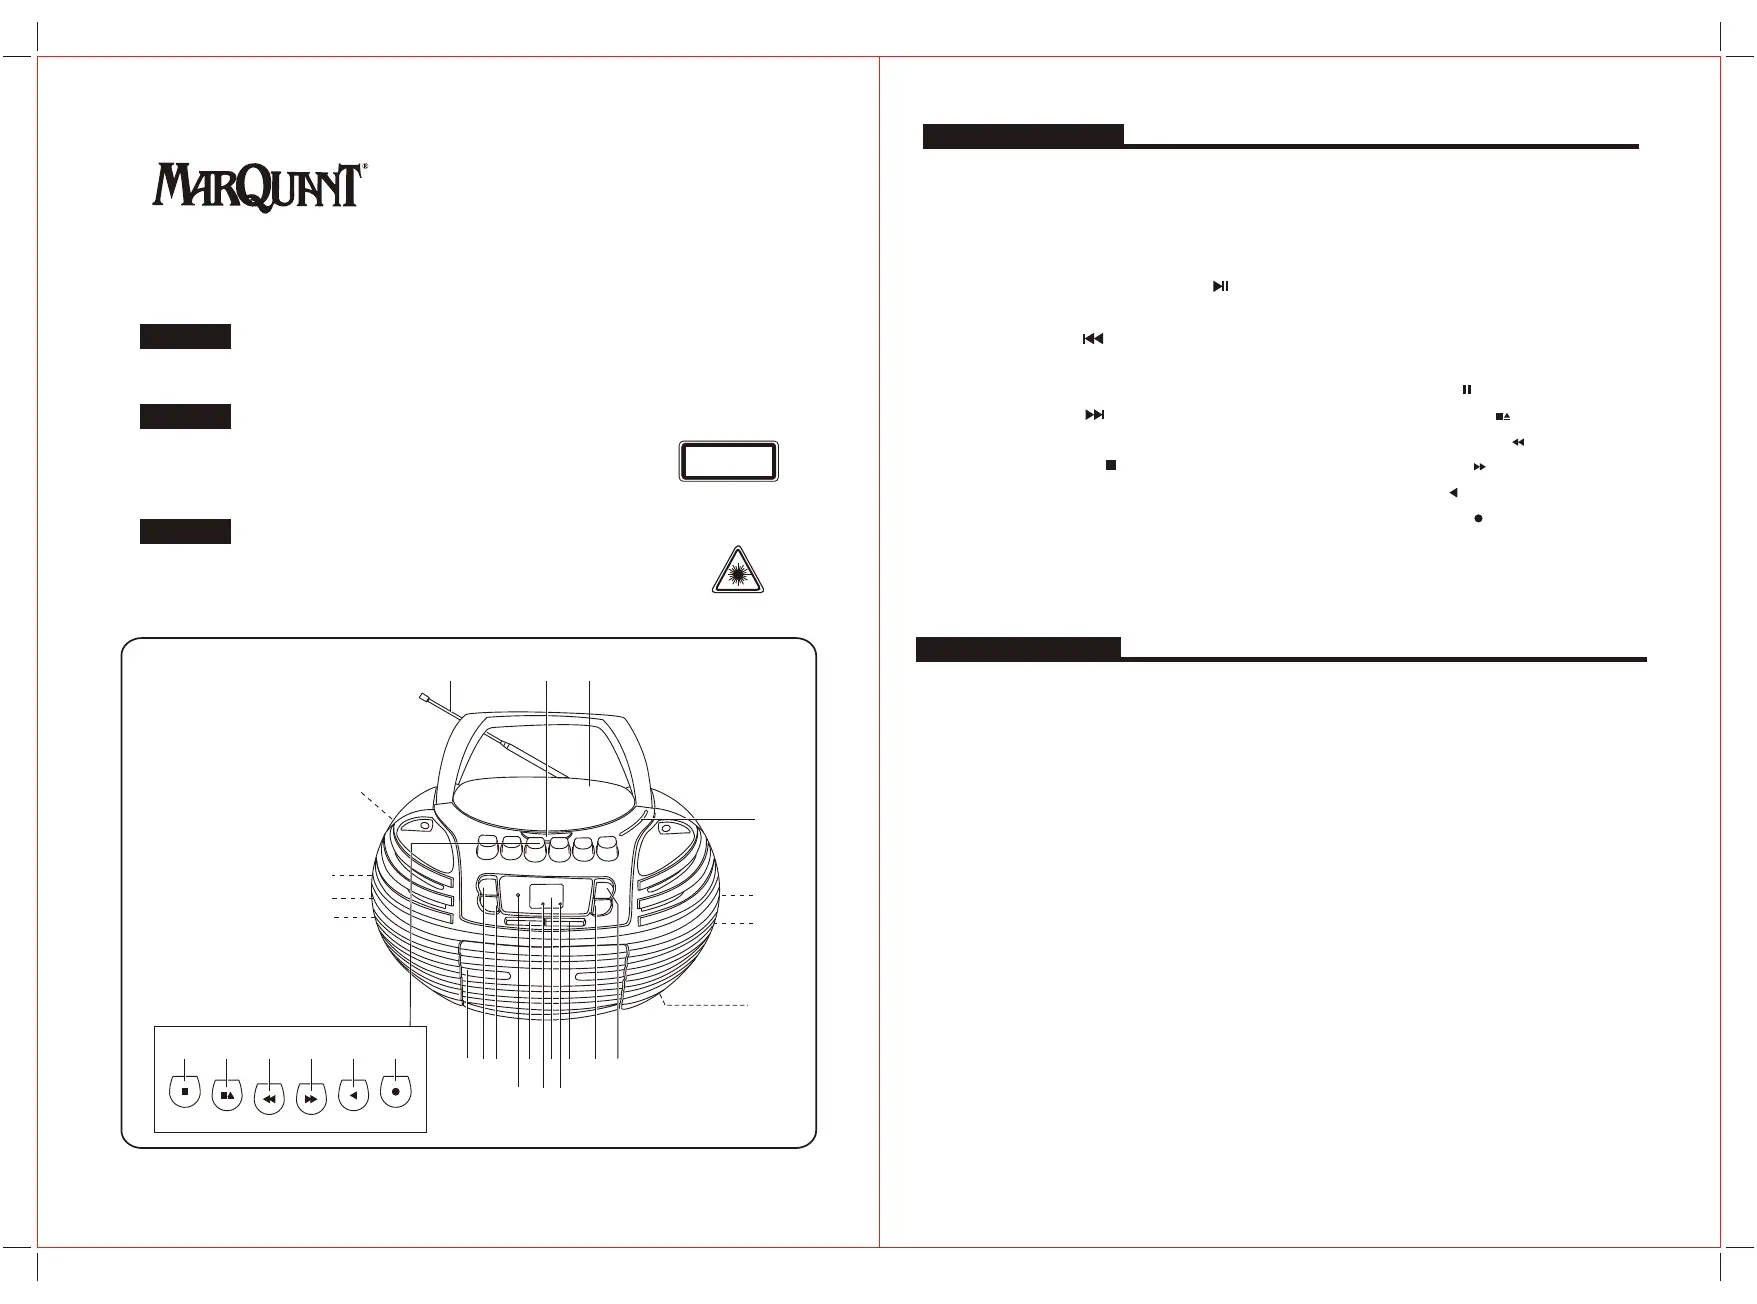
1. Telescopic aerial
2.CD open (OPEN)
3. CD compartment lid
4. Dial scale
5. Play/Pause button (PLAY/ PAUSE )
6. Cassette compartment
7. CD Skip button ( )
8. Repeat indicator (REP.)
9. Play indicator (PLAY)
10. CD Skip button ( )
11. CD Repeat button (REP)
12. Stop button (STOP )
13. LED
14. Program indicator (PROG.)
15. CD Program button (PROG. )
16. AC input socket (~AC IN)
17. Stereo headphones socket (PHONES )
18. Function/Power switch
(RADIO TAPE CD )
19. Volume control (VOLUME)
20. Band switch (AM FM ST)
21. Tuning control (TUNING)
22. Battery compartment
23. Pause button( )
24. Stop/Eject button ( )
25. Fast forward button ( )
26. Rewind button ( )
27. Play button ( )
28. Record button ( )
1 2 3
4
56 7
8 9
1011 1213
14
15
16
17
18
19
20
21
22
23 24 25 26 27 28
GB-1 GB-2
IMPORTANT
Make sure that function is set to TAPE before connecting
the AC cord or inserting batteries.
CAUTION
Use only the supplied AC cord. Use with other cords may
result in the risk of fire.
Using on batteries
Open the lid of the battery compartment on the rear and
C POWER SUPPLY
The batteries need to be replaced when:
The tape speed slows down, volume decreases, or
sound is distorted during operation.
notes on batteries
Do not mix different types of batteries or old batteries
with new ones.
Never recharge the batteries, apply heat to them or
take them apart.
Remove dead batteries.
If liquid leaks from the batteries, wipe thoroughly to remove.
D MAINTENANCE
To clean the cabinet
Use a soft cloth lightly moistened with mild detergent
solution. Do not use strong solvents such as alcohol.
benzine or thinner.
To clean the heads and tape paths
After every 10 hours of use, clean the Recording heads
and Playback head , the pinch roller and capstan .Use
a cotton swab 5 slightly moistened with cleaning fluid
or denatured alcohol.
Cassette tapes
To prevent accidental erasure, bread off the plastic tabs
on the cassette tape after recording with a screwdriver
or other pointed tool.
To record on the tape again, cover the tab openings with
adhesive tape, etc.
1 functionSet to CD.
2 OPEN the disc compartment and place a disc with
the printed side up. The total number of tracks
is displayed.
3 Press PLAY/PAUSE to start play- the indicator
lights up:
The number of the track being played is displayed.
4 Turn VOLUME to adjust the sound.
- Stops play.STOP
PLAY/PAUSE - Pauses play. To resume play, press
again.
- Searches for a particular SKIP/SEARCH
point during playback. Keep or pressed and then
release it.
- Skips to the beginning of a track. Press or
repeatedly
E CD OPERATION
,
REPEAT
Press REPEAT once- the indicator lights up:
A single track is played repeatedly. Select a track
with or .
Press REPEAT twice- the indicator lights up:
All tracks are played repeatedly.
PROGRAM
In stop state, press PROGRAM, the indicator lights up,
and use skip/search to select the track. Will be program,
press play to start program play.
NOTE
Do not use irregular shape CDs(example: heart-shaped,
octagonal ones). It may result in malfunctions.
Do not place more than one disc in the disc
compartment.
Do not try to open the disc compartment during play.
Do not touch the lens. Doing so may cause malfunctions.
1 Set function to RADIO.
2 Select a band with BAND.
3 Tune to a station with TUNING.
4 Turn VOLUME to adjust the sound.
For better reception - Extend the FM antenna and orient
it for the best reception; AM antenna is inside the unit.
Position the unit for the best reception.
FM ST
Sets the FM or AM sound, insert a tape, Press rec start
recording.
F TUNER OPERATION
Use Type 1 (normal) tapes only.
PLAYING BACK A TAPE
1 Set to TAPE.function
2 Press STOP/EJECT to open the cassette
holder and insert a tape with the exposed side up and
the side to be played facing out.
3 Press PLAY to start play.
4 Turn VOLUME to adjust the sound.
- Stops play.STOP/EJECT
PAUSE - Pauses play. To resume play, press again.
- Fast forwards/rewinds. To F FWD/ REW
stop winding. press STOP/EJECT.
G TAPE OPERATION
RECORDING
Note that recording is done on only one side of the tape.
1 Insert a tape with the side to be recorded facing out.
Wind up the tape to the point where recording starts.
2 Get ready to record from the source.
To record from a CD: set function to CD and start play.
To record from the tuner: set function to RADIO and
tune to a station.
3 Press REC to start recording.
PLAY is pressed simultaneously.
To stop recording, press STOP/EJECT.
To erase a recording, set function to TAPE and start
recording.
To turn off the unit, set function to TAPE.
To listen with the headphones, connect headphones with a stereo mini plug to the PHONES jack.
If an erroneous display or malfunction occurs, disconnect the AC cord and remove all the batteries to turn off the
display. Then turn the power back on.
H GENERAL
COPYRIGHT
Please check the copyright laws relating to recordings from disc, radio or external
tape for the country in which the machine is being used.
I SPECIFICATIONS
General
Speaker: 77 mm cone type (2)
Output: Headphones jack (stereo jack)
Power output: 1.5W +1.5 W
Power requirements: DC 12 V using eight size C batteries,
AC 230V, 50Hz (15W)
Weight: 2.4Kg (excluding batteries)
Dimensions: 290(W)x160(H)x270(D) mm
Accessory: AC cord (1)
Specifications and external appearance are
subject to change without notice.
insert eight (size C) batteries, not supplied, with the and
marks correctly aligned. then close the lid.
To switch from AC power supply to battery power supply,
disconnect the AC cord from the AC inlet.
Tuner section
Frequency range: FM : 88-108 MHz
AM : 540-1600 KHz
Deck section
Track format: 4 track, 2 channels
Frequency range: Normal tape
Recording system: AC bias
Erasing system: Magnet erase
Heads: Recording / playback head
Erasure head
CD player section
Disc: Compact disc
Scanning method: Non-contact optical scanner
(semiconductor laser)
GB-3 GB-4


Product specificaties

Merk: Marquant
Categorie: Radio
Model: MPR-88

Heb je hulp nodig?

Als je hulp nodig hebt met Marquant MPR-88 stel dan hieronder een vraag en andere gebruikers zullen je antwoorden


Handleiding Radio Marquant

Handleiding Radio

Nieuwste handleidingen voor Radio