Liebherr CBNamy 5753 Handleiding
Liebherr
Niet gecategoriseerd
CBNamy 5753
Bekijk gratis de handleiding van Liebherr CBNamy 5753 (24 pagina’s), behorend tot de categorie Niet gecategoriseerd. Deze gids werd als nuttig beoordeeld door 49 mensen en kreeg gemiddeld 4.9 sterren uit 25 reviews. Heb je een vraag over Liebherr CBNamy 5753 of wil je andere gebruikers van dit product iets vragen? Stel een vraag
Pagina 1/24

Installation Guide
Quality, Design and Innovation
home.liebherr.com/fridge-manuals

Contents
1 General safety instructions.................................. 2
2 Setup conditions................................................... 3
2.1 Space............................................................................. 3
2.2 Fitting the appliance into the kitchen unit.............. 3
2.3 Setting up multiple appliances.................................. 4
2.4 Electrical connection................................................... 5
3 Installation dimensions........................................ 5
4 Ventilation requirements...................................... 5
5 Transporting the appliance................................... 5
6 Unpacking the appliance...................................... 5
7 Mounting wall spacers.......................................... 5
8 Setting up the device............................................ 5
9 Setting up the appliance level.............................. 6
10 After setup............................................................ 6
11 Disposal of packaging........................................... 6
12 Explanatory symbols used.................................... 6
13 Reversing the door................................................ 7
13.1 Taking off the top soft stop mechanism.................. 8
13.2 Removing the bottom soft stop damper.................. 9
13.3 Disconnecting the cable connection........................ 10
13.4 Removing the top door................................................ 10
13.5 Removing the bottom door......................................... 11
13.6 Moving the upper bearing parts to the other side. 12
13.7 Moving the central bearing parts to the other
side................................................................................. 14
13.8 Moving the lower bearing parts to the other side.. 14
13.9 Moving the door bearing parts to the other side.... 15
13.10 Moving the handles to the other side*..................... 15
13.11 Fitting the bottom door............................................... 16
13.12 Fitting the top door...................................................... 17
13.13 Fitting the cable connection...................................... 17
13.14 Aligning the doors........................................................ 18
13.15 Fit the bottom soft stop mechanism........................ 18
13.16 Fitting the top soft stop mechanism........................ 19
14 Water connection*................................................ 19
15 Connect the water supply*................................... 20
16 Water tank............................................................. 21
16.1 Inserting the water tank............................................. 21
17 Water filter*.......................................................... 21
17.1 Installing the water filter............................................ 21
18 Connecting the appliance..................................... 21
The manufacturer is constantly working to improve all types
and models. Therefore, please be aware that we reserve the
right to make changes to the shape, equipment and tech‐
nology.
Symbol Explanation
Read instructions
Please read the information in these instruc‐
tions carefully to understand all of the benefits
of your new appliance.
Symbol Explanation
Full instructions on the internet
You can find detailed instructions on the
internet using the QR code on the front of
these instruction or by entering the service
number at home.liebherr.com/fridge-
manuals.
The service number can be found on the serial
tag:
Fig. Example illustration
Check appliance
Check all parts for transport damage. If you
have any complaints, please contact your
agent or customer service.
Differences
These instructions apply to a range of models,
so there may be differences. Sections that
apply to certain models only are indicated by
an asterisk (*).
Instructions and results
Instructions are marked with a .
Results are marked with a .
Videos
Videos about the appliances are available on
the YouTube channel of Liebherr-Hausgeräte.
1 General safety instructions
-Please keep this assembly manual in a safe
place so you can refer back to it at any
time.
-If you pass the appliance on, please hand
this assembly manual to the new owner.
-Read this assembly manual before installa‐
tion and use in order to use the appliance
safely and correctly. Follow the instruc‐
tions, safety instructions and warning
messages included at all times. They are
important for ensuring you can operate and
install the appliance safely and without any
problems.
-First read the general safety instructions in
the “General safety instructions” section of
the operating instructions, which accom‐
pany these installation instructions, and
follow them. If you cannot find the oper‐
ating instructions, you can download the
operating instructions from the internet by
entering the service number at
home.liebherr.com/fridge-manuals. The
General safety instructions
2 * Depending on model and options
service number can be found on the serial
tag:
-Observe the warning messages and other
detailed information in the other sections
when installing the appliance:
DANGER indicates a hazardous situation,
which if not avoided, will result in
death or serious injury.
WARNING indicates a hazardous situation,
which if not avoided, could result
in death or serious injury.
CAUTION indicates a hazardous situation,
which if not avoided, will result in
minor or moderate injury.
NOTICE indicates a hazardous situation,
which if not avoided, could result
in damage to property.
Note indicates useful advice and tips.
2 Setup conditions
WARNING
Risk of fire due to moisture!
If live parts or the power cord get wet, this can cause a
short circuit.
uThe appliance is designed for use in enclosed spaces. Do
not operate the appliance in open space or in damp areas
or where there is spray.
Normal use
-Only set up and use the appliance in enclosed spaces.
2.1 Space
WARNING
Leaking refrigerant and oil!
Fire. The refrigerant contained within the appliance is envi‐
ronmentally friendly, but flammable. The oil contained
within the appliance is flammable. Escaping refrigerant and
oil can ignite if they are of high enough concentration and
are exposed to an external heat source.
uDo not damage the pipelines of the coolant circuit and
the compressor.
-If the appliance is installed in a very damp environment
condensate water may form on the outside of the appli‐
ance.
Always make sure the installation area is well venti‐
lated. .
-The more refrigerant there is in the appliance, the larger
the space it is installed in must be. If the space is too
small, any leak may create a flammable mixture of gas
and air. For every 8 g size of the installation space must
be at least 1 m3. Specifications on the refrigerant in the
appliance can be found on the serial tag plate inside the
appliance.
2.1.1 Installation surface
-The floor of the installation site must be horizontal and
level.
-The height of the appliance base must be the same as
the surrounding floor.
2.1.2 Installation position
-Do not install the appliance in direct sunlight or next to
an oven, heater, or similar heat source.
-Always stand the appliance backed directly to the wall
using the enclosed wall spacers (see below).
2.2 Fitting the appliance into the
kitchen unit
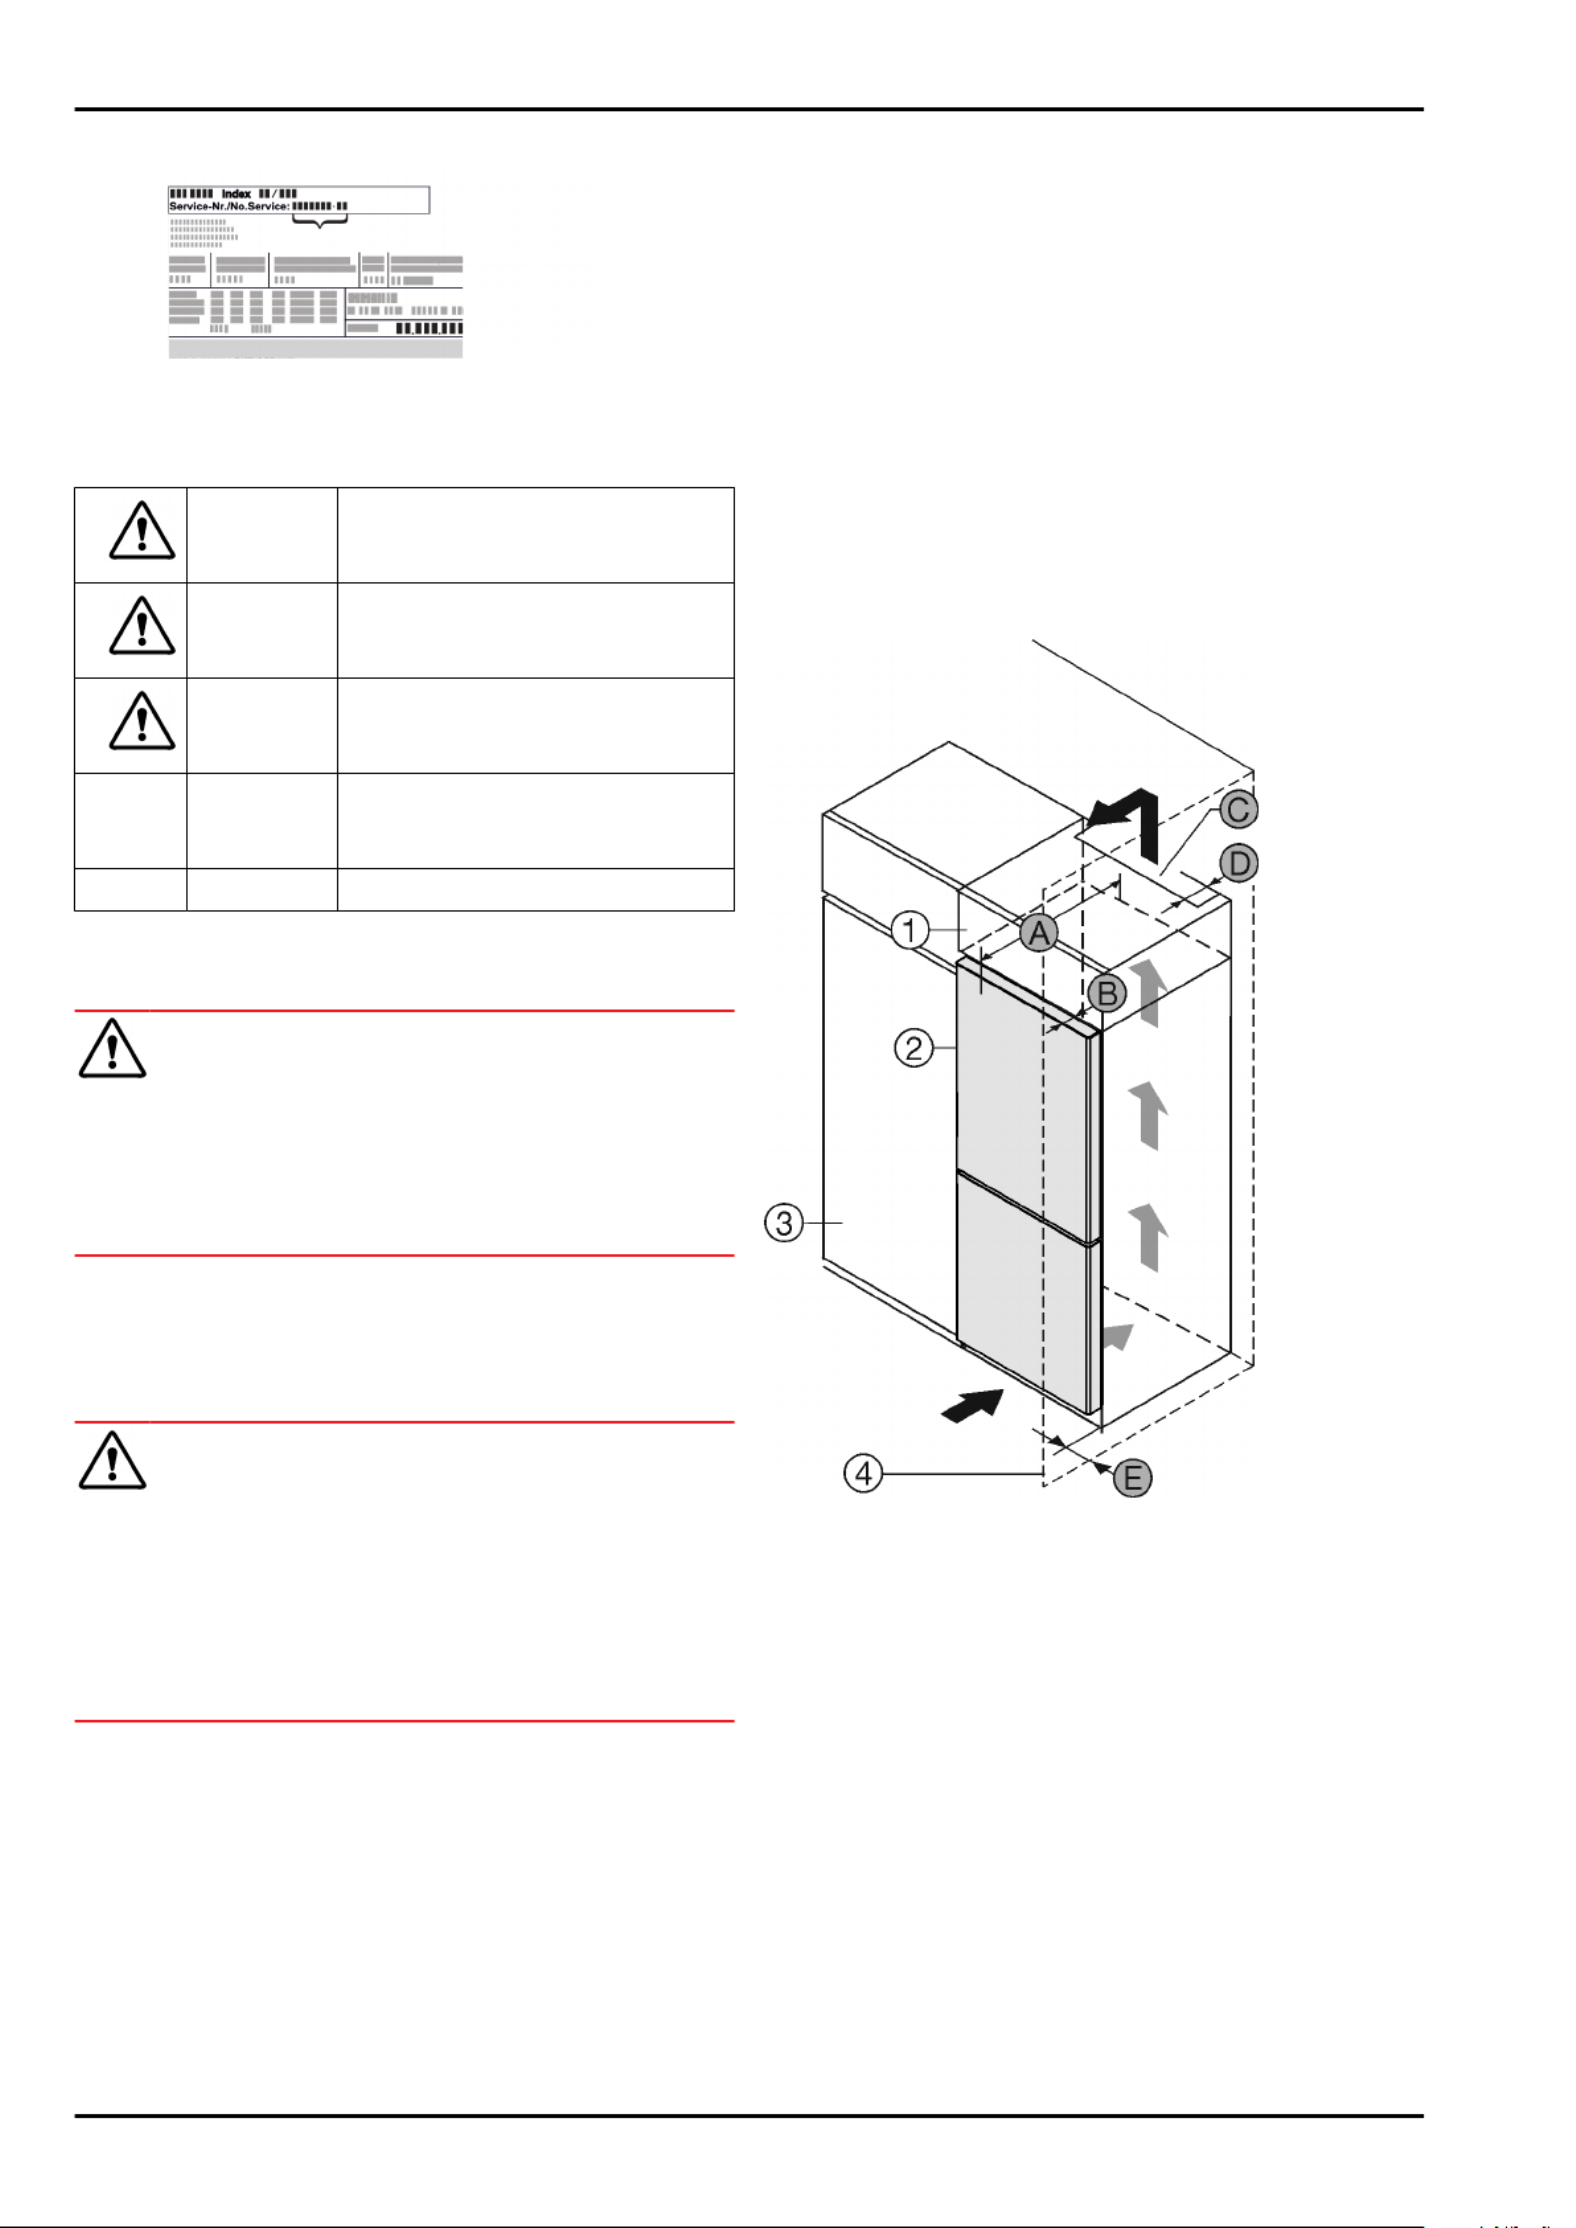
The appliance can be built into kitchen cabinets.
Fig. 1
(1) Top cupboard* Door depth*(B)
(2) (C)Appliance* Ventilation cross-
section*
(3) (D)Kitchen cabinet* Distance to the rear of
the appliance*
(4) (E)Wall* Distance to the side of
the appliance*
(A) Appliance depth*
Set up the appliance directly next to the kitchen cabinet
Fig. 1 (3).*
There must be a ventilation shaft at the depth Fig. 1 (D) of
the back of the top cupboard over the entire width of the
top cupboard.*
The cross section of the ventilation gap Fig. 1 (C) must be
maintained below the ceiling.*
If the appliance is installed with the hinges next to a wall
Fig. 1 (4), the distance between the appliance and the wall
must be at least 13 mm.*
Setup conditions
* Depending on model and options 3
Product specificaties
| Merk: | Liebherr |
| Categorie: | Niet gecategoriseerd |
| Model: | CBNamy 5753 |
Heb je hulp nodig?
Als je hulp nodig hebt met Liebherr CBNamy 5753 stel dan hieronder een vraag en andere gebruikers zullen je antwoorden
Handleiding Niet gecategoriseerd Liebherr

13 Mei 2025

13 Mei 2025

13 Mei 2025

13 Mei 2025

16 November 2024

30 September 2024

6 September 2024

5 September 2024

5 September 2024

5 September 2024
Handleiding Niet gecategoriseerd
- Essentiel B
- Pabobo
- The Joy Factory
- CAT
- Plastkon
- Hatco
- Roswell
- Ruark Audio
- Megger
- Steelseries
- Orbis
- SMAJAYU
- Danfoss
- Palm
- Gurari
Nieuwste handleidingen voor Niet gecategoriseerd

16 September 2025

16 September 2025

16 September 2025

16 September 2025

16 September 2025

16 September 2025

16 September 2025

16 September 2025

16 September 2025

16 September 2025