LG WDPS1W Handleiding
LG
Wasmachine
WDPS1W
Bekijk gratis de handleiding van LG WDPS1W (2 pagina’s), behorend tot de categorie Wasmachine. Deze gids werd als nuttig beoordeeld door 141 mensen en kreeg gemiddeld 4.6 sterren uit 71 reviews. Heb je een vraag over LG WDPS1W of wil je andere gebruikers van dit product iets vragen? Stel een vraag
Pagina 1/2

EN
WARRANTY
LG Electronics Inc., will repair or at its option replace, without charge, your product if it proves to be
defective in material or workmanship under normal use during the warranty period set forth below, effective
from the date of original consumer purchase of the product. This limited warranty is good only to the original
purchaser of the product and effective only when used in the United States including Alaska, Hawail, and
U.S. Territories; and Canada.
WARRANTY PERIOD HOW SERVICE IS HANDLED
1 Year from the Date of Purchase
Call 1-800-243-0000 (USA) or 1-888-542-2623 (CANADA) and choose
the appropriate prompt. Please have product type, model number,
serial number, and ZIP code ready.
THIS WARRANTY IS IN LIEU OF ANY OTHER WARRANTIES, EXPRESS OR IMPLIED, INCLUDING
WITHOUT LIMITATION, ANY WARRANTY OF MERCHANTABILITY OR FITNESS FOR A PARTICULAR
PURPOSE. TO THE EXTENT ANY IMPLIED WARRANTY IS REQUIRED BY LAW, IT IS LIMITED
IN DURATION TO THE EXPRESS WARRANTY PERIOD ABOVE. LG WILL NOT BE LIABLE FOR
ANY CONSEQUENTIAL, INDIRECT, OR INCIDENTAL DAMAGES OF ANY KIND, INCLUDING LOST
REVENUSE OR PROFITS, IN CONNECTION WITH THE PRODUCT.
SOME STATES DO NOT ALLOW LIMITATION ON HOW LONG AN IMPLIED WARRANTY LASTS OR THE
EXCLUSION OF INCIDENTAL OR CONSEQUENTIAL DAMAGES, SO THE ABOVE LIMITATIONS OR
EXCLUSIONS MAY NOT APPLY TO YOU.
THIS LIMITED WARRANTY DOES NOT APPLY TO:
1. Service trips to your home to deliver, pick up, and/or install the product, instruct, or replace house fuses
or correct wiring, or correction of unauthorized repairs; and
2. Damages or operating problems that result from misuse, abuse, operation outside environmental
specifications or contrary to the requirements or precautions in the Operating Guide, accident, vermin, fire,
flood, improper installation, acts of God, unauthorized modification or alteration, incorrect electrical current
or voltage, or commercial use, or use for other than intended purpose.
3. Therefore, the cost of repair or replacement of such a defective product shall be borne by the consumer.
CUSTOMER INFORMATION CENTER NUMBERS
To Prove Warranty Coverage
Retain your Sales Receipt to prove date of purchase.
A copy of your Sales Receipt must be submitted at the time warranty
service is provided.
To Obtain Nearest Authorized
Service Center or Sales Dealer,
or to Obtain Product,Customer,
or Service Assistance
Call 1-800-243-0000 or 1-888-542-2623 (CANADA) and choose the
appropriate prompt from the menu, and have your product type, model
number, serial number, and ZIP Code; or visit our website at http://
www.lgservice.com
EN
CAUTION
• Do not install a dryer pedestal between a
stacked washer and dryer.
6 7
EN EN EN
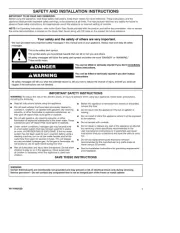
IMPORTANT SAFETY INSTRUCTIONS
READ ALL INSTRUCTIONS BEFORE USE
The following safety guidelines are intended to prevent unforeseen risks
or damage from unsafe or incorrect operation of the appliance.
The guidelines are separated into ‘WARNING’ and ‘CAUTION’
messages as described below.
Safety Messages
This symbol is displayed to indicate matters and operations
that can cause risk. Read the text marked with this symbol
carefully and follow the instructions in order to avoid risk.
WARNING
This indicates that the failure to follow the instructions can cause
serious injury or death.
CAUTION
This indicates that the failure to follow the instructions can cause
minor injury or damage to the product.
WARNING
WARNING
To reduce the risk of explosion, fire, death, electric shock,
injury or scalding to persons when using this product, follow
basic precautions, including the following:
• This appliance should only be installed and transported by two or
more people holding the pedestal securely.
• Unplug the front-loading washing machine or dryer before stacking it
on top of the pedestal.
• Keep flammable materials and vapors, such as gasoline, away from
dryer.
• Place dryer at least 18 inches above the floor for a garage
installation.
INSTALLATION
Parts and Dimensions
The images in this guide may be different from the actual components and accessories, which are subject
to change by the manufacturer without prior notice for product improvement purposes.
Front View
Included Accessories
a
a
a
a
a
Bracket (for Dryer) : 4 EA
Bracket (for Dryer) : 4 EA
Bracket (for Dryer) : 4 EA
Bracket (for Dryer) : 4 EA
Bracket (for Dryer) : 4 EA
b
b
b
b
b
M 4 X 20 Screws : 18 EA
M 4 X 20 Screws : 18 EA
M 4 X 20 Screws : 18 EA
M 4 X 20 Screws : 18 EA
M 4 X 20 Screws : 18 EA
Tools Needed
a
a
a
a
a
Wrench
Wrench
Wrench
Wrench
Wrench
b
b
b
b
b
Screwdriver
Screwdriver
Screwdriver
Screwdriver
Screwdriver
Dimensions
DW
H
W 27" 690 mm
D 27" 690 mm
H 5 1/8" 130 mm
234
EN
5 Securely attach the two products at the
corners using screws.
• First, insert screws on each side. Then
insert screws on the front and back side.
• Tighten screws to assemble the stacking
brackets.
−For washer: 16 screws
−For dryer: 8 screws
6 Extend all 4 feet a of the washing machine
slightly until it is snugged up against the
pedestal. Then tighten the four lock nuts
b.
540˚
540˚
540˚
540˚
540˚
180˚
7 Turn all 4 leveling feet
a in one direction to
raise the pedestal or the other direction to
lower it. Then tighten the locknuts
b.
5
Stacking Pedestal
Before Installation
• If the washer or combo was previously
installed, unplug it, disconnect the inlet hose(s)
from the faucet(s), disconnect the drain hose,
and drain all hoses.
• If dryer was previously installed, uninstall it as
follows:
−Uninstalling an electric dryer:
1) Unplug the power supply cord.
2) Pull the dryer away from the wall enough
to loosen the vent clamp. Loosen the clamp
and carefully remove the exhaust vent from
the dryer exhaust outlet.
−Uninstalling a gas dryer:
1) Unplug the power supply cord,
2) Turn off the gas supply.
3)Pull the dryer away from the wall enough to
loosen the vent clamp. Loosen the clamp and
carefully remove the exhaust vent from the
dryer exhaust outlet.
How to Stack
1 Check the fastening structure at the bottom on
the side of the product. Go to Step 2 for dryer
and Step 4 for washer.
2 Tilt and hold product.
3 Insert the T-clip a of the bracket b into the
dryer base as shown. Press up on the back of
the clip and pull outward to lock into place.
4 Place the product on top of the pedestal.
• Make sure the 4 legs are totally locked
and the holes in the pedestal align with the
holes in the washing machine.
for washer/
combo
for dryer
for dryer
for washer/
combo
Memo
Copyright © 2020 LG Electronics Inc. Todos los derechos reservados
INSTRUCCIONES DE INSTALACIÓN
PEDESTAL
Antes de comenzar con la instalación, lea atentamente estas
instrucciones. Esto simplificará el trabajo y garantizará que el producto
esté instalado de manera correcta y segura. Después de la instalación,
deje estas instrucciones cerca del producto para futuras consultas.
ESPAÑOL
WDPS1*
www.lg.com

SP
11 13
5 Una los dos productos en las esquinas con los
tornillos de forma segura.
• Primero, introduzca los tornillos en cada
lado. Luego, introduzca los tornillos en el
lado frontal y lateral.
• Apriete los tornillos para ensamblar los
soportes de apilado.
−Para la lavadora: 16 tornillos
−Para la secadora: 8 tornillos
6 Extienda los 4 pies a de la lavadora
ligeramente hasta ajustar hacia arriba contra
el pedestal. Luego apriete las cuatro tuercas
de seguridad b.
540˚
540˚
540˚
540˚
540˚
180˚
7 Gire las 4 patas de nivelación
a en una
dirección para elevar el pedestal o en la
dirección contraria para bajarlo. Luego apriete
las tuercas de seguridad
b.
GARANTÍA
LG Electronics Inc., reparará o reemplazará el producto, a su discreción, sin cargo, si se comprueba que
el material o la fabricación tienen defectos en condiciones de uso normales durante el período de garantía
establecido a continuación, con vigencia desde la fecha de compra original del producto por parte del
consumidor. Esta garantía limitada es válida solo para el comprador original del producto y si se utiliza
únicamente dentro de los Estados Unidos, incluyendo Alaska, Hawái y territorios de EE. UU. y Canadá.
PERÍODO DE GARANTÍA CÓMO SE MANEJA EL SERVICIO TÉCNICO
1 año desde la Fecha de compra
Llame al 1-800-243-0000 (EE. UU.) o 1-888-542-2623 (CANADÁ) y
elija la opción deseada. Tenga cerca el tipo de producto, número de
modelo, número de serie y código postal.
ESTA GARANTÍA REEMPLAZA CUALQUIER OTRA GARANTÍA, EXPRESA O IMPLÍCITA, LO QUE
INCLUYE SIN LÍMITE, LAS GARANTÍAS DE APTITUD COMERCIAL O IDONEIDAD PARA UN FIN EN
PARTICULAR. SALVO POR LAS GARANTÍAS IMPLÍCITAS EXIGIDAS POR LA LEY, SU DURACIÓN
ESTÁ LIMITADA AL PERÍODO DE GARANTÍA EXPRESO MENCIONADO ANTERIORMENTE. LG NO
SERÁ RESPONSABLE DE NINGÚN DAÑO EMERGENTE, INDIRECTO O INCIDENTAL DE NINGÚN
TIPO, LO QUE INCLUYE INGRESOS O GANANCIAS PERDIDOS EN RELACIÓN CON EL PRODUCTO.
ALGUNOS ESTADOS NO PERMITEN LIMITACIONES RESPECTO DE LA DURACIÓN DE UNA
GARANTÍA IMPLÍCITA O LA EXCLUSIÓN DE DAÑOS INCIDENTALES O EMERGENTES, DE MANERA
QUE LAS LIMITACIONES O LAS EXCLUSIONES ANTERIORES PUEDEN NO APLICAR PARA USTED.
ESTA GARANTÍA LIMITADA NO SE APLICA A LO SIGUIENTE:
1. Traslados de servicio a su hogar para entregar, recoger o instalar el producto, brindar instrucciones o
reemplazar los fusibles de la casa, corregir cableados o reparaciones no autorizadas; y
2. Daños o problemas de funcionamiento causados por mal uso, abuso, funcionamiento fuera de las
especificaciones ambientales o contrario a los requerimientos o precauciones mencionados en la Guía de
funcionamiento; accidentes, pestes, incendios, inundaciones, instalación inadecuada, hechos de fuerza
mayor, modificaciones o alteraciones no autorizadas, corriente o tensión eléctrica incorrecta, uso comercial,
o uso para otro fin que no sea el previsto.
3. Por lo tanto, el costo de la reparación o el reemplazo de ese producto defectuoso correrá por cuenta del
cliente.
NÚMEROS DEL CENTRO DE INFORMACIÓN AL CLIENTE
Para comprobar la Cobertura de
la garantía
Conserve los Recibos de compra para comprobar la fecha de compra.
Debe presentar una copia del Recibo de compra al recibir el servicio
de garantía.
Para contactar al Centro
de Servicio Autorizado o al
Distribuidor de Ventas más
cercano, o para recibir Asistencia
con el Producto, Cliente o
Reparación.
Llame al 1-800-243-0000 o 1-888-542-2623 (CANADÁ) y elija la
opción deseada del menú. Tenga cerca el tipo de producto, número de
modelo, número de serie y código; o visite nuestro sitio Web en: http://
www.lgservice.com
SP
www.lg.com
SP
INSTALACIÓN
Partes y dimensiones
Las ilustraciones en esta guía pueden diferir de los componentes y accesorios reales, los cuales están
sujetos a cambios sin previo aviso por parte del fabricante a fin de introducir mejoras en el producto.
Vista frontal
Accesorios incluidos
a
a
a
a
a
Soporte (para secadora): 4 EA
Soporte (para secadora): 4 EA
Soporte (para secadora): 4 EA
Soporte (para secadora): 4 EA
Soporte (para secadora): 4 EA
b
b
b
b
b
20 tornillos M 4: 18 EA
20 tornillos M 4: 18 EA
20 tornillos M 4: 18 EA
20 tornillos M 4: 18 EA
20 tornillos M 4: 18 EA
Herramientas necesarias
a
a
a
a
a
Llave
Llave
Llave
Llave
Llave
b
b
b
b
b
Destornillador
Destornillador
Destornillador
Destornillador
Destornillador
Dimensiones
DW
H
W 27" 690 mm
D 27" 690 mm
H 5 1/8" 130 mm
9 10
Pedestal para apilado
Antes de la instalación
• Si la lavadora o el combo se instaló
previamente, desenchufe, desconecte
las mangueras de entrada de los grifos,
desconecte la manguera de drenaje y drene
todas las mangueras.
• Si la secadora se instaló previamente,
desinstálela de la siguiente manera:
−Desinstalación de una secadora eléctrica:
1) Desconecte el cable de alimentación.
2) Separe la secadora de la pared lo
suficiente como para aflojar la abrazadera de
ventilación. Afloje la abrazadera y retire con
cuidado el conducto de ventilación de escape
de la salida de escape de la secadora.
−Desinstalación de una secadora a gas:
1) Desconecte el cable de alimentación.
2) Corte el suministro de gas.
3) Separe la secadora de la pared lo
suficiente como para aflojar la abrazadera de
ventilación. Afloje la abrazadera y retire con
cuidado el conducto de ventilación de escape
de la salida de escape de la secadora.
Cómo apilar
1 Compruebe la estructura de sujeción en la
parte inferior en el costado del producto. Vaya
al Paso 2 para la secadora y al Paso 4 para la
lavadora.
2 Incline y sostenga el producto.
3 Inserte la pinza en T a del soporte b en
la base de la secadora, como se muestra en
la imagen. Presione hacia arriba en la parte
posterior de la pinza y tire hacia afuera para
trabar en el lugar.
4 Ubique el producto sobre el pedestal.
• Asegúrese de que las 4 patas estén
totalmente bloqueadas y que los orificios en
el pedestal estén alineados con los orificios
de la lavadora.
for washer/
combo
for dryer
for dryer
for washer/
combo
SP
Copyright © 2020 LG Electronics Inc. All Rights Reserved
MFL67454005
Rev.01_122120
INSTALLATION INSTRUCTIONS
PEDESTAL
Before beginning installation, read these instructions carefully. This will
simplify installation and ensure that the product is installed correctly
and safely. Leave these instructions near the product after installation
for future reference.
ENGLISH ESPAÑOL
WDPS1*
SP
INSTRUCCIONES IMPORTANTES DE SEGURIDAD
LEA TODAS LAS INSTRUCCIONES ANTES DE UTILIZAR
La finalidad de las siguientes pautas de seguridad es impedir riesgos
o daños imprevistos causados por el funcionamiento inseguro o
incorrecto del artefacto.
Las pautas se dividen en mensajes de "ADVERTENCIA" y
"PRECAUCIÓN", como se describe a continuación.
Mensajes de seguridad
Este símbolo se muestra para indicar asuntos y operaciones que
pueden causar riesgos. Lea el texto marcado con este símbolo
atentamente y siga las instrucciones para evitar riesgos.
ADVERTENCIA
Esto indica que si no sigue las instrucciones se pueden causar
lesiones graves o la muerte.
PRECAUCIÓN
Esto indica que si no sigue las instrucciones se pueden causar
lesiones leves o dañar el producto.
ADVERTENCIA
ADVERTENCIA
Para disminuir el riesgo de explosiones, incendios, la muerte,
descargas eléctricas, lesiones o quemaduras las personas que
usen este producto, siga las precauciones básicas, incluidas
las siguientes:
• Este artefacto solo debe instalarse y transportarse entre dos o más
personas para elevar el pedestal de forma segura.
• Desenchufe la lavadora de carga frontal o la secadora antes de
apilarla sobre el pedestal.
• Mantenga los materiales y vapores inflamables, tales como la
gasolina, alejados de la secaora.
• Coloque la secadora a un mínimo de 46cm (18 pulg.) sobre el piso
para la instalación en un garaje.
8
SP
PRECAUCIÓN
• No instale un pedestal de secadora entre una
lavadora y una secadora apiladas.
12
Product specificaties
| Merk: | LG |
| Categorie: | Wasmachine |
| Model: | WDPS1W |
Heb je hulp nodig?
Als je hulp nodig hebt met LG WDPS1W stel dan hieronder een vraag en andere gebruikers zullen je antwoorden
Handleiding Wasmachine LG
9 September 2025

1 September 2025
4 Augustus 2025
7 Juli 2025

5 Juli 2025

5 Juli 2025
5 Juli 2025
5 Juli 2025
5 Juli 2025
5 Juli 2025
Handleiding Wasmachine
- LERAN
- Scholtes
- Kenwood
- Wolkenstein
- Mabe
- Saturn
- Salora
- James
- Eudora
- Ariston Thermo
- Alluxe
- Pyle
- Speed Queen
- Koenic
- Hoover-Helkama
Nieuwste handleidingen voor Wasmachine
15 September 2025
15 September 2025

15 September 2025
15 September 2025
15 September 2025
15 September 2025
15 September 2025
10 September 2025
9 September 2025
9 September 2025