Korg SY-1D Handleiding


Lees hieronder de 📖 handleiding in het Nederlandse voor Korg SY-1D (4 pagina's) in de categorie Niet gecategoriseerd. Deze handleiding was nuttig voor 60 personen en werd door 2 gebruikers gemiddeld met 4.5 sterren beoordeeld

Pagina 1/4
Precautions
Location
Using the unit in the following locations can result in a malfunction.
• In direct sunlight.
• Locations of extreme temperature or humidity.
• Excessively dusty or dirty locations.
• Locations of excessive vibration.
• Close to magnetic elds.
Power supply
Be sure to turn the power switch to OFF when the unit is not in use.
Remove the battery in order to prevent it from leaking when the unit is
not in use for extended periods.
Interference with other electrical devices
Radios and televisions placed nearby may experience reception
interference. Operate this unit at a suitable distance from radios and
televisions.
Handling
To avoid breakage, do not apply excessive force to the switches or
controls.
Care
If the exterior becomes dirty, wipe it with a clean, dry cloth. Do not use
liquid cleaners such as benzene or thinner, or cleaning compounds or
ammable polishes.
Keep this manual
After reading this manual, please keep it for later reference.
Keeping foreign matter out of your equipment
Never set any container with liquid in it near this equipment. If liquid gets
into the equipment, it could cause a breakdown, re, or electrical shock.
Be careful not to let metal objects get into the equipment.
THE FCC REGULATION WARNING (for USA)
NOTE: This equipment has been tested and found to comply with
the limits for a Class B digital device, pursuant to Part 15 of the FCC
Rules. These limits are designed to provide reasonable protection
against harmful interference in a residential installation. This equip-
ment generates, uses, and can radiate radio frequency energy and,
if not installed and used in accordance with the instructions, may
cause harmful interference to radio communications. However,
there is no guarantee that interference will not occur in a particular
installation. If this equipment does cause harmful interference to
radio or television reception, which can be determined by turning
the equipment off and on, the user is encouraged to try to correct
the interference by one or more of the following measures:
• Reorient or relocate the receiving antenna.
• Increase the separation between the equipment and receiver.
Connect the equipment into an outlet on a circuit different from
that to which the receiver is connected.
Consult the dealer or an experienced radio/TV technician for help.
If items such as cables are included with this equipment, you must
use those included items.
Unauthorized changes or modication to this system can void the
user’s authority to operate this equipment.
Notice regarding disposal (EU only)
If this symbol is shown on the product, manual, battery, or
package, you must dispose of it in the correct manner to avoid
harm to human health or damage to the environment. Contact
your local administrative body for details on the correct dis-
posal method. If the battery contains heavy metals in excess
of the regulated amount, a chemical symbol is displayed
below the symbol on the battery or battery package.
IMPORTANT NOTICE TO CONSUMERS
This product has been manufactured according to strict specica-
tions and voltage requirements that are applicable in the country
in which it is intended that this product should be used. If you have
purchased this product via the internet, through mail order, and/or
via a telephone sale, you must verify that this product is intended
to be used in the country in which you reside.
WARNING: Use of this product in any country other than that for
which it is intended could be dangerous and could invalidate the
manufacturer’s or distributor’s warranty.
Please also retain your receipt as proof of purchase otherwise your
product may be disqualied from the manufacturers or distribu-
tor’s warranty.
* All product names and company names are the trademarks or regis-
tered trademarks of their respective owners.
SYNCHRONIZED NCE MUSIC PLAYERDA
アフターサービス
修理、および商品のお取り扱いについてのご質問ご相談は、
お客様相談窓口へお問い合わせください。
お客様相談窓口
PHS等一部の電話ではご利用できません。固定電話また
は携帯電話からおかけください。
受付時間 月曜~金曜 10:00 17:00
(祝祭日、窓口休業日を除く)
●サービスセンター :
〒168-0073 東京都杉並区下高井戸1-18-16 2F
■お願い
1. 保証書に販売年月日等の記入がない場合は無効となります。記入できないと
きは、お買い上げ年月日を証明できる領収書等と一緒に保管してください。
2. 保証書は再発行致しませんので、紛失しないように大切に保管してください。
コルグ
SyncDancing 保証書
本保証書は、保証規定により無償修理をお約束するものです。
お買い上げ日 年 月
販売店名
CALIFORNIA USA ONLY
Perchlorate Material special handling may apply, See
www.dtsc.ca.gov/hazardouswaste/perchlorate.
This device complies with Part 15 of the FCC Rules.
Operation is subject to the following two conditions: (1) This
device may not cause harmful interference, and (2) this
device must accept any interference received, including
interference that may cause undesired operation.
CAN ICES-3 B / NMB-3 B.
use the jog switch to set the tempo from
= 30 to 252 (BPM). Slide
and hold the jog switch to make the tempo continue to change.
Using this device as a metronome
When using this device as a metronome, set the beat and rhythm.
1. Press the MODE buon to display the Beat or Rhythm seing
screens.
2. Press the SYNC buon to switch the playback sound to a metronome.
3. Use the jog switch to set the beat and rhythm.
Beat: Select a beat from (0 beat) to (9 beat).
Rhy thm:
Se lect a rhyt h m pat ter n from (Quar ter Notes),
(Duplets), (Quadruplets : (Triplets : , , ), or
, , ).
Changing the metronome sound
The metronome sound (tone) on this device can be changed.
1. Press the MODE buon to display the Tone seing screen.
2. Select one of the tones from to .
 Theseseingwillbestoredinthedevice.However,theseingswillnotbe
storedifthedeviceisnotturnedointheordinarymanner(suchaswhenthe
baeryrunout).
Synchronization
The count timing for two or more SyncDancing devices can be synchro-
nized. The SyncDancing device that drives the base tempo is called the
“master”, and the other SyncDancing devices that will follow that tempo
in sync are called “slaves”.
 Thisdeviceusesinfraredcommunicationwhensyncingwithotherdevices.
Donotusethesyncfunctionsaroundotherdevicesthatuseinfraredlight,or
aroundplasmaTVs.
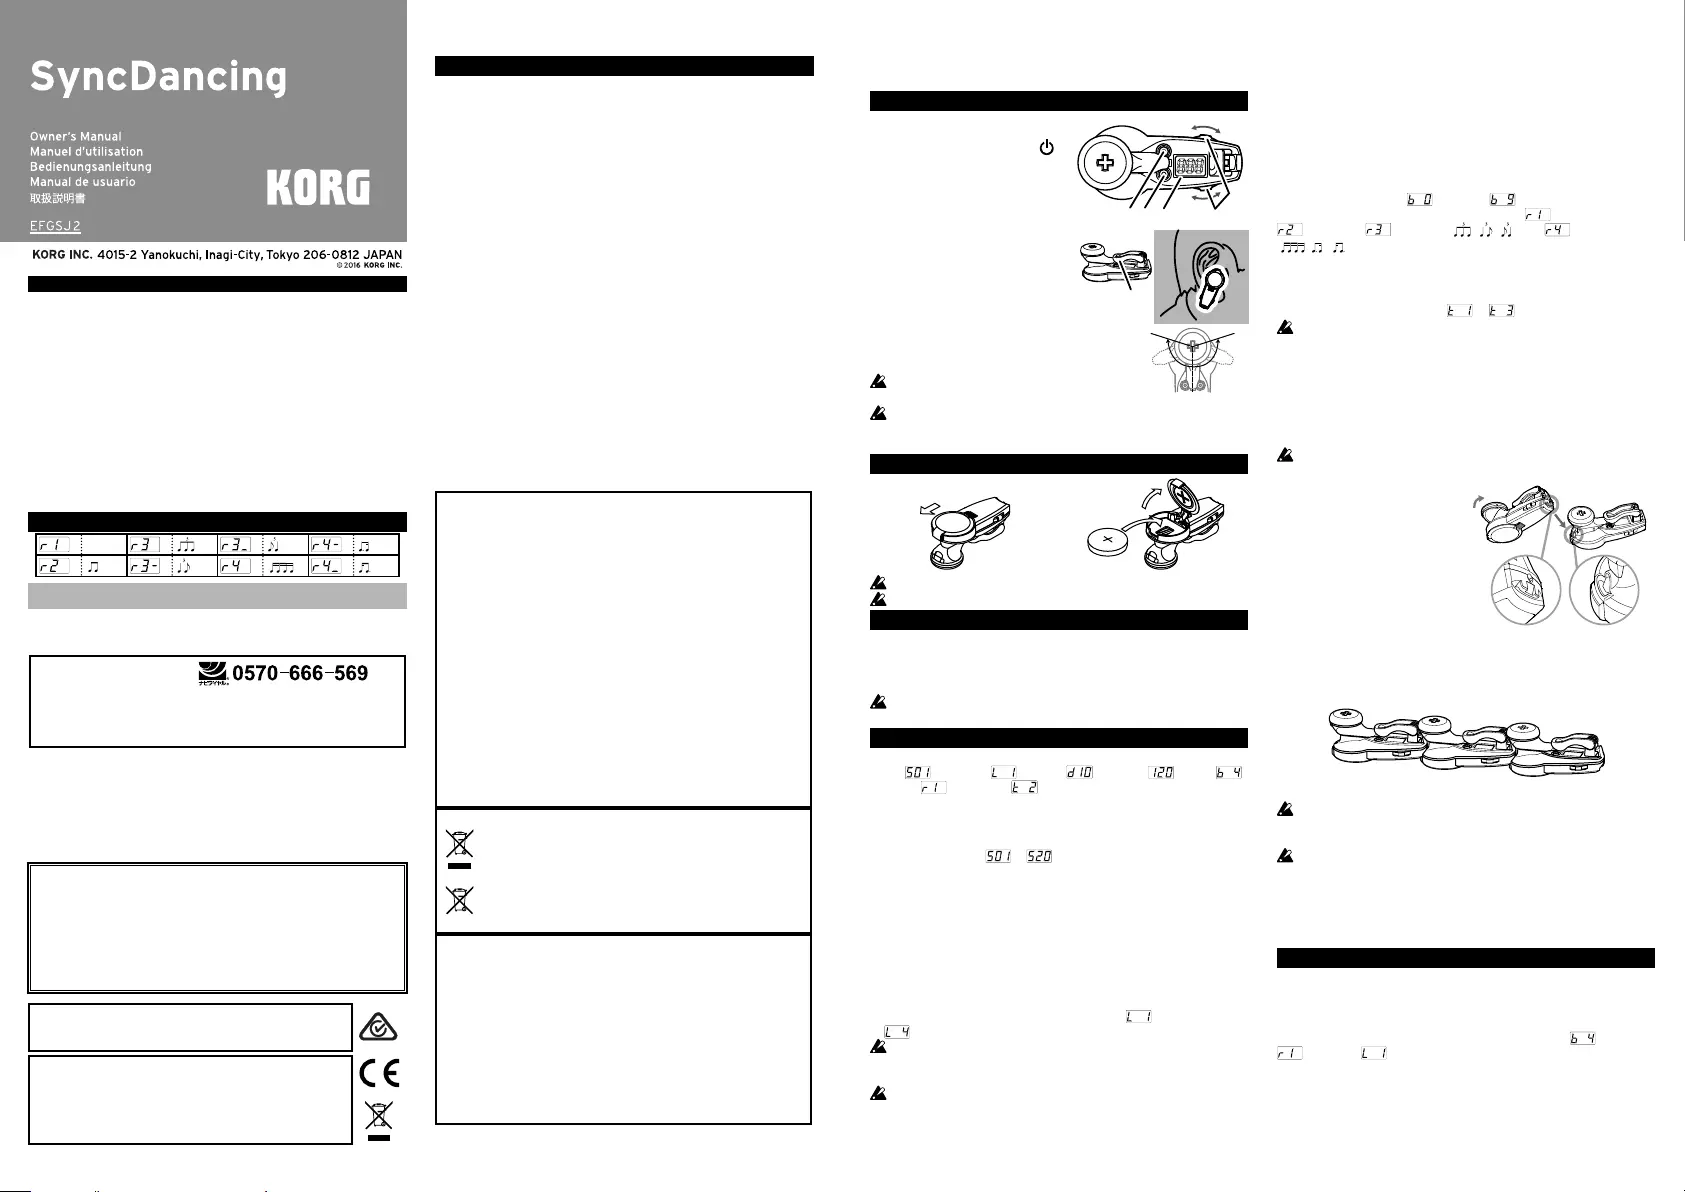
1. Match the protruding part of
the SyncDancing that will be
the master to the recessed part
of the SyncDancing that will
be the slave, as shown in the
diagram.
2. Press the SYNC button on
the SyncDancing that will be
the master.
TIP When synchronizing three or
more devices, connect the SyncDancing that will be the slave, as
shown in the diagram below., and press the SYNC buon on the
master SyncDancing device.
 Oncethesynchronizationseingshavebeenmade,theslaveSyncDancing’s
seingswillbereplacedwiththoseofthemaster.(ExcepttheVolumeandDelay
seings.)
 SynchronizationwillbecancelediftheTempo,Beat,orSongseingsare
changed.
Muting the device
The song and metronome sounds can be muted.
1. Hold down the SYNC buon. Press the SYNC buon to cancel
muting.
Specications
Tempo:
=30–252/min (BPM), 0–9 beat, Beat: Rhythm: Quarter Notes,
Duplets, Triplets, Quadruplets, Song: 20 songs, Tempo accuracy: ±0.1,
Speaker: dynamic speaker, Synchronization communications method:
infrared, Power supply: 3V lithium baery CR 2032, Baery life: approxi-
mately 5 hours (continuous use at Tempo = 120, Beat = , Rhythm =
, Volume = 49 x 22 x 22 mm / 1.93” x ), Dimensions (WxDxH):
0.87” x 0.87”, Weight: 10 g / 0.35 oz. (including baery), Included items:
Owner’s Manual, CR2032 lithium baery (3V),
ear pad, carrying case
* Specications and appearance are subject to change without notice
for improvement.
Master Slave Slave
Thank you for purchasing the Korg SyncDancing SYNCHRO-
NIZED DANCE MUSIC PLAYER.
Features on this device
1. SYNC buon (Hold down : Mute)
2. MODE buon (Hold down :
Power)
3. Display
4. Jog Switch
TIP Operate the jog switch by slid-
ing it in the direction of the
arrow.
5. Ear clip
Attach the device to your ear as
shown in the diagram at right.
Attaching the device
To aach the device to your ear, open
the ear clip, place the round part near
the hollow part of your ear around the earhole, and
then close the ear clip.
 theroundpartcanrotateamaximumof220degrees.
Itwillbreakifyouaempttorotateitfartherthanthis.
As th is a smal l and lightwe ig ht devi c e, th ere is a r isk
that small ch ildren m ay pla ce it in the ir mouth an d ingest it.
Keepthedeviceoutofreachandstoreitawayfromsmallchildren.
Inserting the battery
 Wheninsertingorreplacingthebaery,turnothedevice’spower.
 Makesuretoobservethecorrectpolarity.
Turning on the power
1. To turn on the power, hold down the MODE button until the
display lights.
2. To turn off the power, hold down the MODE button until the
display goes dark.
 Theentiredisplaywillblinkifthebaeryhasworndown.Whenthishap-
pens,replacethebaeryassoonaspossible.
Using this device
Press the MODE button to switch between the setting screens for
Song ( ), Volume ( ), Delay ( ), Beat () (, Tempo ),
Rhythm ( ), and Tone ( ), in that order.
Playing back a song
Set the song to play back using this device.
1. Press the MODE buon to display the Song seing screen.
2. Select a song from to . Press the SYNC buon to play back
the selected song.
Adjusting the song’s playback timing
You can adjust the amount of time (delay) that will pass before playing
back the song after the device is aached .
1. Press the MODE buon to display the Delay seing screen.
2. Set the delay time. The number indicates how many seconds will
pass before playback begins.
Setting the volume
1. Press the MODE buon to display the Volume seing screen, and
use the jog switch to select the volume from (Volume: Low) to
(Volume: High).
 Thisdevice’svolumehasbeensettobealileloud,sinceitmaybeused
whenpracticingmusicalinstruments.Ifthedeviceseemstooloud,fastenitto
yourearatapositionslightlyawayfromtheearhole.
 Toprotectyourhearing,avoidusingthisdeviceforlongperiodsoftime
Setting the tempo
1. Press the MODE buon to display the Tempo seing screen, and
5
1. Slide the lid open. 2. Pull the lid
diagonally upwards,
and then insert the
baery.
1 2 3 4
Song List
1. Frederic Chopin, Nocturne
Op.9 No.2
2. Scarborough Fair
3. Coppelia Wal
4. W.A.Mozart, Eine kleine
Nachtmusik
5. Rodríguez Peña
6. Dos Guitarras
7. La golondrina
8. Recuerdos de la Alhambra
9. Comin' Thro' the Rye
10. Humoresque
11. Johann Strauss 2
Fruhlingsstimmen Op.410
12. Chopin Etudes Op. 10, No.3
13. Torna a Surriento
14. Zigeunerweisen
15. Old Folks at Home
Swanee River)
16. Santa Lucia
17. Wiegenlied Schubert
Lullaby
18. Red Sails In The Sunset
19. Oh! Susanna
20. Russian folk dance
“Kalinka” and “Troika”
220°
Rhythm Pattern List
保証規定(必ずお読みください)
本保証書は、保証期間中に本製品を保証するもので、付属品類(ヘッドホンなど)
は保証の対象になりません。保証期間内に本製品が故障した場合は、保証規定
によって無償修理いたします。
1. 本保証書の有効期間はお買い上げ日より1か年です。
2. 次の修理等は保証期間内であっても有償となります。
消耗部品(電池、スピーカー、真空管、フェーダーなど)の交換。
お取扱い方法が不適当のために生じた故障。
天災(火災、浸水等)によって生じた故障。
故障の原因が本製品以外の他の機器にある場合。
不当な改造、調整、部品交換などにより生じた故障または損傷。
保証書にお買い上げ日、販売店名が未記入の場合、または字句が書き替えら
れている場合。
本保証書の提示がない場合。
尚、当社が修理した部分が再度故障した場合は保証期間外であっても
した日より3か月以内に限り無償修理いたします。
3. 本保証書は日本国内においてのみ有効です。
This warranty is valid only in Japan.
4. 客様が保証期間中に移転された場合でも、保証は引き続きお使いいただけ
ます。詳しくは、お客様相談窓口までお問い合わせください。
5. 修理送費が製品の価格よりくなることもありますで、あらかじ
お客様相談窓口へご相談ください。発送にかかる費用は、客様の負担とさ
せていただきます。
6. 修理中の代替品、品の貸し出しは、いかなる合においても一切って
おりません。
本製品の故障、または使用上生じたお客様の直接、間接の損害につきましては、
弊社は一切の責任を負いかねますのでご了承ください。
本保証書は、保証規定により無償修理をお約束するためのもので、これにより
お客様の法律上の権利を制限するものではありません。
安全上のご注意
火災感電人身傷害の危険を防止するには以下の指示を守ってください
警告 この注意事項を無視した取り扱いをすると、
死亡や重傷を負う可能性が予想されます
次のような場合には、直ちに電池をぬく。
○異物が内部に入ったとき ○製品に異常や故障が生じたとき
修理が必要なときは、コルグお客様相談窓口へ依頼してください。
本製品を分解したり改造したりしない。
修理部品の交換などで、扱説明書に書かれている以外のことは絶対
にしない。
大音量や不快な程度の音量で長時間使用しない。
大音量で長時間使用すると、難聴になる可能性があります。万一
低下や耳鳴りを感じたら、専門の医師に相談してください。
本製品に異物(燃えやすいもの、硬貨、針金など)を入れない。
温度高い(直射当た房機く、
する機器の上など)での使用や保管はしない。
振動の多い場所で使用や保管はしない。
ホコリの多い場所で使用や保管はしない。
風呂場、シャワー室で使用や保管はしない。
雨天時の野外などのような湿気の多い場所で、使用や保管はしない。
本製品の上に、花瓶のような液体が入ったものを置かない。
本製品に液体をこぼさない。
濡れた手で本製品を使用しない。
注意 この注意事項を無視した取り扱いをすると、傷害を負う
可能性、または物理的損害が発生する可能性があります
正常な通気が妨げられない所に設置して使用する。
ラジオレビ子機器などから十に離して使用する。ラジオやテ
レビ等に接近して使用すると本製品が雑音を受けて誤動作する場合が
あります。また、ラジオ、テレビ等に雑音が入ることがあります。
外装のお手入れは、乾いた柔らかい布を使って軽く拭く。
長時間使用しないときは、電池の液漏れを防ぐために電池を抜く。
電池や本体は幼児の手の届かないところに保管する。
電池を過度の熱源(日光、火など)にさらさない。
ボタンやツマミに必要以上の力を加えない。故障の原因になります。
お手れにンジシンー系体、パウド質
燃性のポリッシャーは使用しない。
不安定な場所に置かない。
※ すべての製品名および会社名は、各社の商標または登録商標です。
Vorsichtsmaßnahmen
Aufstellungsort
Vermeiden Sie das Aufstellen des Geräts an Orten, an denen.
• es direkter Sonneneinstrahlung ausgesetzt ist;
• hohe Feuchtigkeit oder Extremtemperaturen auftreten können;
• Staub oder Schmutz in großen Mengen vorhanden sind;
• das Gerät Erschüt terungen ausgesetzt sein kann.
• in der Nähe eines Magnetfeldes.
Stromversorgung
Stellen Sie den Netzschalter auf OFF, wenn das Gerät nicht benutzt
wird. Wenn Sie das Gerät über einen längeren Zeitraum nicht benutzen,
nehmen Sie die Batterien heraus, damit sie nicht auslaufen.
Störeinüsse auf andere Elektrogeräte
Dieser kann bei in der he aufgestellten Rund-funkempfängern oder
Fernsehgeräten Empfangsstörungen hervorrufen. Betreiben Sie solche
Gete nur in einem geeigneten Abstand von diesem Erzeugnis.
Bedienung
Vermeiden Sie bei der Bedienung von Schaltern und Reglern unange-
messenen Kraftaufwand.
Reinigung
Bei auftretender Verschmutzung können Sie das Gehäuse mit einem
trockenen, sauberen Tuch abwischen. Verwenden Sie keinerlei Flüs-
sigreiniger wie beispielsweise Reinigungsbenzin, Vernnungs- oder
Spülmittel. Verwenden Sie niemals brennbare Reiniger.
Bedienungsanleitung
Bewahren Sie diese Bedienungsanleitung gut auf, falls Sie sie später
noch einmal benötigen.
Flüssigkeiten und Fremdkörper
Stellen Sie niemals Behältnisse mit Flüssigkeiten in der he des Geräts
auf. Wenn Flüssigkeit in das Gerät gelangt, können Beschädigung des
Geräts, Feuer oder ein elek-trischer Schlag die Folge sein. Beachten Sie,
daß keinerlei Fremdkörper in das Gerät gelangen.
Hinweis zur Entsorgung (Nur EU)
Wenn Sie das Symbol mit der „durchgekreuzten Mülltonne“ auf
Ihrem Produkt, der dazugehörigen Bedienungsanleitung, der
Batterie oder der Verpackung sehen, müssen Sie das Produkt
in der vorgeschriebenen Art und Weise entsorgen um Schäden
an der menschlichen Gesundheit und der Umwelt zu vermeiden.
Batterien oder Akkus, die Schadstoffe enthalten, sind auch mit
dem Symbol einer durchgekreuzten lltonne gekennzeichnet. In der
Nähe zum Mülltonnensymbol bendet sich die chemische Bezeichnung
des Schadstoffes.
WICHTIGER HINWEIS FÜR KUNDEN
Dieses Produkt wurde unter strenger Beachtung von Spezikationen
und Spannungsanforderungen hergestellt, die im Bestimmungsland
gelten. Wenn Sie dieses Produkt über das Internet, per Postversand
und/oder mit telefonischer Bestellung gekauft haben, ssen Sie
bestätigen, dass dieses Produkt für Ihr Wohngebiet ausgelegt ist.
WARNUNG: Verwendung dieses Produkts in einem anderen Land als
dem, für das es bestimmt ist, verwendet wird, kann gefährlich sein und
die Garantie des Herstellers oder Importeurs hinfällig lassen werden.
Bitte bewahren Sie diese Quittung als Kaufbeleg auf, da andernfalls
das Produkt von der Garantie des Herstellers oder Importeurs aus-
geschlossen werden kann.
* Alle Produkt- und Firmennamen sind Warenzeichen oder eingetragene
Warenzeichen der betreffenden Eigentümer.
Precauciones
Ubicacn
El uso de la unidad en las siguientes ubicaciones puede dar como resul-
tado un mal funcionamiento:
• Expuesto a la luz directa del sol.
• Zonas de extremada temperatura o humedad.
• Zonas con exceso de suciedad o polvo.
• Zonas con excesiva vibración.
• Cercano a campos magnéticos.
Fuente de alimentacn
Apague la unidad cuando no la use la batería. Retire las baterías si no
va a usar la unidad durante un tiempo largo.
Interferencias con otros aparatos
Las radios y televisores situados cerca pueden experimentar interferen-
cias en la recepción. Opere este dispositivo a una distancia prudencial
de radios y televisores.
Manejo
Para evitar una rotura, no aplique excesiva fuerza a los conmutadores
o controles.
Cuidado
Si exterior se ensucia, mpiese con un trapo seco. No use líquidos
limpiadores como disolvente, ni compuestos inamables.
Guarde este manual
Desps de leer este manual, guárdelo para futuras consultas.
Mantenga los elementos externos alejados del equipo
Nunca coloque ningún recipiente con líquido cerca de este equipo, podría
causar un cortocircuito, fuero o descarga eléctrica. Cuide de que no caiga
ningún objeto metálico dentro del equipo.
Nota respecto a residuos y deshechos (solo UE)
Si aparece el símbolo del cubo de basura tachado sobre un
producto, su manual de usuario, la batería, o el embalaje de
cualquiera de éstos, signica que cuando tire dichos artículos
a la basura, ha de hacerlo en acuerdo con la normativa vigen-
te de la Unión Europea para prevenir daños a la salud pública
y al medioambiente. Le rogamos que se ponga en contacto
con su ocina o ministerio de medioambiente para más deta-
lles. Si la batería contiene metales pesados por encima del límite
permitido, habrá un símbolo de un material químico, debajo del
símbolo del cubo de basura tachado.
NOTA IMPORTANTE PARA EL CONSUMIDOR
Este producto ha sido fabricado de acuerdo a estrictas especi-
caciones y requerimientos de voltaje aplicables en el país para el
cual está destinado. Si ha comprado este producto por internet, a
través de correo, y/o venta telefónica, debe usted vericar que el uso
de este producto está destinado al país en el cual reside. AVISO:
El uso de este producto en un país distinto al cual está destinado
podría resultar peligroso y podría invalidar la garantía del fabricante
o distribuidor. Por favor guarde su recibo como prueba de compra
ya que de otro modo el producto puede verse privado de la garantía
del fabricante o distribuidor.
* Todos los nombres de productos y compañías son marcas comerciales
o marcas registradas de sus respectivos propietarios.
Précautions
Emplacement
L'utilisation de cet instrument dans les endroits suivants peut en
entraîner le mauvais fonctionnement.
• En plein soleil.
• Endroits très chauds ou ts humides.
• Endroits sales ou fort poussreux.
• Endroits soumis à de fortes vibrations.
• A proximité de champs magnétiques.
Alimentation
Lorsque vous n’utilisez pas l’appareil, n’oubliez pas de le mettre hors
tension. Retirez les piles pour éviter toute fuite lorsque l’appareil ne
sera pas utilisé pendant de longues périodes de temps.
Interrences avec d'autres appareils électriques
Les postes de radio et de télévision situés à proximi peuvent par
conséquent souffrir d'interrences à la réception. Veuillez dès lors
faire fonctionner cet appareil à une distance raisonnable de postes
de radio et de télévision.
Maniement
Pour éviter de les endommager, manipulez les commandes et les
boutons de cet instrument avec soin.
Entretien
Lorsque l'instrument se salit, nettoyez-le avec un chiffon propre et
sec. Ne vous servez pas d'agents de nettoyage liquides tels que du
benzène ou du diluant, voire des produits inammables.
Conservez ce manuel
Après avoir lu ce manuel, veuillez le conserver soigneusement pour
toute référence ultérieure.
Evitez toute intrusion d'objets ou de liquide
Ne placez jamais de cipient contenant du liquide près de l'instrument.
Si le liquide se renverse ou coule, il risque de provoquer des dom-
mages, un court-circuit ou une électrocution. Veillez à ne pas laisser
tomber des objets métalliques dans le boîtier (trombones, par ex.).
Note concernant les dispositions (Seulement EU)
Si ce symbole apparait sur le produit, le manuel, les piles ou
les packs de piles, cela signie que vous devez le recycler
d’une manière correcte an de prévenir les dommages pour
la santé humaine et les dommages potentiels pour l’environ-
nement. Contactez votre administration locale pour de plus
amples renseignements concernant la bonne méthode de
recyclage. Si la pile contient des métaux lourds au-delà du
seuil réglementé, un symbole chimique est afché en dessous du
symbole de la poubelle barrée d’une croix sur la pile ou le pack de
piles.
REMARQUE IMPORTANTE POUR LES CLIENTS
Ce produit a été fabriqué suivant des spécications sévères et des
besoins en tension applicables dans le pays où ce produit doit être
utilisé. Si vous avez acheté ce produit via l’internet, par vente par
correspondance ou/et vente par téphone, vous devez vérier que
ce produit est bien utilisable dans le pays où vous résidez.
ATTENTION: L’utilisation de ce produit dans un pays autre que celui
pour lequel il a été conçu peut être dangereuse et annulera la garan-
tie du fabricant ou du distributeur. Conservez bien votre récépisqui
est la preuve de votre achat, faute de quoi votre produit ne risque de
ne plus être couvert par la garantie du fabricant ou du distributeur.
*Tous les noms de produits et de sociétés sont des marques commer-
ciales ouposées de leur détenteur respectif.
de tempo. Réglez le tempo avec le commutateur-molee sur une
valeur entre 30 et 252 (BPM). Glissez le commutateur-molee et
maintenez-le dans cee position pour changer la valeur de façon
continue.
Utilisation de la fonction de métronome
Avant d’utiliser la fonction métronome, réglez le nombre de baements
et la division du temps.
1. Appuyez sur le bouton MODE pour acher l’écran de réglage du
nombre de baements ou de la division du temps.
2. Appuyez sur le bouton SYNC pour activer le son du métronome.
3. Réglez le nombre de baements et la division du temps avec le
commutateur-molee.
Nombre de baements: Choisissez un réglage entre (0 baement)
et “ ” (9 baements).
Division du temps: Choisissez un réglage entre (noire),
(duolet), (triolet : (quartolet : ,,) et , , ).
Changement du son de métronome
Vous pouvez si vous le souhaitez changer le son produit par le métronome.
1. Appuyez sur le bouton MODE pour afficher lécran de réglage de son.
2. Choisissez un des sons “ ” à “ .
 Cesréglagessontmémorisésparlemétronome.Enrevanche,seulelaprocé-
durenormaledemisehorstensionpermetleursauvegarde(encasd’épuisement
delapile,parex.,lesréglagessontperdus).
Synchronisation
Ce métronome possède une fonction permeant de synchroniser deux ou
plus de deux métronomes SyncDancing. Le SyncDancing “mtre” produit
le tempo sur lequel vont saligner les autres métronomes SyncDancing
(appelés “esclaves” dans ce type de conguration).
 Cemétronomepossèdeunefonctiondecommunicationinfrarougequiper-
metlasynchronisationentreplusieurstronomesSyncDancing.N’utilisezpas
lafonctiondesynchronisationàproximitéd’autresappareilsfonctionnantavec
infrarouge,niprèsdeléviseursplasma.
1. Insérez la saillie du SyncDan-
cing maître de synchro dans le
renfoncement du SyncDancing
utilisé comme esclave, comme
illustré ci-contre.
2. Appuyez sur le bouton SYNC du
métronome SyncDancing maître
de synchro.
TIP Pour synchroniser trois métro-
nomes ou plus, placez le ou les SyncDancing utilisés comme esclaves
comme illustci-dessous, puis appuyez sur le bouton SYNC du
SyncDancing maître.
 Unefoislesmétronomessynchronisés,lesréglagesduoudesmétronomes-
esclavessontremplacésparceuxduSyncDancingmaître.(Sauflesréglagesde
volumeetdedélai)
 Lasynchronisationestannuequandvouschangezleréglagedetempo,de
nombredebaementsoudemorceau.
Mise en sourdine
La fonction de sourdine permet de couper le son du morceau et du métronome.
1. Maintenez enfoncé le bouton SYNC. Pour annuler la fonction de
sourdine, appuyez sur le bouton SYNC.
Fiche technique
Tempo:
=30~252/min (BPM), Baements: 0~9 baements, Rythme: Noire,
Duolet, Triolet, Quartolet, Morceau: 20 morceaux, Précision du tempo:
±0.1, Haut-parleur: Dynamique, thode de synchronisation: par in-
frarouge, Alimentation: Pile au lithium CR2032 (3V), Autonomie de la
pile: environ 5 heures (avec les réglages Tempo = 120, = Baements ,
Rythme = , Volume = ), Dimensions (L x P x H): 49 x 22 x 22 mm,
Poids: environ 10 g (pile comprise), Included items:
Manuel d’utilisation,
Pile au lithium CR2032 (3V)
,
mousse doreillee, Étui de transport
* Les caractéristiques et l’aspect du produit sont susceptibles d’être
modiés sans avis préalable en vue d’une amélioration.
maître esclaves esclaves
Merci d’avoir choisi le lecteur de dance music synchronisé
SyncDancing de Korg.
Éléments de ce instrument
1. Bouton SYNC
(maintenu enfoncé: sourdine)
2. Bouton MODE
(maintenu enfoncé: alimentation)
3. Écran
4. Commutateur-molee
TIP Actionnez le commutateur-molee en
le glissant dans le sens de la èche.
5. Oreillee
Fixez l’oreillee sur votre oreille comme
illustré à droite.
Fixation du métronome
Pour fixer le métronome sur votre
oreille, ouvrez lattache et placez le
bout arrondi dans le creux de votre oreille, puis
refermez l’aache.
 Leboutarrondipeutpivotersurunanglemaximalde
220degrés.Ellesebriserasivousessayezdelafairetourner
plus.
 Deparsapetitetaille,cetronomeprésenteunrisqued’ingestionac-
cidentellepourlesenfantsenbasâge.Veillezàtoujoursgarderceproduithors
deportéedesjeunesenfants.
Mise en place de la pile
 Veillezàtoujoursmerelemétronomehorstensionavantderemplacerlapile.
 Veillezàrespecterlapolaritélorsdelamiseenplacedelapile.
Mise sous tension
1. Pour mere le métronome sous tension, maintenez son bouton
MODE enfoncé jusqu’à ce que l’écran s’illumine.
2. Pour mere le métronome hors tension, maintenez son bouton
MODE enfoncé jusqu’à ce que l’écran s’éteigne.
 Lécranentierclignotequandlapiles’épuise.Danscecas,remplacezlapile
dèsquepossible.
Utilisation de ce instrument
Appuyez sur le bouton MODE pour choisir alternativement et dans cet
ordre l’écran de réglage de morceau ( ), de volume ( ), de délai (
), de tempo ( ), de division du ), de nombre de baements (
temps ( ) et de son ( ).
Lecture dun morceau
Choisissez le morceau à lire sur ce métronome.
1. Appuyez sur le bouton MODE pour acher l’écran de choix de
morceau.
2. à Choisissez un morceau . Appuyez sur le bouton SYNC
pour lancer la lecture du morceau sélectionné.
glage de marrage de lecture
Ce réglage dénit le délai écoulé avant le démarrage du morceau (pour
permere la mise en place du métronome).
1. Appuyez sur le bouton MODE pour acher l’écran de réglage du
délai.
2. Réglez le délai avant la lecture. L’écran indique le nombre de
secondes qui s’écouleront avant le démarrage de lecture.
Réglage du volume
1. Appuyez sur le bouton MODE pour acher l’écran de réglage de
volume. Réglez le volume avec le commutateur-molee en choi-
sissant entre (bas volume) et “ ” (volume élevé).
 Levolumedecemétronomeestassezélevépourpermeresonutilisation
dansunenvironnementbruyant(avecuninstrumentacoustique,parexemple).
Silevolumevoussembletropélevé,décalezlégèrementlemétronomeducentre
devotreconduitauditif.
 Pourévitertoutdommagedelouïe,n’utilisezpascemétronomedefaçonprolongée.
Réglage du tempo
1. Appuyez sur le bouton MODE pour acher l’écran de réglage
1 2 3 4
5
1. Ouvrez le
couvercle
en le
glissant.
2. Relevez le
couvercle et
meez la pile
en place.
Tempo einstellen
1. Drücken Sie die MODE-Taste, um die Tempoanzeige aufzurufen
und regeln Sie das Tempo mit dem Jog-Schalter auf Werte zwischen
30 bis 252 min (BPM). Halten Sie den Jog-Schalter geschoben, ändert
sich das Tempo kontinuierlich.
Gerät als Metronom verwenden
Um das Gerät als Metronom zu verwenden, hlen Sie zuerst Taktart
und Rhythmus aus.
1. Drücken Sie die MODE-Taste, um die Taktart- oder Rhythmus-
Anzeige aufzurufen.
2. Drücken Sie die SYNC-Taste, um den Metronomsound zu aktivieren.
3. Wählen Sie mit dem Jog-Schalter Taktart und Rhythmus aus.
Taktart: Wählen Sie eine Taktart zwischen (0 Schläge) und
(9 Schläge).
Rhythmus: Wählen Sie als Rhythmusmuster (Viertelnoten),
(Duolen), (Triolen: ,,) oder (Quartolen: ,,).
Metronomsound ändern
Sie haben verschiedene Metronomsounds zur Auswahl.
1. Drücken Sie die MODE-Taste, um die Ton-Anzeige aufzurufen.
2. bis hlen Sie einen der drei Töne aus.
 DieEinstellungenwerdenauchbeimAusschaltengespeichert,gehenjedoch
verloren,wenndasGetsichunvorhergesehenausschaltet,weilz.B.dieBat-
terienerschöpftsind.
Synchronisierung
Sie nnen das Tempo zweier oder mehrerer SyncDancing-Geräte
synchronisieren. hlen Sie hierzu ein SyncDancing als „Master“ aus
- dieses Gerät gibt nun das Tempo vor, dem die anderen SyncDancing-
Geräte als „Slaves“ folgen.
 DieSynchronisierungderGeräteerfolgtmielsInfrarot-Kommunikation.
VerwendenSiedeshalbdieSynchronisierungsfunktionnichtinderNähean-
dererGerätemitInfrarotschnistellenoderimUmfeldvonPlasmabildschirmen.
1. Schieben Sie die Nase des
al s Master ausgewählten
SyncDancing in die Ausspa-
rung des als Slave dienenden
Syn cDancings wie in der
Abbildung gezeigt.
2. Drücken Sie die SYNC-Taste
am als Master ausgewählten
SyncDancing.
TIP Sie nnen auch drei oder
mehr SyncDancing-Geräte
miteinander synchronisieren. Verbinden Sie hierzu die Slave-Geräte
wie in der Abbildung unten gezeigt und drücken Sie die SYNC-Taste
am Master-Gerät.
 NachderSynchronisierunghabendieSlave-GerätedieEinstellungendesMaster-
Gerätsübernommen.(AusgenommendieEinstellungenfürLautstärkeundDelay.)
 SobaldTempo,TaktartoderSongsgeändertwerden,wirddieSynchronisierung
aufgehoben.
Stumm schalten
Sie können Songs und Metronom stumm schalten.
1. Halten Sie hierzu die SYNC-Taste gedrückt. Drücken Sie die SYNC-
Taste erneut, um die Stummschaltung aufzuheben.
Technische Daten
Tempo:
=30–252/min (BPM), 0–9 beat, Taktarten: Rhythmus: Viertelno-
ten, Duolen, Triolen, Quartolen, Song: 20 Schläge, Tempo-Genauigkeit:
±0.1, Lautsprech er: Dynamisch er Lautsprech er, Kommunikations-
methode bei Synchronisierung Infrarot, Stromversorgung: CR2032
-Lithiumbaerie (3 V), Lebensdauer der Baerie: Ca. 5 Stunden [Tempo
= 120, Taktarten = , Rhythmus = , Lautstärke = ], Abmes-
sungen (B x T x H): 49 x 22 x 22 mm, Gewich t: 10 g (mit Batterie),
Lieferumfang: Bedienungsanleitung
,
CR2032
-Lithiumbatterie (3 V),
Ohrpolster, Transporasche
* Änderungen der technischen Daten und des Designs ohne vorherige
Ankündigung vorbehalten.
Master Slaves Slaves
Vielen Dank, dass Sie sich für den synchronisierbaren Tanz-
musik-Player SyncDancing von Korg entschieden haben.
Eigenschaften dieses Geräts
1. SYNC-Taste (Gedrückt halten: Stumm)
2. MODE-Taste (Gedrückt halten:
Einschalten)
3. Display
4. Jog-Schalter
TIP Der Jog-Schalter wird durch Ver-
schieben in Pfeilrichtung bedient.
5. Ohrenclip
Befestigen Sie das Gerät wie in der Ab-
bildung rechts gezeigt an Ihrem Ohr.
Gerät anbringen
Öffnen Sie den Ohrenclip, setzen Sie
das Gerät mit dem runden Teil vorm
Gehörgang in die Ohrmuschel ein und schließen
Sie den Clip wieder.
 DergroßeClipkannmaximalum220Graddrehen.
WennSieversuchen,ihnweiterzudrehen,brichterab.
 Achtung:DaskleineGerätkannleichtvonKleinkindernverschlucktwerden.
AchtenSiedeshalbdarauf,dasGerätnichtinKinderhändezugebenundbewahren
SieesaneinemsicherenOrtauf.
Batterie einlegen
 AchtenSiedarauf,vordemEinlegenoderWechselnderBaeriendasGerät
auszuschalten.
 AchtenSieaufdiekorrektePolung.
Get einschalten
1. Halten Sie zum Einschalten die MODE-Taste gedrückt, bis das
Display aueuchtet.
2. Halten Sie zum Ausschalten die MODE-Taste gedrückt, bis das
Display erlischt.
 DasDisplayblinktbeierschöpftenBaerien.ErseenSieindiesemFall
dieBaerienschnellstmöglich.
Get verwenden
Drücken Sie die MODE-Taste, um wie folgt zwischen den Anzeigen für
Song ( ), Lautstärke ( ), Delay ( ), Tempo ( ), Taktart ( ),
Rhythmus ( ) und Ton ( ) umzuschalten.
Songwiedergabe
hlen Sie zuerst den Song, den Sie mit dem Gerät wiedergeben möchten.
1. Drücken Sie die MODE-Taste, um die Song-Anzeige aufzurufen.
2. Wählen Sie nun einen Song von S01 bis S20. Drücken Sie die SYNC-
Taste, um den Song wiederzugeben.
Wiedergabebeginn des Songs einstellen
Sie können den Zeitraum (Delay) einstellen, der vergeht, bis nach dem
Anbringen des Geräts die Songwiedergabe beginnt.
1. Drücken Sie die MODE-Taste, um die Delay-Anzeige aufzurufen.
2. Wählen Sie die Delay-Dauer. Die Zahl im Display entspricht den
Sekunden, die vergehen, bis die Wiedergabe beginnt.
Lautstärke einstellen
1. Drücken Sie die MODE-Taste, um die Lautstärkeanzeige aufzuru-
fen und regeln Sie die Lautstärke mit dem Jog-Schalter von
(niedrige Lautstärke) auf (hohe Lautstärke).
 DieGerätelautstärkeistrelativhocheingestellt,damitesbeimÜbenmit
Musikinstrumentenverwendetwerdenkann.FallsIhnendieLautstärkezuhoch
erscheint,bringenSiedasGerätsoan,dassderLautsprechernichtdirektinIhren
Gehörgangabstrahlt.
 UmIhrGehörzuschonen,solltenSie diesesGerätnichtüberngere
Zeiträumehinwegverwenden.
1 2 3 4
1.Entriegeln Sie den
Baeriedeckel durch
Verschieben.
2. Ziehen Sie den
Deckel schräg nach
oben und legen Sie
die Baerie ein.
220°
5
220°


Product specificaties

Merk: Korg
Categorie: Niet gecategoriseerd
Model: SY-1D

Heb je hulp nodig?

Als je hulp nodig hebt met Korg SY-1D stel dan hieronder een vraag en andere gebruikers zullen je antwoorden


Handleiding Niet gecategoriseerd Korg

Handleiding Niet gecategoriseerd

Nieuwste handleidingen voor Niet gecategoriseerd