Konica Minolta Vectis 100 BF Handleiding
Konica Minolta Niet gecategoriseerd Vectis 100 BF
Bekijk gratis de handleiding van Konica Minolta Vectis 100 BF (4 pagina’s), behorend tot de categorie Niet gecategoriseerd. Deze gids werd als nuttig beoordeeld door 44 mensen en kreeg gemiddeld 4.2 sterren uit 6 reviews. Heb je een vraag over Konica Minolta Vectis 100 BF of wil je andere gebruikers van dit product iets vragen? Stel een vraag
Pagina 1/4
Minolta Co., Ltd.3-13, 2-Chome, Azuchi-Machi, Chuo-Ku, Osaka 541-8556, Japan
Minolta GmbHKurt-Fischer-Strasse 50, D-22923 Ahrensburg, Germany
Minolta France S.A.365 Route de Saint-Germain, F-78420 Carrieres-Sur-Seine, France
Minolta (UK) LimitedRooksley Park, Precedent Drive, Rooksley, Milton Keynes, MK13 8HF, UK
Minolta Austria Ges. m.b.H.Amalienstrasse 59-61, A-1131 Wien, Austria
Minolta Camera Benelux B.V.Zonnebaan 39, P.O. Box 6000, NL-3600 HAMaarssen, The Netherlands
Belgium BranchKontichsesteenweg 38, B-2630 Aartselaar, Belgium
Minolta (Schweiz) AGRiedstrasse 6 CH-8953 Dietikon, Switzerland
Minolta Svenska ABP.O.Box 9058, Albygatan 114, S-17109 Solna, Sweden
Finland BranchNiittykatu 6 PL37 SF-02201 Espoo, Finland
Minolta Portugal Limitada
Av. do Brasil 33-A,
P-1700 Lisboa, Portugal
Minolta Corporation
Head Office101 Williams Drive, Ramsey, New Jersey 07446, U.S.A.
Los Angeles Branch11150 Hope Street Cypress, CA90630, U.S.A.
Minolta Canada Inc.
Head Office369 Britannia Road East, Mississauga, Ontario L4Z 2H5, Canada
Vancouver Branch230-3771 Jacombs Road, Richmond, B.C. V6V 2L9, Canada
Minolta Hong Kong LimitedRoom 208, 2/F, Eastern Center, 1065 King’s Road, Quarry Bay, Hong Kong, China
Minolta Singapore (Pte) Ltd.10, Teban Gardens Crescent, Singapore 608923
Shanghai Minolta Optical Products Co., Ltd.368 Minolta Road, Songjiang, Shanghai, China
INSTRUCTION MANUAL
©1998 Minolta Co., Ltd. under the Bern Convention
and Universal Copyright Convention
Printed in China
9222-2220-37 PR-A802
Advantages of the Advanced Photo System
Easier to load…
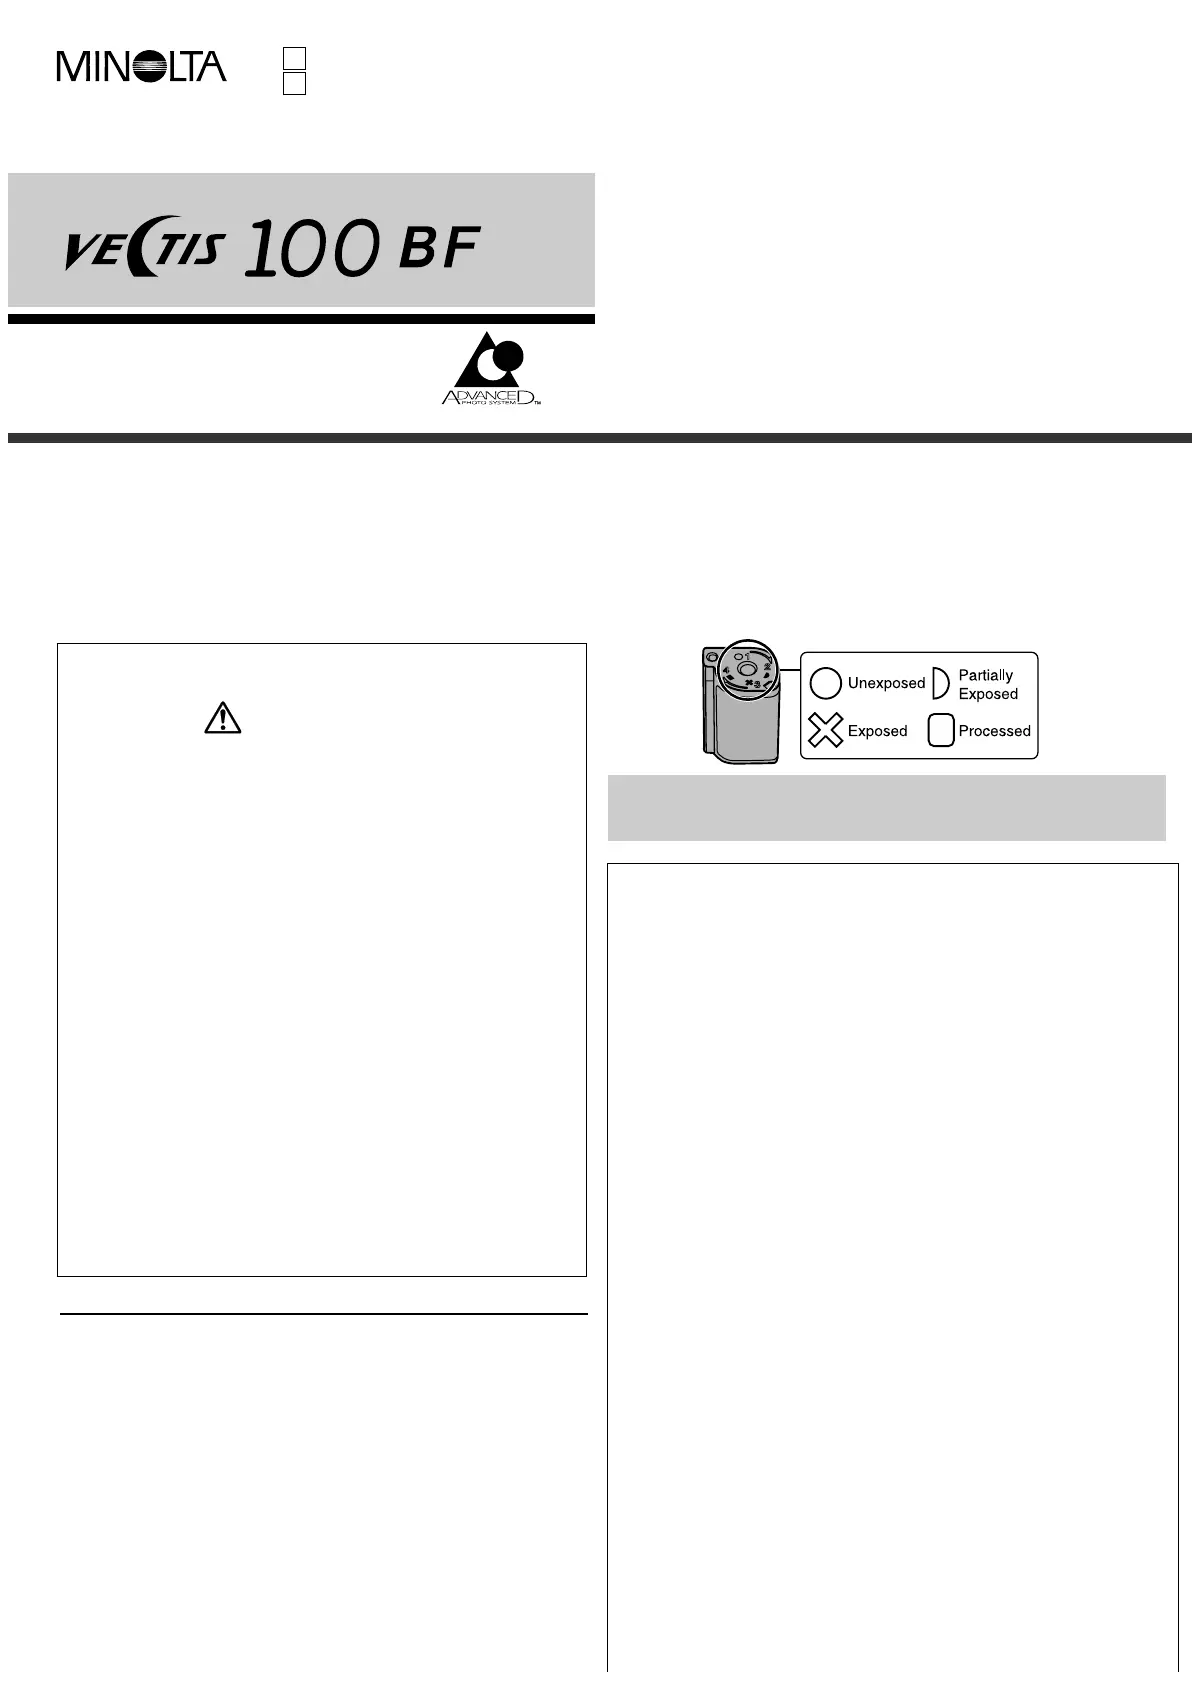
Advanced Photo System cameras use the new IX240 type film. This new
film features drop-in-loading to make loading your camera simple, the first
time, every time. Indicators on the cassette tell you and your camera if the
film is unexposed, partially exposed, exposed, or processed.
This mark on the bottom of your camera certifies that this camera meets
the requirements of the EU (European Union) concerning interference
causing equipment regulations. CE stands for Conformité Européenne
(European Conformity).
BODYTOPand FRONT
1.Meter window*
2.Shutter-release button
3.Format switch
4.Viewfinder window*
5.Self-timer/Red-eye reduction lamp
6.Self-timer button
7.Lens*
8.Lens-cover/Main switch
9.AF windows*
10.Flash** Do not touch
NAMES OF PARTS
Read and understand all warnings and cautions before using
this product.
WARNING
To receive the best possible prints, take your
film to a photolab displaying the Certified
Advanced Photo System logo. Photofinishers
displaying this logo have been certified
according to Advanced Photo System
guidelines.
New print formats…
Classic C print, wider H print, and panorama Pprint formats are
available with Advanced Photo System cameras.
Thank you for purchasing this Minolta camera. Your camera is an
easy to operate lens shutter camera from Minolta’s line of
Advanced Photo System™cameras.
This manual is designed to help you understand the operation of
your camera and its functions. Please familiarize yourself with
the names of the controls and their locations on the camera, then
read this manual thoroughly.
S
E
Camera Type: IX240 Lens shutter camera
Lens: 24mm f/4.5
Focusing Range:0.8m - ∞(2.6 ft. - ∞)
Film Speed Setting:Automatic setting for ISO100, 200/400
Metering Range (ISO 200):
EV6 - EV16
Flash Range (ISO 200):
0.8 - 5.6m (2.6 - 18.2 ft.)
Battery:CR2 (3V) lithium battery x 1
Battery performance:Approx. 12 rolls with a CR2 lithium cell (based on
Minolta’s standard test method, using 25 exposure
film with flash on for 50% of the exposures).
Viewfinder:Magnification 0.64X
Dimensions WxHxD:110 x 63.5 x 39mm
(4.4 x 2.5 x 1.5 in.)
Weight:155g (5.5 oz.)
Specifications are based on the latest information available at the time of
printing and are subject to change without notice.
SPECIFICATIONS
OPERATING TEMPERATURE AND CONDITIONS
• This camera will only load film with the Unexposed ●mark current.
• DEP, Double Exposure Prevention, prevents the camera from
accepting exposed film.
• This camera is designed for use for -5°C to 40°C (23°F to 104°F).
• Never leave your camera where it may be subjected to extreme
temperatures such as the glove compartment of a car.
• At colder temperatures, the data panel response time will be slow; at
higher temperatures, the display will temporarily darken, but will restore
when the temperature normalizes.
• Never subject your camera to extreme humidity.
• To prevent condensation from forming, place the camera in a sealed
plastic bag when bringing it from the cold exterior to a warm building.
Allow it to come to room temperature before removing it from the bag.
• When photographing in cold weather, we recommend that you keep the
camera and spare batteries inside your coat to keep them warm when
you are not shooting. Cold batteries will regain some of their charge
when they warm up.
• This camera is not waterproof, dust-proof, or sand-proof; take care
when using it at the beach or near water. Costly or irreparable damage
may occur.
Batteries may become hot or explode due to improper use.
• Use only the batteries specified in this instruction manual.
• Do not install the batteries with the polarity (+/–) reversed.
• Do not subject batteries to fire or high temperatures.
• Do not attempt to recharge, short, or disassemble.
• Tape over lithium battery before disposal. Follow local codes for
battery disposal.
Use caution, accidents may occur when using this product
near young children.
Keep batteries or things that could be swallowed away from
young children. Contact a doctor immediately if an object is
swallowed.
Immediately remove the batteries and discontinue use if...
•the camera is dropped or subjected to an impact in which the
interior is exposed.
• the product emits a strange smell, heat, or smoke.
Do not disassemble. Electric shock may occur if a high volt-
age circuit inside the camera is touched. Take your camera
to a Minolta Service Facility when repairs are required.
This device complies with Part 15 of the FCC Rules. Operation is subject to the following
two conditions: (1) This device may not cause harmful interference, and (2) this device
must accept any interference received, including interference that may cause undesired
operation. Changes or modifications not approved by the party responsible for compliance
could void the user's authority to operate the equipment. This equipment has been tested
and found to comply with the limits for a Class B digital device, pursuant to Part 15 of the
FCC Rules. These limits are designed to provide reasonable protection against harmful
interference in a residential installation. This equipment generates, uses and can radiate
radio frequency energy and, if not installed and used in accordance with the instructions,
may cause harmful interference to radio communications. However, there is no guarantee
that interference will not occur in a particular installation. If this equipment does cause
harmful interference to radio or television reception, which can be determined by turning
the equipment off and on, the user is encouraged to try to correct the interference by one
or more of the following measures:
• Reorient or relocate the receiving antenna.
• Increase the separation between the equipment and the receiver.
• Connect the equipment to an outlet on a circuit different from that to which the receiver is
connected.
• Consult the dealer or an experienced radio/TV technician for help.
This Class B digital apparatus meets all requirements of the Canadian Interference-
Causing Equipment Regulations.
BODYBACK and BOTTOM
11.Mode button
12.Manual-rewind button
13.Flash-ready lamp
14.Viewfinder*
15.Data panel
16.Battery-chamber release
17.Battery-chamber door
18.Tripod socket
19.Film-chamber door
20.Film-chamber release
DATAPANEL
21.Flash mode indicators
22.Frame counter
23.Continuous drive indicator
24.Film-transport indicators
25.Battery-condition indicator
New processing…
In addition to returning your prints in the format you selected,
certified photofinishers will return your Advanced Photo System film
in its original cassette with an index print. To order reprints, simply
choose the images you want from the index print. No more
searching through negatives to find the right frame.
Advanced Photo System™is a trademark of the five system
developing companies.
VEI, Visual Exposure Indicators
MANUALDE INSTRUCCIONES
Product specificaties
| Merk: | Konica Minolta |
| Categorie: | Niet gecategoriseerd |
| Model: | Vectis 100 BF |
Heb je hulp nodig?
Als je hulp nodig hebt met Konica Minolta Vectis 100 BF stel dan hieronder een vraag en andere gebruikers zullen je antwoorden
Handleiding Niet gecategoriseerd Konica Minolta

31 Maart 2025
21 Maart 2025
21 Maart 2025
12 Maart 2025
12 Maart 2025
12 Maart 2025
2 December 2024
2 December 2024
2 December 2024
2 December 2024
Handleiding Niet gecategoriseerd
Nieuwste handleidingen voor Niet gecategoriseerd
23 Juli 2026
23 Juli 2026
23 Juli 2026
23 Juli 2026
23 Juli 2026
22 Juli 2026
22 Juli 2026
22 Juli 2026
22 Juli 2026
22 Juli 2026