Kohler Finial K-310 Handleiding
Bekijk gratis de handleiding van Kohler Finial K-310 (2 pagina’s), behorend tot de categorie Kraan. Deze gids werd als nuttig beoordeeld door 13 mensen en kreeg gemiddeld 4.1 sterren uit 4 reviews. Heb je een vraag over Kohler Finial K-310 of wil je andere gebruikers van dit product iets vragen? Stel een vraag
Pagina 1/2
Seetheservicepartsontheoppositepage.
Sereporteràlarubriquesurlespiècesderechangesurlapageopposée.
Consultelaspiezasderepuestoenlapáginaopuesta.
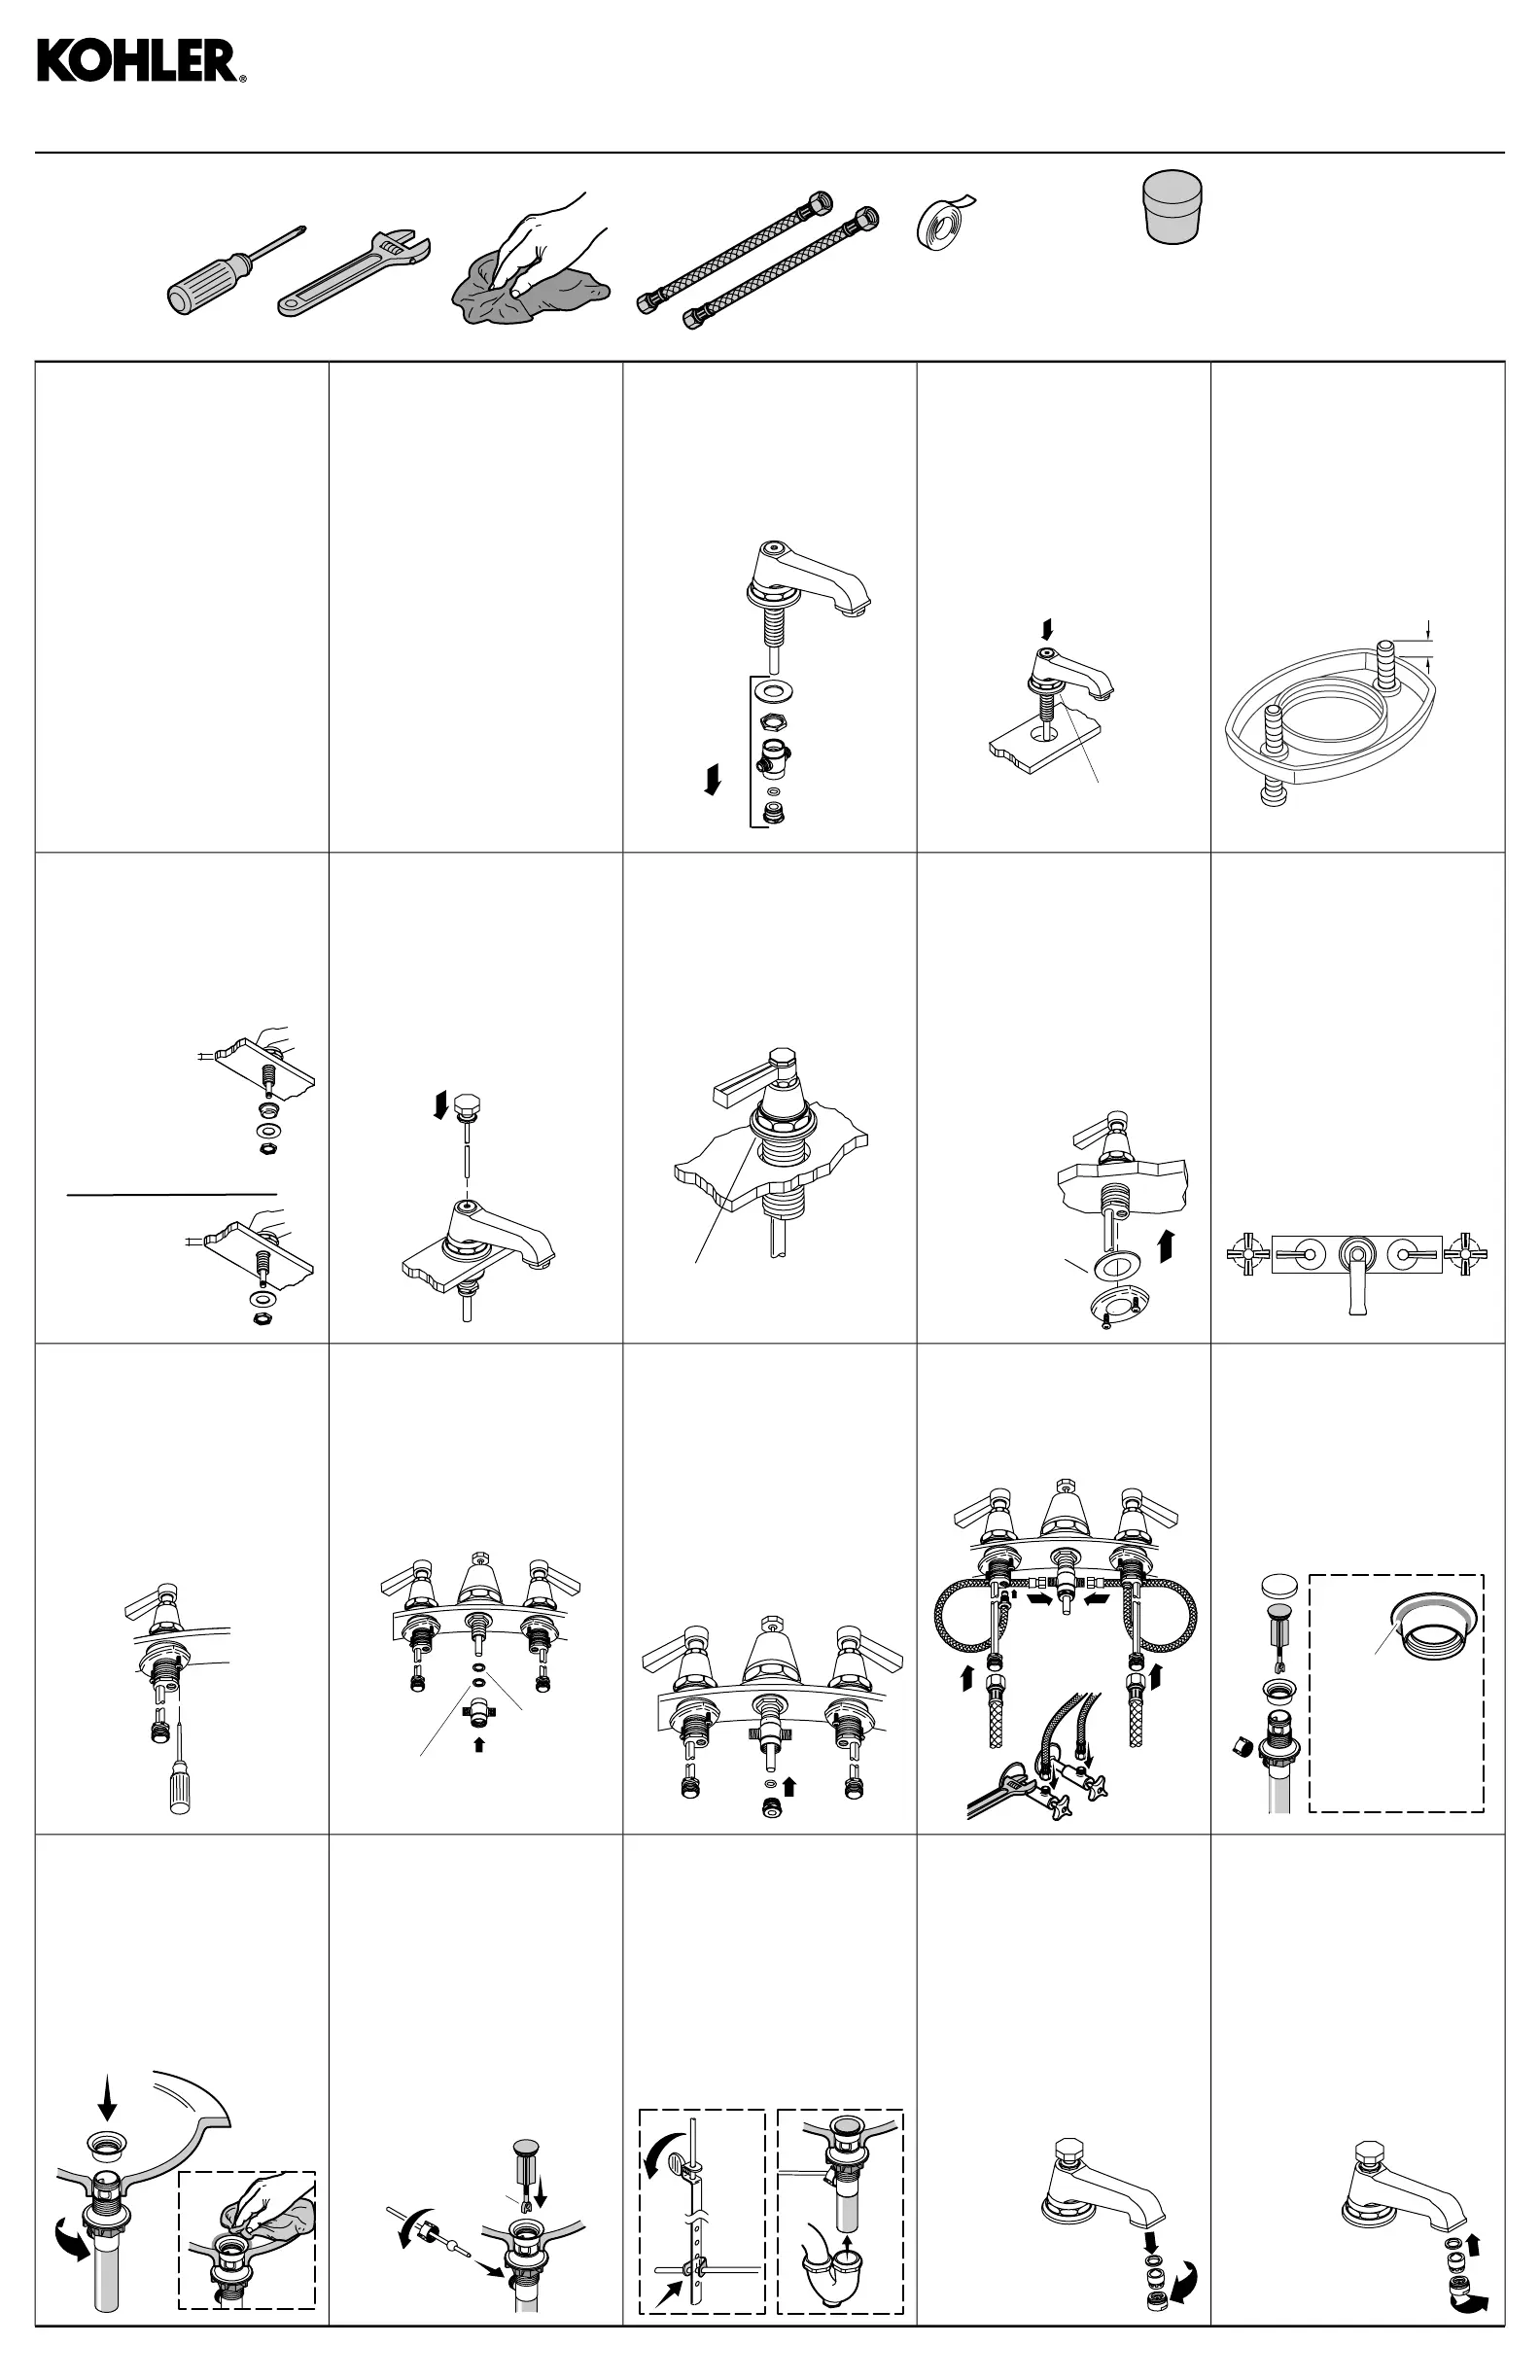
Installation Guide
Guide d’installation
Guía de instalación
Sealant Tape
Ruban d'étanchéité
Cinta selladora
Stainless (Non-Staining) Plumbers Putty
Mastic de plombier inoxydable
(non tachant)
Masilla de plomería para
inoxidable (que no manche)
1/8"
(3 mm)
3
Installthescrewsintothering.
Installerlesvisdansl'anneau.
Instalelostornillosenelanillo.
Apply plumbers putty.
Appliquer du mastic de plomberie.
Aplique masilla de plomería.
2
Applyplumbersputty.Installthe
faucet.
Appliquerdumasticde
plomberie.Installerlerobinet.
Apliquemasilladeplomería.
Instalelagrifería.
1
Removethebottomcomponents.
Disassemblethetee.
Retirerlescomposantsinférieurs.
Désassemblerle"T".
Retireloscomponentesinferiores.
DesensamblelaT.
ImportantInformation
Donotusepetroleum-based
plumbersputtyonmarbleorstone
surfaces.
Informationsimportantes
Nepasutiliserdumasticdeplombier
àbasedepétrolesurlessurfacesen
marbreouenpierre.
Informaciónimportante
Noutilicemasilladeplomeríacon
basedepetróleoensuperficiesde
mármolopiedra.
ImportantInformation
Ifpossible,assemblethefaucetand
draintothelavatorybeforeinstalling
thelavatory.
Informationsimportantes
Sipossible,assemblerlerobinetet
ledrainaulavaboavantd'installer
cedernier.
Informaciónimportante
Siesposible,ensamblelagriferíay
eldesagüeenellavaboantesde
instalarellavabo.
8
Turnthehandlesto"Off."Align
thehandles.
Mettrelespoignéesenposition
"Off".Alignerlespoignées.
Girelasmanijasalaposición
cerrada"Off".Alineelasmanijas.
Metal Washer
Rondelle métallique
Arandela de metal
7
Installthewasherandring.Do
nottightenthescrews.
Installerlarondelleetl'anneau.
Nepasserrerlesvis.
Instalelaarandelayelanillo.No
aprietelostornillos.
Apply plumbers putty.
Appliquer du mastic de plomberie.
Aplique masilla de plomería.
6
Applyplumbersputtytothe
handle.Installthehandle.
Appliquerdumasticdeplombier
surlapoignée.Installerla
poignée.
Apliquemasilladeplomeríaala
manija.Instalelamanija.
5
Installtheliftrod.
Installerlatigedelevage.
Instaleeltirador.
Greater than 1/2" (13 mm)
thick.
Épaisseur supérieure à
1/2" (13 mm).
Espesor mayor de
1/2" (13 mm).
Less than 1/2" (13 mm) thick.
Épaisseur inférieure à
1/2" (13 mm).
Espesor menor de
1/2" (13 mm).
4
Installthecomponentsrequired
forthedeckthickness.
Installerlescomponentsrequis
pourl'épaisseurducomptoir.
Instaleloscomponentes
requeridossegúnelgrosordela
cubierta.
Stainless
(Non-Staining)
Plumbers Putty
Mastic de plombier
inoxydable
(non tachant)
Masilla de plomería
para inoxidable
(que no manche)
13
Disassemblethedrain.Apply
plumbersputtytotheunderside
oftheflange.
Désassemblerledrain.Appliquer
dumasticdeplombierau
dessousdelabride.
Desensambleeldesagüe.
Apliquemasilladeplomeríaal
dorsodelabrida.
12
Connectthehoses.
Connecterlestuyaux.
Conectelasmangueras.
11
InstalltheO-ringtothetee.
Securewiththenut.
Installerlejointtoriquesurle"T".
Fixerenplaceavecl'écrou.
InstaleelaroselloalaT.Fijecon
latuerca.
Gasket
Joint
Empaque
Rubber Washer
Rondelle en caoutchouc
Arandela de goma
10
Installandtightenthetee.
Installeretserrerle"T".
InstaleyaprietelaT.
9
Securethehandles.
Fixerlespoignées
Fijelasmanijas.
18
Turnoffthewater.Reinstallthe
aerator.
Couperl'eau.Réinstaller
l'aérateur.
Cierreelagua.Vuelvaainstalar
elaireador.
17
Removetheaerator.Turnonthe
water,flushthehoses,and
checkforleaks.
Retirerl'aérateur.Ouvrirle
robinetd'eau,rincerlestuyaux
etrechercherdesfuites.
Quiteelaireador.Abraelagua,
dejecorreraguaparalimpiarlas
mangueras,yverifiquequeno
hayafugas.
16
Tightenthethumbscrew.Connect
theliftrodusingtheclip.Connect
thetraptothetailpiece.
Serrerlavisdeserrage.Con-
necterlatigedelevageenutil-
isantleclip.Connecterlesiphon
àlapiècederaccordement.
Aprieteeltornillodemariposa.
Conecteeltiradorutilizandoel
clip.Conectelatrampaaltubo
final.
Stopper Bolt
Boulon d'arrêt
Perno del obturador
15
Inserttherodandtightenthenut.
Theninsertthestopper.Ifneed-
ed,turnthestopperbolttoadjust
theheight.
Insérerlatigeetserrerl'écrou.
Insérerensuitelebouchon.Si
nécessaire,tournerleboulondu
bouchonpourréglerlahauteur.
Insertelavarillayaprietelatuer-
ca.Luegoinserteelobturador.
Siesnecesario,gireelpernodel
obturadorparaajustarlaaltura.
14
Installtheflange.Tightenthenut.
Wipeawayexcessplumbers
putty.
Installerlabride.Serrerl'écrou.
Essuyertoutexcédentdemastic.
Instalelabrida.Aprietelatuerca.
Limpieelexcesodemasillade
plomería.
1130517-2-C
Product specificaties
| Merk: | Kohler |
| Categorie: | Kraan |
| Model: | Finial K-310 |
Heb je hulp nodig?
Als je hulp nodig hebt met Kohler Finial K-310 stel dan hieronder een vraag en andere gebruikers zullen je antwoorden
Handleiding Kraan Kohler

30 Mei 2026
29 Mei 2026
29 Mei 2026
27 Mei 2026
27 Mei 2026
27 Mei 2026
26 Mei 2026
26 Mei 2026
26 Mei 2026
26 Mei 2026
Handleiding Kraan
Nieuwste handleidingen voor Kraan
14 Mei 2026
12 Mei 2026
12 Mei 2026
12 Mei 2026
9 Mei 2026
8 Mei 2026
5 Mei 2026
5 Mei 2026