JL Audio Stealthbox SB-GM-BURBCNSL/10W3v3 Handleiding

JL Audio Niet gecategoriseerd Stealthbox SB-GM-BURBCNSL/10W3v3

Lees hieronder de 📖 handleiding in het Nederlandse voor JL Audio Stealthbox SB-GM-BURBCNSL/10W3v3 (8 pagina's) in de categorie Niet gecategoriseerd. Deze handleiding was nuttig voor 29 personen en werd door 2 gebruikers gemiddeld met 4.5 sterren beoordeeld

Pagina 1/8
Stealthbox®
I N S T A L L A T I O N G U I D E
SB - G M -B U RB C NSL / 1 0 W3 v 2 , J L AU D I O , I n c 2 0 0 5 Sh e e t SK U # 0 1 1 1 6 7 3 /0 8 / 2 0 0 5Pag e 1
for the
SB-GM-BURBSCNSL/10W3v2
(2003-Up Chevrolet Suburban,Tahoe,
Silverado &
GMC Yukon,YukonXL, Sierra with front
bucket seats and center console)
This Stealthbox is a product which
requires professional installation skills and
tools.
Please read this installation guide thor-
oughly before beginning the project. It
will guide you step by step through the
installation. Several of the steps in this
process may require two people to
accomplish.
It is absolutely vital that the enclosure
be properly mounted to the vehicle
according to these instructions. Failure
to mount the enclosure properly pres-
ents two problems: 1) The sub-bass
performance will suffer due to the
movement of the enclosure caused by
the force exerted by the woofer(s) and
2) A loose enclosure presents a serious
safety hazard in the event of a collision
or sudden deceleration.
Please enjoy your JL Audio Stealthbox
responsibly.
Read the instructions completely, before the start of
the install.
This Stealthbox Enclosure install does require per-
manent modification to the OEM inner console.
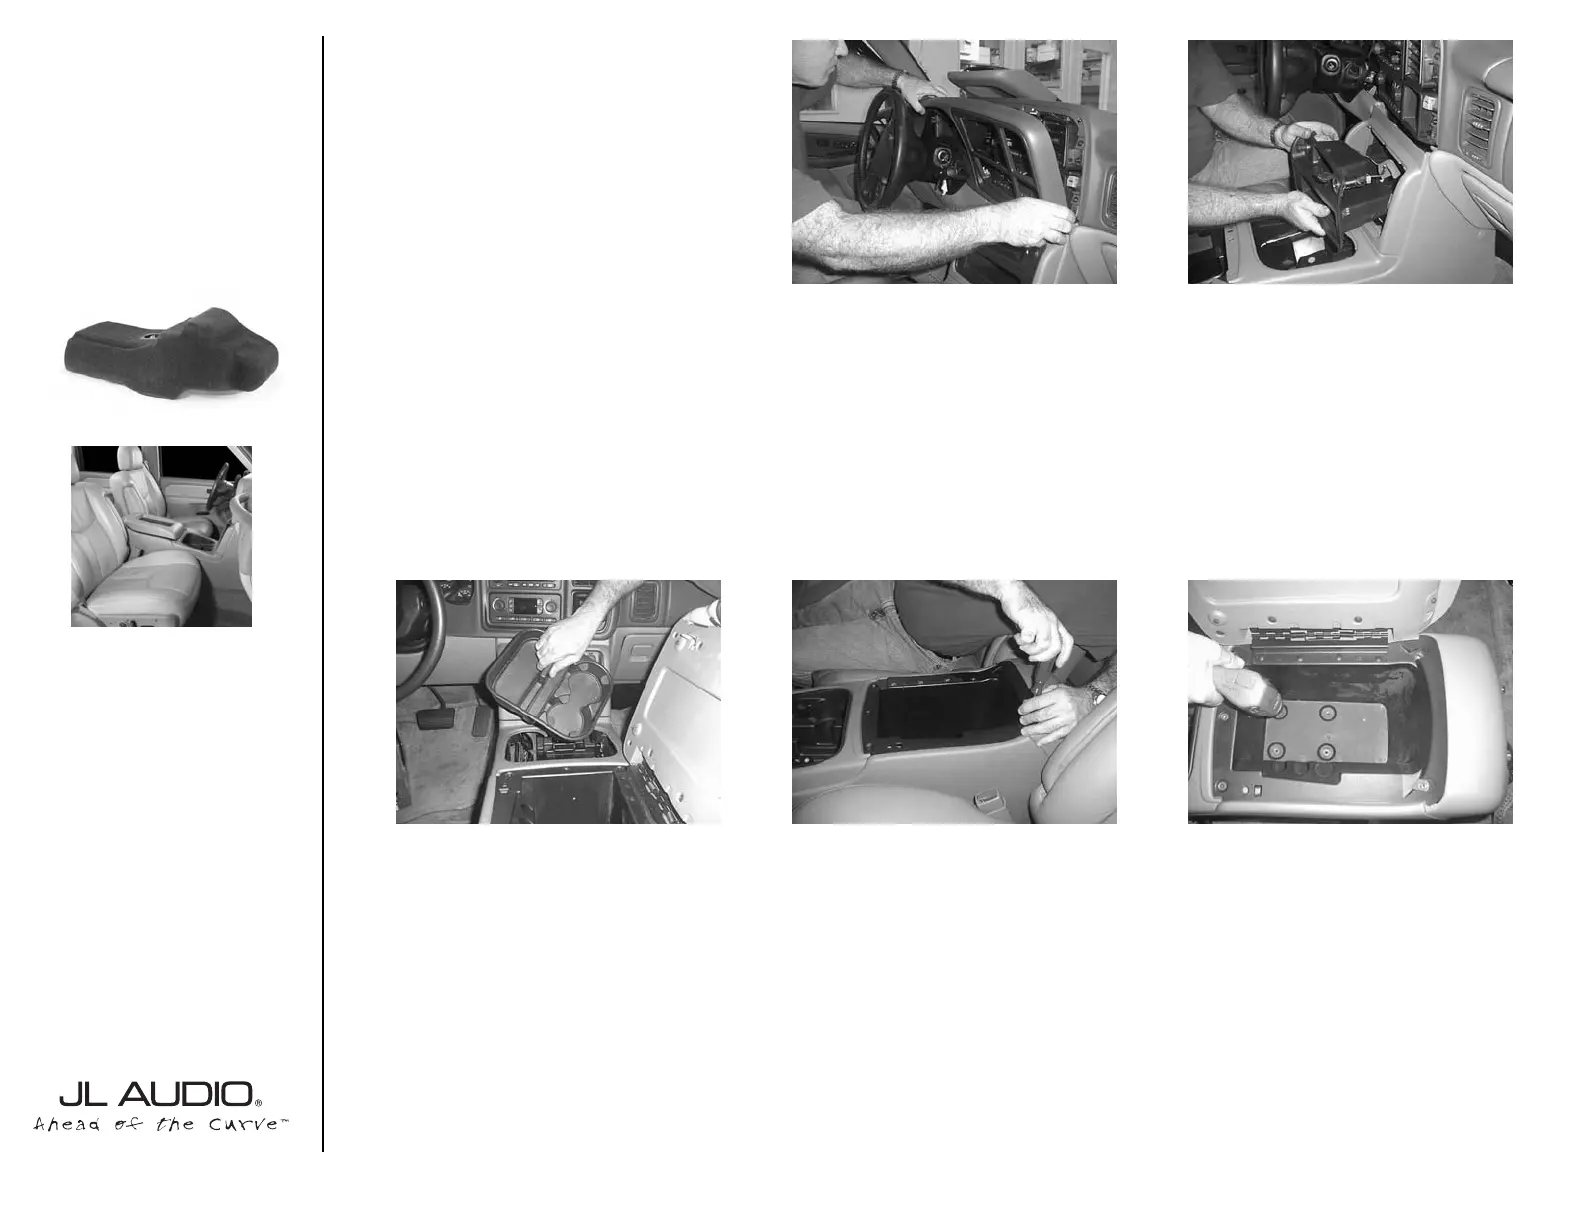
STEP 1: Engage the emergency brake.
Place the key into the ignition and turn to the accessory posi-
tion.
The shifter and the steering wheel needs to be posi-
tioned all the way down.
Remove the front dash cluster panel, by pulling the dash trim
towards you and work around the diameter. Be careful not to
damage the four way light push button, located on top of the
steering column.
Once the trim is removed. Place the transmission into park,
remove the key from the ignition and pop the emergency brake.
STEP 2: Moving down to the top portion of the
center console. Pull the upper storage pocket panel
out and disconnect the electrical outlets.
STEP 3: Pull the cup holders up and out of the
center console.
STEP 4: On the upper lip of the main storage
bucket, remove all the screws, including the storage
lid’s screws.
STEP 5: To remove the main storage bucket,
remove the rubber mat.This will expose the four
screws that need to be removed.
Once all these screws have been removed. Remove
the storage bucket by lifting up and out of the con-
sole.
START
HERE
Continued on Next Page
w w w . j l a u d i o . c o m
➔ ➔
➔ ➔
STEP 6: To remove the front bucket seats, you
use a 15mm socket(not supplied) for the front nuts
and a 12mm(not supplied) for the rear bolts.
Tilt the seats backward to access and discon-
nect the wiring.This does include the air bag
wire.
STEP 10: To remove the OEM console, lift up on
the rear of the console and pull it back away from
the dash.
Cont.
From
Previous
Page
Continued on Next Page
STEP 7: Once the front seats have been
removed, you will need to outline the outside of
the center console with masking tape(not supplied).
This will help in future steps.
STEP 11: *TRUCKS ONLY*
With the console out, there is duct work that is exposed from under the dash. Remove the plastic duct that is attached to
the upper duct work. With the lower duct piece removed, it now exposes a door.
Insert the key into the ignition, turn to the accessory position, turn on the A/C. When the A/C is turned on, this willalloe the
exposed door to open.
This door is opened by a C-bracket that comes down from the upper dash.This C-bracket needs to be removed. If this
bracket is not removed, the A/C air flow will be not be correct.
This C-bracket is attached to the door and a motor that us located in the upper dash. Push the C-bracket to the passenger
side of the truck.This will detach the bracket from the door.With the C-bracket in hand, reach up as far up on the bracket
and push towards the passenger side of the truck.This will detach the C-bracket from the motor. Give the C-bracket to the
owner of the truck or store inside the truck for safe keeping.This bar will need to be reinstalled, If the Stealthbox is removed
and air flow is needed to the rear vents.
Use a small screw(not supplied) to hold this door shut. If this door is not screwed shut, air will blow on the driver’s feet and
reduce pressure from the dash vents.
STEP 8: With the upper storage pocket panel
removed.You can view a pair of bolts. Using a 10mm
socket(not supplied), remove these bolts.
If you have not removed th front seats, there are
other bolts and screws that need to be located and
removed.This is to allow the console to be removed
out of the vehicle.
STEP 9: Look down in the console from the cup
holder area.You need to locate and disconnect a
white connection plug. Pull the lever on this white
connection plug to disconnect from the wire har-
ness..
SB - G M -B U RB C N S L /1 0 W 3 v 2 , J L AU D IO, I n c 2 0 0 5 Sh e e t SK U # 0 1 1 1 6 7 3 /0 8 / 2 0 0 5Pag e 2
w w w . j l a u d i o . c o m
*WARNING*
If you have removed the front seats, you need to place
both front seats back into the vehicle and reconnect the
wires from . Do not secure the seats back toSTEP 6
the floor.
Reconnect the ground wire to the negative side of the
battery.
Follow next step (STEP 11) and then repeat procedure
to remove the front seats. (caution before STEP 6)
*CAUTION*
The vehicle that you are working on might be
equipped with side impact air bags.To remove the
front seats, please follow these required procedures.
1)Disconnect the ground wire from the negative
side of the battery.
2)Let the vehicle sit for 15 minutes.This allows the
air bags to discharge.
3)Now you can remove the front seats and discon-
nect the air bag wire.
If you are not comfortable with disconnecting the air
bag wires.This install can be accomplished by not
removing the front seats. It will be tight quarters.
*Trucks* If you remove the front seats, you will
have to place the seats back in and reconnect the
air bag wires.Then repeat the removal process, in
future steps. You might not want to remove the
seats till then.
➔ ➔
➔➔➔
STEP 14: With the OEM carpet and the
jute(sound deadening) cut out. Position the supplied
pair of 3”x3” wax squares in place.
Make sure that the wax square is placed and with
the adhesive down and positioned as in the picture.
STEP 18: The wire harness from STEP 12 needs
to be rerouted over to the other side of the struc-
ture support bar under the dash.
Also at this time, run the speaker wire form the
amplifier location to the Stealthbox location.
Double check the woofer for correct functioning.
Cont.
From
Previous
Page
Continued on Next Page
STEP 15: Thread the supplied pair of socket cup
set screws into the Stealthbox. Leaving about 1/4”
exposed.
Position the Stealthbox into the mounting location
and firmly press down.
The Stealthbox is molded to mirror the floor. It
should tuck right in.
STEP 19: With the wire harness properly tucked
under the carpet, use double sided tape(not sup-
plied) to secure the carpet to the metal floor.
If the carpet is not secured to the floor, it will bunch
up after the OEM console is reinstalled.
Remove the masking tape that outlined the OEM
console from STEP2.
STEP 16: When the Stealthbox is removed, the
wax square should have the impressions of the
socket cup set screws.
STEP 17: *CAUTION*
Before drilling, make sure that you are not going to
be drilling into any gas lines, brake lines, transmission
lines, electrical wiring, transfer case(4x4 vehicles) or
anything else that might cause a reduction in your
weekly pay. Always wear eye protection when
drilling.
With the use of a 1/2” drill bit and drill. Drill out the
floor at the’ impressions on the wax squares.
SB - G M -B U RB C N S L /1 0 W 3 v 2 , J L AU D I O, I n c 2 0 0 5 Sh e e t SK U #0 1 1 1 6 7 3 / 0 8 / 2 0 0 5Pag e 3
w w w . j l a u d i o . c o m
STEP 12: Remove the OEM wire harness from
the plastic track. Wrap the OEM wiring in black
tape.
STEP 13: With the OEM wiring harness out of
the way, you need to cut the carpet.
SIDES: From the tape outline of the center con
sole, measure inward to middle of the transmission
tunnel 1.5” from the tape. Mark and cut, front to
back.
FRONT: Cut left to right at the front area where
the outline starts to taper inward.
REAR: Feel for the black plastic mounting bracket.
Cut left to right at the transmission tunnel, behind
the black plastic mounting bracket.View picture.


Product specificaties

Merk: JL Audio
Categorie: Niet gecategoriseerd
Model: Stealthbox SB-GM-BURBCNSL/10W3v3

Heb je hulp nodig?

Als je hulp nodig hebt met JL Audio Stealthbox SB-GM-BURBCNSL/10W3v3 stel dan hieronder een vraag en andere gebruikers zullen je antwoorden


Handleiding Niet gecategoriseerd JL Audio

Handleiding Niet gecategoriseerd

Nieuwste handleidingen voor Niet gecategoriseerd