Hotpoint H3 D91GS UK Handleiding
Bekijk gratis de handleiding van Hotpoint H3 D91GS UK (4 pagina’s), behorend tot de categorie Wasdroger. Deze gids werd als nuttig beoordeeld door 76 mensen en kreeg gemiddeld 4.3 sterren uit 3 reviews. Heb je een vraag over Hotpoint H3 D91GS UK of wil je andere gebruikers van dit product iets vragen? Stel een vraag
Pagina 1/4
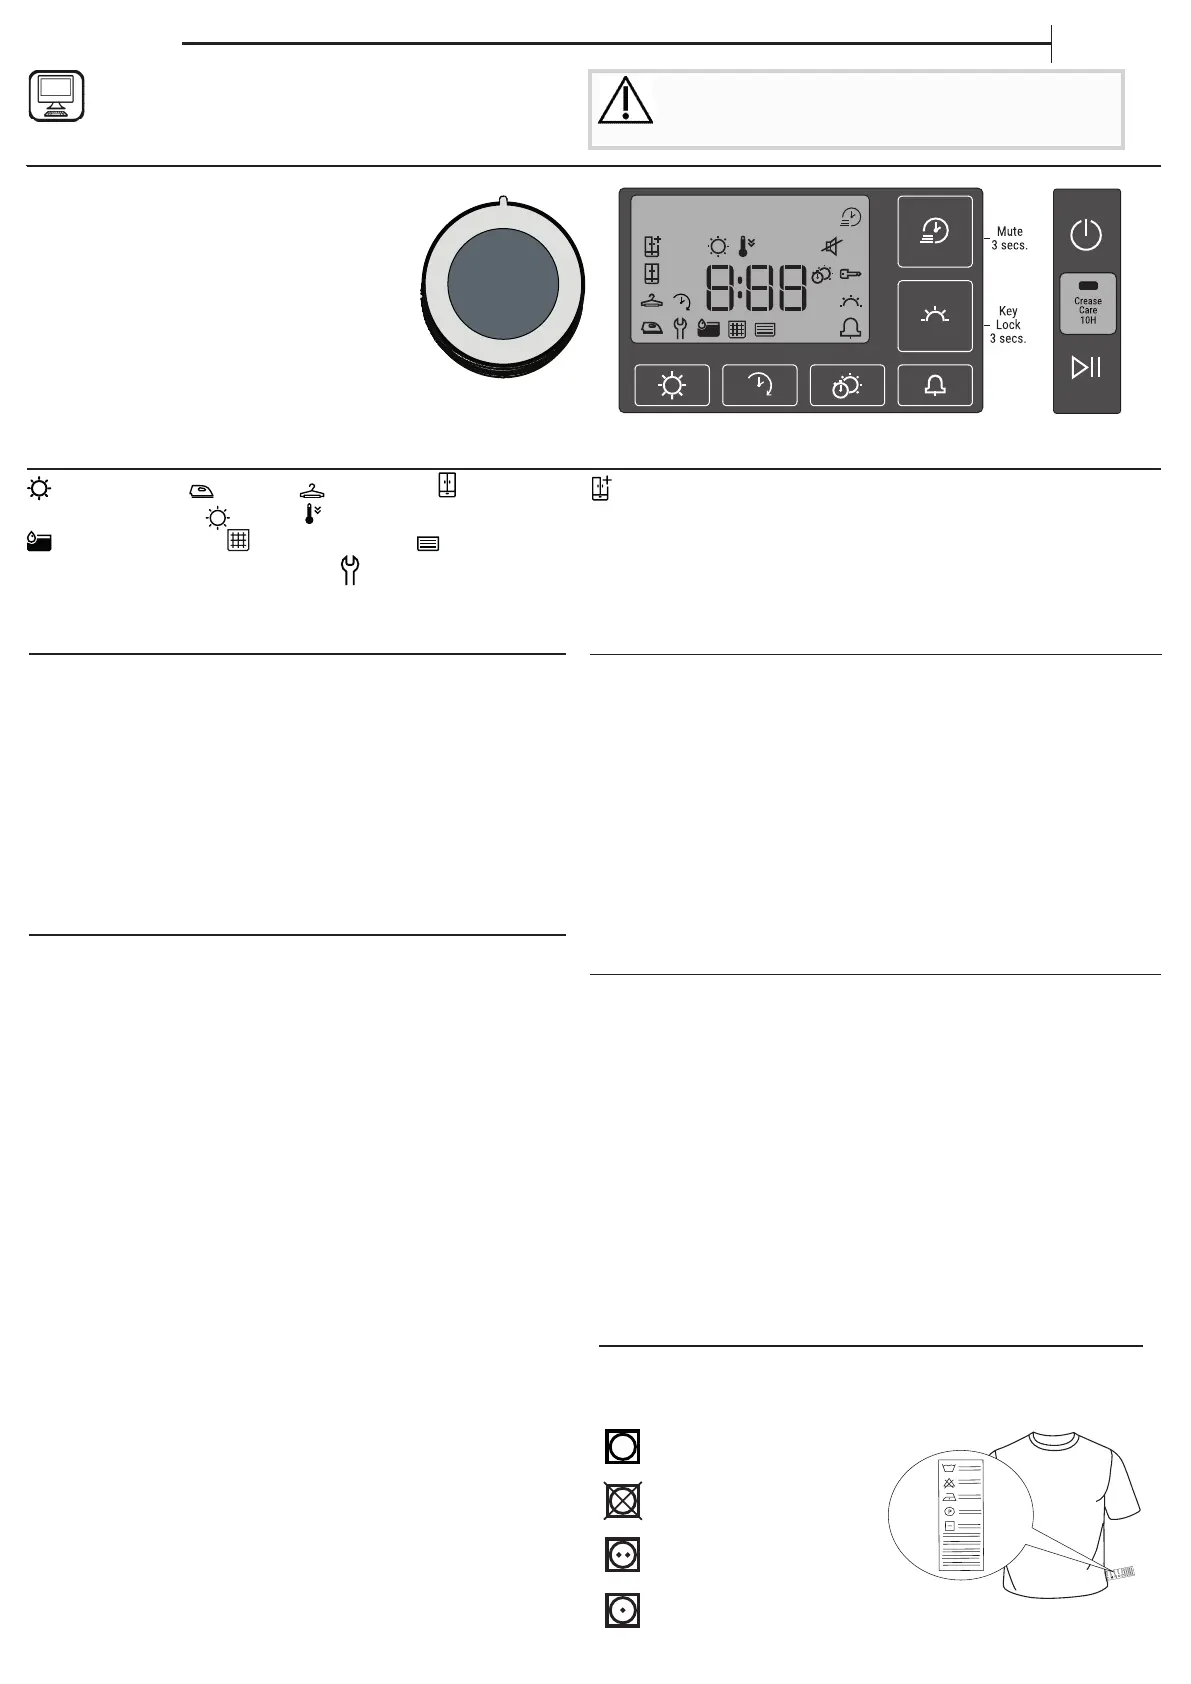
CARE LABEL
Always check the care labels, especially when placing garments
in the tumble dryer for the rst time. Below are the most
commonly used symbols:
May be tumble dried.
Do not tumble dry.
Tumble dry – high heat.
Tumble dry – low heat.
THANK YOU FOR BUYING A HOTPOINT PRODUCT.
In order to receive a more complete assistance, please
register your product on www.hotpoint.eu/register
Policies, standard documentation, ordering of spare parts and additional product information can be
found by:
• Visiting our website docs.hotpoint.eu and parts-selfservice.whirlpool.com
• Using QR Code
• Alternatively, contact our After-sales Service (See phone number in the warranty booklet). When
contacting our After-sales Service, please state the codes provided on your product’s identication plate.
EN
Quick guide
Before using the appliance carefully read the Safety
Instructions.
xxxxxxxxxxxx
xxxx
FIRST TIME USE
Remove all the tapes used to hold items on the machine.
Before you use it, clean the inside of the drum to remove any
dust that could have accumulated during transport. Slight odour
or vapour may be found if you open the door during its rst use,
this is normal and should only last a few minutes.
Make sure that the water tank is correctly inserted. Make sure
that the drain hose on the back of the dryer is properly
connected, either to the dryers's water tank or to your domestic
drainage system.
The dryer must be installed in a room with a temperature
ranging between 5°C and 35°C to ensure proper operation.
DAILY USE
Doing this will keep your machine working at its BEST:
- remember to empty your water tank after each drying cycle.
- remember to clean your condenser unit regularly
(monthly).
- remember to clean your lter after each drying cycle.
Refer to the Care & Maintenance section.
1. Plug the dryer into the power supply socket.
2. Open the door and load garments; always refer to instructions on
clothing labels and the max loads indicated in the programme
section. Empty pockets. Make sure garments do not get caught
between the door and/or the door lter. Do not load items that
are dripping wet. Do not tumble dry large, very bulky items.
3. Close the door.
4. Press the "On/O" button.
5. Select the most suitable programme
for the type of fabric in that
load.
6. Select the options, if necessary.
7. Press the "
Start/Pause"
button to begin drying.
8. At the end of the drying cycle, a buzzer will beep. An indicator on
the control panel signals the end of the cycle. Pull the load out
immediately to prevent the formation of creases on laundry.
9. Turn the machine o by pressing the "On/O" button, open the
door and pull the clothing out. If the machine is not switched o
manually, after about a quarter of an hour from the end of the
cycle , the appliance turns o automatically to save energy.
Note that some programme/option accords with "Crease Care"
system. This means that for some hours, after the end of the
drying cycle, the drum rotates at regular intervals to prevent the
formation of creases.
In case of power failure, it is necessary to press the "Start/Pause"
button to restart the cycle.
TRANSPORT AND HANDLING
Never lift the dryer by holding on to its top side.
1. Unplug the dryer
2. Remove the water from the water tank completely.
3. Make sure that door and water tank are properly closed.
4. If the drain hose is connected to your drainage system, re-connect
it to the back of the dryer (see "Installation" section in the Safety
Instructions).
OPENING THE DOOR DURING THE CYCLE
Laundry can be checked while the drying cycle runs and any
garments already dry can be removed, while drying continues for
the remaining items. After closing the door, press the "Start/Pause"
button to resume machine operation.
CONTROL PANEL
1 ON/OFF Button (hold to Reset)
2 Programme Selection Knob
3 Start/Pause
Options Buttons
4 Crease Care
5 Dryness Level
6 Start Delay
7 Timed Drying
8 Cycle End Signal
9 Gentle (hold for Key Lock)
10 Rapid (hold to Mute)
INDICATORS
Dryness Level: Iron Dry - Hanger Dry - Cupboard Dry - Extra Dry
Programme Status: Drying - Cool Down - END End of Cycle
Empty water tank- Clean door lter - Clean the condenser unit
Refer to the troubleshooting section: Failure:Call after sales service.
END
END
1
3
2
4
10
8
9
567
h
h
h
Product specificaties
| Merk: | Hotpoint |
| Categorie: | Wasdroger |
| Model: | H3 D91GS UK |
| Apparaatplaatsing: | Vrijstaand |
| Soort bediening: | Draaiknop |
| Kleur van het product: | Grafiet |
| Deurscharnieren: | Rechts |
| Ingebouwd display: | Ja |
| Warmtebron: | Electrisch |
| Gewicht: | 37000 g |
| Breedte: | 595 mm |
| Diepte: | 610 mm |
| Hoogte: | 850 mm |
| Netbelasting: | 2400 W |
| Type lader: | Voorbelading |
| Droogsysteem: | Condensatie |
| Materiaal trommel: | Gegalvaniseerd |
| Trommelinhoud: | 112 l |
| Uitgestelde start timer: | Ja |
| Startvertraging: | 24 uur |
| Resterende tijd indicatie: | Ja |
| Wi-Fi-besturing: | Nee |
| Aantal droogprogramma's: | 15 |
| Droogklasse: | B |
| Duur cyclus: | - min |
| Geluidsniveau: | 69 dB |
| Anti-kreuk functie: | Ja |
| Energie-efficiëntieklasse: | B |
| Jaarlijks energieverbruik: | 616 kWu |
| Gewicht verpakking: | 38700 g |
| Breedte verpakking: | 640 mm |
| Diepte verpakking: | 670 mm |
| Hoogte verpakking: | 890 mm |
| Draairichting deur verwisselbaar: | Nee |
| Stroom: | 13 A |
| Zelfreinigend: | Nee |
| Near Field Communication (NFC): | Nee |
| Land van herkomst: | Verenigd Koninkrijk |
| Extra droog: | Nee |
| Anti-allergiefunctie: | Ja |
| Huidige waardering: | 13 A |
| Nominale capaciteit: | 9 kg |
| AC-ingangsspanning: | 220 - 240 V |
| Type beeldscherm: | LED |
| Energie-efficiëntieschaal: | A tot G |
| Indicator filterreiniging: | Ja |
| Droogprogramma's: | White clothes, Cotton, Synthetics, Iron dry |
Heb je hulp nodig?
Als je hulp nodig hebt met Hotpoint H3 D91GS UK stel dan hieronder een vraag en andere gebruikers zullen je antwoorden
Handleiding Wasdroger Hotpoint

8 Juni 2026
24 Maart 2026
5 Maart 2026
2 Maart 2026
10 Februari 2026
7 Januari 2026
7 Januari 2026
30 December 2026
22 December 2025
20 December 2025
Handleiding Wasdroger
Nieuwste handleidingen voor Wasdroger
6 Juli 2026
6 Juli 2026
6 Juli 2026
6 Juli 2026
6 Juli 2026
6 Juli 2026
3 Juli 2026
2 Juli 2026
2 Juli 2026
1 Juli 2026